<!DOCTYPE html>
    <html lang="vi" xmlns="http://www.w3.org/1999/xhtml" prefix="og: http://ogp.me/ns#">
    <head>
<title>Cách cài đặt và chạy Nginx Server trên Windows</title>
<meta name="description" content="Cách cài đặt và chạy Nginx Server trên Windows - Savefile - Tin Tức -...">
<meta name="author" content=".: Nguoicodonvn2008.info - Cõi lòng người cô đơn :.">
<meta name="copyright" content=".: Nguoicodonvn2008.info - Cõi lòng người cô đơn :. [admin@nguoicodonvn2008.info]">
<meta name="robots" content="index, archive, follow, noodp">
<meta name="googlebot" content="index,archive,follow,noodp">
<meta name="msnbot" content="all,index,follow">
<meta name="generator" content="NukeViet v4.5">
<meta http-equiv="Content-Type" content="text/html; charset=utf-8">
<meta property="og:title" content="Cách cài đặt và chạy Nginx Server trên Windows">
<meta property="og:type" content="website">
<meta property="og:description" content="Savefile - Tin Tức - https&#x3A;&#x002F;&#x002F;www.nguoicodonvn2008.info&#x002F;vi&#x002F;news&#x002F;savefile&#x002F;nhac-tre&#x002F;cach-cai-dat-va-chay-nginx-server-tren-windows-7291.html">
<meta property="og:site_name" content=".&#x3A; Nguoicodonvn2008.info - Cõi lòng người cô đơn &#x3A;.">
<meta property="og:url" content="https://www.nguoicodonvn2008.info/vi/news/savefile/nhac-tre/cach-cai-dat-va-chay-nginx-server-tren-windows-7291.html">
<link rel="shortcut icon" href="https://www.nguoicodonvn2008.info/favicon.ico">
<link rel="canonical" href="https://www.nguoicodonvn2008.info/vi/news/savefile/nhac-tre/cach-cai-dat-va-chay-nginx-server-tren-windows-7291.html">
<link rel="alternate" href="https://www.nguoicodonvn2008.info/vi/news/rss/" title="Tin Tức" type="application/rss+xml">
<link rel="alternate" href="https://www.nguoicodonvn2008.info/vi/news/rss/karaoke-dual/" title="Tin Tức - Karaoke Dual" type="application/rss+xml">
<link rel="alternate" href="https://www.nguoicodonvn2008.info/vi/news/rss/nhac-tre/" title="Tin Tức - Nhạc trẻ" type="application/rss+xml">
<link rel="alternate" href="https://www.nguoicodonvn2008.info/vi/news/rss/tru-tinh/" title="Tin Tức - Trữ tình" type="application/rss+xml">
<link rel="alternate" href="https://www.nguoicodonvn2008.info/vi/news/rss/nuoc-ngoai/" title="Tin Tức - Nước ngoài" type="application/rss+xml">
<link rel="alternate" href="https://www.nguoicodonvn2008.info/vi/news/rss/remix/" title="Tin Tức - Remix" type="application/rss+xml">
<link rel="alternate" href="https://www.nguoicodonvn2008.info/vi/news/rss/tam-su-tinh-yeu/" title="Tin Tức - Tâm sự tình yêu" type="application/rss+xml">
<link rel="alternate" href="https://www.nguoicodonvn2008.info/vi/news/rss/tho-suu-tam/" title="Tin Tức - Thơ sưu tầm" type="application/rss+xml">
<link rel="alternate" href="https://www.nguoicodonvn2008.info/vi/news/rss/cuoc-song/" title="Tin Tức - Cuộc sống" type="application/rss+xml">
<link rel="alternate" href="https://www.nguoicodonvn2008.info/vi/news/rss/phan-mem/" title="Tin Tức - Phần mềm" type="application/rss+xml">
<link rel="alternate" href="https://www.nguoicodonvn2008.info/vi/news/rss/kien-thuc-may-tinh/" title="Tin Tức - Kiến thức máy tính" type="application/rss+xml">
<link rel="alternate" href="https://www.nguoicodonvn2008.info/vi/news/rss/hoc-tap/" title="Tin Tức - Học tập" type="application/rss+xml">
<link rel="alternate" href="https://www.nguoicodonvn2008.info/vi/news/rss/tai-lieu/" title="Tin Tức - Tài liệu" type="application/rss+xml">
<link rel="alternate" href="https://www.nguoicodonvn2008.info/vi/news/rss/de-thi/" title="Tin Tức - Đề thi" type="application/rss+xml">
<link rel="preload" as="style" href="https://www.nguoicodonvn2008.info/assets/css/font-awesome.min.css" type="text/css">
<link rel="preload" as="style" href="https://www.nguoicodonvn2008.info/themes/default/css/bootstrap.non-responsive.css" type="text/css">
<link rel="preload" as="style" href="https://www.nguoicodonvn2008.info/themes/default/css/style.css" type="text/css">
<link rel="preload" as="style" href="https://www.nguoicodonvn2008.info/themes/default/css/style.non-responsive.css" type="text/css">
<link rel="preload" as="style" href="https://www.nguoicodonvn2008.info/themes/default/css/news.css" type="text/css">
<link rel="preload" as="style" href="https://www.nguoicodonvn2008.info/themes/default/css/custom.css" type="text/css">
<link rel="preload" as="script" href="https://www.nguoicodonvn2008.info/assets/js/jquery/jquery.min.js" type="text/javascript">
<link rel="preload" as="script" href="https://www.nguoicodonvn2008.info/assets/js/language/vi.js" type="text/javascript">
<link rel="preload" as="script" href="https://www.nguoicodonvn2008.info/assets/js/DOMPurify/purify3.js" type="text/javascript">
<link rel="preload" as="script" href="https://www.nguoicodonvn2008.info/assets/js/global.js" type="text/javascript">
<link rel="preload" as="script" href="https://www.nguoicodonvn2008.info/assets/js/site.js" type="text/javascript">
<link rel="preload" as="script" href="https://www.nguoicodonvn2008.info/themes/default/js/news.js" type="text/javascript">
<link rel="preload" as="script" href="https://www.nguoicodonvn2008.info/themes/default/js/main.js" type="text/javascript">
<link rel="preload" as="script" href="https://www.nguoicodonvn2008.info/themes/default/js/custom.js" type="text/javascript">
<link rel="preload" as="script" href="https://www.nguoicodonvn2008.info/themes/default/js/bootstrap.min.js" type="text/javascript">
<link rel="stylesheet" href="https://www.nguoicodonvn2008.info/assets/css/font-awesome.min.css">
<link rel="stylesheet" href="https://www.nguoicodonvn2008.info/themes/default/css/bootstrap.non-responsive.css">
<link rel="stylesheet" href="https://www.nguoicodonvn2008.info/themes/default/css/style.css">
<link rel="stylesheet" href="https://www.nguoicodonvn2008.info/themes/default/css/style.non-responsive.css">
<link rel="StyleSheet" href="https://www.nguoicodonvn2008.info/themes/default/css/news.css">
<link rel="stylesheet" href="https://www.nguoicodonvn2008.info/themes/default/css/custom.css">
<style type="text/css">
	body{background: #fff;}
</style>
    </head>
    <body>
<div id="print">
	<div id="hd_print">
		<h2 class="pull-left">.&#x3A; Nguoicodonvn2008.info - Cõi lòng người cô đơn &#x3A;.</h2>
		<p class="pull-right"><a title=".&#x3A; Nguoicodonvn2008.info - Cõi lòng người cô đơn &#x3A;." href="https://www.nguoicodonvn2008.info/">https://www.nguoicodonvn2008.info</a></p>
	</div>
	<div class="clear"></div>
	<hr />
	<div id="content">
		<h1>Cách cài đặt và chạy Nginx Server trên Windows</h1>
		<ul class="list-inline">
			<li>Thứ năm - 13/07/2023 09:28</li>
			<li class="hidden-print txtrequired"><em class="fa fa-print">&nbsp;</em><a title="In ra" href="javascript:;" onclick="window.print()">In ra</a></li>
			<li class="hidden-print txtrequired"><em class="fa fa-power-off">&nbsp;</em><a title="Đóng cửa sổ này" href="javascript:;" onclick="window.close()">Đóng cửa sổ này</a></li>
		</ul>
		<div class="clear"></div>
		<div id="hometext">
		</div>
				<div class="imghome">
			<img alt="Cách cài đặt và chạy Nginx Server trên Windows" src="https://st.quantrimang.com/photos/image/2023/07/13/chay-nginx-server-tren-windows-27.jpg" width="460" class="img-thumbnail" />
		</div>
		<div class="clear"></div>
		<div id="bodytext" class="clearfix">
			<p style="text-align: justify;">Nginx là một&nbsp;web server&nbsp;rất phổ biến với các hệ thống&nbsp;Linux&nbsp;và BSD.&nbsp;Nó cũng có thể được cài đặt trên Windows miễn là bạn có thể chấp nhận các hạn chế về hiệu suất mà cho đến nay vẫn chưa được khắc phục. Bạn vẫn có thể host web server hoặc cổng thông tin khách hàng/nhân viên một cách thoải mái trên laptop Windows của mình. Để cài đặt và chạy Nginx thành công trên Windows, hãy làm theo các bước bên dưới.</p>

<h2 style="text-align: justify;">Cài đặt Nginx trong Windows</h2>

<p style="text-align: justify;">Để bắt đầu, bạn sẽ cần cài đặt Nginx trên laptop hoặc PC chạy Windows của bạn. Không có trình cài đặt Nginx thông thường nào với hệ điều hành này. Bạn sẽ cần tải xuống một trong các phiên bản trực tuyến của nó và lưu vào vị trí ổ C: trên PC.</p>

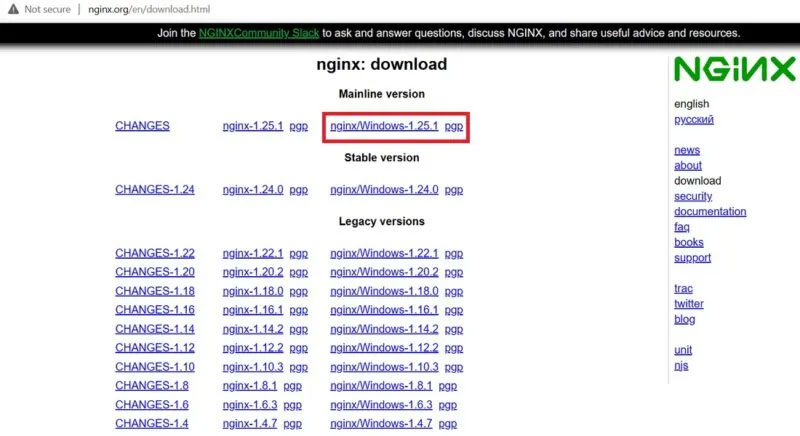
<p style="text-align: justify;">1. Chọn phiên bản bạn muốn và tải file zip của nó xuống PC. Nginx khuyên bạn nên sử dụng “mainline version” vì nó đi kèm với các tính năng mới nhất. Nếu bạn không cần những tính năng đó, phiên bản ổn định mới nhất cũng sẽ hoạt động.</p>

<figure>
<div style="text-align: justify;"><img alt="Tải xuống phiên bản chính của Nginx từ trang web chính thức" data-i="0" data-src="https://st.quantrimang.com/photos/image/2023/07/13/chay-nginx-server-tren-windows-1.jpg" data-was-processed="true" height="436" src="https://st.quantrimang.com/photos/image/2023/07/13/chay-nginx-server-tren-windows-1.jpg" width="800" /></div>

<figcaption>
<div style="text-align: justify;">Tải xuống phiên bản chính của Nginx từ trang web chính thức</div>
</figcaption>
</figure>

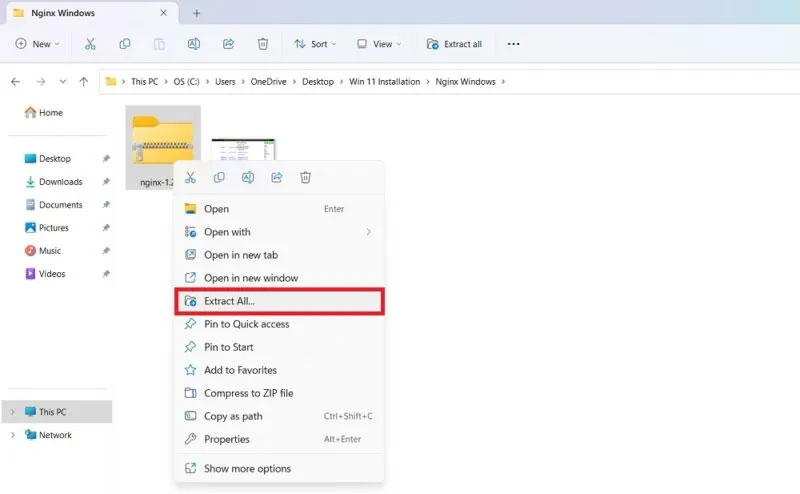
<p style="text-align: justify;">2. Sau khi tải xuống, hãy giải nén thư mục mới bằng cách nhấp chuột phải vào thư mục đó. Bạn cũng có thể sử dụng phần mềm nén phổ biến như&nbsp;<a data-type="internal" href="https://quantrimang.com/download/7-zip-183466" title="7-Zip">7-Zip</a>&nbsp;hoặc&nbsp;<a data-type="internal" href="https://quantrimang.com/download/winrar-178943" title="WinRAR">WinRAR</a>.</p>

<figure>
<div style="text-align: justify;"><img alt="Nhấp chuột phải để giải nén tất cả các file cho phần mềm cài đặt Nginx đã tải xuống." data-i="1" data-src="https://st.quantrimang.com/photos/image/2023/07/13/chay-nginx-server-tren-windows-2.jpg" data-was-processed="true" height="494" src="https://st.quantrimang.com/photos/image/2023/07/13/chay-nginx-server-tren-windows-2.jpg" width="800" /></div>

<figcaption>
<div style="text-align: justify;">Nhấp chuột phải để giải nén tất cả các file cho phần mềm cài đặt Nginx đã tải xuống.</div>
</figcaption>
</figure>

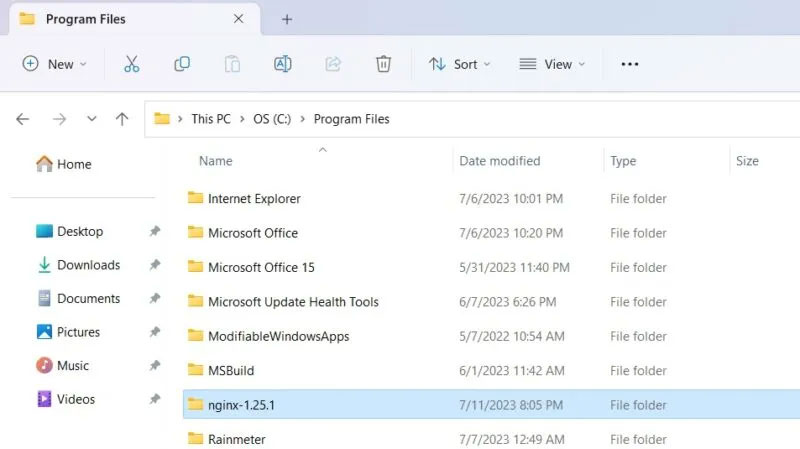
<p style="text-align: justify;">3. Di chuyển toàn bộ thư mục đi kèm với bản sao tải xuống tích hợp vào ổ C:. Ví dụ đã chuyển nó vào&nbsp;<strong>“Program Files”</strong>&nbsp;nhưng nó có thể được lưu ở bất kỳ vị trí nào trên PC của bạn, kể cả ổ D.</p>

<figure>
<div style="text-align: justify;"><img alt="Di chuyển thư mục Nginx đã giải nén vào Program Files" data-i="2" data-src="https://st.quantrimang.com/photos/image/2023/07/13/chay-nginx-server-tren-windows-3.jpg" data-was-processed="true" height="449" src="https://st.quantrimang.com/photos/image/2023/07/13/chay-nginx-server-tren-windows-3.jpg" width="800" /></div>

<figcaption>
<div style="text-align: justify;">Di chuyển thư mục Nginx đã giải nén vào Program Files</div>
</figcaption>
</figure>

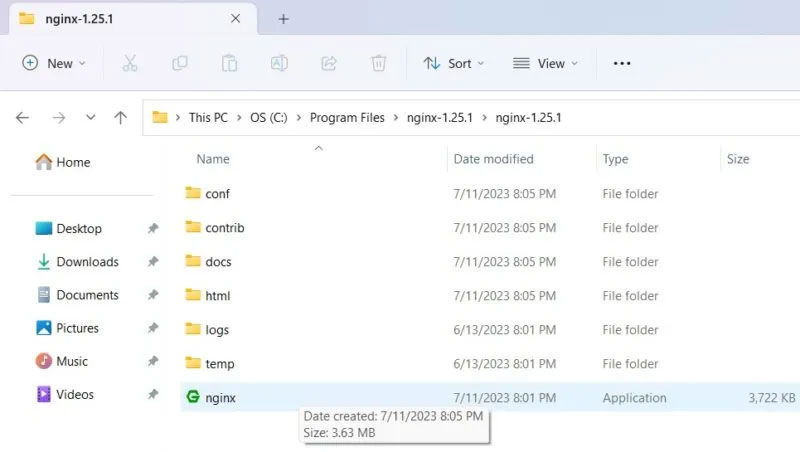
<p style="text-align: justify;">4. Chọn và nhấp đúp vào file&nbsp;<strong>“Nginx.exe”.</strong>&nbsp;Bây giờ nó đã được kích hoạt để sử dụng tiếp. Ví dụ sẽ chạy Nginx từ vị trí này như một chương trình web service mặc định.</p>

<figure>
<div style="text-align: justify;"><img alt="Nhấp đúp vào ứng dụng Nginx bên trong thư mục Program Files." data-i="3" data-src="https://st.quantrimang.com/photos/image/2023/07/13/chay-nginx-server-tren-windows-4.jpg" data-was-processed="true" height="452" src="https://st.quantrimang.com/photos/image/2023/07/13/chay-nginx-server-tren-windows-4.jpg" width="800" /></div>

<figcaption>
<div style="text-align: justify;">Nhấp đúp vào ứng dụng Nginx bên trong thư mục Program Files.</div>
</figcaption>
</figure>

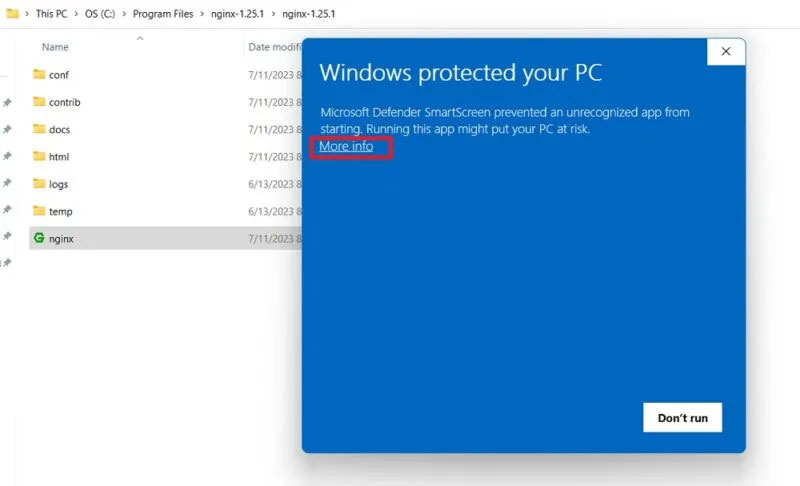
<p style="text-align: justify;">5. Nếu bạn đã bật bộ lọc Windows SmartScreen, nó có thể ngăn trình cài đặt Nginx chạy. Nhấp vào&nbsp;<strong>“More info”</strong>&nbsp;để bỏ qua giới hạn.</p>

<figure>
<div style="text-align: justify;"><img alt="Nhấp vào &#039;More info&#039; trên cửa sổ ứng dụng Nginx chặn SmartScreen." data-i="4" data-src="https://st.quantrimang.com/photos/image/2023/07/13/chay-nginx-server-tren-windows-5.jpg" data-was-processed="true" height="486" src="https://st.quantrimang.com/photos/image/2023/07/13/chay-nginx-server-tren-windows-5.jpg" width="800" /></div>

<figcaption>
<div style="text-align: justify;">Nhấp vào &quot;More info&quot; trên cửa sổ ứng dụng Nginx chặn SmartScreen.</div>
</figcaption>
</figure>

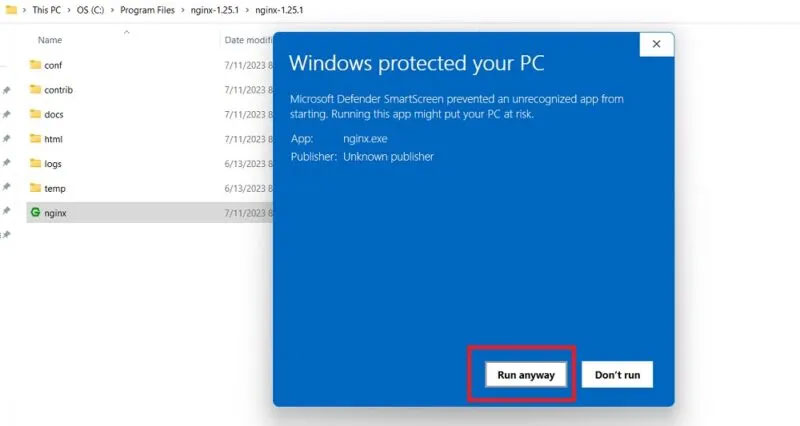
<p style="text-align: justify;">6. Nhấp vào dòng chữ&nbsp;<strong>“Run anyway”</strong>&nbsp;để chạy file nginx.exe.</p>

<figure>
<div style="text-align: justify;"><img alt="SmartScreen chặn ứng dụng Nginx mà bạn vẫn có thể chạy." data-i="5" data-src="https://st.quantrimang.com/photos/image/2023/07/13/chay-nginx-server-tren-windows-6.jpg" data-was-processed="true" height="426" src="https://st.quantrimang.com/photos/image/2023/07/13/chay-nginx-server-tren-windows-6.jpg" width="800" /></div>

<figcaption>
<div style="text-align: justify;">SmartScreen chặn ứng dụng Nginx mà bạn vẫn có thể chạy.</div>
</figcaption>
</figure>

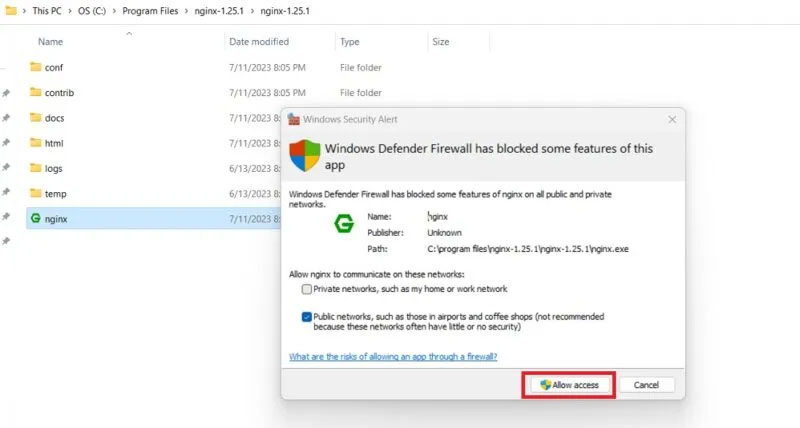
<p style="text-align: justify;">7. Bạn có thể gặp thêm màn hình chặn tường lửa của Windows Defender trong khi chạy Nginx server, điều này phải được bạn cho phép. Sau khi hoàn tất, bạn có thể dễ dàng sử dụng Nginx trên thiết bị Windows của mình.</p>

<figure>
<div style="text-align: justify;"><img alt="Tường lửa Windows Defender đã chặn ứng dụng Nginx. Nhấp vào Allow access để chạy nó." data-i="6" data-src="https://st.quantrimang.com/photos/image/2023/07/13/chay-nginx-server-tren-windows-7.jpg" data-was-processed="true" height="428" src="https://st.quantrimang.com/photos/image/2023/07/13/chay-nginx-server-tren-windows-7.jpg" width="800" /></div>

<figcaption>
<div style="text-align: justify;">Tường lửa Windows Defender đã chặn ứng dụng Nginx. Nhấp vào Allow access để chạy nó.</div>
</figcaption>
</figure>

<h2 style="text-align: justify;">Cách khởi động Nginx trên Windows</h2>

<p style="text-align: justify;">Có nhiều cách để chạy Nginx trên PC Windows tùy thuộc vào yêu cầu sử dụng cuối cùng của bạn. Bạn có thể sử dụng đồng thời các phương pháp này. Ví dụ, bạn có thể khởi chạy Nginx server bằng file ứng dụng của nó hoặc từ&nbsp;<a data-type="internal" href="https://quantrimang.com/gioi-thieu-ve-powershell-37928" title="PowerShell và mọi điều bạn cần biết về tiện ích này">PowerShell</a>.</p>

<h3 style="text-align: justify;">1. Sử dụng file ứng dụng Nginx</h3>

<p style="text-align: justify;">Nginx có một file ứng dụng tích hợp mà bạn có thể nhấp đúp vào như được mô tả trong phần trên. Bạn sẽ cần bỏ qua mọi hạn chế do SmartScreen hoặc Windows Defender.</p>

<p style="text-align: justify;">1. Sau khi hoàn tất, hãy chuyển đến trình duyệt mặc định của bạn và nhập&nbsp;<strong>localhost.</strong>&nbsp;Microsoft Edge là trình duyệt được sử dụng trong ví dụ dưới đây.</p>

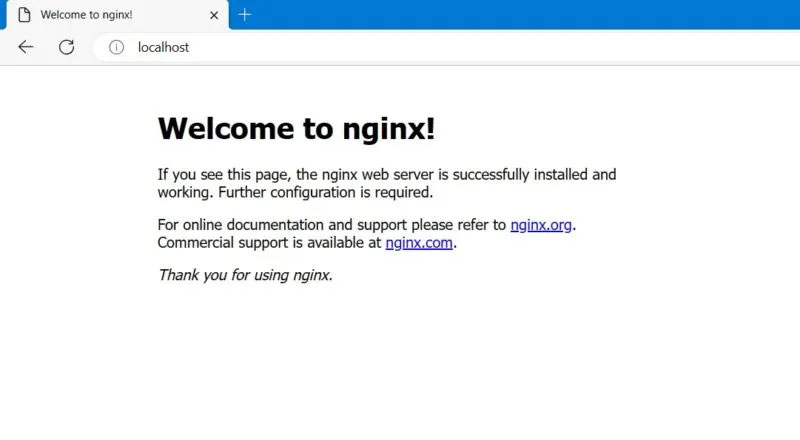
<p style="text-align: justify;">2. Nếu bạn thấy màn hình cho biết Nginx web server đã được cài đặt thành công và đang hoạt động, điều đó có nghĩa là không có vấn đề gì với quá trình cài đặt Nginx của bạn trong Windows.</p>

<figure>
<div style="text-align: justify;"><img alt="Trình duyệt Edge trong Windows đang hiển thị script mặc định của Nginx sau khi nhập &#039;localhost&#039; trên thanh địa chỉ." data-i="7" data-src="https://st.quantrimang.com/photos/image/2023/07/13/chay-nginx-server-tren-windows-8.jpg" data-was-processed="true" height="440" src="https://st.quantrimang.com/photos/image/2023/07/13/chay-nginx-server-tren-windows-8.jpg" width="800" /></div>

<figcaption>
<div style="text-align: justify;">Trình duyệt Edge trong Windows đang hiển thị script mặc định của Nginx sau khi nhập &quot;localhost&quot; trên thanh địa chỉ.</div>
</figcaption>
</figure>

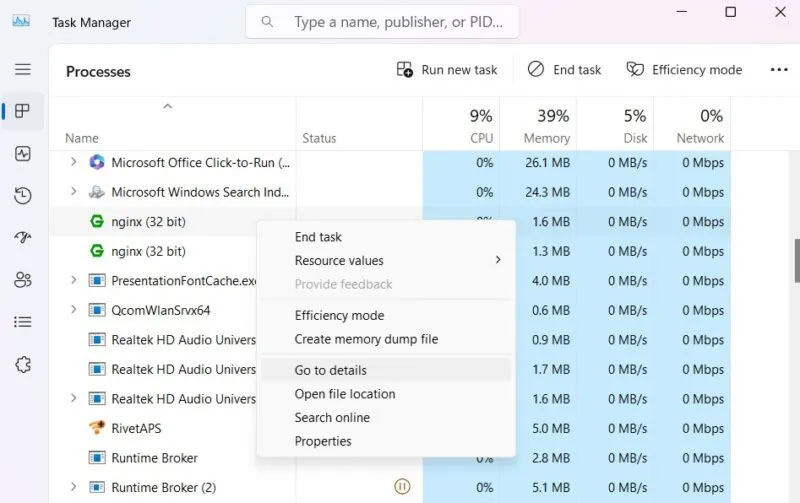
<p style="text-align: justify;">3. Để dừng Nginx, bạn có thể kết thúc nó từ cửa sổ&nbsp;<a data-type="internal" href="https://quantrimang.com/cong-nghe/huong-dan-su-dung-task-manager-83602" title="Tất tần tật về cách sử dụng Task Manager">Task Manager</a>. Nếu bạn không thể chấm dứt nó trực tiếp từ&nbsp;<strong>Processes</strong>, hãy nhấp chuột phải để chọn&nbsp;<strong>“Go to details”</strong>.</p>

<figure>
<div style="text-align: justify;"><img alt="Nhấp chuột phải để chọn &#039;Go to details&#039; cho tiến trình Nginx trong Task Manager." data-i="8" data-src="https://st.quantrimang.com/photos/image/2023/07/13/chay-nginx-server-tren-windows-9.jpg" data-was-processed="true" height="503" src="https://st.quantrimang.com/photos/image/2023/07/13/chay-nginx-server-tren-windows-9.jpg" width="800" /></div>

<figcaption>
<div style="text-align: justify;">Nhấp chuột phải để chọn &quot;Go to details&quot; cho tiến trình Nginx trong Task Manager.</div>
</figcaption>
</figure>

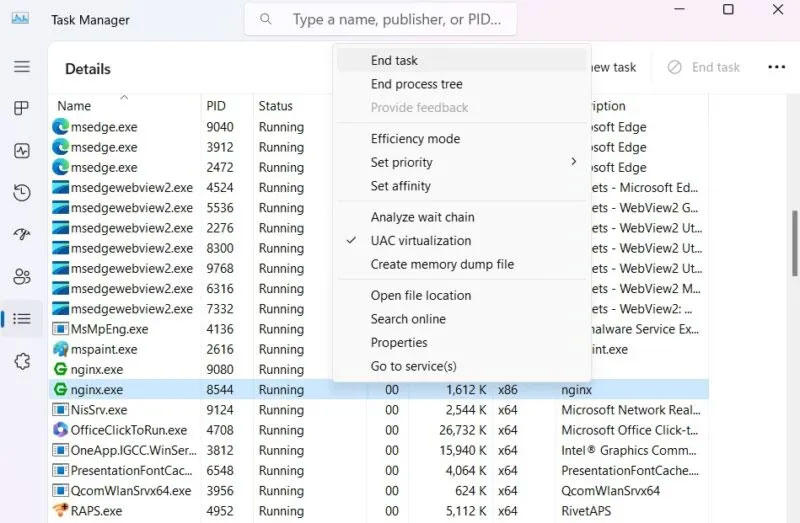
<p style="text-align: justify;">4. Xác định tất cả các phiên bản của Nginx.exe và nhấp chuột phải để kết thúc từng tác vụ.</p>

<figure>
<div style="text-align: justify;"><img alt="Nhấp chuột phải để chọn &#039;End task&#039; để chấm dứt tiến trình Nginx bên trong Task Manager" data-i="9" data-src="https://st.quantrimang.com/photos/image/2023/07/13/chay-nginx-server-tren-windows-10.jpg" data-was-processed="true" height="523" src="https://st.quantrimang.com/photos/image/2023/07/13/chay-nginx-server-tren-windows-10.jpg" width="800" /></div>

<figcaption>
<div style="text-align: justify;">Nhấp chuột phải để chọn &quot;End task&quot; để chấm dứt tiến trình Nginx bên trong Task Manager</div>
</figcaption>
</figure>

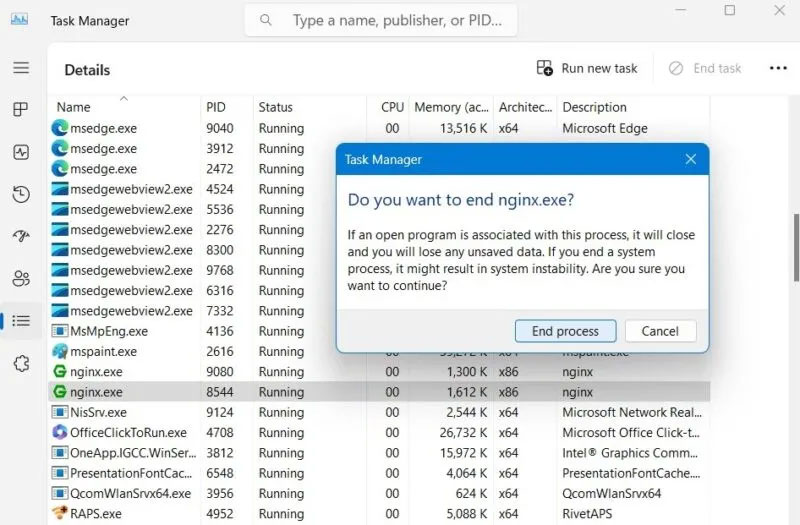
<p style="text-align: justify;">5. Bỏ qua mọi cảnh báo chẳng hạn như “Do you want to end Nginx.exe”. Nhấp vào&nbsp;<strong>“End process”</strong>&nbsp;để tiếp tục quá trình chấm dứt.</p>

<figure>
<div style="text-align: justify;"><img alt="Nhấp vào &#039;End process&#039; để chấm dứt Nginx.exe khỏi Task Manager." data-i="10" data-src="https://st.quantrimang.com/photos/image/2023/07/13/chay-nginx-server-tren-windows-11.jpg" data-was-processed="true" height="525" src="https://st.quantrimang.com/photos/image/2023/07/13/chay-nginx-server-tren-windows-11.jpg" width="800" /></div>

<figcaption>
<div style="text-align: justify;">Nhấp vào &quot;End process&quot; để chấm dứt Nginx.exe khỏi Task Manager.</div>
</figcaption>
</figure>

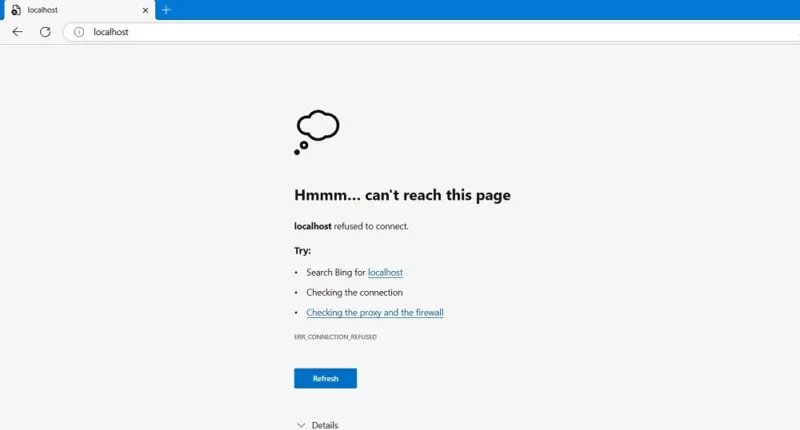
<p style="text-align: justify;">6. Khi nhập&nbsp;<strong>localhost</strong>, bạn sẽ thấy màn hình<strong>&nbsp;“Can’t reach this page”&nbsp;</strong>trên trang web của trình duyệt.</p>

<figure>
<div style="text-align: justify;"><img alt="Nginx localhost hiển thị lỗi &#039;Can’t reach this page&#039; trên trình duyệt." data-i="11" data-src="https://st.quantrimang.com/photos/image/2023/07/13/chay-nginx-server-tren-windows-12.jpg" data-was-processed="true" height="430" src="https://st.quantrimang.com/photos/image/2023/07/13/chay-nginx-server-tren-windows-12.jpg" width="800" /></div>

<figcaption>
<div style="text-align: justify;">Nginx localhost hiển thị lỗi &quot;Can’t reach this page&quot; trên trình duyệt.</div>
</figcaption>
</figure>

<h3 style="text-align: justify;">2. Sử dụng PowerShell</h3>

<p style="text-align: justify;">Phần tốt nhất của Nginx là nó có thể chạy dưới dạng script tự động từ PowerShell và cả Command Prompt. Bài viết sẽ chứng minh điều đó cho PowerShell bên dưới.</p>

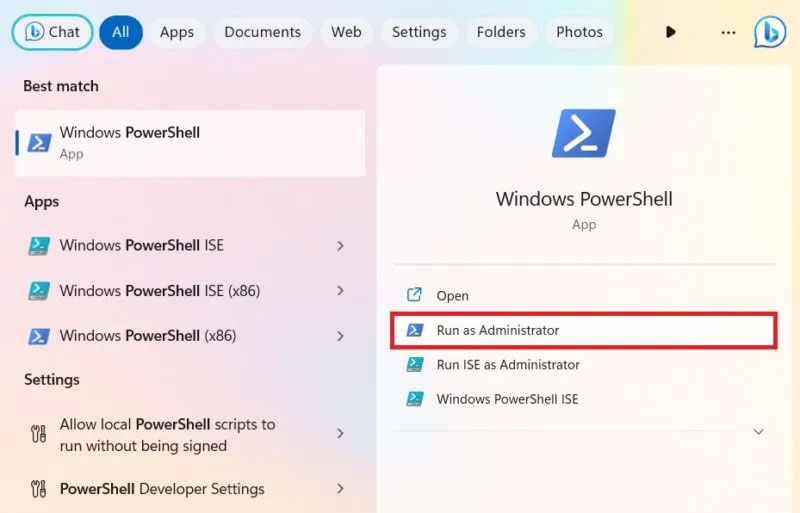
<p style="text-align: justify;">1.&nbsp;Khởi chạy PowerShell với quyền admin.</p>

<figure>
<div style="text-align: justify;"><img alt="Chạy PowerShell với quyền admin." data-i="12" data-src="https://st.quantrimang.com/photos/image/2023/07/13/chay-nginx-server-tren-windows-13.jpg" data-was-processed="true" height="513" src="https://st.quantrimang.com/photos/image/2023/07/13/chay-nginx-server-tren-windows-13.jpg" width="800" /></div>

<figcaption>
<div style="text-align: justify;">Chạy PowerShell với quyền admin.</div>
</figcaption>
</figure>

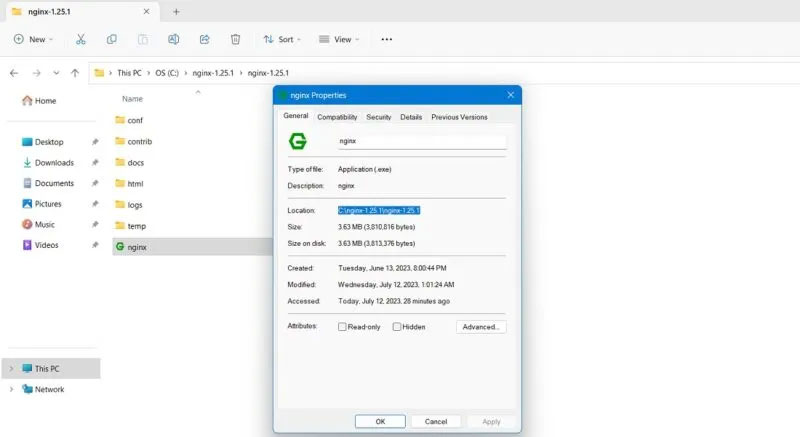
<p style="text-align: justify;">2. Quay trở lại thư mục mà bạn đã lưu ứng dụng Nginx và nhấp chuột phải để chuyển đến&nbsp;<strong>Properties</strong>&nbsp;của nó. Tại đây bạn có thể sao chép đường dẫn thư mục chính xác. Trong ví dụ này, đó là&nbsp;<strong>“C:\nginx-1.25.1\nginx-1.25.1”</strong></p>

<figure>
<div style="text-align: justify;"><img alt="Đường dẫn vị trí của file ứng dụng Nginx trong thư mục Nginx đã cài đặt." data-i="13" data-src="https://st.quantrimang.com/photos/image/2023/07/13/chay-nginx-server-tren-windows-14.jpg" data-was-processed="true" height="437" src="https://st.quantrimang.com/photos/image/2023/07/13/chay-nginx-server-tren-windows-14.jpg" width="800" /></div>

<figcaption>
<div style="text-align: justify;">Đường dẫn vị trí của file ứng dụng Nginx trong thư mục Nginx đã cài đặt.</div>
</figcaption>
</figure>

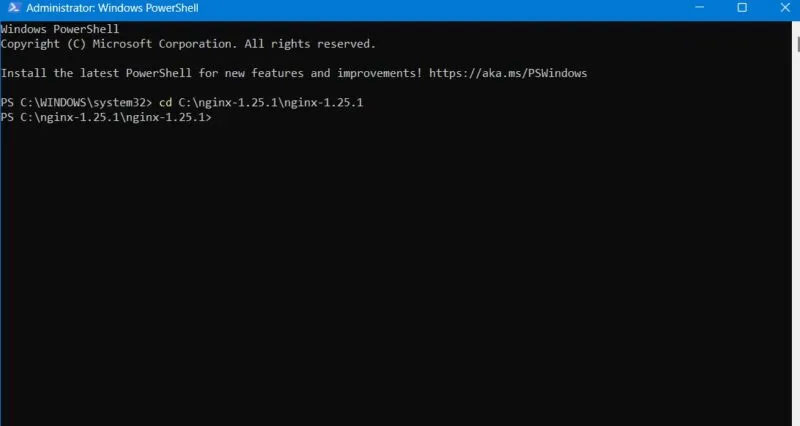
<p style="text-align: justify;">3. Thay đổi thư mục PowerShell để trỏ đến đường dẫn trên.</p>

<pre id="pre0">
<code>cd Path of Nginx installer</code></pre>

<figure>
<div style="text-align: justify;"><img alt="Chuyển hướng đường dẫn thư mục ứng dụng PowerShell sang Nginx." data-i="14" data-src="https://st.quantrimang.com/photos/image/2023/07/13/chay-nginx-server-tren-windows-15.jpg" data-was-processed="true" height="426" src="https://st.quantrimang.com/photos/image/2023/07/13/chay-nginx-server-tren-windows-15.jpg" width="800" /></div>

<figcaption>
<div style="text-align: justify;">Chuyển hướng đường dẫn thư mục ứng dụng PowerShell sang Nginx.</div>
</figcaption>
</figure>

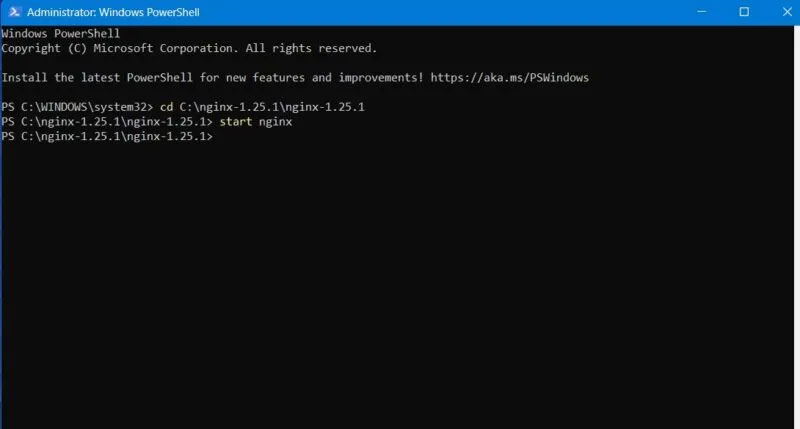
<p style="text-align: justify;">4. Để khởi tạo Nginx server, hãy nhập lệnh sau.</p>

<pre id="pre1">
<code>start nginx</code></pre>

<figure>
<div style="text-align: justify;"><img alt="Khởi động Nginx trong PowerShell với quyền admin." data-i="15" data-src="https://st.quantrimang.com/photos/image/2023/07/13/chay-nginx-server-tren-windows-16.jpg" data-was-processed="true" height="429" src="https://st.quantrimang.com/photos/image/2023/07/13/chay-nginx-server-tren-windows-16.jpg" width="800" /></div>

<figcaption>
<div style="text-align: justify;">Khởi động Nginx trong PowerShell với quyền admin.</div>
</figcaption>
</figure>

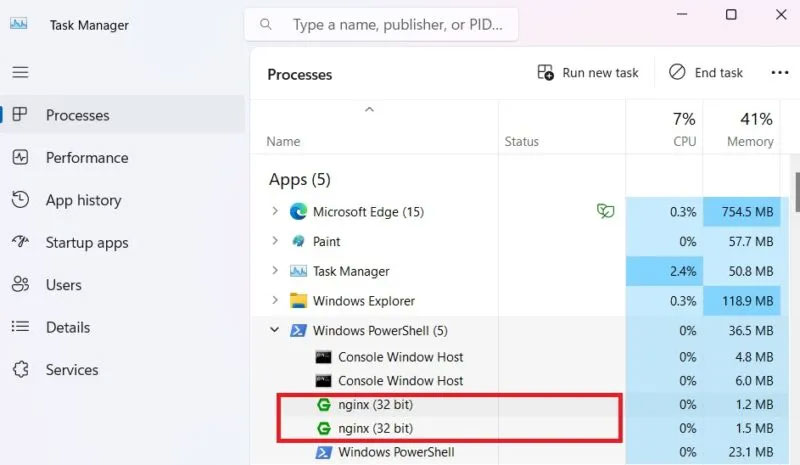
<p style="text-align: justify;">5. Bạn có thể xem các phiên bản tiến trình Nginx.exe trong Task Manager được lồng trong Windows PowerShell.</p>

<figure>
<div style="text-align: justify;"><img alt="Nginx đang chạy dưới dạng các tiến trình nền trong cửa sổ PowerShell như được thấy trong Task Manager." data-i="16" data-src="https://st.quantrimang.com/photos/image/2023/07/13/chay-nginx-server-tren-windows-17.jpg" data-was-processed="true" height="465" src="https://st.quantrimang.com/photos/image/2023/07/13/chay-nginx-server-tren-windows-17.jpg" width="800" /></div>

<figcaption>
<div style="text-align: justify;">Nginx đang chạy dưới dạng các tiến trình nền trong cửa sổ PowerShell như được thấy trong Task Manager.</div>
</figcaption>
</figure>

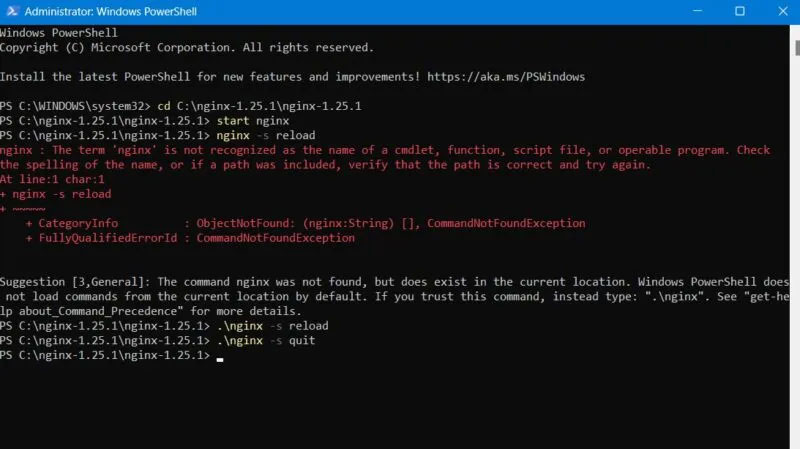
<p style="text-align: justify;">6. Trên Windows, Nginx có thể chạy như một ứng dụng console tiêu chuẩn. Để quản lý nó, các lệnh đơn giản sau thường được sử dụng:</p>

<table>
	<tbody>
		<tr>
			<td style="text-align: justify;"><code>nginx -s stop</code></td>
			<td style="text-align: justify;">Tắt máy nhanh</td>
		</tr>
		<tr>
			<td style="text-align: justify;"><code>nginx -s quit</code></td>
			<td style="text-align: justify;">Tắt máy bình thường</td>
		</tr>
		<tr>
			<td style="text-align: justify;"><code>nginx -s reload</code></td>
			<td style="text-align: justify;">Thay đổi cấu hình, bắt đầu các worker process mới với cấu hình mới, tắt dần các worker process cũ</td>
		</tr>
		<tr>
			<td style="text-align: justify;"><code>nginx -s reopen</code></td>
			<td style="text-align: justify;">Mở lại file nhật ký</td>
		</tr>
	</tbody>
</table>

<p style="text-align: justify;">7. Nếu bạn gặp phải bất kỳ lỗi nào, chẳng hạn như “The command nginx was not found, but does exist in the current location ”, PowerShell sẽ nhắc bạn sử dụng một lệnh khác. Ví dụ sau đã thay thế tất cả các phiên bản của&nbsp;<strong>nginx</strong>&nbsp;bằng&nbsp;<strong>/.nginx</strong>, sử dụng chúng để load lại và thoát khỏi chương trình.</p>

<figure>
<div style="text-align: justify;"><img alt="Danh sách lệnh Nginx trong cửa sổ PowerShell." data-i="17" data-src="https://st.quantrimang.com/photos/image/2023/07/13/chay-nginx-server-tren-windows-18.jpg" data-was-processed="true" height="449" src="https://st.quantrimang.com/photos/image/2023/07/13/chay-nginx-server-tren-windows-18.jpg" width="800" /></div>

<figcaption>
<div style="text-align: justify;">Danh sách lệnh Nginx trong cửa sổ PowerShell.</div>
</figcaption>
</figure>

<h3 style="text-align: justify;">3. Sử dụng&nbsp;IIS Manager</h3>

<p style="text-align: justify;">Bạn cũng có thể sử dụng Internet Information Services (IIS) để chạy Nginx, một web server của Microsoft phục vụ các trang hoặc file HTML được yêu cầu. Trước đây, nó là bắt buộc nhưng bây giờ không còn như vậy nữa.</p>

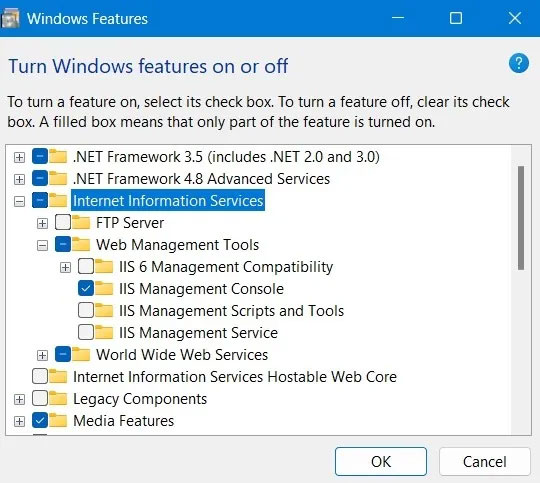
<p style="text-align: justify;">1. Bạn có thể bật tính năng này trong phần&nbsp;<strong>“Turn Windows Features On or Off”</strong>&nbsp;thuộc Control Panel. Kiểm tra các trường bắt buộc cho&nbsp;<strong>“Web Management Tools”</strong>&nbsp;và&nbsp;<strong>“IIS Management Console”</strong>.</p>

<figure>
<div style="text-align: justify;"><img alt="Bật IIS Management Console trong Internet Information Services." data-i="18" data-src="https://st.quantrimang.com/photos/image/2023/07/13/chay-nginx-server-tren-windows-19.jpg" data-was-processed="true" height="483" src="https://st.quantrimang.com/photos/image/2023/07/13/chay-nginx-server-tren-windows-19.jpg" width="540" /></div>

<figcaption>
<div style="text-align: justify;">Bật IIS Management Console trong Internet Information Services.</div>
</figcaption>
</figure>

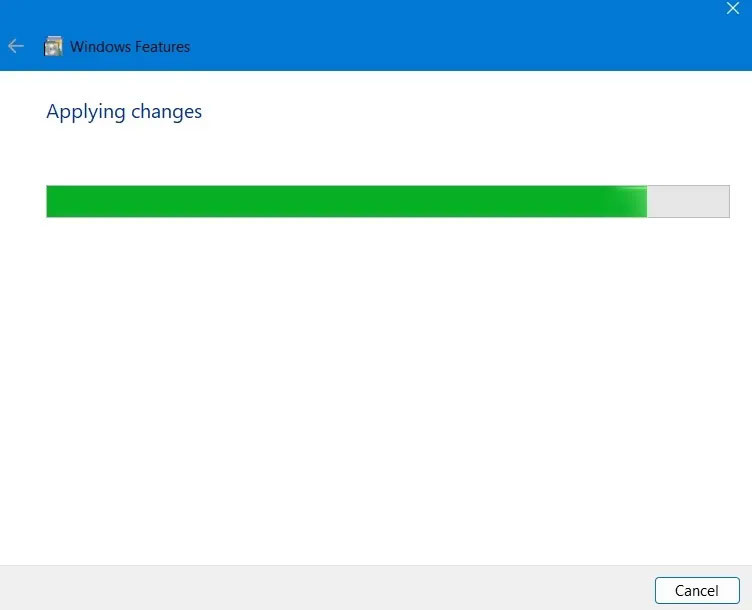
<p style="text-align: justify;">2. Sẽ mất một lúc để IIS được bật trên máy tính của bạn khi các thay đổi được áp dụng.</p>

<figure>
<div style="text-align: justify;"><img alt="Áp dụng các thay đổi để bật các tính năng của Windows trong cửa sổ." data-i="19" data-src="https://st.quantrimang.com/photos/image/2023/07/13/chay-nginx-server-tren-windows-20.jpg" data-was-processed="true" height="610" src="https://st.quantrimang.com/photos/image/2023/07/13/chay-nginx-server-tren-windows-20.jpg" width="752" /></div>

<figcaption>
<div style="text-align: justify;">Áp dụng các thay đổi để bật các tính năng của Windows trong cửa sổ.</div>
</figcaption>
</figure>

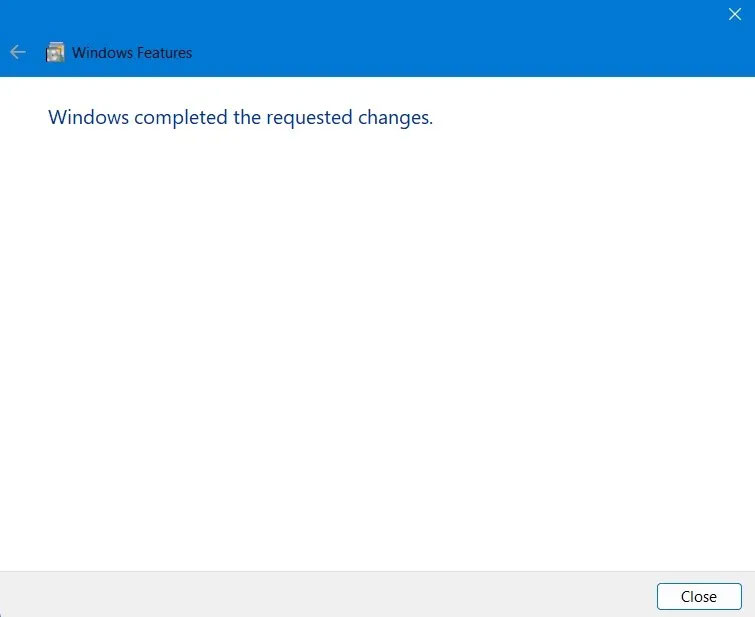
<p style="text-align: justify;">3. Bạn sẽ thấy trạng thái thành công “Windows completed the requested changes”.</p>

<figure>
<div style="text-align: justify;"><img alt="Windows đã hoàn thành các thay đổi được yêu cầu để bật các tính năng cần thiết với IIS Console." data-i="20" data-src="https://st.quantrimang.com/photos/image/2023/07/13/chay-nginx-server-tren-windows-21.jpg" data-was-processed="true" height="617" src="https://st.quantrimang.com/photos/image/2023/07/13/chay-nginx-server-tren-windows-21.jpg" width="755" /></div>

<figcaption>
<div style="text-align: justify;">Windows đã hoàn thành các thay đổi được yêu cầu để bật các tính năng cần thiết với IIS Console.</div>
</figcaption>
</figure>

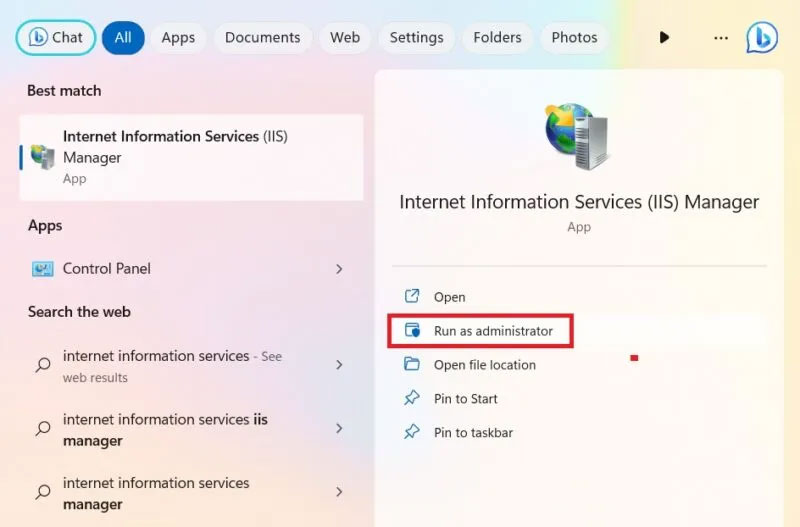
<p style="text-align: justify;">4. Bạn có thể mở IIS Manager trực tiếp từ menu Start. Luôn mở nó ở chế độ Administrator.</p>

<figure>
<div style="text-align: justify;"><img alt="Mở ứng dụng IIS Manager từ menu Start ở chế độ Administrator." data-i="21" data-src="https://st.quantrimang.com/photos/image/2023/07/13/chay-nginx-server-tren-windows-22.jpg" data-was-processed="true" height="527" src="https://st.quantrimang.com/photos/image/2023/07/13/chay-nginx-server-tren-windows-22.jpg" width="800" /></div>

<figcaption>
<div style="text-align: justify;">Mở ứng dụng IIS Manager từ menu Start ở chế độ Administrator.</div>
</figcaption>
</figure>

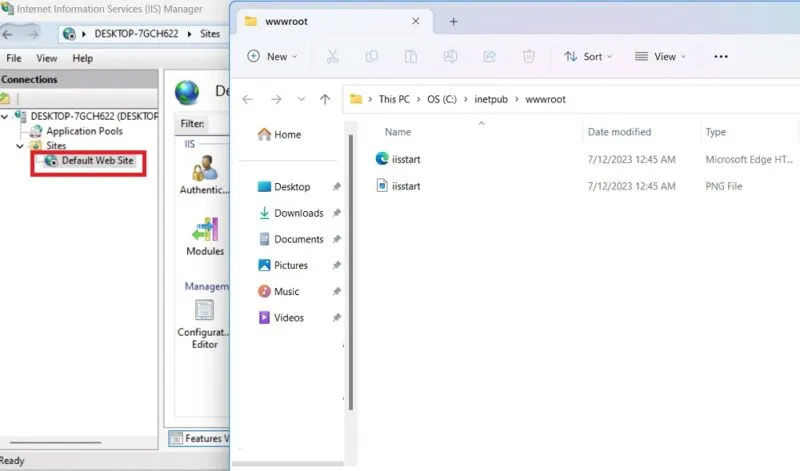
<p style="text-align: justify;">5. Tại đây, bạn sẽ có thể truy cập trang web mặc định, thường nằm ở&nbsp;<strong>“inetpub wwwroot”.</strong>&nbsp;Bạn có thể tìm nó trong File Explorer thông qua một tìm kiếm đơn giản.</p>

<p style="text-align: justify;">6. Khi bạn nhấp đúp vào tùy chọn&nbsp;<strong>“Default web site”</strong>&nbsp;trong IIS Manager, nó sẽ dẫn đến thư mục mới này. Ngoài ra, bạn có thể nhấp chuột phải vào menu và chọn&nbsp;<strong>“Explore”</strong>&nbsp;để có kết quả tương tự.</p>

<figure>
<div style="text-align: justify;"><img alt="Thư mục gốc của PC được xác định bằng IIS Manager." data-i="22" data-src="https://st.quantrimang.com/photos/image/2023/07/13/chay-nginx-server-tren-windows-23.jpg" data-was-processed="true" height="471" src="https://st.quantrimang.com/photos/image/2023/07/13/chay-nginx-server-tren-windows-23.jpg" width="800" /></div>

<figcaption>
<div style="text-align: justify;">Thư mục gốc của PC được xác định bằng IIS Manager.</div>
</figcaption>
</figure>

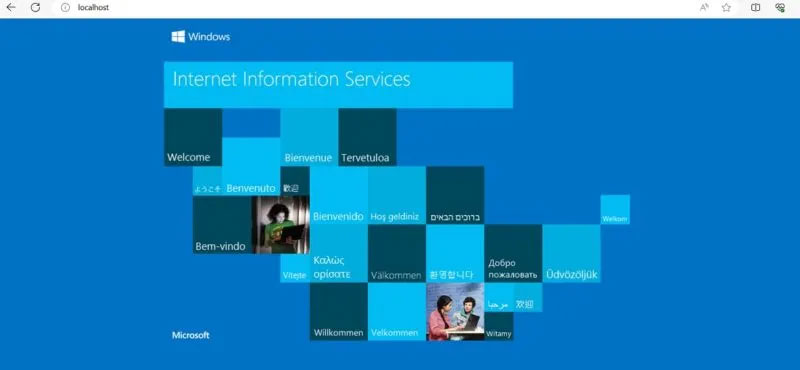
<p style="text-align: justify;">7. Khi IIS Console được bật, bạn có thể xem trang web của nó bằng cách nhập&nbsp;<strong>localhost</strong>&nbsp;trên trình duyệt mặc định của mình.</p>

<figure>
<div style="text-align: justify;"><img alt="Máy chủ cục bộ trong Nginx trỏ đến trang web IIS." data-i="23" data-src="https://st.quantrimang.com/photos/image/2023/07/13/chay-nginx-server-tren-windows-24.jpg" data-was-processed="true" height="370" src="https://st.quantrimang.com/photos/image/2023/07/13/chay-nginx-server-tren-windows-24.jpg" width="800" /></div>

<figcaption>
<div style="text-align: justify;">Máy chủ cục bộ trong Nginx trỏ đến trang web IIS.</div>
</figcaption>
</figure>

<h2 style="text-align: justify;">Cách cấu hình Nginx cho Windows</h2>

<p style="text-align: justify;">Để chạy Nginx trong Windows, tất cả các thay đổi mong muốn đều bị ảnh hưởng từ những chuỗi khác nhau được sửa đổi trong các file&nbsp;<strong>“index.html”</strong>&nbsp;và&nbsp;<strong>“nginx.conf”</strong>&nbsp;trong thư mục cài đặt. Các chuỗi này thường được chỉnh sửa bằng trình soạn thảo văn bản Notepad, nhưng bạn có thể sử dụng bất kỳ trình soạn thảo nào khác như Atom, Notepad++ hoặc Visual Studio Code. Ví dụ này sẽ chỉnh sửa file cấu hình bằng Notepad++.</p>

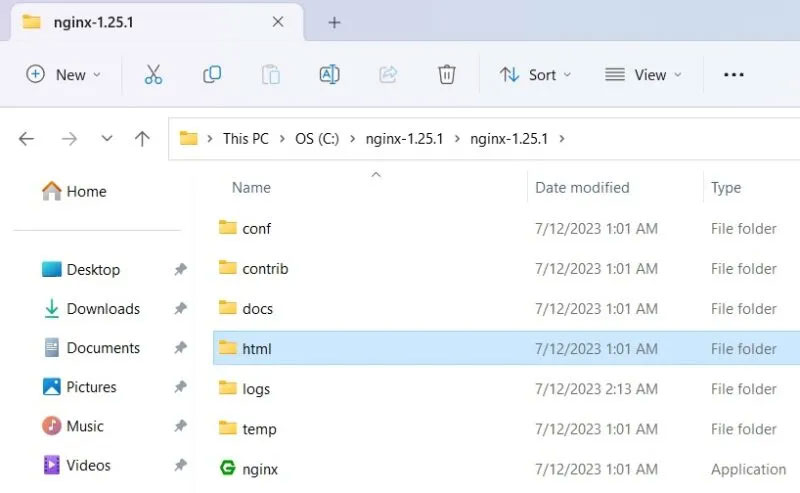
<p style="text-align: justify;">1. Chuyển đến thư mục mà bạn đã lưu ứng dụng Nginx của mình. Nhấp vào thư mục con&nbsp;<strong>“html”.</strong></p>

<figure>
<div style="text-align: justify;"><img alt="Thư mục con HTML trong thư mục Nginx." data-i="24" data-src="https://st.quantrimang.com/photos/image/2023/07/13/chay-nginx-server-tren-windows-25.jpg" data-was-processed="true" height="493" src="https://st.quantrimang.com/photos/image/2023/07/13/chay-nginx-server-tren-windows-25.jpg" width="800" /></div>

<figcaption>
<div style="text-align: justify;">Thư mục con HTML trong thư mục Nginx.</div>
</figcaption>
</figure>

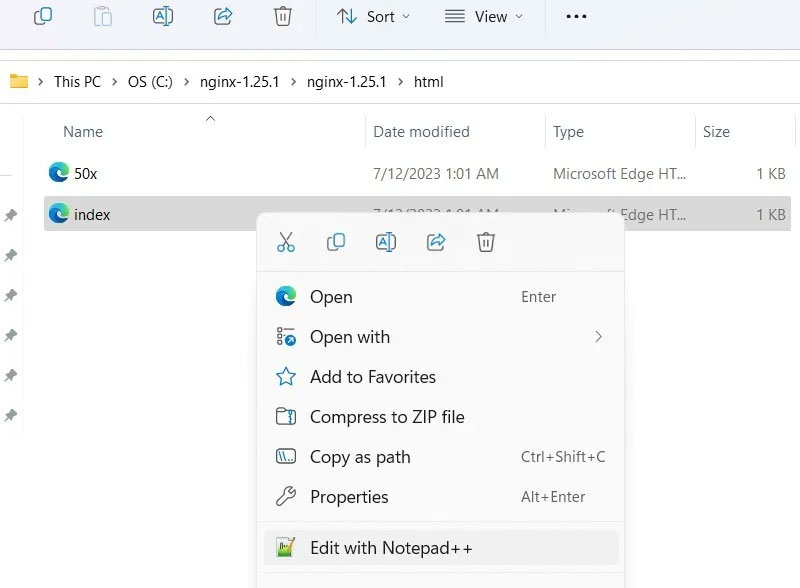
<p style="text-align: justify;">2. Nhấp chuột phải để chọn&nbsp;<strong>“Edit with Notepad++”</strong>&nbsp;cho file index.html.</p>

<figure>
<div style="text-align: justify;"><img alt="Nhấp chuột phải để chỉnh sửa file Index HTML trong thư mục Nginx bằng Notepad++." data-i="25" data-src="https://st.quantrimang.com/photos/image/2023/07/13/chay-nginx-server-tren-windows-26.jpg" data-was-processed="true" height="588" src="https://st.quantrimang.com/photos/image/2023/07/13/chay-nginx-server-tren-windows-26.jpg" width="800" /></div>

<figcaption>
<div style="text-align: justify;">Nhấp chuột phải để chỉnh sửa file Index HTML trong thư mục Nginx bằng Notepad++.</div>
</figcaption>
</figure>

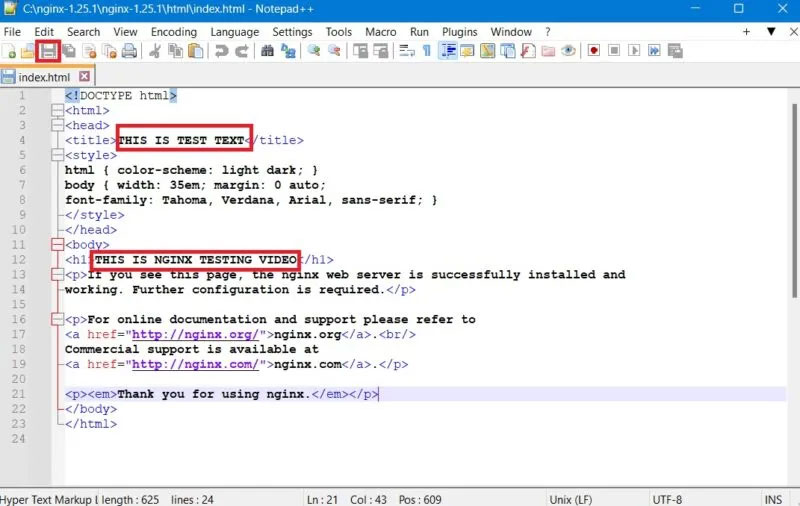
<p style="text-align: justify;">3. Bạn có thể chỉnh sửa file index.html trong&nbsp;thư mục root&nbsp;trên tab mới hoặc tab riêng biệt. Thay đổi văn bản thành những gì bạn muốn web server hiển thị trên màn hình.</p>

<p style="text-align: justify;">4. Đừng quên nhấp vào nút&nbsp;<strong>&quot;Save&quot;</strong>&nbsp;ở trên cùng sau khi bạn hoàn tất.</p>

<p style="text-align: justify;">5. Thoát khỏi chương trình Nginx.exe bằng cách sử dụng&nbsp;<strong>“End Task”</strong>&nbsp;như trong phần trên và khởi động lại nó.</p>

<figure>
<div style="text-align: justify;"><img alt="Chỉnh sửa file HTML của Nginx với các thay đổi văn bản và lưu file." data-i="26" data-src="https://st.quantrimang.com/photos/image/2023/07/13/chay-nginx-server-tren-windows-27.jpg" data-was-processed="true" height="506" src="https://st.quantrimang.com/photos/image/2023/07/13/chay-nginx-server-tren-windows-27.jpg" width="800" /></div>

<figcaption>
<div style="text-align: justify;">Chỉnh sửa file HTML của Nginx với các thay đổi văn bản và lưu file.</div>
</figcaption>
</figure>

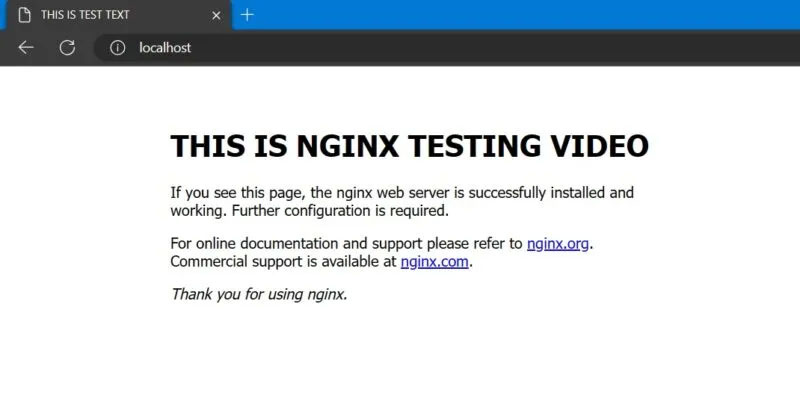
<p style="text-align: justify;">6. Nhập&nbsp;<strong>localhost</strong>&nbsp;trong cửa sổ trình duyệt. Nginx web server sẽ đánh dấu các chỉnh sửa bạn đã thực hiện.</p>

<figure>
<div style="text-align: justify;"><img alt="Văn bản đã chỉnh sửa được xem dưới dạng máy chủ cục bộ trên trình duyệt mặc định." data-i="27" data-src="https://st.quantrimang.com/photos/image/2023/07/13/chay-nginx-server-tren-windows-28.jpg" data-was-processed="true" height="413" src="https://st.quantrimang.com/photos/image/2023/07/13/chay-nginx-server-tren-windows-28.jpg" width="800" /></div>

<figcaption>
<div style="text-align: justify;">Văn bản đã chỉnh sửa được xem dưới dạng máy chủ cục bộ trên trình duyệt mặc định.</div>
</figcaption>
</figure>

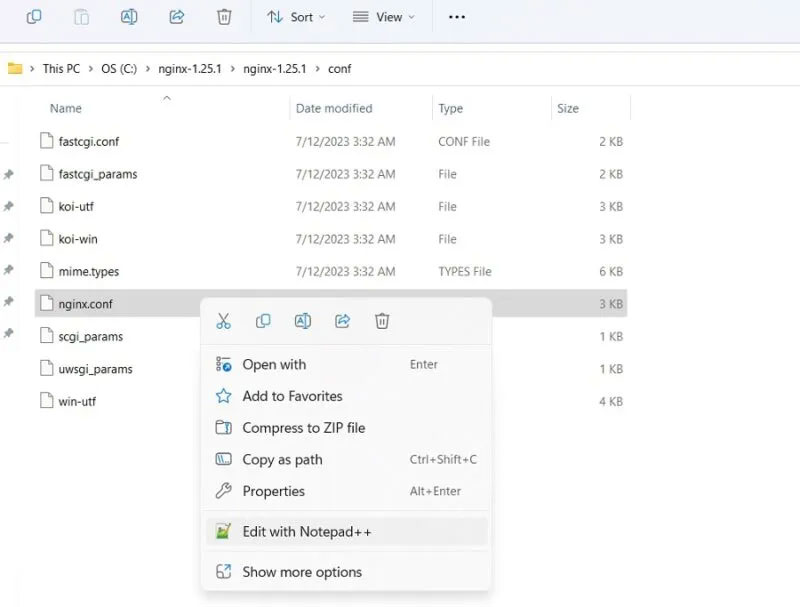
<p style="text-align: justify;">7. Sau đó, nhấp vào&nbsp;<strong>“Conf”</strong>&nbsp;và nhấp chuột phải để chọn&nbsp;<strong>“nginx.conf”</strong>, sau đó chọn&nbsp;<strong>“Edit with Notepad++”</strong>.</p>

<figure>
<div style="text-align: justify;"><img alt="Nhấp chuột phải để chỉnh sửa file conf Nginx bằng Notepad++." data-i="28" data-src="https://st.quantrimang.com/photos/image/2023/07/13/chay-nginx-server-tren-windows-29.jpg" data-was-processed="true" height="607" src="https://st.quantrimang.com/photos/image/2023/07/13/chay-nginx-server-tren-windows-29.jpg" width="800" /></div>

<figcaption>
<div style="text-align: justify;">Nhấp chuột phải để chỉnh sửa file conf Nginx bằng Notepad++.</div>
</figcaption>
</figure>

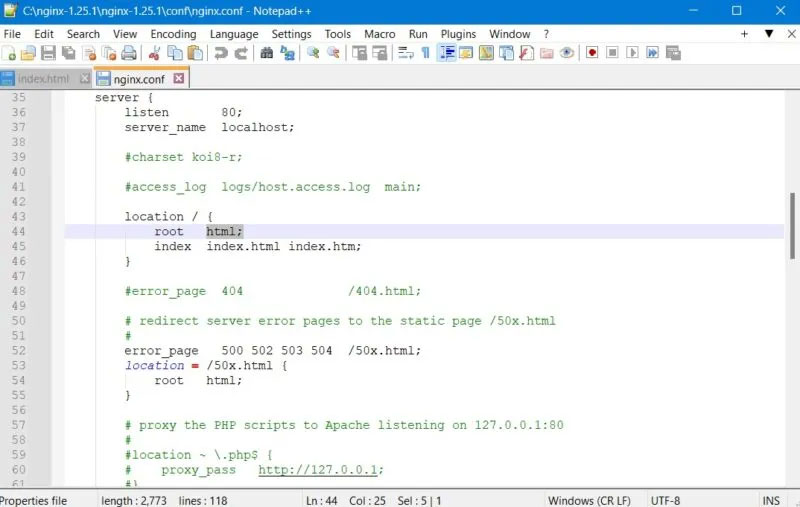
<p style="text-align: justify;">8. Tìm vị trí của thư mục root và thay đổi nó từ html mặc định thành bất kỳ đường dẫn vật lý nào khác.</p>

<figure>
<div style="text-align: justify;"><img alt="Thay đổi đường dẫn gốc của file Conf bằng Notepad++." data-i="29" data-src="https://st.quantrimang.com/photos/image/2023/07/13/chay-nginx-server-tren-windows-30.jpg" data-was-processed="true" height="507" src="https://st.quantrimang.com/photos/image/2023/07/13/chay-nginx-server-tren-windows-30.jpg" width="800" /></div>

<figcaption>
<div style="text-align: justify;">Thay đổi đường dẫn gốc của file Conf bằng Notepad++.</div>
</figcaption>
</figure>

<div style="text-align: justify;">&nbsp;</div>
		</div>
				<div id="author">
						<p>
				<strong>Nguồn tin:</strong>
				Quantrimang.com
			</p>
		</div>
	</div>
	<div id="footer" class="clearfix">
		<div id="url">
			<strong>URL của bản tin này: </strong><a href="https://www.nguoicodonvn2008.info/vi/news/savefile/nhac-tre/cach-cai-dat-va-chay-nginx-server-tren-windows-7291.html" title="Cách cài đặt và chạy Nginx Server trên Windows">https://www.nguoicodonvn2008.info/vi/news/savefile/nhac-tre/cach-cai-dat-va-chay-nginx-server-tren-windows-7291.html</a>

		</div>
		<div class="clear"></div>
		<div class="copyright">
			&copy; .&#x3A; Nguoicodonvn2008.info - Cõi lòng người cô đơn &#x3A;.
		</div>
		<div id="contact">
			<a href="mailto:admin@nguoicodonvn2008.info">admin@nguoicodonvn2008.info</a>
		</div>
	</div>
</div>
        <div id="timeoutsess" class="chromeframe">
            Bạn đã không sử dụng Site, <a onclick="timeoutsesscancel();" href="https://www.nguoicodonvn2008.info/#">Bấm vào đây để duy trì trạng thái đăng nhập</a>. Thời gian chờ: <span id="secField"> 60 </span> giây
        </div>
        <div id="openidResult" class="nv-alert" style="display:none"></div>
        <div id="openidBt" data-result="" data-redirect=""></div>
		</script>
		<div class="car-top">
  <span><img src="https://www.nguoicodonvn2008.info/themes/default/images/car.png" alt=""></span>
</div>
<div id="run_cronjobs" style="visibility:hidden;display:none;"><img alt="cron" src="/index.php?second=cronjobs&amp;p=p0qkIQZc" width="1" height="1" /></div>
<script src="https://www.nguoicodonvn2008.info/assets/js/jquery/jquery.min.js"></script>
<script>var nv_base_siteurl="/",nv_lang_data="vi",nv_lang_interface="vi",nv_name_variable="nv",nv_fc_variable="op",nv_lang_variable="language",nv_module_name="news",nv_func_name="savefile",nv_is_user=0, nv_my_ofs=-4,nv_my_abbr="EDT",nv_cookie_prefix="nv4c_e856T",nv_check_pass_mstime=1738000,nv_area_admin=0,nv_safemode=0,theme_responsive=0,nv_recaptcha_ver=2,nv_recaptcha_sitekey="",nv_recaptcha_type="image",XSSsanitize=1;</script>
<script src="https://www.nguoicodonvn2008.info/assets/js/language/vi.js"></script>
<script src="https://www.nguoicodonvn2008.info/assets/js/DOMPurify/purify3.js"></script>
<script src="https://www.nguoicodonvn2008.info/assets/js/global.js"></script>
<script src="https://www.nguoicodonvn2008.info/assets/js/site.js"></script>
<script src="https://www.nguoicodonvn2008.info/themes/default/js/news.js"></script>
<script src="https://www.nguoicodonvn2008.info/themes/default/js/main.js"></script>
<script src="https://www.nguoicodonvn2008.info/themes/default/js/custom.js"></script>
<script type="application/ld+json">
        {
            "@context": "https://schema.org",
            "@type": "Organization",
            "url": "https://www.nguoicodonvn2008.info",
            "logo": "https://www.nguoicodonvn2008.info/uploads/angel.gif"
        }
        </script>
<script src="https://www.nguoicodonvn2008.info/themes/default/js/bootstrap.min.js"></script>
<script type="text/javascript">
var $scrolltop = $('.car-top');
$scrolltop.on('click', function () {
    $('html,body').animate({
        scrollTop: 0
    }, 800);
    $(this).addClass("car-run");
    setTimeout(function(){ $scrolltop.removeClass('car-run');}, 1000);
    return false;
});
$(window).on('scroll', function ()
{ 
    if($(window).scrollTop() >= 200)
    {
        $scrolltop.addClass("show");
        $scrolltop.addClass("car-down");
    }
    else
    {
       $scrolltop.removeClass("show");
       setTimeout(function(){ $scrolltop.removeClass('car-down');}, 300);
    }
});
</script>
</body>
</html>