<!DOCTYPE html>
    <html lang="vi" xmlns="http://www.w3.org/1999/xhtml" prefix="og: http://ogp.me/ns#">
    <head>
<title>Windows 11 Media Creation Tool ngừng hoạt động trên Windows 10&#x3A; Làm sao để nâng cấp ngay bây giờ?</title>
<meta name="description" content="Windows 11 Media Creation Tool ngừng hoạt động trên Windows 10&#x3A; Làm sao để nâng cấp ngay bây giờ? - Savefile - Tin Tức -...">
<meta name="author" content=".: Nguoicodonvn2008.info - Cõi lòng người cô đơn :.">
<meta name="copyright" content=".: Nguoicodonvn2008.info - Cõi lòng người cô đơn :. [admin@nguoicodonvn2008.info]">
<meta name="robots" content="index, archive, follow, noodp">
<meta name="googlebot" content="index,archive,follow,noodp">
<meta name="msnbot" content="all,index,follow">
<meta name="generator" content="NukeViet v4.5">
<meta http-equiv="Content-Type" content="text/html; charset=utf-8">
<meta property="og:title" content="Windows 11 Media Creation Tool ngừng hoạt động trên Windows 10&#x3A; Làm sao để nâng cấp ngay bây giờ?">
<meta property="og:type" content="website">
<meta property="og:description" content="Savefile - Tin Tức -...">
<meta property="og:site_name" content=".&#x3A; Nguoicodonvn2008.info - Cõi lòng người cô đơn &#x3A;.">
<meta property="og:url" content="https://www.nguoicodonvn2008.info/vi/news/savefile/kien-thuc-may-tinh/windows-11-media-creation-tool-ngung-hoat-dong-tren-windows-10-lam-sao-de-nang-cap-ngay-bay-gio-11421.html">
<link rel="shortcut icon" href="https://www.nguoicodonvn2008.info/favicon.ico">
<link rel="canonical" href="https://www.nguoicodonvn2008.info/vi/news/savefile/kien-thuc-may-tinh/windows-11-media-creation-tool-ngung-hoat-dong-tren-windows-10-lam-sao-de-nang-cap-ngay-bay-gio-11421.html">
<link rel="alternate" href="https://www.nguoicodonvn2008.info/vi/news/rss/" title="Tin Tức" type="application/rss+xml">
<link rel="alternate" href="https://www.nguoicodonvn2008.info/vi/news/rss/karaoke-dual/" title="Tin Tức - Karaoke Dual" type="application/rss+xml">
<link rel="alternate" href="https://www.nguoicodonvn2008.info/vi/news/rss/nhac-tre/" title="Tin Tức - Nhạc trẻ" type="application/rss+xml">
<link rel="alternate" href="https://www.nguoicodonvn2008.info/vi/news/rss/tru-tinh/" title="Tin Tức - Trữ tình" type="application/rss+xml">
<link rel="alternate" href="https://www.nguoicodonvn2008.info/vi/news/rss/nuoc-ngoai/" title="Tin Tức - Nước ngoài" type="application/rss+xml">
<link rel="alternate" href="https://www.nguoicodonvn2008.info/vi/news/rss/remix/" title="Tin Tức - Remix" type="application/rss+xml">
<link rel="alternate" href="https://www.nguoicodonvn2008.info/vi/news/rss/tam-su-tinh-yeu/" title="Tin Tức - Tâm sự tình yêu" type="application/rss+xml">
<link rel="alternate" href="https://www.nguoicodonvn2008.info/vi/news/rss/tho-suu-tam/" title="Tin Tức - Thơ sưu tầm" type="application/rss+xml">
<link rel="alternate" href="https://www.nguoicodonvn2008.info/vi/news/rss/cuoc-song/" title="Tin Tức - Cuộc sống" type="application/rss+xml">
<link rel="alternate" href="https://www.nguoicodonvn2008.info/vi/news/rss/phan-mem/" title="Tin Tức - Phần mềm" type="application/rss+xml">
<link rel="alternate" href="https://www.nguoicodonvn2008.info/vi/news/rss/kien-thuc-may-tinh/" title="Tin Tức - Kiến thức máy tính" type="application/rss+xml">
<link rel="alternate" href="https://www.nguoicodonvn2008.info/vi/news/rss/hoc-tap/" title="Tin Tức - Học tập" type="application/rss+xml">
<link rel="alternate" href="https://www.nguoicodonvn2008.info/vi/news/rss/tai-lieu/" title="Tin Tức - Tài liệu" type="application/rss+xml">
<link rel="alternate" href="https://www.nguoicodonvn2008.info/vi/news/rss/de-thi/" title="Tin Tức - Đề thi" type="application/rss+xml">
<link rel="preload" as="style" href="https://www.nguoicodonvn2008.info/assets/css/font-awesome.min.css" type="text/css">
<link rel="preload" as="style" href="https://www.nguoicodonvn2008.info/themes/default/css/bootstrap.non-responsive.css" type="text/css">
<link rel="preload" as="style" href="https://www.nguoicodonvn2008.info/themes/default/css/style.css" type="text/css">
<link rel="preload" as="style" href="https://www.nguoicodonvn2008.info/themes/default/css/style.non-responsive.css" type="text/css">
<link rel="preload" as="style" href="https://www.nguoicodonvn2008.info/themes/default/css/news.css" type="text/css">
<link rel="preload" as="style" href="https://www.nguoicodonvn2008.info/themes/default/css/custom.css" type="text/css">
<link rel="preload" as="script" href="https://www.nguoicodonvn2008.info/assets/js/jquery/jquery.min.js" type="text/javascript">
<link rel="preload" as="script" href="https://www.nguoicodonvn2008.info/assets/js/language/vi.js" type="text/javascript">
<link rel="preload" as="script" href="https://www.nguoicodonvn2008.info/assets/js/DOMPurify/purify3.js" type="text/javascript">
<link rel="preload" as="script" href="https://www.nguoicodonvn2008.info/assets/js/global.js" type="text/javascript">
<link rel="preload" as="script" href="https://www.nguoicodonvn2008.info/assets/js/site.js" type="text/javascript">
<link rel="preload" as="script" href="https://www.nguoicodonvn2008.info/themes/default/js/news.js" type="text/javascript">
<link rel="preload" as="script" href="https://www.nguoicodonvn2008.info/themes/default/js/main.js" type="text/javascript">
<link rel="preload" as="script" href="https://www.nguoicodonvn2008.info/themes/default/js/custom.js" type="text/javascript">
<link rel="preload" as="script" href="https://www.nguoicodonvn2008.info/themes/default/js/bootstrap.min.js" type="text/javascript">
<link rel="stylesheet" href="https://www.nguoicodonvn2008.info/assets/css/font-awesome.min.css">
<link rel="stylesheet" href="https://www.nguoicodonvn2008.info/themes/default/css/bootstrap.non-responsive.css">
<link rel="stylesheet" href="https://www.nguoicodonvn2008.info/themes/default/css/style.css">
<link rel="stylesheet" href="https://www.nguoicodonvn2008.info/themes/default/css/style.non-responsive.css">
<link rel="StyleSheet" href="https://www.nguoicodonvn2008.info/themes/default/css/news.css">
<link rel="stylesheet" href="https://www.nguoicodonvn2008.info/themes/default/css/custom.css">
<style type="text/css">
	body{background: #fff;}
</style>
    </head>
    <body>
<div id="print">
	<div id="hd_print">
		<h2 class="pull-left">.&#x3A; Nguoicodonvn2008.info - Cõi lòng người cô đơn &#x3A;.</h2>
		<p class="pull-right"><a title=".&#x3A; Nguoicodonvn2008.info - Cõi lòng người cô đơn &#x3A;." href="https://www.nguoicodonvn2008.info/">https://www.nguoicodonvn2008.info</a></p>
	</div>
	<div class="clear"></div>
	<hr />
	<div id="content">
		<h1>Windows 11 Media Creation Tool ngừng hoạt động trên Windows 10&#x3A; Làm sao để nâng cấp ngay bây giờ?</h1>
		<ul class="list-inline">
			<li>Thứ tư - 22/10/2025 01:58</li>
			<li class="hidden-print txtrequired"><em class="fa fa-print">&nbsp;</em><a title="In ra" href="javascript:;" onclick="window.print()">In ra</a></li>
			<li class="hidden-print txtrequired"><em class="fa fa-power-off">&nbsp;</em><a title="Đóng cửa sổ này" href="javascript:;" onclick="window.close()">Đóng cửa sổ này</a></li>
		</ul>
		<div class="clear"></div>
		<div id="hometext">
		</div>
				<div class="imghome">
			<img alt="Windows 11 Media Creation Tool ngừng hoạt động trên Windows 10&#x3A; Làm sao để nâng cấp ngay bây giờ?" src="https://st.quantrimang.com/photos/image/2025/10/21/media-creation-tool-ngung-hoat-dong-5.jpg" width="460" class="img-thumbnail" />
		</div>
		<div class="clear"></div>
		<div id="bodytext" class="clearfix">
			<p style="text-align: justify;">Windows 11 Media Creation Tool đã ngừng hoạt động trên các thiết bị Windows 10 22H2. Nếu bạn thử khởi chạy công cụ, nó sẽ tự động đóng lại sau khi hiển thị logo Windows mà không gặp bất kỳ lỗi nào. Microsoft đã xác nhận sự cố và sẽ khắc phục trong bản cập nhật MCT mới. Cho đến lúc đó, bạn có thể sử dụng các phương pháp sau để nâng cấp lên Windows 11.</p>

<div style="text-align: justify;"><br />
<br />
Advertisement</div>

<h2 style="text-align: justify;">Nâng cấp tại chỗ bằng ISO Windows 11</h2>

<p style="text-align: justify;">Mặc dù tạo USB cài đặt Windows 11 là một cách phổ biến để nâng cấp hoặc cài đặt sạch Windows, nhưng điều này không bắt buộc. ISO Windows 11 là đủ để thực hiện nâng cấp tại chỗ. Mặc dù ISO chỉ có thể nâng cấp môi trường Windows hiện có, nhưng điều này sẽ không thành vấn đề vì bạn đã sử dụng&nbsp;<a data-type="internal" href="https://quantrimang.com/cong-nghe/windows-10-os" title="Windows 10">Windows 10</a>.</p>

<p style="text-align: justify;">ISO cũng có thể được di chuyển sang các PC Windows khác để nâng cấp (như trên USB) nếu bạn có nhiều hơn một thiết bị cần nâng cấp. Nhược điểm chính là bạn không thể tùy chỉnh trình cài đặt một cách dễ dàng và nó sẽ không thực hiện cài đặt sạch thực sự, vì nó lưu trữ các file hệ điều hành cũ để khôi phục. Sau đây là những gì bạn cần làm:
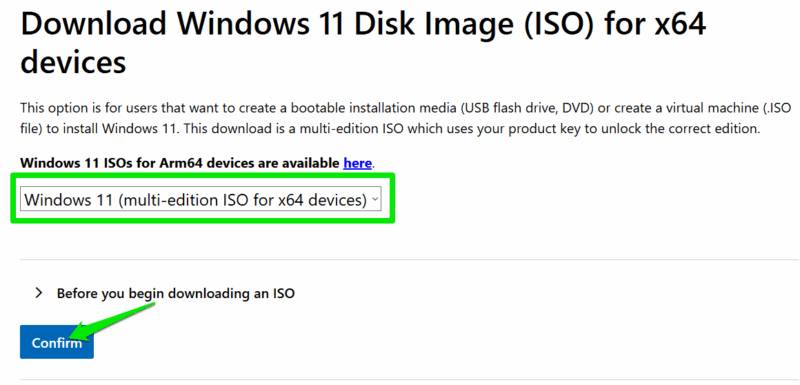
</p>

<p style="text-align: justify;">Truy cập trang tải xuống Windows 11&nbsp;trên trang web của Microsoft, chọn Windows 11 trong phần&nbsp;<strong>Download Windows 11 Disk Image (ISO) for x64 devices</strong>&nbsp;và nhấp vào&nbsp;<strong>Confirm</strong>. Sau đó, chọn ngôn ngữ hệ điều hành để tạo liên kết giới hạn thời gian tải xuống ISO.<br />
<span style="color:rgb(231, 76, 60);"><strong>https://www.microsoft.com/en-us/software-download/windows11</strong></span></p>

<figure>
<div style="text-align: justify;"><img alt="Tải xuống Windows 11 ISO từ trang web của Microsoft" data-adbro-processed="true" data-i="0" data-src="https://st.quantrimang.com/photos/image/2025/10/21/media-creation-tool-ngung-hoat-dong-1.jpg" data-was-processed="true" height="385" src="https://st.quantrimang.com/photos/image/2025/10/21/media-creation-tool-ngung-hoat-dong-1.jpg" width="800" /></div>

<figcaption>
<div style="text-align: justify;">Tải xuống Windows 11 ISO từ trang web của Microsoft</div>
</figcaption>
</figure>

<p style="text-align: justify;">Sau khi tải xuống, nhấp chuột phải vào file&nbsp;<strong>Windows 11 ISO</strong>&nbsp;và chọn&nbsp;<strong>Mount</strong>.</p>

<figure>
<div style="text-align: justify;"><img alt="Mount ISO của Windows 11" data-i="1" data-src="https://st.quantrimang.com/photos/image/2025/10/21/media-creation-tool-ngung-hoat-dong-2.jpg" data-was-processed="true" height="350" src="https://st.quantrimang.com/photos/image/2025/10/21/media-creation-tool-ngung-hoat-dong-2.jpg" width="775" /></div>

<figcaption>
<div style="text-align: justify;">Mount ISO của Windows 11</div>
</figcaption>
</figure>

<p style="text-align: justify;">
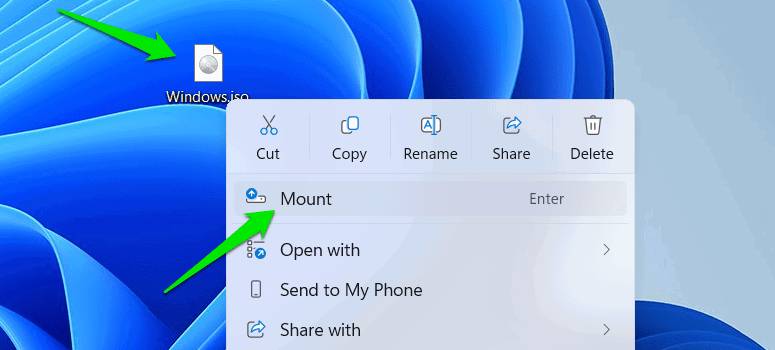
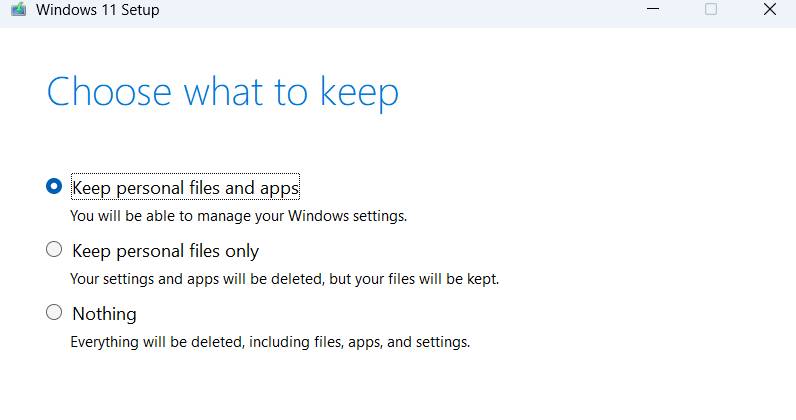
Thao tác này sẽ mount file thành ổ và bạn có thể xem nội dung. Bây giờ, hãy mở file&nbsp;<strong>setup.exe</strong>&nbsp;và trình hướng dẫn cài đặt sẽ bắt đầu. Để nâng cấp, hãy chọn tùy chọn&nbsp;<strong>Keep personal files and apps</strong>, và để khởi động lại, hãy chọn&nbsp;<strong>Nothing</strong>. Windows sẽ khởi động lại và quá trình cài đặt Windows 11 sẽ bắt đầu.</p>

<figure>
<div style="text-align: justify;"><img alt="Chọn Keep personal files and apps" data-i="2" data-src="https://st.quantrimang.com/photos/image/2025/10/21/media-creation-tool-ngung-hoat-dong-3.jpg" data-was-processed="true" height="420" src="https://st.quantrimang.com/photos/image/2025/10/21/media-creation-tool-ngung-hoat-dong-3.jpg" width="796" /></div>

<figcaption>
<div style="text-align: justify;">Chọn Keep personal files and apps</div>
</figcaption>
</figure>

<h2 style="text-align: justify;">Tạo USB cài đặt Windows 11 bằng Rufus</h2>

<p style="text-align: justify;">
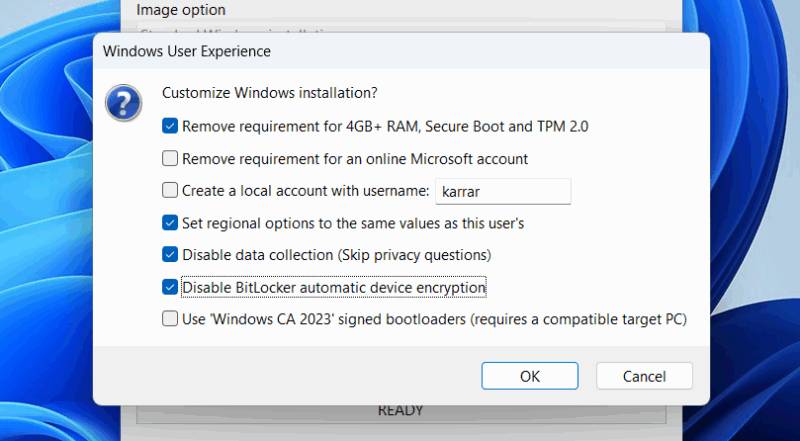
Nếu bạn phải tạo USB cài đặt Windows 11, thì Media Creation Tool không phải là công cụ duy nhất cho mục đích này.&nbsp;Rufus&nbsp;là một công cụ phổ biến có thể tạo USB cài đặt Windows 11 từ file ISO Windows. Không giống như MCT, Rufus cung cấp cho bạn nhiều tùy chọn tùy chỉnh hơn, bao gồm khả năng bỏ qua yêu cầu tạo tài khoản Microsoft và cài đặt Windows 11.</p>

<p style="text-align: justify;">Bạn sẽ cần file ISO Windows 11, vì vậy hãy đảm bảo tải xuống trước. Sau đó, kết nối USB (tối thiểu 8GB) và khởi chạy Rufus. Tại đây, nhấp vào&nbsp;<strong>Select</strong>&nbsp;và chọn file ISO Windows 11 để tải.</p>

<figure>
<div style="text-align: justify;"><img alt="Giao diện Rufus với file ISO Windows 11 đã tải" data-i="3" data-src="https://st.quantrimang.com/photos/image/2025/10/21/media-creation-tool-ngung-hoat-dong-4.jpg" data-was-processed="true" height="592" src="https://st.quantrimang.com/photos/image/2025/10/21/media-creation-tool-ngung-hoat-dong-4.jpg" width="800" /></div>

<figcaption>
<div style="text-align: justify;">Giao diện Rufus với file ISO Windows 11 đã tải</div>
</figcaption>
</figure>

<p style="text-align: justify;">
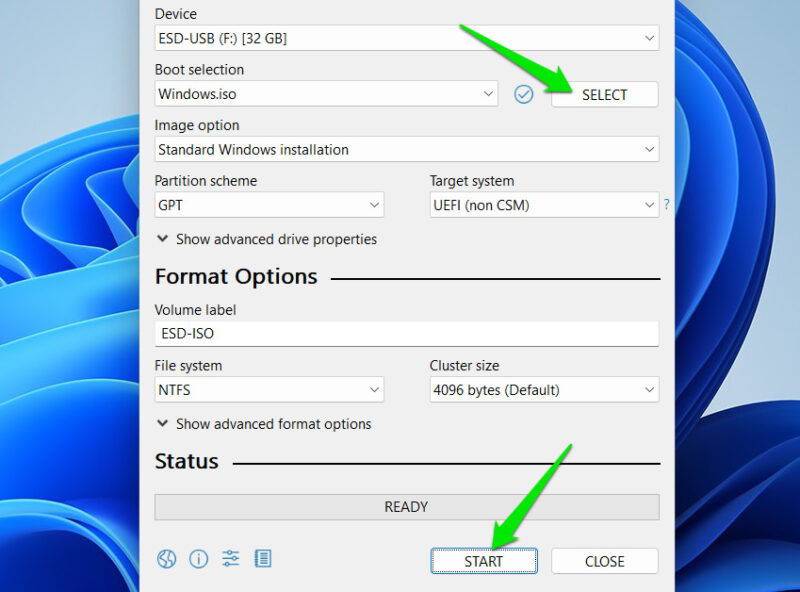
Nó sẽ tự động điền vào tất cả các trường, chọn các thiết lập phù hợp nhất với Windows 11. Đối với hầu hết người dùng, các thiết lập mặc định sẽ ổn; bạn chỉ cần nhấp vào nút&nbsp;<strong>Start</strong>. Nó sẽ cung cấp một loạt các tùy chọn tùy chỉnh đặc biệt, bạn có thể cấu hình chúng theo ý muốn và nhấp vào&nbsp;<strong>OK</strong>&nbsp;để bắt đầu quá trình.</p>

<figure>
<div style="text-align: justify;"><img alt="Các tùy chọn tùy chỉnh Rufus được chọn" data-i="4" data-src="https://st.quantrimang.com/photos/image/2025/10/21/media-creation-tool-ngung-hoat-dong-5.jpg" data-was-processed="true" height="441" src="https://st.quantrimang.com/photos/image/2025/10/21/media-creation-tool-ngung-hoat-dong-5.jpg" width="800" /></div>

<figcaption>
<div style="text-align: justify;">Các tùy chọn tùy chỉnh Rufus được chọn</div>
</figcaption>
</figure>

<h2 style="text-align: justify;">Sử dụng Windows 11 Installation Assistant</h2>

<p style="text-align: justify;">Nếu máy tính Windows 10 của bạn đáp ứng các yêu cầu của Windows 11 và bạn chỉ muốn&nbsp;nâng cấp lên Windows 11, thì sử dụng Windows 11 Installation Assistant là cách dễ nhất. Nó sẽ làm tất cả mọi việc cho bạn; bạn chỉ cần chấp nhận các lời nhắc là được.</p>

<p style="text-align: justify;">Tải xuống Windows 11 Installation Assistant từ trang web của Microsoft. Sau đó, khởi chạy chương trình và nó sẽ thực hiện phần còn lại. Đầu tiên, nó sẽ kiểm tra xem máy tính của bạn có tương thích với cài đặt Windows 11 hay không, sau đó yêu cầu các quyền cần thiết để tải xuống những file cần thiết và nâng cấp máy tính của bạn lên Windows 11.</p>

<h2 style="text-align: justify;">Sử dụng Command Prompt để tạo USB cài đặt Windows 11</h2>

<p style="text-align: justify;">Đối với những người muốn tạo USB cài đặt Windows 11 nhưng không muốn sử dụng bất kỳ công cụ của bên thứ ba nào, thì có thể thực hiện bằng&nbsp;các lệnh Command Prompt. Việc này sẽ hơi phức tạp một chút vì bạn cần phải flash USB và sau đó sao chép các file từ ISO Windows vào đó. Dưới đây là hướng dẫn từng bước để&nbsp;tạo công cụ USB cài đặt Windows 11 bằng Command Prompt.</p>

<p style="text-align: justify;">Công cụ Windows Media Creation Tool không được cập nhật thường xuyên, vì vậy có thể sẽ mất một thời gian để bản sửa lỗi được phát hành. Đừng chần chừ, hãy sử dụng các phương pháp này để nâng cấp lên Windows 11 trực tiếp hoặc qua USB. Nếu máy tính không đáp ứng các yêu cầu của Windows 11, hãy&nbsp;sử dụng Flyby11 để dễ dàng nâng cấp máy tính không được hỗ trợ.</p>

<div style="text-align: justify;">&nbsp;</div>
		</div>
				<div id="author">
						<p>
				<strong>Nguồn tin:</strong>
				Quantrimang.com:
			</p>
		</div>
	</div>
	<div id="footer" class="clearfix">
		<div id="url">
			<strong>URL của bản tin này: </strong><a href="https://www.nguoicodonvn2008.info/vi/news/savefile/kien-thuc-may-tinh/windows-11-media-creation-tool-ngung-hoat-dong-tren-windows-10-lam-sao-de-nang-cap-ngay-bay-gio-11421.html" title="Windows 11 Media Creation Tool ngừng hoạt động trên Windows 10&#x3A; Làm sao để nâng cấp ngay bây giờ?">https://www.nguoicodonvn2008.info/vi/news/savefile/kien-thuc-may-tinh/windows-11-media-creation-tool-ngung-hoat-dong-tren-windows-10-lam-sao-de-nang-cap-ngay-bay-gio-11421.html</a>

		</div>
		<div class="clear"></div>
		<div class="copyright">
			&copy; .&#x3A; Nguoicodonvn2008.info - Cõi lòng người cô đơn &#x3A;.
		</div>
		<div id="contact">
			<a href="mailto:admin@nguoicodonvn2008.info">admin@nguoicodonvn2008.info</a>
		</div>
	</div>
</div>
        <div id="timeoutsess" class="chromeframe">
            Bạn đã không sử dụng Site, <a onclick="timeoutsesscancel();" href="https://www.nguoicodonvn2008.info/#">Bấm vào đây để duy trì trạng thái đăng nhập</a>. Thời gian chờ: <span id="secField"> 60 </span> giây
        </div>
        <div id="openidResult" class="nv-alert" style="display:none"></div>
        <div id="openidBt" data-result="" data-redirect=""></div>
		</script>
		<div class="car-top">
  <span><img src="https://www.nguoicodonvn2008.info/themes/default/images/car.png" alt=""></span>
</div>
<div id="run_cronjobs" style="visibility:hidden;display:none;"><img alt="cron" src="/index.php?second=cronjobs&amp;p=r33BpZn6" width="1" height="1" /></div>
<script src="https://www.nguoicodonvn2008.info/assets/js/jquery/jquery.min.js"></script>
<script>var nv_base_siteurl="/",nv_lang_data="vi",nv_lang_interface="vi",nv_name_variable="nv",nv_fc_variable="op",nv_lang_variable="language",nv_module_name="news",nv_func_name="savefile",nv_is_user=0, nv_my_ofs=-4,nv_my_abbr="EDT",nv_cookie_prefix="nv4c_e856T",nv_check_pass_mstime=1738000,nv_area_admin=0,nv_safemode=0,theme_responsive=0,nv_recaptcha_ver=2,nv_recaptcha_sitekey="",nv_recaptcha_type="image",XSSsanitize=1;</script>
<script src="https://www.nguoicodonvn2008.info/assets/js/language/vi.js"></script>
<script src="https://www.nguoicodonvn2008.info/assets/js/DOMPurify/purify3.js"></script>
<script src="https://www.nguoicodonvn2008.info/assets/js/global.js"></script>
<script src="https://www.nguoicodonvn2008.info/assets/js/site.js"></script>
<script src="https://www.nguoicodonvn2008.info/themes/default/js/news.js"></script>
<script src="https://www.nguoicodonvn2008.info/themes/default/js/main.js"></script>
<script src="https://www.nguoicodonvn2008.info/themes/default/js/custom.js"></script>
<script type="application/ld+json">
        {
            "@context": "https://schema.org",
            "@type": "Organization",
            "url": "https://www.nguoicodonvn2008.info",
            "logo": "https://www.nguoicodonvn2008.info/uploads/angel.gif"
        }
        </script>
<script src="https://www.nguoicodonvn2008.info/themes/default/js/bootstrap.min.js"></script>
<script type="text/javascript">
var $scrolltop = $('.car-top');
$scrolltop.on('click', function () {
    $('html,body').animate({
        scrollTop: 0
    }, 800);
    $(this).addClass("car-run");
    setTimeout(function(){ $scrolltop.removeClass('car-run');}, 1000);
    return false;
});
$(window).on('scroll', function ()
{ 
    if($(window).scrollTop() >= 200)
    {
        $scrolltop.addClass("show");
        $scrolltop.addClass("car-down");
    }
    else
    {
       $scrolltop.removeClass("show");
       setTimeout(function(){ $scrolltop.removeClass('car-down');}, 300);
    }
});
</script>
</body>
</html>