Thủ thuật tạo shortcut chạy ứng dụng dưới quyền Admin
- Thứ bảy - 03/10/2020 00:58
- In ra
- Đóng cửa sổ này
Khi cần, bạn có thể tạo một shortcut với quyền admin để cho phép người dùng tiêu chuẩn chạy các chương trình yêu cầu quyền admin.
Trong Windows, bạn có thể tạo các shortcut tùy chỉnh cho hầu hết mọi file, thư mục hoặc chương trình. Nói chung, các shortcut không cung cấp cho bạn bất kỳ quyền admin nào. Nhưng có những tình huống bạn cần cho phép những người dùng khác trên hệ thống chạy các chương trình yêu cầu quyền admin. Trong những trường hợp này, bạn không cần phải cung cấp mật khẩu admin. Thay vào đó, bạn có thể tạo một shortcut tùy chỉnh với quyền admin để cho phép người dùng tiêu chuẩn chạy chương trình với tư cách admin.
Ngoài ra, nếu không muốn thấy lời nhắc UAC, bạn hoàn toàn có thể tránh chúng bằng cách tạo shortcut với chế độ admin. Sau đây là các bước đơn giản để tạo shortcut với quyền admin và để người dùng tiêu chuẩn chạy chương trình với tư cách quản trị viên.
Lưu ý: Trước khi chuyển sang phần tiếp theo, hãy tìm tên máy tính, tên người dùng và mật khẩu của tài khoản admin. Bạn sẽ cần những thông tin này trong các bước tới.
1. Kích hoạt tài khoản Admin
Theo mặc định tài khoản Admin bị vô hiệu hóa, do đó bạn phải kích hoạt tài khoản Admin.
Để kích hoạt tài khoản Admin, bạn thực hiện theo các bước dưới đây:
Trên khung Search Start Menu bạn gõ từ khóa Command Prompt, sau đó kích chuột phải vào shortcut Command Prompt rồi chọn Run as administrator.

Nhập câu lệnh dưới đây vào cửa sổ Command Prompt để kích hoạt tài khoản Admin:
net user administrator /active:yes

Tài khoản Admin đã được kích hoạt, tuy nhiên tài khoản không có mật khẩu bảo vệ.
Để thiết lập mật khẩu tài khoản Admin, bạn mở Control Panel sau đó chọn Accounts and Family Safety => User Accounts.
Trên cửa sổ User Account click chọn Manage another account.

Chọn Administrator account, chọn tiếp Create a password rồi tiến hành tạo mật khẩu cho tài khoản Admin.

2. Các bước để tạo shortcut với quyền admin
Tạo shortcut với quyền admin cho chương trình cho phép người dùng tiêu chuẩn chạy nó với tư cách admin dễ dàng hơn bạn nghĩ. Điều tuyệt vời nhất đối với phương pháp dưới đây là bạn không phải đưa ra mật khẩu admin và quyền admin chỉ giới hạn trong chương trình. Chỉ cần làm theo các bước như sau.
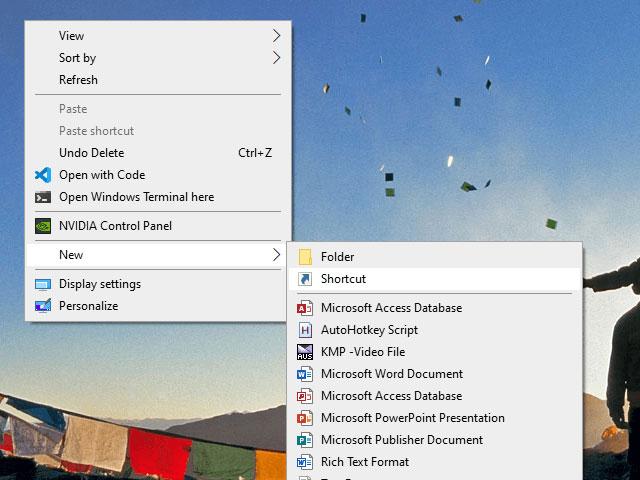
1. Giống như với bất kỳ shortcut tùy chỉnh nào, bạn có thể tạo nó trực tiếp trên desktop. Chỉ cần nhấp chuột phải vào màn hình nền và chọn New > Shortcut.
2. Trong trường trống, sao chép và dán code dưới đây. Thay thế ComputerName bằng tên máy tính thực tế, Username bằng tên người dùng thực tế và đường dẫn file minh họa bằng đường dẫn thực tế của file exe cho chương trình đích.
runas /user:ComputerName\Username /savecred "C:\dummy\path\to\file.exe"
3. Nhấp vào nút Next.
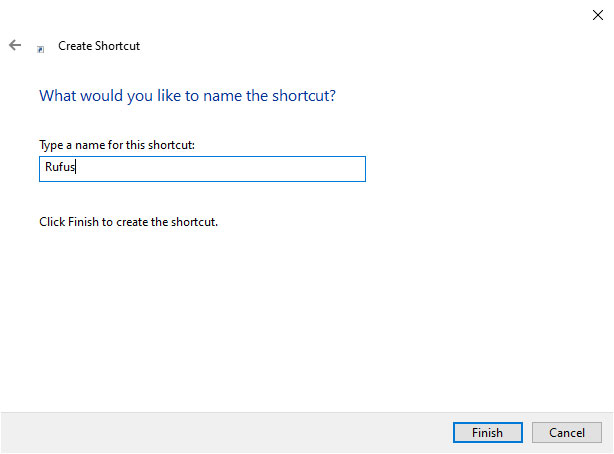
4. Trong cửa sổ này, hãy đặt tên cho shortcut. Bạn có thể đặt tên cho shortcut với bất cứ điều gì bạn muốn. Sau đó, nhấp vào nút Finish.
5. Sau khi tạo shortcut, nhấp đúp vào nó. Trong lần đầu tiên, bạn sẽ được nhắc nhập mật khẩu admin. Nhập mật khẩu và nhấn Enter.


6. Nếu tên người dùng và mật khẩu là chính xác, shortcut sẽ được thực thi và chương trình sẽ được khởi chạy với quyền admin.
Tên người dùng và mật khẩu được lưu tự động trong Windows Credential Manager. Vì vậy, những người dùng khác không phải nhập mật khẩu. Thay vào đó, Windows sẽ tự động trích xuất mật khẩu từ Credential Manager và khởi chạy ứng dụng.
Nếu bạn không còn cần người dùng khởi chạy ứng dụng với tư cách admin nữa, hãy xóa shortcut.
3. Tạo shortcut mở ứng dụng với quyền admin theo cách thủ công trong Task Scheduler
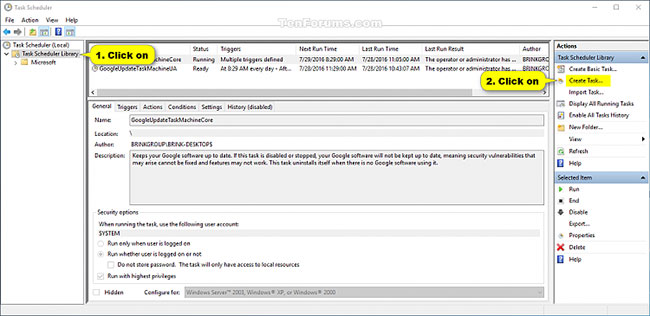
1. Nhấn các phím Win + R để mở hộp thoại Run, nhập taskchd.msc vào Run và nhấn OK để mở Task Scheduler.
2. Nhấp vào Task Scheduler Library ở bên trái của Task Scheduler và nhấn vào Create Task trong phần Actions bên phải.
3. Trong tab General, nhập tên (ví dụ: "Elevated command prompt") bạn muốn cho tác vụ này và nhập mô tả tùy chọn của tác vụ.
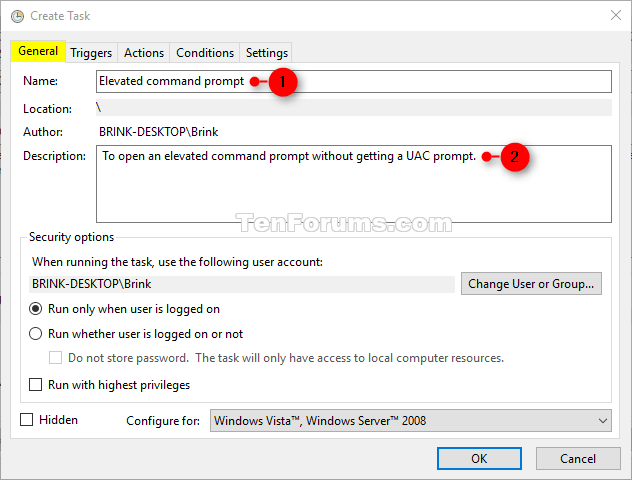
Ghi lại tên tác vụ này. Bạn sẽ cần điều đó ở bước 8 và khi bạn tạo shortcut của tác vụ này ở bước 13 bên dưới.
4. Trong tab General, chọn hộp Run with highest privileges.
5. Trong tab General, chọn Windows 10 trong menu drop-down Configure for.
6. Nhấp vào tab Actions và chọn New.
7. Nhập cmd.exe vào trường Program/script.
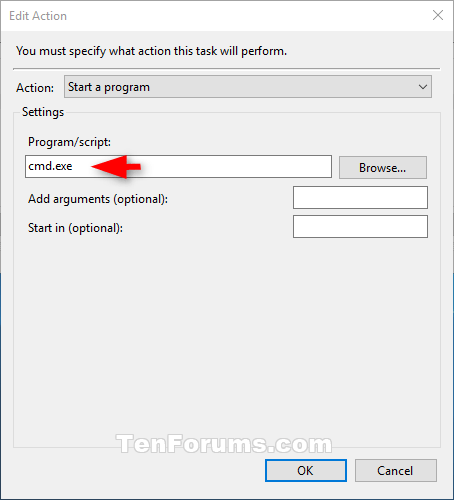
Đây là những gì đang được sử dụng để mở shortcut với quyền admin, vì vậy nó không thể được thay đổi thành bất kỳ thứ gì khác.
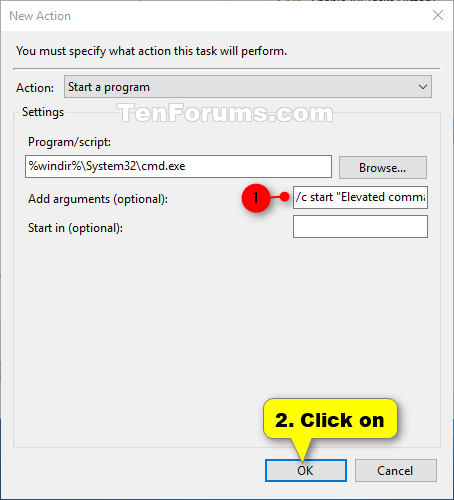
8. Nhập lệnh bên dưới vào trường Add arguments và nhấn OK.
/c start "Task Name" "Full path of application file"
Thay thế Task Name trong lệnh trên bằng tên tác vụ (ví dụ: "Elevated command prompt") bạn đã sử dụng trong bước 3 ở trên.
Thay thế Full path of application file trong lệnh trên bằng đường dẫn đầy đủ thực tế của file ứng dụng bạn muốn chạy với quyền admin.
Ví dụ:
/c start "Elevated command prompt" "%windir%\System32\cmd.exe"
9. Bây giờ, bạn sẽ thấy hành động mới này được liệt kê.
10. Nhấp vào tab Conditions, bỏ chọn hộp Start the task only if the computer is on AC power và nhấn OK.
11. Bây giờ, bạn sẽ thấy tác vụ mới này được liệt kê trong Task Scheduler Library. Bây giờ, bạn có thể đóng Task Scheduler nếu muốn.
12. Nhấp chuột phải hoặc nhấn và giữ trên desktop, chọn New và nhấp vào Shortcut.
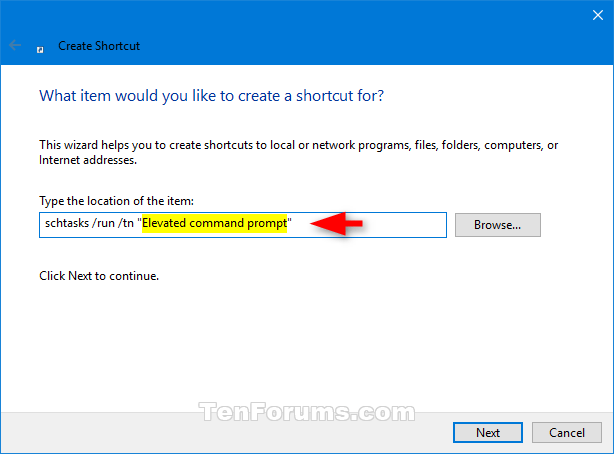
13. Nhập lệnh bên dưới vào trường vị trí và chọn Next.
schtasks /run /tn "Task Name"
Thay thế Task Name trong lệnh trên bằng tên tác vụ bạn đã sử dụng trong bước 3 ở trên.
Ví dụ:
schtasks /run /tn "Elevated command prompt"
14. Nhập tên bạn muốn cho shortcut này của tác vụ và nhấp vào Finish.
15. Nhấp chuột phải hoặc nhấn và giữ vào shortcut mới trên màn hình và chọn Properties.
16. Nhấp vào nút Change Icon trong tab Shortcut.
17. Nhấn OK.
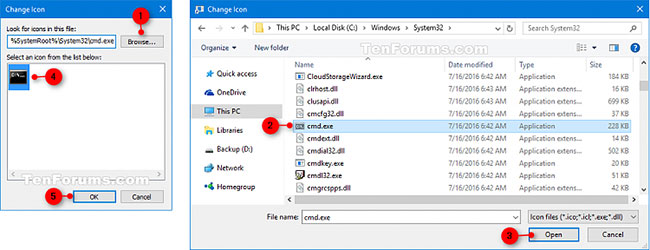
18. Nhấp vào Browse, điều hướng đến và chọn file ứng dụng (ví dụ: "%windir%\System32\cmd.exe") bạn muốn chạy với quyền admin, nhấp vào Open, chọn biểu tượng bạn muốn cho shortcut và nhấn OK.
Bạn có thể sử dụng bất kỳ biểu tượng nào bạn muốn cho shortcut này.
19. Nhấn OK.
20. Bạn có thể chạy khi khởi động, ghim vào thanh tác vụ, menu Start, thêm vào All apps, Quick Launch, gán phím tắt hoặc di chuyển shortcut này đến nơi bạn thích để dễ sử dụng.
