Thủ thuật ngăn Windows tự động update các driver cụ thể
- Thứ hai - 24/08/2020 00:59
- In ra
- Đóng cửa sổ này
Trên hệ điều hành Windows, đặc biệt là Windows 10 thường tự động cài đặt update driver (cập nhật driver) cho các phần cứng ngay cả khi được yêu cầu hay không yêu cầu. Nếu không muốn tự động cập nhật driver, bạn có thể tiến hành chặn ngăn Windows tự động update driver. Nếu đang sử dụng Windows phiên bản Pro hoặc Enterprise, bạn có thể sử dụng Group Policy Editor để ngăn Windows tự động update driver.

Tìm IDs phần cứng của thiết bị trên Device Manager
Bước đầu tiên mà bạn cần làm là tiến hành tìm IDs phần cứng (Hardware IDs) của thiết bị mà bạn muốn chặn cập nhật (updates) trên Device Manager.
Để làm được điều này, bạn click chọn Start, sau đó nhập device manager vào khung Search trên Start Menu rồi nhấn Enter hoặc click chọn Device Manager.

Trên cửa sổ Device Manager, tìm thiết bị mà bạn muốn chặn cập nhật (updates). Kích chuột phải vào thiết bị rồi chọn Properties.

Tiếp theo trên cửa sổ Properties, bạn click chọn thẻ Details.

Từ Menu Property, bạn chọn Hardware IDs để hiển thị IDs liên quan đến thiết bị.

Cuối cùng tiến hành Note lại các IDs này bằng cách sao chép và dán vào Notepad, sau đó lưu file Notepad để sử dụng sau.
Ngăn cài đặt và update thiết bị trên Group Policy Editor
Bây giờ bạn đã có trong tay IDs phần cứng, bước tiếp theo bạn cần làm là sử dụng Group Policy Editor để thực hiện thay đổi.
Lưu ý rằng Group Policy Editor chỉ sử dụng được trên phiên bản Windows Pro hoặc Enterprise. Phiên bản Windows Home không có Group Policy Editor.
Đầu tiên đăng nhập tài khoản Admin của bạn và mở Group Policy Editor bằng cách click chọn Start, sau đó nhập gpedit.msc vào khung Search rồi nhấn Enter.

Trên cửa sổ Group Policy, ở khung bên trái, mở rộng:
Computer Configuration > Administrative Templates > System > Device Installation > Device Installation Restrictions
Ở khung bên phải, bạn tìm mục Prevent installation of devices that match any of these devices IDs và kích đúp chuột vào đó.

Trên cửa sổ Prevent installation of devices that match any of these devices IDs, bạn chọn tùy chọn Enabled rồi click chọn nút Show.

Tiếp theo trên cửa sổ Show Contents bạn tiến hành thêm IDs phần cứng của thiết bị. Bạn chỉ có thể thêm từng ID một, do đó bạn có thể sao chép từng ID một và dán vào các dòng có sẵn tại khung Value. Sau khi đã thêm tất cả ID phần cứng, bạn click chọn OK.

Lưu ý rằng bạn đang chặn cập nhật (updates) cho nhiều hơn một thiết bị, do đó bạn có thể thêm các ID phần cứng trên cửa sổ Show Content cho đến khi hoàn tất.
Trở lại trang Policy, bạn đánh tích chọn Also apply to matching devices that are already installed rồi click chọn OK.

Bước tiếp theo là thoát khỏi Group Policy Editor.
Bạn có thể kiểm tra các thiết lập mới bằng cách thử cài đặt update một driver. Hoặc cách đơn giản hơn là truy cập lại Device Manager để xem các thay đổi. Trên cửa sổ chính Device Manager, bạn sẽ nhìn thấy thiết bị mà bạn đã chặn được liệt kê trong phần Other devices với một biểu tượng cảnh báo.
Nếu bạn mở trang thuộc tính của thiết bị, bạn có thể nhìn thấy cài đặt đã bị cấm bởi chính sách hệ thống.

Ngoài ra, Windows Update vẫn có thể tải về bản cập nhật driver mới cho thiết bị. Tuy nhiên nó sẽ không thể cài đặt cập nhật driver này, thay vào đó nó sẽ hiển thị thông báo lỗi cài đặt trên cửa sổ Windows Updates.
Giả sử trong trường hợp nếu muốn cho phép update (cập nhật) thiết bị một lần nữa, bạn có thể mở Group Policy Editor và tiến hành vô hiệu hóa Policy. Bạn sẽ phải làm điều này ngay cả khi bạn chỉ muốn cho phép cập nhật một driver.
Cảnh báo, nếu bạn vô hiệu hóa policy (hoặc thiết lập là "Not Configured"), tất cả các ID phần cứng mà bạn đã thêm vào policy sẽ bị xóa sạch. Nếu bạn muốn kích hoạt lại policy một lần nữa, bạn sẽ phải nhập lại tất cả các ID phần cứng.
Điều này đặc biệt quan trọng cần lưu ý nếu bạn nhập ID phần cứng cho nhiều thiết bị. Nếu bạn muốn kích hoạt lại bản cập nhật cho chỉ một thiết bị, tốt nhất là xóa policy và xóa bỏ ID phần cứng cụ thể của driver này.
Chặn cập nhật driver cho thiết bị cụ thể bằng Registry Editor
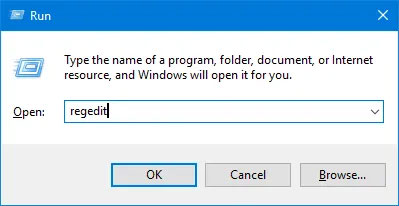
Nếu đang sử dụng phiên bản Windows 10 Home, thì bạn cần chỉnh sửa Registry. Để làm điều đó, hãy nhấn Win + R, nhập regedit và nhấn nút Enter để mở Registry Editor.
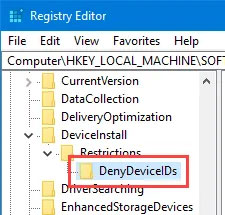
Tại đây, điều hướng đến vị trí sau.
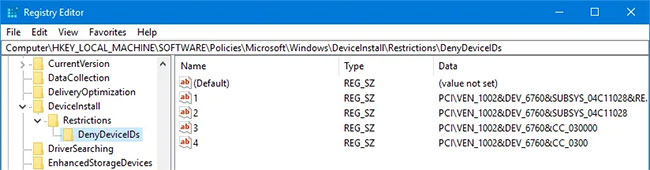
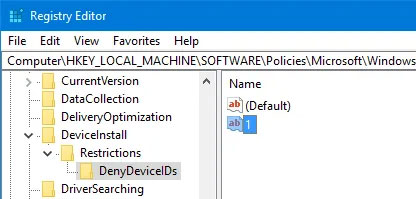
HKEY_LOCAL_MACHINE\SOFTWARE\Policies\Microsoft\Windows\DeviceInstall\Restrictions\DenyDeviceIDs
Trên bảng điều khiển bên trái, nhấp chuột phải vào key Restriction và chọn tùy chọn New > Key. Sau đó đặt tên cho key mới là DenyDeviceIDs.
Trên bảng điều khiển bên phải, nhấp chuột phải và chọn tùy chọn New > String Value.
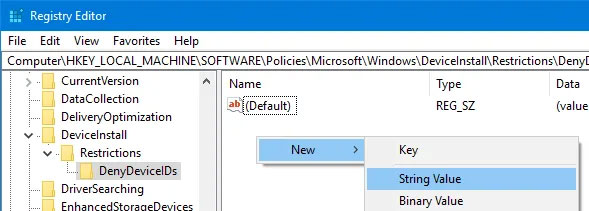
Đổi tên String Value thành 1.
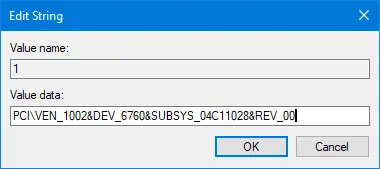
Nhấp đúp vào giá trị mới tạo, nhập một trong các ID phần cứng đã sao chép trước đó và nhấp vào nút OK.
Vì có nhiều ID phần cứng cho một thiết bị, bạn cần tạo thêm 3 String Value và đặt tên chúng theo thứ tự tăng dần, ví dụ: 1, 2, 3, 4, v.v... Đối với mỗi giá trị, hãy nhập ID phần cứng bổ sung và lưu nó. Khi bạn hoàn thành mọi thứ, đây là giao diện của nó. Như bạn có thể thấy, ví dụ đã tạo nhiều giá trị chuỗi và thêm ID phần cứng.
Bây giờ, chỉ cần khởi động lại hệ thống là xong. Để hoàn nguyên, hãy xóa các String Value.
Trên đây là 2 cách để ngăn Windows tự động update các driver cụ thể. Hy vọng chúng hữu ích với bạn. Nếu có cách hoặc kinh nghiệm nào khác trong việc này, vui lòng chia sẻ ý kiến với mọi người trong phần bình luận bên dưới nhé!
