<!DOCTYPE html>
    <html lang="vi" xmlns="http://www.w3.org/1999/xhtml" prefix="og: http://ogp.me/ns#">
    <head>
<title>Hướng dẫn bỏ ghim thư mục mặc định Windows 11</title>
<meta name="description" content="Hướng dẫn bỏ ghim thư mục mặc định Windows 11 - Savefile - Tin Tức -...">
<meta name="author" content=".: Nguoicodonvn2008.info - Cõi lòng người cô đơn :.">
<meta name="copyright" content=".: Nguoicodonvn2008.info - Cõi lòng người cô đơn :. [admin@nguoicodonvn2008.info]">
<meta name="robots" content="index, archive, follow, noodp">
<meta name="googlebot" content="index,archive,follow,noodp">
<meta name="msnbot" content="all,index,follow">
<meta name="generator" content="NukeViet v4.5">
<meta http-equiv="Content-Type" content="text/html; charset=utf-8">
<meta property="og:title" content="Hướng dẫn bỏ ghim thư mục mặc định Windows 11">
<meta property="og:type" content="website">
<meta property="og:description" content="Savefile - Tin Tức - https&#x3A;&#x002F;&#x002F;www.nguoicodonvn2008.info&#x002F;vi&#x002F;news&#x002F;savefile&#x002F;kien-thuc-may-tinh&#x002F;huong-dan-bo-ghim-thu-muc-mac-dinh-windows-11-10178.html">
<meta property="og:site_name" content=".&#x3A; Nguoicodonvn2008.info - Cõi lòng người cô đơn &#x3A;.">
<meta property="og:url" content="https://www.nguoicodonvn2008.info/vi/news/savefile/kien-thuc-may-tinh/huong-dan-bo-ghim-thu-muc-mac-dinh-windows-11-10178.html">
<link rel="shortcut icon" href="https://www.nguoicodonvn2008.info/favicon.ico">
<link rel="canonical" href="https://www.nguoicodonvn2008.info/vi/news/savefile/kien-thuc-may-tinh/huong-dan-bo-ghim-thu-muc-mac-dinh-windows-11-10178.html">
<link rel="alternate" href="https://www.nguoicodonvn2008.info/vi/news/rss/" title="Tin Tức" type="application/rss+xml">
<link rel="alternate" href="https://www.nguoicodonvn2008.info/vi/news/rss/karaoke-dual/" title="Tin Tức - Karaoke Dual" type="application/rss+xml">
<link rel="alternate" href="https://www.nguoicodonvn2008.info/vi/news/rss/nhac-tre/" title="Tin Tức - Nhạc trẻ" type="application/rss+xml">
<link rel="alternate" href="https://www.nguoicodonvn2008.info/vi/news/rss/tru-tinh/" title="Tin Tức - Trữ tình" type="application/rss+xml">
<link rel="alternate" href="https://www.nguoicodonvn2008.info/vi/news/rss/nuoc-ngoai/" title="Tin Tức - Nước ngoài" type="application/rss+xml">
<link rel="alternate" href="https://www.nguoicodonvn2008.info/vi/news/rss/remix/" title="Tin Tức - Remix" type="application/rss+xml">
<link rel="alternate" href="https://www.nguoicodonvn2008.info/vi/news/rss/tam-su-tinh-yeu/" title="Tin Tức - Tâm sự tình yêu" type="application/rss+xml">
<link rel="alternate" href="https://www.nguoicodonvn2008.info/vi/news/rss/tho-suu-tam/" title="Tin Tức - Thơ sưu tầm" type="application/rss+xml">
<link rel="alternate" href="https://www.nguoicodonvn2008.info/vi/news/rss/cuoc-song/" title="Tin Tức - Cuộc sống" type="application/rss+xml">
<link rel="alternate" href="https://www.nguoicodonvn2008.info/vi/news/rss/phan-mem/" title="Tin Tức - Phần mềm" type="application/rss+xml">
<link rel="alternate" href="https://www.nguoicodonvn2008.info/vi/news/rss/kien-thuc-may-tinh/" title="Tin Tức - Kiến thức máy tính" type="application/rss+xml">
<link rel="alternate" href="https://www.nguoicodonvn2008.info/vi/news/rss/hoc-tap/" title="Tin Tức - Học tập" type="application/rss+xml">
<link rel="alternate" href="https://www.nguoicodonvn2008.info/vi/news/rss/tai-lieu/" title="Tin Tức - Tài liệu" type="application/rss+xml">
<link rel="alternate" href="https://www.nguoicodonvn2008.info/vi/news/rss/de-thi/" title="Tin Tức - Đề thi" type="application/rss+xml">
<link rel="preload" as="style" href="https://www.nguoicodonvn2008.info/assets/css/font-awesome.min.css" type="text/css">
<link rel="preload" as="style" href="https://www.nguoicodonvn2008.info/themes/default/css/bootstrap.non-responsive.css" type="text/css">
<link rel="preload" as="style" href="https://www.nguoicodonvn2008.info/themes/default/css/style.css" type="text/css">
<link rel="preload" as="style" href="https://www.nguoicodonvn2008.info/themes/default/css/style.non-responsive.css" type="text/css">
<link rel="preload" as="style" href="https://www.nguoicodonvn2008.info/themes/default/css/news.css" type="text/css">
<link rel="preload" as="style" href="https://www.nguoicodonvn2008.info/themes/default/css/custom.css" type="text/css">
<link rel="preload" as="script" href="https://www.nguoicodonvn2008.info/assets/js/jquery/jquery.min.js" type="text/javascript">
<link rel="preload" as="script" href="https://www.nguoicodonvn2008.info/assets/js/language/vi.js" type="text/javascript">
<link rel="preload" as="script" href="https://www.nguoicodonvn2008.info/assets/js/DOMPurify/purify3.js" type="text/javascript">
<link rel="preload" as="script" href="https://www.nguoicodonvn2008.info/assets/js/global.js" type="text/javascript">
<link rel="preload" as="script" href="https://www.nguoicodonvn2008.info/assets/js/site.js" type="text/javascript">
<link rel="preload" as="script" href="https://www.nguoicodonvn2008.info/themes/default/js/news.js" type="text/javascript">
<link rel="preload" as="script" href="https://www.nguoicodonvn2008.info/themes/default/js/main.js" type="text/javascript">
<link rel="preload" as="script" href="https://www.nguoicodonvn2008.info/themes/default/js/custom.js" type="text/javascript">
<link rel="preload" as="script" href="https://www.nguoicodonvn2008.info/themes/default/js/bootstrap.min.js" type="text/javascript">
<link rel="stylesheet" href="https://www.nguoicodonvn2008.info/assets/css/font-awesome.min.css">
<link rel="stylesheet" href="https://www.nguoicodonvn2008.info/themes/default/css/bootstrap.non-responsive.css">
<link rel="stylesheet" href="https://www.nguoicodonvn2008.info/themes/default/css/style.css">
<link rel="stylesheet" href="https://www.nguoicodonvn2008.info/themes/default/css/style.non-responsive.css">
<link rel="StyleSheet" href="https://www.nguoicodonvn2008.info/themes/default/css/news.css">
<link rel="stylesheet" href="https://www.nguoicodonvn2008.info/themes/default/css/custom.css">
<style type="text/css">
	body{background: #fff;}
</style>
    </head>
    <body>
<div id="print">
	<div id="hd_print">
		<h2 class="pull-left">.&#x3A; Nguoicodonvn2008.info - Cõi lòng người cô đơn &#x3A;.</h2>
		<p class="pull-right"><a title=".&#x3A; Nguoicodonvn2008.info - Cõi lòng người cô đơn &#x3A;." href="https://www.nguoicodonvn2008.info/">https://www.nguoicodonvn2008.info</a></p>
	</div>
	<div class="clear"></div>
	<hr />
	<div id="content">
		<h1>Hướng dẫn bỏ ghim thư mục mặc định Windows 11</h1>
		<ul class="list-inline">
			<li>Thứ hai - 14/04/2025 23:38</li>
			<li class="hidden-print txtrequired"><em class="fa fa-print">&nbsp;</em><a title="In ra" href="javascript:;" onclick="window.print()">In ra</a></li>
			<li class="hidden-print txtrequired"><em class="fa fa-power-off">&nbsp;</em><a title="Đóng cửa sổ này" href="javascript:;" onclick="window.close()">Đóng cửa sổ này</a></li>
		</ul>
		<div class="clear"></div>
		<div id="hometext">
		</div>
				<div class="imghome">
			<img alt="Hướng dẫn bỏ ghim thư mục mặc định Windows 11" src="https://st.quantrimang.com/photos/image/2025/04/11/bo-ghim-thu-muc-mac-dinh-Win-11-4.jpg" width="460" class="img-thumbnail" />
		</div>
		<div class="clear"></div>
		<div id="bodytext" class="clearfix">
			<p style="text-align: justify;">&nbsp;Windows&nbsp;11 File Explorer bao gồm một số thư mục mặc định được ghim vào thanh bên, như Documents, Pictures, Music và Videos. Mặc dù bạn sẽ truy cập nhanh khi cần nhưng chúng chiếm diện tích không gian làm việc trên&nbsp;&nbsp;máy tính&nbsp;của bạn. Nếu không có nhu cầu sử dụng thì người dùng hoàn toàn có thể bỏ ghim thư mục mặc định trong File Explorer, theo bài viết dưới đây.</p>

<h2 style="text-align: justify;">Cách bỏ ghim thư mục mặc định qua File Explorer Settings</h2>

<p style="text-align: justify;"><strong>Bước 1:</strong></p>

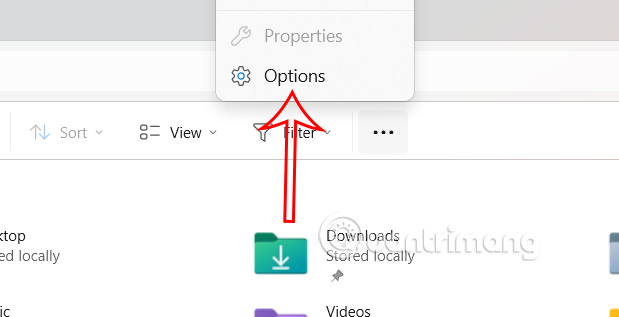
<p style="text-align: justify;">Bạn nhấn&nbsp;<strong>tổ hợp phím Windows + E</strong>&nbsp;để mở File Explorer, sau đó nhấn vào&nbsp;<strong>biểu tượng 3 chấm rồi chọn Options</strong>&nbsp;trong danh sách hiển thị.</p>

<p style="text-align: justify;"><img alt="Chỉnh File Explorer" data-i="0" data-src="https://st.quantrimang.com/photos/image/2025/04/11/bo-ghim-thu-muc-mac-dinh-Win-11-1.jpg" data-was-processed="true" height="307" src="https://st.quantrimang.com/photos/image/2025/04/11/bo-ghim-thu-muc-mac-dinh-Win-11-1.jpg" width="600" /></p>

<p style="text-align: justify;"><strong>Bước 2:</strong></p>

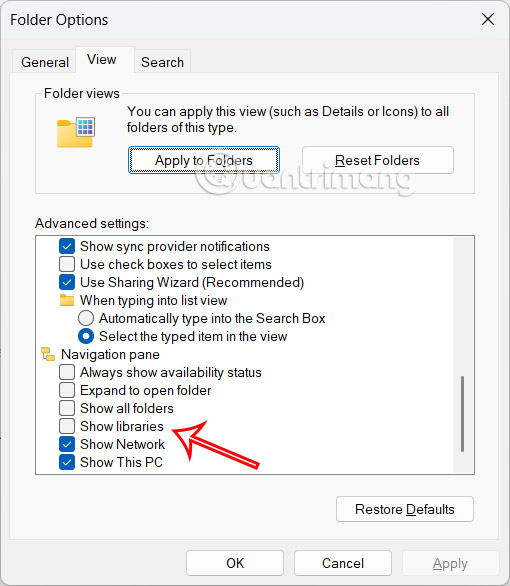
<p style="text-align: justify;">Chuyển vào giao diện mới, bạn&nbsp;<strong>nhấn vào tab View</strong>&nbsp;sau đó&nbsp;<strong>bỏ tích tại Show libraries hoặc Show frequently used folders&nbsp;</strong>để bỏ ghim thư mục mặc định trên máy tính.</p>

<p style="text-align: justify;">Cuối cùng nhấn Apply, sau đó nhấp vào OK để lưu cài đặt mới.</p>

<p style="text-align: justify;"><img alt="Bỏ ghim thư mục mặc định qua File Explorer Settings" data-i="1" data-src="https://st.quantrimang.com/photos/image/2025/04/11/bo-ghim-thu-muc-mac-dinh-Win-11-2.jpg" data-was-processed="true" height="517" src="https://st.quantrimang.com/photos/image/2025/04/11/bo-ghim-thu-muc-mac-dinh-Win-11-2.jpg" width="450" /></p>

<h2 style="text-align: justify;">Bỏ ghim thư mục mặc định qua Registry Editor</h2>

<p style="text-align: justify;"><strong>Bước 1:</strong></p>

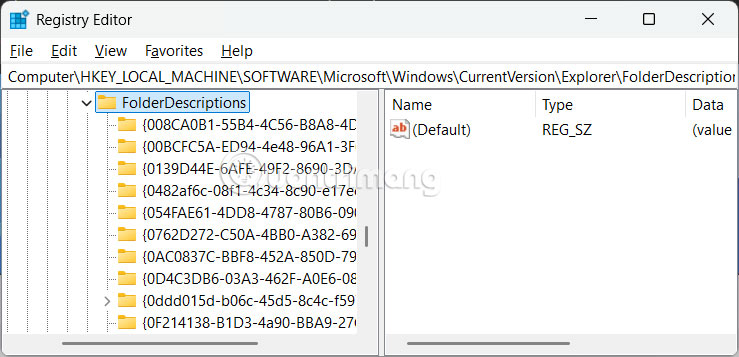
<p style="text-align: justify;">Bạn mở hộp thoại Run rồi nhập từ khóa regedit để&nbsp;<strong>truy cập Registry Editor</strong>. Tiếp đến bạn&nbsp;<strong>truy cập theo đường dẫn</strong>&nbsp;dưới đây.</p>

<pre id="pre0">
<code>HKEY_LOCAL_MACHINE\SOFTWARE\Microsoft\Windows\CurrentVersion\Explorer\FolderDescriptions</code></pre>

<p style="text-align: justify;"><img alt="Truy cập Registry Editor" data-i="2" data-src="https://st.quantrimang.com/photos/image/2025/04/11/bo-ghim-thu-muc-mac-dinh-Win-11-3.jpg" data-was-processed="true" height="309" src="https://st.quantrimang.com/photos/image/2025/04/11/bo-ghim-thu-muc-mac-dinh-Win-11-3.jpg" width="640" /></p>

<p style="text-align: justify;"><strong>Bước 2:</strong></p>

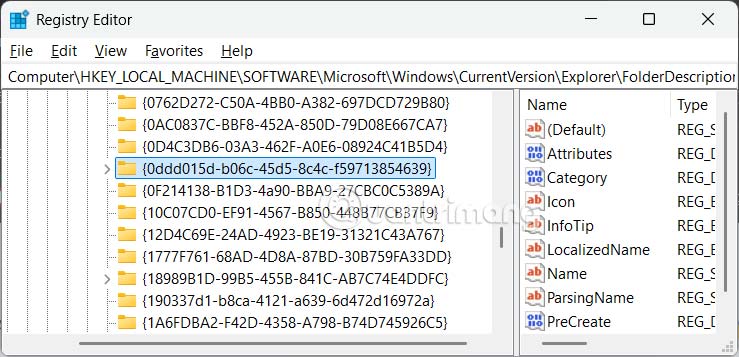
<p style="text-align: justify;">Trong khóa này, bạn sẽ tìm thấy các khóa con tương ứng với các thư mục mặc định như Documents, Pictures, Music, Videos và Downloads. Mỗi thư mục có một mã định danh duy nhất (GUID). Xác định vị trí GUID cho thư mục bạn muốn xóa.</p>

<ul>
	<li style="text-align: justify;">Documents: {f42ee2d3-909f-4907-8871-4c22fc0bf756}.</li>
	<li style="text-align: justify;">Pictures: {0ddd015d-b06c-45d5-8c4c-f59713854639}.</li>
	<li style="text-align: justify;">Music: {a0c69a99-21c8-4671-8703-7934162fcf1d}.</li>
	<li style="text-align: justify;">Videos: {35286a68-3c57-41a1-bbb1-0eae73d76c95}.</li>
	<li style="text-align: justify;">Downloads: {7d83ee9b-2244-4e70-b1f5-5393042af1e4}.</li>
</ul>

<p style="text-align: justify;"><img alt="Thư mục mặc định" data-i="3" data-src="https://st.quantrimang.com/photos/image/2025/04/11/bo-ghim-thu-muc-mac-dinh-Win-11-4.jpg" data-was-processed="true" height="290" src="https://st.quantrimang.com/photos/image/2025/04/11/bo-ghim-thu-muc-mac-dinh-Win-11-4.jpg" width="600" /></p>

<p style="text-align: justify;"><strong>Bước 3:</strong></p>

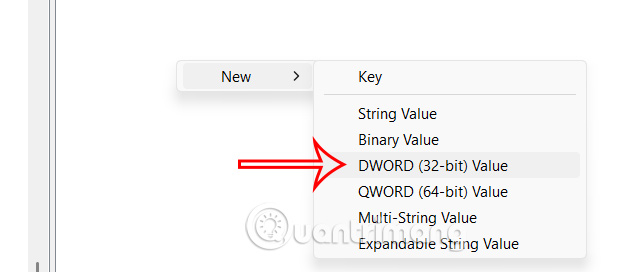
<p style="text-align: justify;">Nhấn vào thư mục rồi nhìn sang cạnh, chuột phải chọn<strong>&nbsp;New &gt; DWORD (32-bit) Value</strong>. Chúng ta đặt tên cho giá trị này là&nbsp;<strong>ThisPCPolicy</strong>.</p>

<p style="text-align: justify;"><img alt="Tạo giá trị mới" data-i="4" data-src="https://st.quantrimang.com/photos/image/2025/04/11/bo-ghim-thu-muc-mac-dinh-Win-11-5.jpg" data-was-processed="true" height="272" src="https://st.quantrimang.com/photos/image/2025/04/11/bo-ghim-thu-muc-mac-dinh-Win-11-5.jpg" width="628" /></p>

<p style="text-align: justify;">Bước 3:</p>

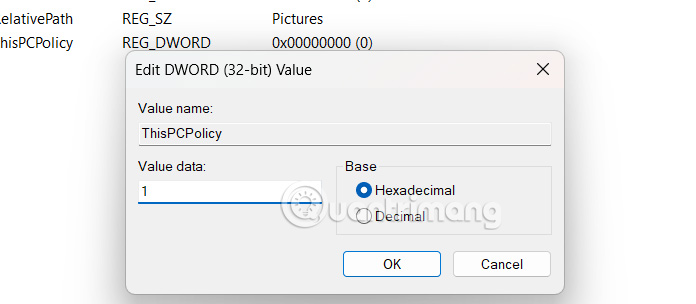
<p style="text-align: justify;"><strong>Click đúp&nbsp;</strong>vào giá trị này rồi&nbsp;<strong>nhập 1 để bỏ ghim thư mục mặc định Windows 11</strong>.</p>

<p style="text-align: justify;">Cuối cùng khởi động lại máy tính để áp dụng.</p>

<p style="text-align: justify;"><img alt="Bỏ ghim thư mục mặc định qua Registry Editor" data-i="5" data-src="https://st.quantrimang.com/photos/image/2025/04/11/bo-ghim-thu-muc-mac-dinh-Win-11-6.jpg" data-was-processed="true" height="262" src="https://st.quantrimang.com/photos/image/2025/04/11/bo-ghim-thu-muc-mac-dinh-Win-11-6.jpg" width="600" /></p>

<h2 style="text-align: justify;">Sử dụng Winaero Tweaker bỏ ghim thư mục mặc định</h2>

<p style="text-align: justify;">Bạn tải phần mềm Winaero Tweaker theo link dưới đây.</p>

<p style="text-align: justify;"><a data-google-interstitial="false" data-google-vignette="false" href="https://quantrimang.com/cong-nghe/huong-dan-bo-ghim-thu-muc-mac-dinh-windows-11-208484#">&nbsp;Windows</a>&nbsp;11 File Explorer bao gồm một số thư mục mặc định được ghim vào thanh bên, như Documents, Pictures, Music và Videos. Mặc dù bạn sẽ truy cập nhanh khi cần nhưng chúng chiếm diện tích không gian làm việc trên&nbsp;<a data-google-interstitial="false" data-google-vignette="false" href="https://quantrimang.com/cong-nghe/huong-dan-bo-ghim-thu-muc-mac-dinh-windows-11-208484#">&nbsp;máy tính</a>&nbsp;của bạn. Nếu không có nhu cầu sử dụng thì người dùng hoàn toàn có thể bỏ ghim thư mục mặc định trong File Explorer, theo bài viết dưới đây.</p>

<h2 style="text-align: justify;">Cách bỏ ghim thư mục mặc định qua File Explorer Settings</h2>

<p style="text-align: justify;"><strong>Bước 1:</strong></p>

<p style="text-align: justify;">Bạn nhấn&nbsp;<strong>tổ hợp phím Windows + E</strong>&nbsp;để mở File Explorer, sau đó nhấn vào&nbsp;<strong>biểu tượng 3 chấm rồi chọn Options</strong>&nbsp;trong danh sách hiển thị.</p>

<p style="text-align: justify;"><img alt="Chỉnh File Explorer" data-i="0" data-src="https://st.quantrimang.com/photos/image/2025/04/11/bo-ghim-thu-muc-mac-dinh-Win-11-1.jpg" data-was-processed="true" height="307" src="https://st.quantrimang.com/photos/image/2025/04/11/bo-ghim-thu-muc-mac-dinh-Win-11-1.jpg" width="600" /></p>

<p style="text-align: justify;"><strong>Bước 2:</strong></p>

<p style="text-align: justify;">Chuyển vào giao diện mới, bạn&nbsp;<strong>nhấn vào tab View</strong>&nbsp;sau đó&nbsp;<strong>bỏ tích tại Show libraries hoặc Show frequently used folders&nbsp;</strong>để bỏ ghim thư mục mặc định trên máy tính.</p>

<p style="text-align: justify;">Cuối cùng nhấn Apply, sau đó nhấp vào OK để lưu cài đặt mới.</p>

<p style="text-align: justify;"><img alt="Bỏ ghim thư mục mặc định qua File Explorer Settings" data-i="1" data-src="https://st.quantrimang.com/photos/image/2025/04/11/bo-ghim-thu-muc-mac-dinh-Win-11-2.jpg" data-was-processed="true" height="517" src="https://st.quantrimang.com/photos/image/2025/04/11/bo-ghim-thu-muc-mac-dinh-Win-11-2.jpg" width="450" /></p>

<h2 style="text-align: justify;">Bỏ ghim thư mục mặc định qua Registry Editor</h2>

<p style="text-align: justify;"><strong>Bước 1:</strong></p>

<p style="text-align: justify;">Bạn mở hộp thoại Run rồi nhập từ khóa regedit để&nbsp;<strong>truy cập Registry Editor</strong>. Tiếp đến bạn&nbsp;<strong>truy cập theo đường dẫn</strong>&nbsp;dưới đây.</p>

<pre id="pre0">
<code>HKEY_LOCAL_MACHINE\SOFTWARE\Microsoft\Windows\CurrentVersion\Explorer\FolderDescriptions</code></pre>

<p style="text-align: justify;"><img alt="Truy cập Registry Editor" data-i="2" data-src="https://st.quantrimang.com/photos/image/2025/04/11/bo-ghim-thu-muc-mac-dinh-Win-11-3.jpg" data-was-processed="true" height="309" src="https://st.quantrimang.com/photos/image/2025/04/11/bo-ghim-thu-muc-mac-dinh-Win-11-3.jpg" width="640" /></p>

<p style="text-align: justify;"><strong>Bước 2:</strong></p>

<p style="text-align: justify;">Trong khóa này, bạn sẽ tìm thấy các khóa con tương ứng với các thư mục mặc định như Documents, Pictures, Music, Videos và Downloads. Mỗi thư mục có một mã định danh duy nhất (GUID). Xác định vị trí GUID cho thư mục bạn muốn xóa.</p>

<ul>
	<li style="text-align: justify;">Documents: {f42ee2d3-909f-4907-8871-4c22fc0bf756}.</li>
	<li style="text-align: justify;">Pictures: {0ddd015d-b06c-45d5-8c4c-f59713854639}.</li>
	<li style="text-align: justify;">Music: {a0c69a99-21c8-4671-8703-7934162fcf1d}.</li>
	<li style="text-align: justify;">Videos: {35286a68-3c57-41a1-bbb1-0eae73d76c95}.</li>
	<li style="text-align: justify;">Downloads: {7d83ee9b-2244-4e70-b1f5-5393042af1e4}.</li>
</ul>

<p style="text-align: justify;"><img alt="Thư mục mặc định" data-i="3" data-src="https://st.quantrimang.com/photos/image/2025/04/11/bo-ghim-thu-muc-mac-dinh-Win-11-4.jpg" data-was-processed="true" height="290" src="https://st.quantrimang.com/photos/image/2025/04/11/bo-ghim-thu-muc-mac-dinh-Win-11-4.jpg" width="600" /></p>

<p style="text-align: justify;"><strong>Bước 3:</strong></p>

<p style="text-align: justify;">Nhấn vào thư mục rồi nhìn sang cạnh, chuột phải chọn<strong>&nbsp;New &gt; DWORD (32-bit) Value</strong>. Chúng ta đặt tên cho giá trị này là&nbsp;<strong>ThisPCPolicy</strong>.</p>

<p style="text-align: justify;"><img alt="Tạo giá trị mới" data-i="4" data-src="https://st.quantrimang.com/photos/image/2025/04/11/bo-ghim-thu-muc-mac-dinh-Win-11-5.jpg" data-was-processed="true" height="272" src="https://st.quantrimang.com/photos/image/2025/04/11/bo-ghim-thu-muc-mac-dinh-Win-11-5.jpg" width="628" /></p>

<p style="text-align: justify;">Bước 3:</p>

<p style="text-align: justify;"><strong>Click đúp&nbsp;</strong>vào giá trị này rồi&nbsp;<strong>nhập 1 để bỏ ghim thư mục mặc định Windows 11</strong>.</p>

<p style="text-align: justify;">Cuối cùng khởi động lại máy tính để áp dụng.</p>

<p style="text-align: justify;"><img alt="Bỏ ghim thư mục mặc định qua Registry Editor" data-i="5" data-src="https://st.quantrimang.com/photos/image/2025/04/11/bo-ghim-thu-muc-mac-dinh-Win-11-6.jpg" data-was-processed="true" height="262" src="https://st.quantrimang.com/photos/image/2025/04/11/bo-ghim-thu-muc-mac-dinh-Win-11-6.jpg" width="600" /></p>

<h2 style="text-align: justify;">Sử dụng Winaero Tweaker bỏ ghim thư mục mặc định</h2>

<p style="text-align: justify;">Bạn tải phần mềm Winaero Tweaker theo link dưới đây.</p>

<p style="text-align: justify;">&nbsp;Windows&nbsp;11 File Explorer bao gồm một số thư mục mặc định được ghim vào thanh bên, như Documents, Pictures, Music và Videos. Mặc dù bạn sẽ truy cập nhanh khi cần nhưng chúng chiếm diện tích không gian làm việc trên&nbsp;&nbsp;máy tính&nbsp;của bạn. Nếu không có nhu cầu sử dụng thì người dùng hoàn toàn có thể bỏ ghim thư mục mặc định trong File Explorer, theo bài viết dưới đây.</p>

<h2 style="text-align: justify;">Cách bỏ ghim thư mục mặc định qua File Explorer Settings</h2>

<p style="text-align: justify;"><strong>Bước 1:</strong></p>

<p style="text-align: justify;">Bạn nhấn&nbsp;<strong>tổ hợp phím Windows + E</strong>&nbsp;để mở File Explorer, sau đó nhấn vào&nbsp;<strong>biểu tượng 3 chấm rồi chọn Options</strong>&nbsp;trong danh sách hiển thị.</p>

<p style="text-align: justify;"><img alt="Chỉnh File Explorer" data-i="0" data-src="https://st.quantrimang.com/photos/image/2025/04/11/bo-ghim-thu-muc-mac-dinh-Win-11-1.jpg" data-was-processed="true" height="307" src="https://st.quantrimang.com/photos/image/2025/04/11/bo-ghim-thu-muc-mac-dinh-Win-11-1.jpg" width="600" /></p>

<p style="text-align: justify;"><strong>Bước 2:</strong></p>

<p style="text-align: justify;">Chuyển vào giao diện mới, bạn&nbsp;<strong>nhấn vào tab View</strong>&nbsp;sau đó&nbsp;<strong>bỏ tích tại Show libraries hoặc Show frequently used folders&nbsp;</strong>để bỏ ghim thư mục mặc định trên máy tính.</p>

<p style="text-align: justify;">Cuối cùng nhấn Apply, sau đó nhấp vào OK để lưu cài đặt mới.</p>

<p style="text-align: justify;"><img alt="Bỏ ghim thư mục mặc định qua File Explorer Settings" data-i="1" data-src="https://st.quantrimang.com/photos/image/2025/04/11/bo-ghim-thu-muc-mac-dinh-Win-11-2.jpg" data-was-processed="true" height="517" src="https://st.quantrimang.com/photos/image/2025/04/11/bo-ghim-thu-muc-mac-dinh-Win-11-2.jpg" width="450" /></p>

<h2 style="text-align: justify;">Bỏ ghim thư mục mặc định qua Registry Editor</h2>

<p style="text-align: justify;"><strong>Bước 1:</strong></p>

<p style="text-align: justify;">Bạn mở hộp thoại Run rồi nhập từ khóa regedit để&nbsp;<strong>truy cập Registry Editor</strong>. Tiếp đến bạn&nbsp;<strong>truy cập theo đường dẫn</strong>&nbsp;dưới đây.</p>

<pre id="pre0">
<code>HKEY_LOCAL_MACHINE\SOFTWARE\Microsoft\Windows\CurrentVersion\Explorer\FolderDescriptions</code></pre>

<p style="text-align: justify;"><img alt="Truy cập Registry Editor" data-i="2" data-src="https://st.quantrimang.com/photos/image/2025/04/11/bo-ghim-thu-muc-mac-dinh-Win-11-3.jpg" data-was-processed="true" height="309" src="https://st.quantrimang.com/photos/image/2025/04/11/bo-ghim-thu-muc-mac-dinh-Win-11-3.jpg" width="640" /></p>

<p style="text-align: justify;"><strong>Bước 2:</strong></p>

<p style="text-align: justify;">Trong khóa này, bạn sẽ tìm thấy các khóa con tương ứng với các thư mục mặc định như Documents, Pictures, Music, Videos và Downloads. Mỗi thư mục có một mã định danh duy nhất (GUID). Xác định vị trí GUID cho thư mục bạn muốn xóa.</p>

<ul>
	<li style="text-align: justify;">Documents: {f42ee2d3-909f-4907-8871-4c22fc0bf756}.</li>
	<li style="text-align: justify;">Pictures: {0ddd015d-b06c-45d5-8c4c-f59713854639}.</li>
	<li style="text-align: justify;">Music: {a0c69a99-21c8-4671-8703-7934162fcf1d}.</li>
	<li style="text-align: justify;">Videos: {35286a68-3c57-41a1-bbb1-0eae73d76c95}.</li>
	<li style="text-align: justify;">Downloads: {7d83ee9b-2244-4e70-b1f5-5393042af1e4}.</li>
</ul>

<p style="text-align: justify;"><img alt="Thư mục mặc định" data-i="3" data-src="https://st.quantrimang.com/photos/image/2025/04/11/bo-ghim-thu-muc-mac-dinh-Win-11-4.jpg" data-was-processed="true" height="290" src="https://st.quantrimang.com/photos/image/2025/04/11/bo-ghim-thu-muc-mac-dinh-Win-11-4.jpg" width="600" /></p>

<p style="text-align: justify;"><strong>Bước 3:</strong></p>

<p style="text-align: justify;">Nhấn vào thư mục rồi nhìn sang cạnh, chuột phải chọn<strong>&nbsp;New &gt; DWORD (32-bit) Value</strong>. Chúng ta đặt tên cho giá trị này là&nbsp;<strong>ThisPCPolicy</strong>.</p>

<p style="text-align: justify;"><img alt="Tạo giá trị mới" data-i="4" data-src="https://st.quantrimang.com/photos/image/2025/04/11/bo-ghim-thu-muc-mac-dinh-Win-11-5.jpg" data-was-processed="true" height="272" src="https://st.quantrimang.com/photos/image/2025/04/11/bo-ghim-thu-muc-mac-dinh-Win-11-5.jpg" width="628" /></p>

<p style="text-align: justify;">Bước 3:</p>

<p style="text-align: justify;"><strong>Click đúp&nbsp;</strong>vào giá trị này rồi&nbsp;<strong>nhập 1 để bỏ ghim thư mục mặc định Windows 11</strong>.</p>

<p style="text-align: justify;">Cuối cùng khởi động lại máy tính để áp dụng.</p>

<p style="text-align: justify;"><img alt="Bỏ ghim thư mục mặc định qua Registry Editor" data-i="5" data-src="https://st.quantrimang.com/photos/image/2025/04/11/bo-ghim-thu-muc-mac-dinh-Win-11-6.jpg" data-was-processed="true" height="262" src="https://st.quantrimang.com/photos/image/2025/04/11/bo-ghim-thu-muc-mac-dinh-Win-11-6.jpg" width="600" /></p>

<h2 style="text-align: justify;">Sử dụng Winaero Tweaker bỏ ghim thư mục mặc định</h2>

<p style="text-align: justify;">Bạn tải phần mềm Winaero Tweaker theo link dưới đây.</p>

<p style="text-align: justify;"><span style="color:rgb(231, 76, 60);"><strong>https://quantrimang.com/download/tai-winaero-tweaker-188119</strong></span></p>

<p style="text-align: justify;">Sau đó mở Winaero Tweaker và nhấn vào mục File Explorer ở thanh bên trái. Tiếp đến nhấn vào Customize This PC Folders và sẽ thấy danh sách các thư mục mặc định đang được tích chọn.</p>

<div style="text-align: justify;">&nbsp;</div>

<p style="text-align: justify;">Bỏ chọn các thư mục bạn muốn xóa khỏi thanh bên File Explorer và lưu lại thay đổi.</p>

<p style="text-align: justify;">Sau đó mở Winaero Tweaker và nhấn vào mục File Explorer ở thanh bên trái. Tiếp đến nhấn vào Customize This PC Folders và sẽ thấy danh sách các thư mục mặc định đang được tích chọn.</p>

<div style="text-align: justify;">&nbsp;</div>

<p style="text-align: justify;">Bỏ chọn các thư mục bạn muốn xóa khỏi thanh bên File Explorer và lưu lại thay đổi.</p>

<p style="text-align: justify;">Sau đó mở Winaero Tweaker và nhấn vào mục File Explorer ở thanh bên trái. Tiếp đến nhấn vào Customize This PC Folders và sẽ thấy danh sách các thư mục mặc định đang được tích chọn.</p>

<div style="text-align: justify;">&nbsp;</div>

<p style="text-align: justify;">Bỏ chọn các thư mục bạn muốn xóa khỏi thanh bên File Explorer và lưu lại thay đổi.</p>

<div style="text-align: justify;">&nbsp;</div>
		</div>
				<div id="author">
						<p>
				<strong>Nguồn tin:</strong>
				Quantrimang.com:
			</p>
		</div>
	</div>
	<div id="footer" class="clearfix">
		<div id="url">
			<strong>URL của bản tin này: </strong><a href="https://www.nguoicodonvn2008.info/vi/news/savefile/kien-thuc-may-tinh/huong-dan-bo-ghim-thu-muc-mac-dinh-windows-11-10178.html" title="Hướng dẫn bỏ ghim thư mục mặc định Windows 11">https://www.nguoicodonvn2008.info/vi/news/savefile/kien-thuc-may-tinh/huong-dan-bo-ghim-thu-muc-mac-dinh-windows-11-10178.html</a>

		</div>
		<div class="clear"></div>
		<div class="copyright">
			&copy; .&#x3A; Nguoicodonvn2008.info - Cõi lòng người cô đơn &#x3A;.
		</div>
		<div id="contact">
			<a href="mailto:admin@nguoicodonvn2008.info">admin@nguoicodonvn2008.info</a>
		</div>
	</div>
</div>
        <div id="timeoutsess" class="chromeframe">
            Bạn đã không sử dụng Site, <a onclick="timeoutsesscancel();" href="https://www.nguoicodonvn2008.info/#">Bấm vào đây để duy trì trạng thái đăng nhập</a>. Thời gian chờ: <span id="secField"> 60 </span> giây
        </div>
        <div id="openidResult" class="nv-alert" style="display:none"></div>
        <div id="openidBt" data-result="" data-redirect=""></div>
		</script>
		<div class="car-top">
  <span><img src="https://www.nguoicodonvn2008.info/themes/default/images/car.png" alt=""></span>
</div>
<script src="https://www.nguoicodonvn2008.info/assets/js/jquery/jquery.min.js"></script>
<script>var nv_base_siteurl="/",nv_lang_data="vi",nv_lang_interface="vi",nv_name_variable="nv",nv_fc_variable="op",nv_lang_variable="language",nv_module_name="news",nv_func_name="savefile",nv_is_user=0, nv_my_ofs=-4,nv_my_abbr="EDT",nv_cookie_prefix="nv4c_e856T",nv_check_pass_mstime=1738000,nv_area_admin=0,nv_safemode=0,theme_responsive=0,nv_recaptcha_ver=2,nv_recaptcha_sitekey="",nv_recaptcha_type="image",XSSsanitize=1;</script>
<script src="https://www.nguoicodonvn2008.info/assets/js/language/vi.js"></script>
<script src="https://www.nguoicodonvn2008.info/assets/js/DOMPurify/purify3.js"></script>
<script src="https://www.nguoicodonvn2008.info/assets/js/global.js"></script>
<script src="https://www.nguoicodonvn2008.info/assets/js/site.js"></script>
<script src="https://www.nguoicodonvn2008.info/themes/default/js/news.js"></script>
<script src="https://www.nguoicodonvn2008.info/themes/default/js/main.js"></script>
<script src="https://www.nguoicodonvn2008.info/themes/default/js/custom.js"></script>
<script type="application/ld+json">
        {
            "@context": "https://schema.org",
            "@type": "Organization",
            "url": "https://www.nguoicodonvn2008.info",
            "logo": "https://www.nguoicodonvn2008.info/uploads/angel.gif"
        }
        </script>
<script src="https://www.nguoicodonvn2008.info/themes/default/js/bootstrap.min.js"></script>
<script type="text/javascript">
var $scrolltop = $('.car-top');
$scrolltop.on('click', function () {
    $('html,body').animate({
        scrollTop: 0
    }, 800);
    $(this).addClass("car-run");
    setTimeout(function(){ $scrolltop.removeClass('car-run');}, 1000);
    return false;
});
$(window).on('scroll', function ()
{ 
    if($(window).scrollTop() >= 200)
    {
        $scrolltop.addClass("show");
        $scrolltop.addClass("car-down");
    }
    else
    {
       $scrolltop.removeClass("show");
       setTimeout(function(){ $scrolltop.removeClass('car-down');}, 300);
    }
});
</script>
</body>
</html>