Hướng dẫn 5 cách xóa tài khoản User trên Windows 10
- Thứ sáu - 27/09/2024 23:48
- In ra
- Đóng cửa sổ này
Nếu bạn có nhiều tài khoản User trên máy tính Windows 10 hoặc nếu bạn không muốn sử dụng một tài khoản User nào đó, bạn có thể lựa chọn xóa tài khoản User đó đi.
Thêm nữa, khi xóa các tài khoản user mà bạn không sử dụng đến có thể "giải phóng" được dung lượng bộ nhớ một cách đáng kể, thậm chí máy tính của bạn còn chạy "mượt" hơn ban đầu.
1. Xóa tài khoản user thông qua Windows Settings
Để xóa tài khoản user thông qua Windows Settings, bạn thực hiện theo các bước dưới đây:
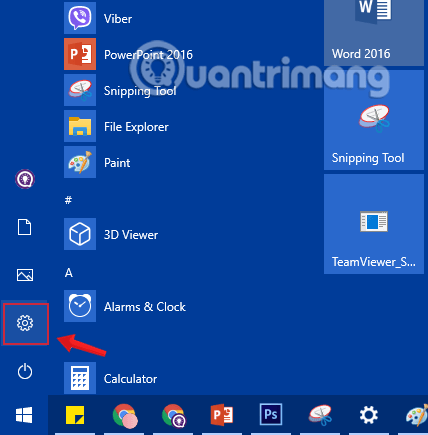
Bước 1: Mở ứng dụng Settings bằng cách click vào biểu tượng Settings trên Start menu hoặc nhấn tổ hợp phím Windows+I.
Bước 2: Trên giao diện Settings, bạn click chọn Account (Your accounts, email, sync, work, family).
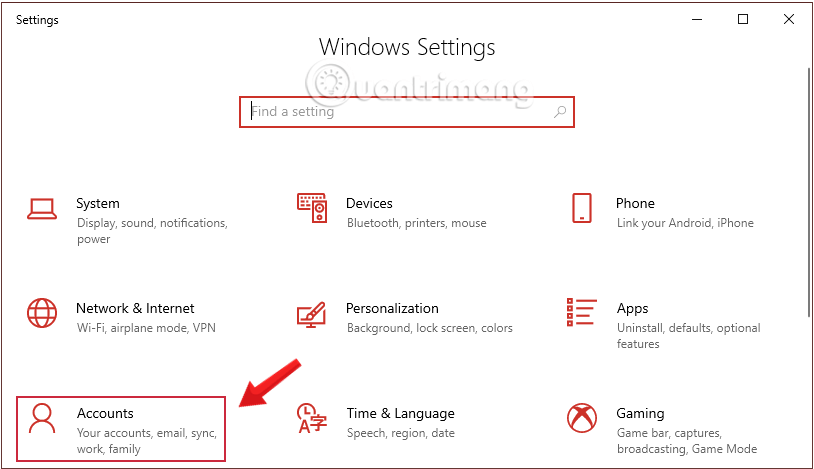
Nhấn chọn Account trong Windows Settings
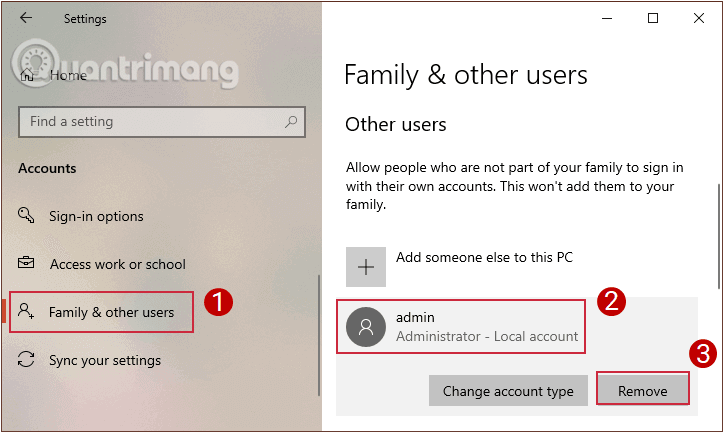
Bước 3: Click chọn Family and other users, sau đó click chọn tài khoản user mà bạn muốn xóa rồi click chọn Remove.
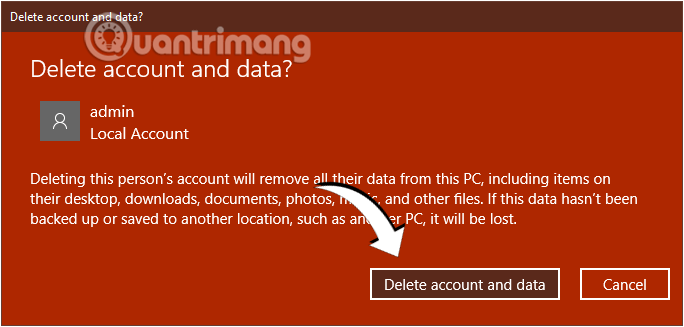
Bước 4: Lúc này trên màn hình sẽ hiển thị hộp thoại xác nhận, click chọn Delete account and data để xóa tài khoản user bạn muốn xóa.
2. Xóa account win 10 thông qua Control Panel
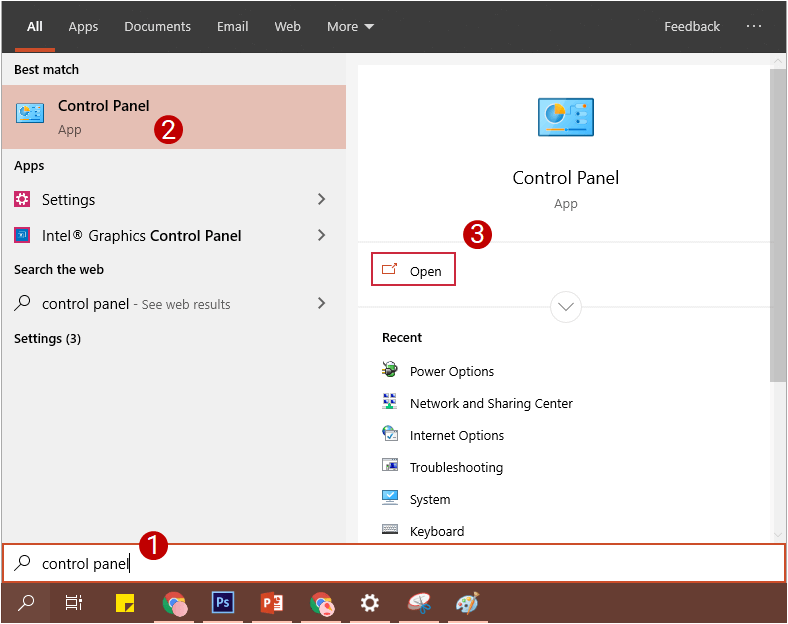
Bước 1: Mở Control Panel bằng cách nhập từ khóa Control panel vào khung Search Start Menu hoặc khung Search trên thanh Taskbar rồi nhấn Enter.
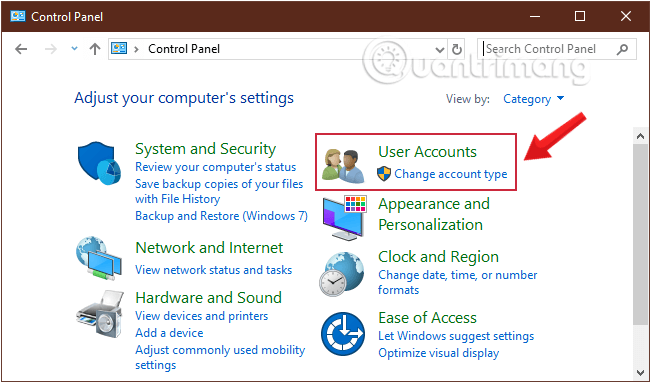
Bước 2: Click chọn User Accounts để mở cửa sổ User Account.
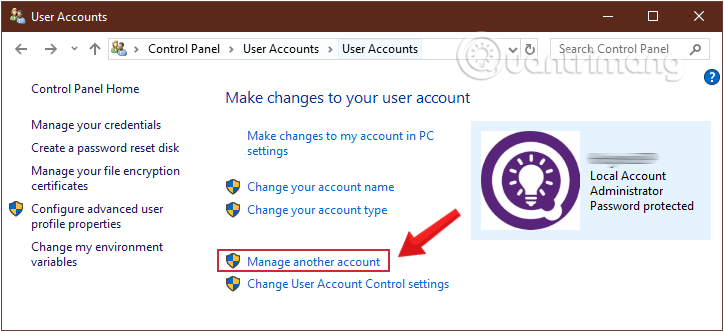
Bước 3: Chọn tiếp User Accounts ở giao diện tiếp theo.
Bước 4: Click chọn liên kết Manage another account để xem tất cả tài khoản user trên máy tính của bạn.
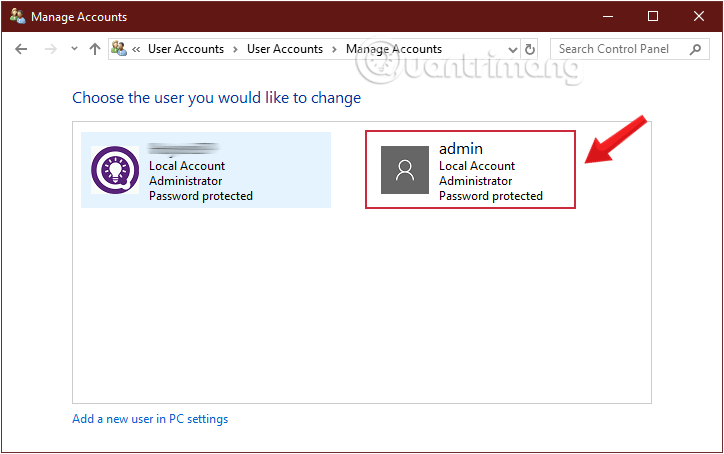
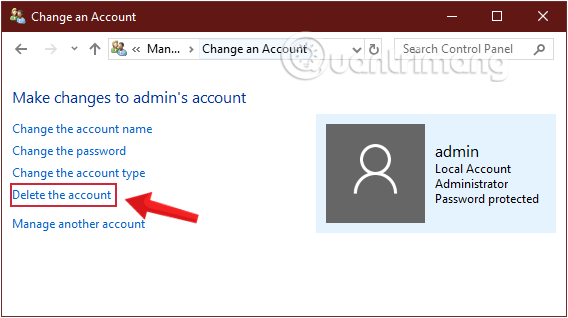
Bước 5: Click chọn tài khoản user mà bạn muốn xóa.
Bước 6: Tại đây bạn click chọn liên kết Delete the account.
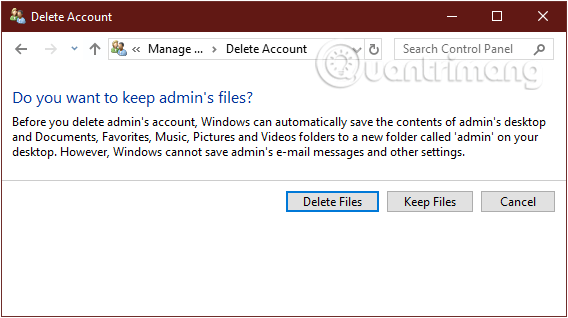
Bước 7: Trên màn hình sẽ xuất hiện thông báo "Do you want to keep user's files?".
Nếu click chọn Keep Files, Windows 10 sẽ lưu lại các thứ trên màn hình desktop, tài liệu, favorites, video, nhạc và ảnh vào 1 thư mục mới và sẽ đặt tên cho thư mục này. Ngược lại nếu chọn Delete Files thì mọi thứ sẽ bị xóa hoàn toàn.
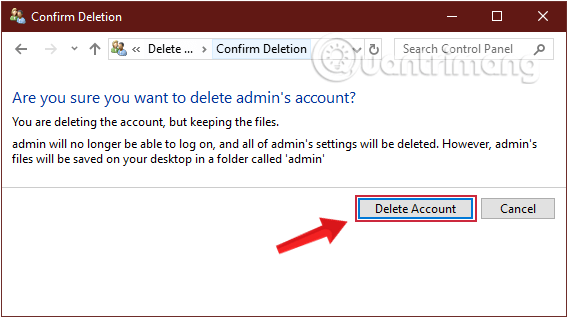
Bước 8: Sau khi click chọn Keep Files để lưu các file này, bạn click chọn Delete Account để xóa tài khoản user bạn đã chọn.
3. Xóa người dùng win 10 thông qua Command Prompt
Bước 1: Mở Command Prompt dưới quyền Admin, đầu tiên bạn nhập cmd vào khung Seach Start Menu hoặc trên thanh Taskbar, sau đó kích chuột phải vào Command Prompt chọn Run as administrator.
Hoặc cách khác là kích chuột phải vào Start Menu sau đó click chọn Command Prompt (admin) để mở Command prompt dưới quyền Admin.

Nếu bạn dùng Windows 10 với các phiên bản mới nhất thì nút Run as administrator sẽ hiện ngay khi bạn search ra Command Prompt.
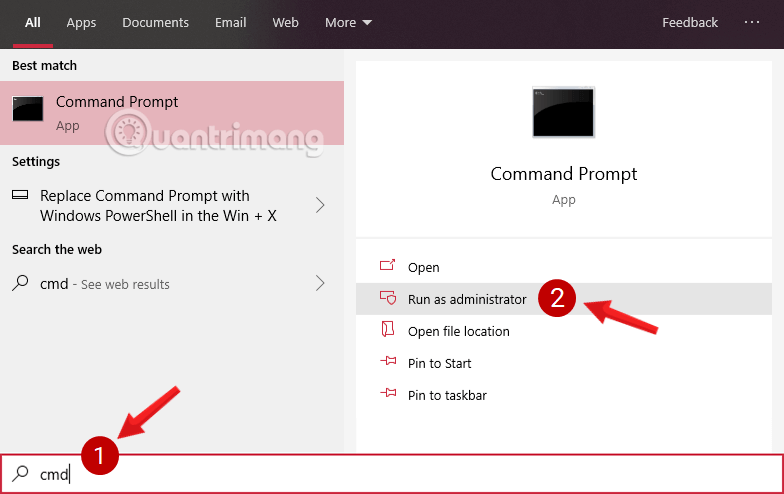
Click chọn Yes nếu trên màn hình xuất hiện thông báo User Account Control.
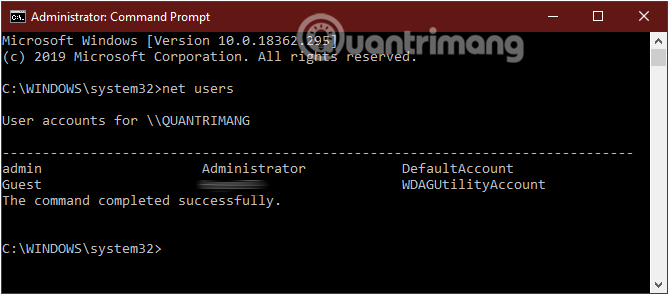
Bước 2: Trên cửa sổ Command Prompt, nhập lệnh dưới đây vào rồi nhấn Enter để xem tất cả các tài khoản user trên máy tính của bạn:
net users
Bước 3: Tiếp theo nhập câu lệnh dưới đây để xóa tài khoản user, rồi nhấn Enter:
net user UserAccountName /delete

Lưu ý: Trong câu lệnh trên thay UserName bằng tên tài khoản user bạn muốn xóa mà bạn vừa tìm ở bước 2.
4. Xóa tài khoản User thông qua Local Users and Groups
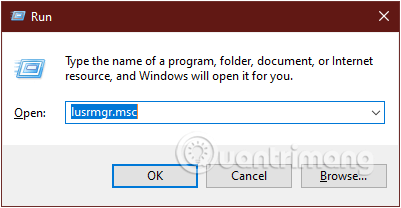
Bước 1: Nhấn tổ hợp phím Windows+R để mở cửa sổ lệnh Run.
Bước 2: Nhập lệnh sau vào hộp thoại Run và nhấn Enter:
lusrmgr.msc
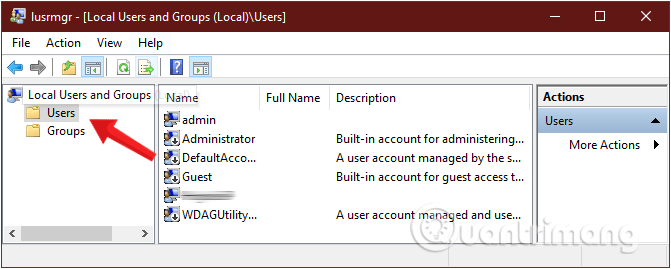
Bước 3: Ở cửa sổ Local Users and Groups hiện ra, click chọn thư mục User ở danh sách khung bên trái để mở thư mục User.
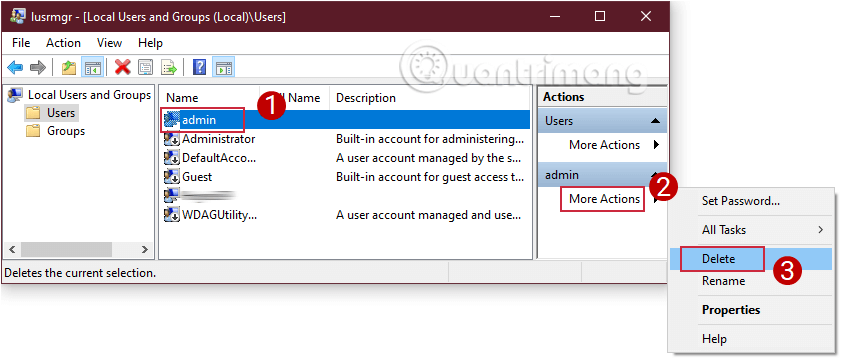
Bước 4: Tại đây bạn click chọn tài khoản User mà bạn muốn xóa ở danh sách khung ở giữa, sau đó click chọn More Actions ở khung Actions ở bên phải rồi click chọn Delete.
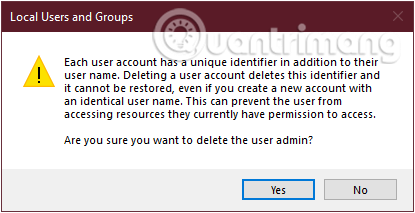
Bước 5: Lúc này trên màn hình sẽ xuất hiện hộp thoại xác nhận, click chọn Yes để đồng ý xóa tài khoản user bạn đã chọn.
Bước 6: Sau khi hoàn tất, đóng cửa sổ Local Users and Groups lại là xong.
5. Xóa tài khoản User thông qua Netplwiz
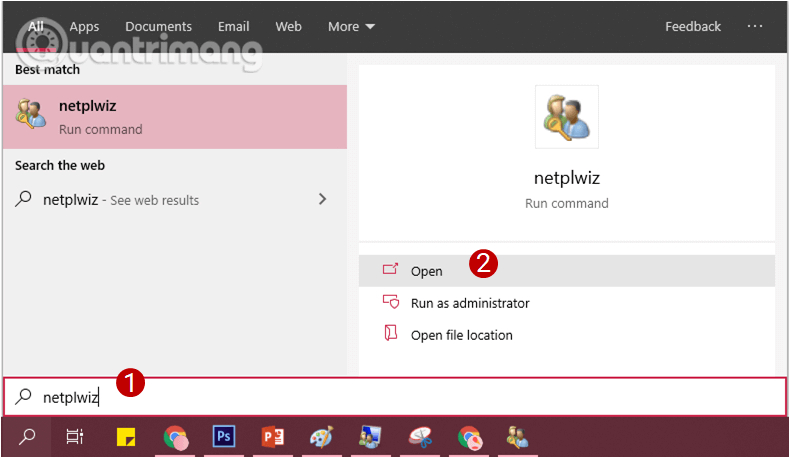
Bước 1: Nhập netplwiz vào khung Search trên Start Menu hoặc trên khung Search thanh Taskbar rồi nhấn Enter.
Bước 2: Nếu trên màn hình xuất hiện thông báo UAC, click chọn Yes dể xác nhận.
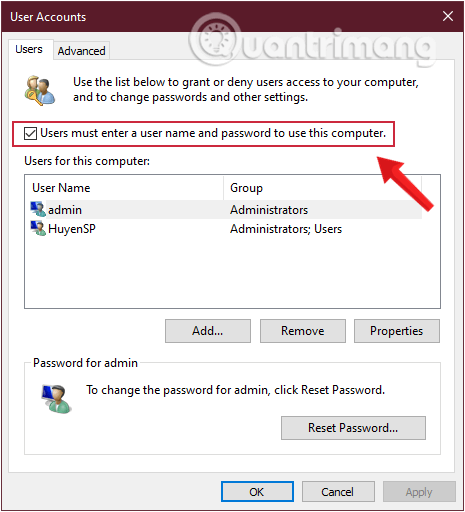
Bước 3: Tiếp theo trên cửa sổ User Account, bạn đánh tích chọn Users must enter a user name and password to use this computer.
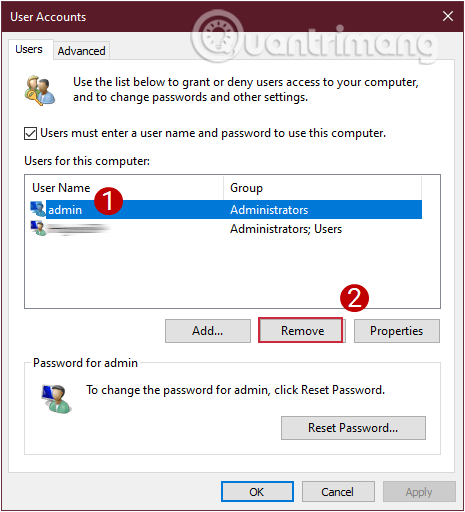
Bước 4: Tiếp theo click chọn tài khoản user bạn muốn xóa rồi click chọn Remove.
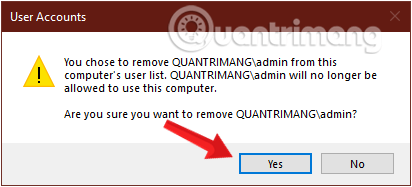
Bước 5: Click chọn Yes để xác nhận xóa.
Bước 6: Nếu bạn thiết lập Windows tự động đăng nhập vào tài khoản User này trên Startup, bạn phải thiết lập lại tính năng này một lần nữa.
Bước 7: Sau khi hoàn tất, đóng cửa sổ Netplwiz lại là xong.
6. Xóa user trên máy tính bằng System Properties
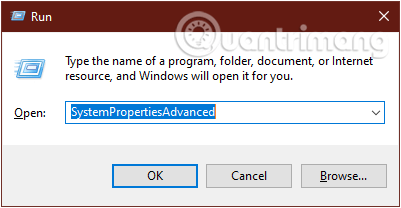
Bước 1: Nhấn tổ hợp phím Windows+R để mở cửa sổ lệnh Run.
Bước 2: Nhập lệnh sau vào hộp thoại Run và nhấn Enter:
SystemPropertiesAdvanced
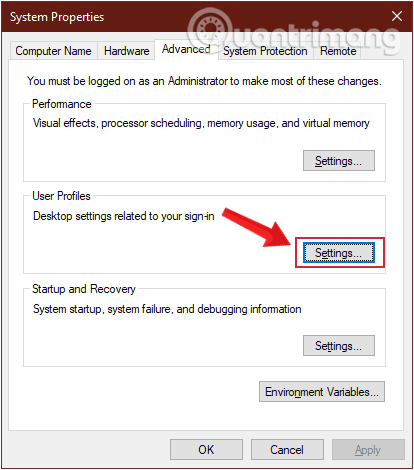
Bước 3: Ở cửa sổ System Properties hiện ra, bạn nhấn vào Settings trong phần User Profiles.
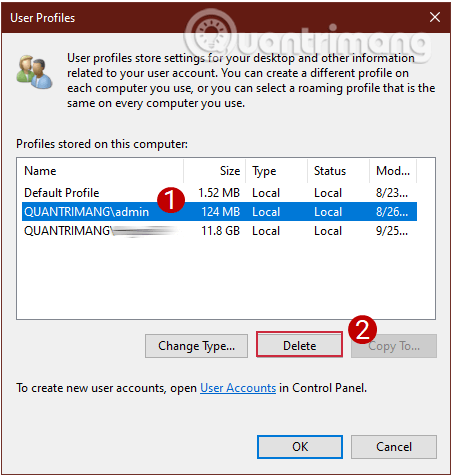
Bước 4: Trong cửa sổ User Profiles mới, chọn profile người dùng bạn muốn xóa và nhấn vào Delete.
Bước 5: Click chọn Yes ở lời nhắc hiện lên để xác nhận xóa.
Chúc các bạn thành công!
