<!DOCTYPE html>
    <html lang="vi" xmlns="http://www.w3.org/1999/xhtml" prefix="og: http://ogp.me/ns#">
    <head>
<title>Hướng dẫn 5 cách xóa tài khoản User trên Windows 10</title>
<meta name="description" content="Hướng dẫn 5 cách xóa tài khoản User trên Windows 10 - Savefile - Tin Tức -...">
<meta name="author" content=".: Nguoicodonvn2008.info - Cõi lòng người cô đơn :.">
<meta name="copyright" content=".: Nguoicodonvn2008.info - Cõi lòng người cô đơn :. [admin@nguoicodonvn2008.info]">
<meta name="robots" content="index, archive, follow, noodp">
<meta name="googlebot" content="index,archive,follow,noodp">
<meta name="msnbot" content="all,index,follow">
<meta name="generator" content="NukeViet v4.5">
<meta http-equiv="Content-Type" content="text/html; charset=utf-8">
<meta property="og:title" content="Hướng dẫn 5 cách xóa tài khoản User trên Windows 10">
<meta property="og:type" content="website">
<meta property="og:description" content="Savefile - Tin Tức - https&#x3A;&#x002F;&#x002F;www.nguoicodonvn2008.info&#x002F;vi&#x002F;news&#x002F;savefile&#x002F;kien-thuc-may-tinh&#x002F;huong-dan-5-cach-xoa-tai-khoan-user-tren-windows-10-8572.html">
<meta property="og:site_name" content=".&#x3A; Nguoicodonvn2008.info - Cõi lòng người cô đơn &#x3A;.">
<meta property="og:url" content="https://www.nguoicodonvn2008.info/vi/news/savefile/kien-thuc-may-tinh/huong-dan-5-cach-xoa-tai-khoan-user-tren-windows-10-8572.html">
<link rel="shortcut icon" href="https://www.nguoicodonvn2008.info/favicon.ico">
<link rel="canonical" href="https://www.nguoicodonvn2008.info/vi/news/savefile/kien-thuc-may-tinh/huong-dan-5-cach-xoa-tai-khoan-user-tren-windows-10-8572.html">
<link rel="alternate" href="https://www.nguoicodonvn2008.info/vi/news/rss/" title="Tin Tức" type="application/rss+xml">
<link rel="alternate" href="https://www.nguoicodonvn2008.info/vi/news/rss/karaoke-dual/" title="Tin Tức - Karaoke Dual" type="application/rss+xml">
<link rel="alternate" href="https://www.nguoicodonvn2008.info/vi/news/rss/nhac-tre/" title="Tin Tức - Nhạc trẻ" type="application/rss+xml">
<link rel="alternate" href="https://www.nguoicodonvn2008.info/vi/news/rss/tru-tinh/" title="Tin Tức - Trữ tình" type="application/rss+xml">
<link rel="alternate" href="https://www.nguoicodonvn2008.info/vi/news/rss/nuoc-ngoai/" title="Tin Tức - Nước ngoài" type="application/rss+xml">
<link rel="alternate" href="https://www.nguoicodonvn2008.info/vi/news/rss/remix/" title="Tin Tức - Remix" type="application/rss+xml">
<link rel="alternate" href="https://www.nguoicodonvn2008.info/vi/news/rss/tam-su-tinh-yeu/" title="Tin Tức - Tâm sự tình yêu" type="application/rss+xml">
<link rel="alternate" href="https://www.nguoicodonvn2008.info/vi/news/rss/tho-suu-tam/" title="Tin Tức - Thơ sưu tầm" type="application/rss+xml">
<link rel="alternate" href="https://www.nguoicodonvn2008.info/vi/news/rss/cuoc-song/" title="Tin Tức - Cuộc sống" type="application/rss+xml">
<link rel="alternate" href="https://www.nguoicodonvn2008.info/vi/news/rss/phan-mem/" title="Tin Tức - Phần mềm" type="application/rss+xml">
<link rel="alternate" href="https://www.nguoicodonvn2008.info/vi/news/rss/kien-thuc-may-tinh/" title="Tin Tức - Kiến thức máy tính" type="application/rss+xml">
<link rel="alternate" href="https://www.nguoicodonvn2008.info/vi/news/rss/hoc-tap/" title="Tin Tức - Học tập" type="application/rss+xml">
<link rel="alternate" href="https://www.nguoicodonvn2008.info/vi/news/rss/tai-lieu/" title="Tin Tức - Tài liệu" type="application/rss+xml">
<link rel="alternate" href="https://www.nguoicodonvn2008.info/vi/news/rss/de-thi/" title="Tin Tức - Đề thi" type="application/rss+xml">
<link rel="preload" as="style" href="https://www.nguoicodonvn2008.info/assets/css/font-awesome.min.css" type="text/css">
<link rel="preload" as="style" href="https://www.nguoicodonvn2008.info/themes/default/css/bootstrap.non-responsive.css" type="text/css">
<link rel="preload" as="style" href="https://www.nguoicodonvn2008.info/themes/default/css/style.css" type="text/css">
<link rel="preload" as="style" href="https://www.nguoicodonvn2008.info/themes/default/css/style.non-responsive.css" type="text/css">
<link rel="preload" as="style" href="https://www.nguoicodonvn2008.info/themes/default/css/news.css" type="text/css">
<link rel="preload" as="style" href="https://www.nguoicodonvn2008.info/themes/default/css/custom.css" type="text/css">
<link rel="preload" as="script" href="https://www.nguoicodonvn2008.info/assets/js/jquery/jquery.min.js" type="text/javascript">
<link rel="preload" as="script" href="https://www.nguoicodonvn2008.info/assets/js/language/vi.js" type="text/javascript">
<link rel="preload" as="script" href="https://www.nguoicodonvn2008.info/assets/js/DOMPurify/purify3.js" type="text/javascript">
<link rel="preload" as="script" href="https://www.nguoicodonvn2008.info/assets/js/global.js" type="text/javascript">
<link rel="preload" as="script" href="https://www.nguoicodonvn2008.info/assets/js/site.js" type="text/javascript">
<link rel="preload" as="script" href="https://www.nguoicodonvn2008.info/themes/default/js/news.js" type="text/javascript">
<link rel="preload" as="script" href="https://www.nguoicodonvn2008.info/themes/default/js/main.js" type="text/javascript">
<link rel="preload" as="script" href="https://www.nguoicodonvn2008.info/themes/default/js/custom.js" type="text/javascript">
<link rel="preload" as="script" href="https://www.nguoicodonvn2008.info/themes/default/js/bootstrap.min.js" type="text/javascript">
<link rel="stylesheet" href="https://www.nguoicodonvn2008.info/assets/css/font-awesome.min.css">
<link rel="stylesheet" href="https://www.nguoicodonvn2008.info/themes/default/css/bootstrap.non-responsive.css">
<link rel="stylesheet" href="https://www.nguoicodonvn2008.info/themes/default/css/style.css">
<link rel="stylesheet" href="https://www.nguoicodonvn2008.info/themes/default/css/style.non-responsive.css">
<link rel="StyleSheet" href="https://www.nguoicodonvn2008.info/themes/default/css/news.css">
<link rel="stylesheet" href="https://www.nguoicodonvn2008.info/themes/default/css/custom.css">
<style type="text/css">
	body{background: #fff;}
</style>
    </head>
    <body>
<div id="print">
	<div id="hd_print">
		<h2 class="pull-left">.&#x3A; Nguoicodonvn2008.info - Cõi lòng người cô đơn &#x3A;.</h2>
		<p class="pull-right"><a title=".&#x3A; Nguoicodonvn2008.info - Cõi lòng người cô đơn &#x3A;." href="https://www.nguoicodonvn2008.info/">https://www.nguoicodonvn2008.info</a></p>
	</div>
	<div class="clear"></div>
	<hr />
	<div id="content">
		<h1>Hướng dẫn 5 cách xóa tài khoản User trên Windows 10</h1>
		<ul class="list-inline">
			<li>Thứ năm - 27/06/2024 23:28</li>
			<li class="hidden-print txtrequired"><em class="fa fa-print">&nbsp;</em><a title="In ra" href="javascript:;" onclick="window.print()">In ra</a></li>
			<li class="hidden-print txtrequired"><em class="fa fa-power-off">&nbsp;</em><a title="Đóng cửa sổ này" href="javascript:;" onclick="window.close()">Đóng cửa sổ này</a></li>
		</ul>
		<div class="clear"></div>
		<div id="hometext">
		</div>
				<div class="imghome">
			<img alt="Hướng dẫn 5 cách xóa tài khoản User trên Windows 10" src="https://st.quantrimang.com/photos/image/2019/09/23/sua-wifi-khong-ket-noi-win-10-10.png" width="460" class="img-thumbnail" />
		</div>
		<div class="clear"></div>
		<div id="bodytext" class="clearfix">
			<h1>Nếu bạn có nhiều tài khoản User trên máy tính&nbsp;&nbsp;Windows 10&nbsp;hoặc nếu bạn không muốn sử dụng một tài khoản User nào đó, bạn có thể lựa chọn xóa tài khoản User đó đi.</h1>
&nbsp;

<p>Thêm nữa, khi xóa các tài khoản user mà bạn không sử dụng đến có thể &quot;giải phóng&quot; được dung lượng bộ nhớ một cách đáng kể, thậm chí máy tính của bạn còn chạy &quot;mượt&quot; hơn ban đầu.</p>

<h2>&nbsp;</h2>

<h2 id="mcetoc_1dlmik2u50">1. Xóa tài khoản user thông qua&nbsp;&nbsp;Windows&nbsp;Settings</h2>

<p>Để xóa tài khoản user thông qua&nbsp;&nbsp;Windows&nbsp;Settings, bạn thực hiện theo các bước dưới đây:</p>

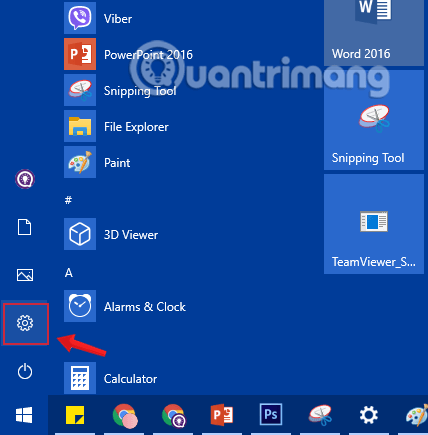
<p><strong>Bước 1:&nbsp;</strong>Mở ứng dụng Settings bằng cách click vào biểu tượng&nbsp;<strong>Settings</strong>&nbsp;trên Start menu hoặc nhấn tổ hợp phím&nbsp;<strong><code>Windows</code>+<code>I</code>.</strong></p>

<figure><img alt="Nhấn chọn biểu tượng Settings trong Start Menu" data-i="0" data-src="https://st.quantrimang.com/photos/image/2019/09/23/sua-wifi-khong-ket-noi-win-10-10.png" data-was-processed="true" height="435" src="https://st.quantrimang.com/photos/image/2019/09/23/sua-wifi-khong-ket-noi-win-10-10.png" width="428" />
<figcaption>Nhấn chọn biểu tượng Settings trong Start Menu</figcaption>
</figure>
<iframe allow="autoplay" allowtransparency="true" aria-label="Advertisement" data-google-container-id="a!2" data-google-query-id="CMag5qys_YYDFetYDwIdPYAO7A" data-load-complete="true" frameborder="0" height="0" hspace="0" id="aswift_1" marginheight="0" marginwidth="0" name="aswift_1" sandbox="allow-scripts allow-same-origin allow-forms allow-presentation" scrolling="no" tabindex="0" title="Advertisement" vspace="0" width="694"></iframe>

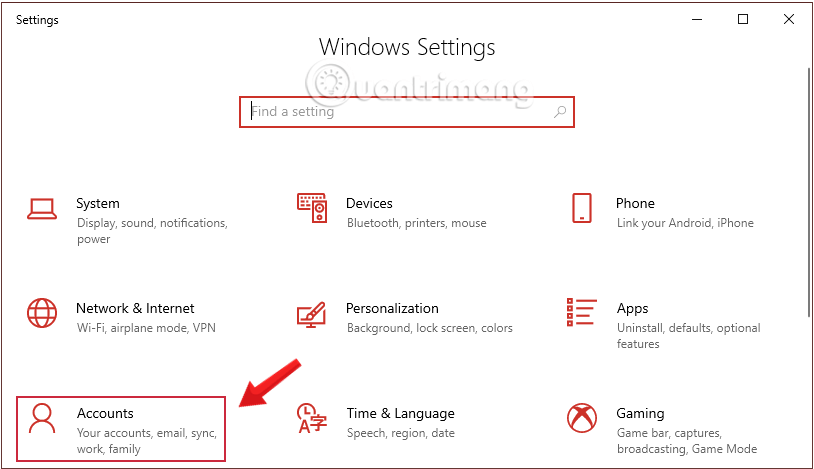
<p><strong>Bước 2:&nbsp;</strong>Trên giao diện&nbsp;<strong>Settings,</strong>&nbsp;bạn click chọn&nbsp;<strong>Account (Your accounts, email, sync, work, family).</strong></p>

<figure><img alt="Nhấn chọn Account trong Windows Settings" data-adbro-processed="true" data-i="1" data-src="https://st.quantrimang.com/photos/image/2019/09/26/xoa-tai-khoan-user-window-10-1.png" data-was-processed="true" height="469" src="https://st.quantrimang.com/photos/image/2019/09/26/xoa-tai-khoan-user-window-10-1.png" width="814" />
<figcaption>Nhấn chọn Account trong Windows Settings</figcaption>
</figure>

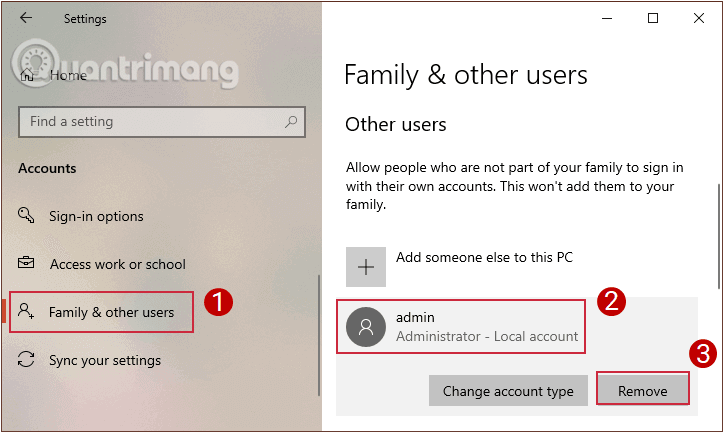
<p><strong>Bước 3:&nbsp;</strong>Click chọn&nbsp;<strong>Family and other users</strong>, sau đó click chọn tài khoản user mà bạn muốn xóa rồi click chọn&nbsp;<strong>Remove.</strong></p>

<figure><img alt="Chọn tài khoản user mà bạn muốn xóa trong Family and other users" data-i="2" data-src="https://st.quantrimang.com/photos/image/2019/09/26/xoa-tai-khoan-user-window-10-2.png" data-was-processed="true" height="433" src="https://st.quantrimang.com/photos/image/2019/09/26/xoa-tai-khoan-user-window-10-2.png" width="728" />
<figcaption>Chọn tài khoản user mà bạn muốn xóa trong Family and other users</figcaption>
</figure>

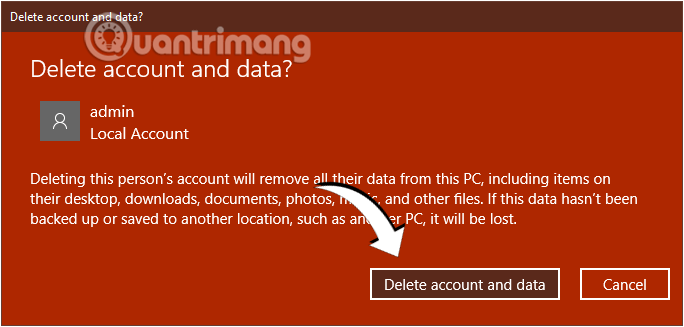
<p><strong>Bước 4:</strong>&nbsp;Lúc này trên màn hình sẽ hiển thị hộp thoại xác nhận, click chọn&nbsp;<strong>Delete account and data</strong>&nbsp;để xóa tài khoản user bạn muốn xóa.</p>

<figure><img alt="Click chọn Delete account and data ở thông báo hiện lên để xác nhận xóa user" data-i="3" data-src="https://st.quantrimang.com/photos/image/2019/09/26/xoa-tai-khoan-user-window-10-3.png" data-was-processed="true" height="327" src="https://st.quantrimang.com/photos/image/2019/09/26/xoa-tai-khoan-user-window-10-3.png" width="684" />
<figcaption>Click chọn Delete account and data ở thông báo hiện lên để xác nhận xóa user</figcaption>
</figure>
<iframe allow="autoplay" allowtransparency="true" aria-label="Advertisement" data-google-container-id="a!3" data-google-query-id="CKnx5qys_YYDFZBqDwIdQMEEbg" data-load-complete="true" frameborder="0" height="0" hspace="0" id="aswift_2" marginheight="0" marginwidth="0" name="aswift_2" sandbox="allow-scripts allow-same-origin allow-forms allow-presentation" scrolling="no" tabindex="0" title="Advertisement" vspace="0" width="694"></iframe>

<h2 id="mcetoc_1dlmik2u51">2. Xóa account win 10 thông qua Control Panel</h2>

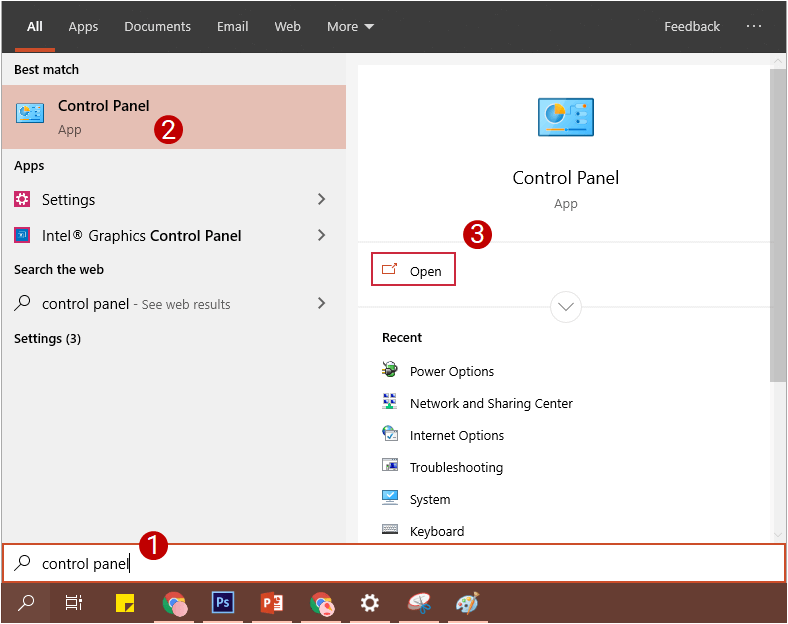
<p><strong>Bước 1:</strong>&nbsp;Mở Control Panel bằng cách nhập từ khóa&nbsp;<strong>Control panel</strong>&nbsp;vào khung&nbsp;<strong>Search Start Menu</strong>&nbsp;hoặc khung&nbsp;<strong>Search</strong>&nbsp;trên thanh&nbsp;<strong>Taskbar</strong>&nbsp;rồi nhấn<strong>&nbsp;Enter.</strong></p>

<figure><img alt="Mở Control Panel trên khung Search thanh Taskbar" data-i="4" data-src="https://st.quantrimang.com/photos/image/2019/09/26/xoa-tai-khoan-user-window-10-4.png" data-was-processed="true" height="624" src="https://st.quantrimang.com/photos/image/2019/09/26/xoa-tai-khoan-user-window-10-4.png" width="788" />
<figcaption>Mở Control Panel trên khung Search thanh Taskbar</figcaption>
</figure>

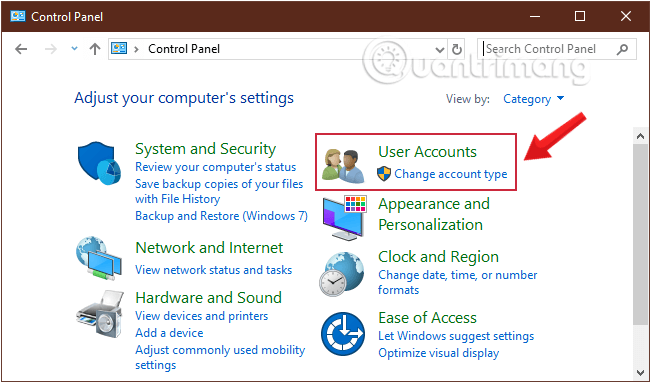
<p><strong>Bước 2:&nbsp;</strong>Click chọn&nbsp;<strong>User Accounts</strong>&nbsp;để mở cửa sổ User Account.</p>

<figure><img alt="Click chọn User Accounts để mở cửa sổ User Account" data-i="5" data-src="https://st.quantrimang.com/photos/image/2019/09/26/xoa-tai-khoan-user-window-10-5.png" data-was-processed="true" height="383" src="https://st.quantrimang.com/photos/image/2019/09/26/xoa-tai-khoan-user-window-10-5.png" width="651" />
<figcaption>Click chọn User Accounts để mở cửa sổ User Account</figcaption>
</figure>

<p><strong>Bước 3:&nbsp;</strong>Chọn tiếp&nbsp;<strong>User Accounts</strong>&nbsp;ở giao diện tiếp theo.</p>

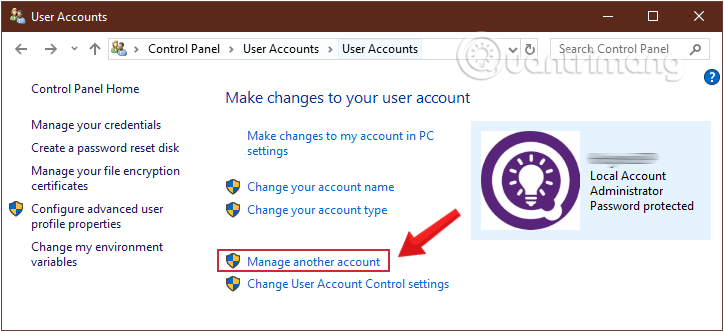
<p><strong>Bước 4:</strong>&nbsp;Click chọn liên kết&nbsp;<strong>Manage another account</strong>&nbsp;để xem tất cả tài khoản user trên máy tính của bạn.</p>

<figure><img alt="Click chọn liên kết Manage another account " data-i="6" data-src="https://st.quantrimang.com/photos/image/2019/09/26/xoa-tai-khoan-user-window-10-6.png" data-was-processed="true" height="332" src="https://st.quantrimang.com/photos/image/2019/09/26/xoa-tai-khoan-user-window-10-6.png" width="724" />
<figcaption>Click chọn liên kết Manage another account</figcaption>
</figure>
<iframe allow="autoplay" allowtransparency="true" aria-label="Advertisement" data-google-container-id="a!4" data-google-query-id="CKuty62s_YYDFZ9qDwIdqe0FJw" data-load-complete="true" frameborder="0" height="0" hspace="0" id="aswift_3" marginheight="0" marginwidth="0" name="aswift_3" sandbox="allow-scripts allow-same-origin allow-forms allow-presentation" scrolling="no" tabindex="0" title="Advertisement" vspace="0" width="694"></iframe>

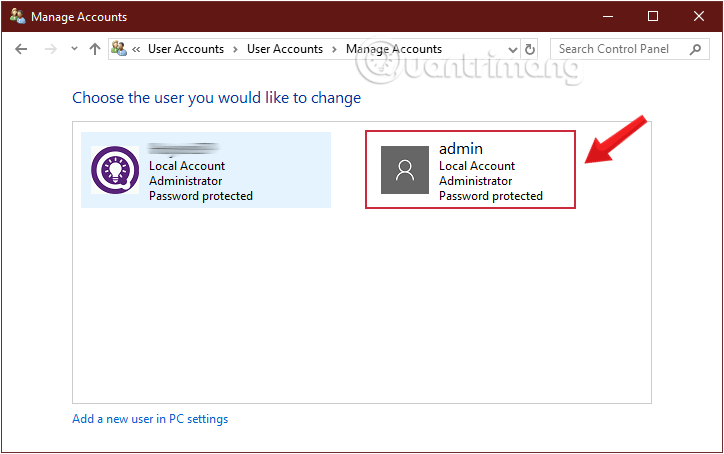
<p><strong>Bước 5:&nbsp;</strong>Click chọn tài khoản user mà bạn muốn xóa.</p>

<figure><img alt="Click chọn tài khoản user mà bạn muốn xóa" data-i="7" data-src="https://st.quantrimang.com/photos/image/2019/09/26/xoa-tai-khoan-user-window-10-7-1.png" data-was-processed="true" height="454" src="https://st.quantrimang.com/photos/image/2019/09/26/xoa-tai-khoan-user-window-10-7-1.png" width="724" />
<figcaption>Click chọn tài khoản user mà bạn muốn xóa</figcaption>
</figure>

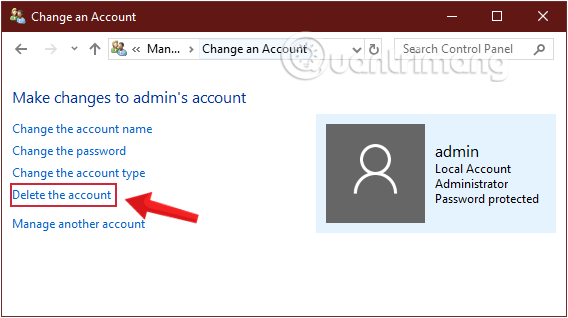
<p><strong>Bước 6:&nbsp;</strong>Tại đây bạn click chọn liên kết<strong>&nbsp;Delete the account.</strong></p>

<figure><img alt="Chọn liên kết Delete the account" data-i="8" data-src="https://st.quantrimang.com/photos/image/2019/09/26/xoa-tai-khoan-user-window-10-8.png" data-was-processed="true" height="318" src="https://st.quantrimang.com/photos/image/2019/09/26/xoa-tai-khoan-user-window-10-8.png" width="568" />
<figcaption>Chọn liên kết Delete the account</figcaption>
</figure>

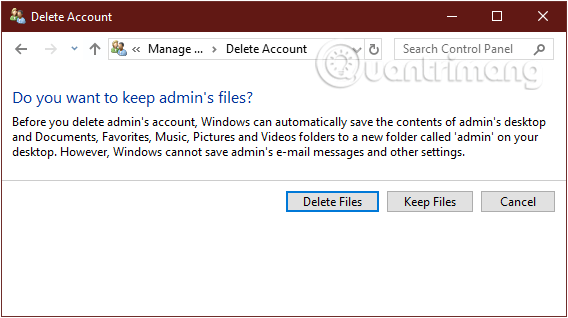
<p><strong>Bước 7:&nbsp;</strong>Trên màn hình sẽ xuất hiện thông báo &quot;<strong>Do you want to keep user&#039;s files?</strong>&quot;.</p>

<p>Nếu click chọn<strong>&nbsp;Keep Files</strong>,&nbsp;&nbsp;Windows 10&nbsp;sẽ lưu lại các thứ trên màn hình desktop, tài liệu, favorites, video, nhạc và ảnh vào 1 thư mục mới và sẽ đặt tên cho thư mục này. Ngược lại nếu chọn Delete Files thì mọi thứ sẽ bị xóa hoàn toàn.</p>

<figure><img alt="Chọn Keep Files hoặc Delete Files tùy theo nhu cầu của bạn" data-i="9" data-src="https://st.quantrimang.com/photos/image/2019/09/26/xoa-tai-khoan-user-window-10-9.png" data-was-processed="true" height="318" src="https://st.quantrimang.com/photos/image/2019/09/26/xoa-tai-khoan-user-window-10-9.png" width="568" />
<figcaption>Chọn Keep Files hoặc Delete Files tùy theo nhu cầu của bạn</figcaption>
</figure>

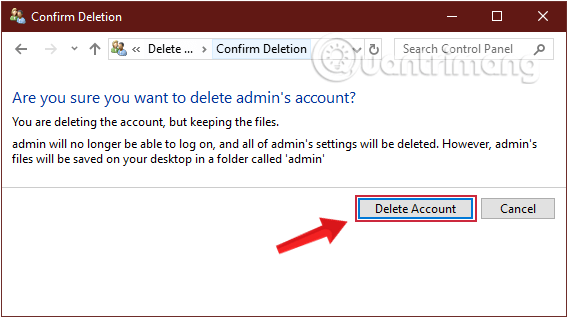
<p><strong>Bước 8:</strong>&nbsp;Sau khi click chọn&nbsp;<strong>Keep Files</strong>&nbsp;để lưu các file này, bạn click chọn<strong>&nbsp;Delete Account</strong>&nbsp;để xóa tài khoản user bạn đã chọn.</p>

<figure><img alt="Chọn Delete Account để xóa tài khoản user bạn đã chọn" data-i="10" data-src="https://st.quantrimang.com/photos/image/2019/09/26/xoa-tai-khoan-user-window-11.png" data-was-processed="true" height="318" src="https://st.quantrimang.com/photos/image/2019/09/26/xoa-tai-khoan-user-window-11.png" width="568" />
<figcaption>Chọn Delete Account để xóa tài khoản user bạn đã chọn</figcaption>
</figure>

<h2 id="mcetoc_1dlmik2u52">3. Xóa người dùng win 10 thông qua Command Prompt</h2>

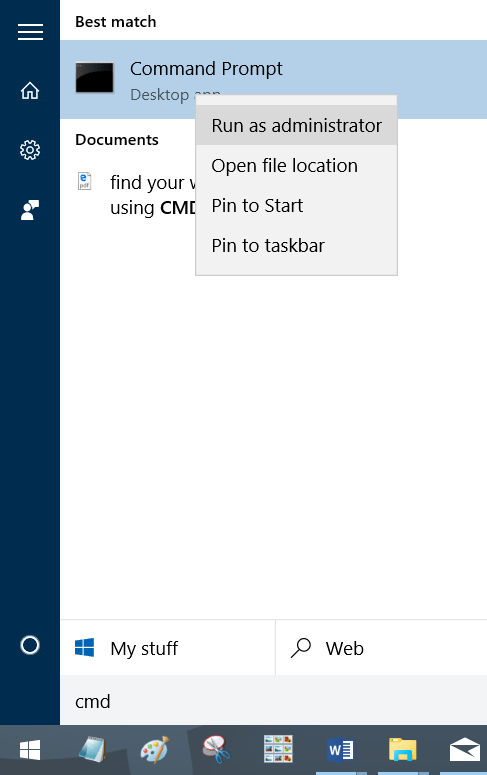
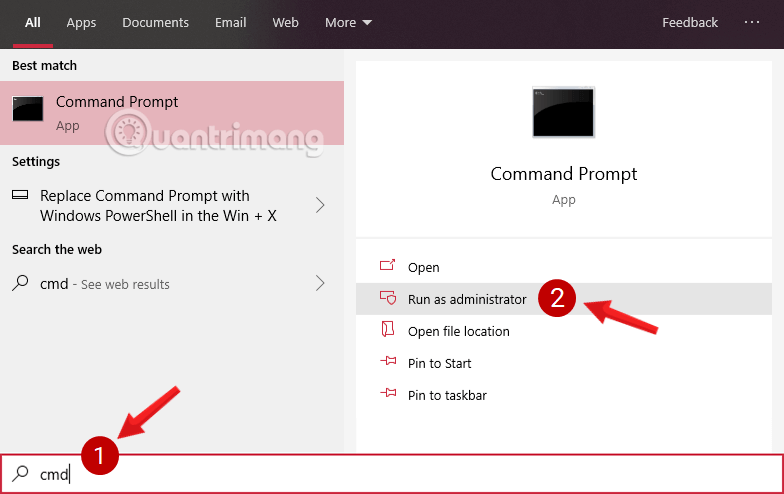
<p><strong>Bước 1:&nbsp;</strong>Mở Command Prompt dưới quyền Admin, đầu tiên bạn nhập&nbsp;<code><strong>cmd</strong></code>&nbsp;vào khung Seach Start Menu hoặc trên thanh Taskbar, sau đó kích chuột phải vào Command Prompt chọn&nbsp;<strong>Run as administrator.</strong></p>

<p>Hoặc cách khác là kích chuột phải vào Start Menu sau đó click chọn&nbsp;<strong>Command Prompt (admin)</strong>&nbsp;để mở Command prompt dưới quyền Admin.</p>

<p><img alt="kích chuột phải vào Command Prompt chọn Run as administrator" data-i="11" data-src="https://st.quantrimang.com/photos/image/2016/05/09/command-prompt.png" data-was-processed="true" height="650" src="https://st.quantrimang.com/photos/image/2016/05/09/command-prompt.png" title="kích chuột phải vào Command Prompt chọn Run as administrator" width="408" /></p>
<iframe allow="autoplay" allowtransparency="true" aria-label="Advertisement" data-google-container-id="a!5" data-google-query-id="CIGika6s_YYDFaxlDwIdRiIDHw" data-load-complete="true" frameborder="0" height="0" hspace="0" id="aswift_4" marginheight="0" marginwidth="0" name="aswift_4" sandbox="allow-scripts allow-same-origin allow-forms allow-presentation" scrolling="no" tabindex="0" title="Advertisement" vspace="0" width="694"></iframe>

<p>Nếu bạn dùng&nbsp;<a href="https://quantrimang.com/cong-nghe/huong-dan-5-cach-xoa-tai-khoan-user-tren-windows-10-122598#">&nbsp;Windows 10</a>&nbsp;với các phiên bản mới nhất thì nút&nbsp;<strong>Run as administrator</strong>&nbsp;sẽ hiện ngay khi bạn search ra&nbsp;<strong>Command Prompt.</strong></p>

<figure><img alt="Mở Command Prompt trong Windows 10 phiên bản mới" data-i="12" data-src="https://st.quantrimang.com/photos/image/2019/08/31/thay-doi-nut-nguon-win10-3.png" data-was-processed="true" height="494" src="https://st.quantrimang.com/photos/image/2019/08/31/thay-doi-nut-nguon-win10-3.png" width="784" />
<figcaption>Mở Command Prompt trong&nbsp;&nbsp;Windows 10&nbsp;phiên bản mới</figcaption>
</figure>

<p>Click chọn<strong>&nbsp;Yes</strong>&nbsp;nếu trên màn hình xuất hiện thông báo User Account Control.</p>

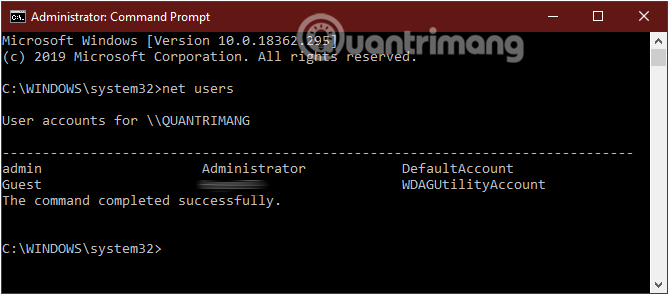
<p><strong>Bước 2:&nbsp;</strong>Trên cửa sổ Command Prompt, nhập lệnh dưới đây vào rồi nhấn&nbsp;<strong>Enter</strong>&nbsp;để xem tất cả các tài khoản user trên máy tính của bạn:</p>

<pre id="pre0">
net users</pre>

<figure><img alt="Nhập lệnh vào cửa sổ command prompt" data-i="13" data-src="https://st.quantrimang.com/photos/image/2019/09/26/xoa-tai-khoan-user-window-10-11-1.png" data-was-processed="true" height="295" src="https://st.quantrimang.com/photos/image/2019/09/26/xoa-tai-khoan-user-window-10-11-1.png" width="669" />
<figcaption>Nhập lệnh vào cửa sổ command prompt</figcaption>
</figure>

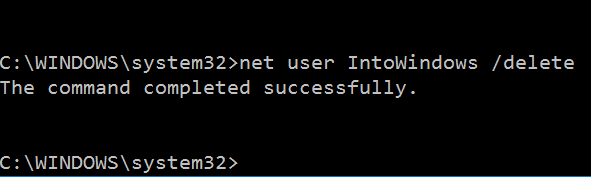
<p><strong>Bước 3:&nbsp;</strong>Tiếp theo nhập câu lệnh dưới đây để xóa tài khoản user, rồi nhấn&nbsp;<strong>Enter:</strong></p>

<pre id="pre1">
net user UserAccountName /delete</pre>

<figure><img alt="Xóa tài khoản user thông qua Command Prompt" data-i="14" data-src="https://st.quantrimang.com/photos/image/2016/05/09/xoa-tai-khoan-user.png" data-was-processed="true" height="177" src="https://st.quantrimang.com/photos/image/2016/05/09/xoa-tai-khoan-user.png" width="591" />
<figcaption>Xóa tài khoản user thông qua Command Prompt</figcaption>
</figure>

<p><strong>Lưu ý:&nbsp;</strong>Trong câu lệnh trên thay&nbsp;<strong>UserName</strong>&nbsp;bằng tên tài khoản user bạn muốn xóa mà bạn vừa tìm ở bước 2.</p>

<h2 id="mcetoc_1dlmik2u53">4. Xóa tài khoản User thông qua Local Users and Groups</h2>

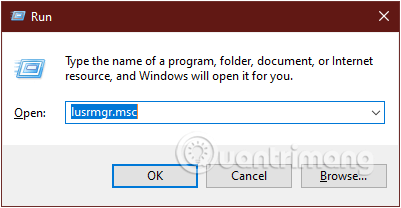
<p><strong>Bước 1:&nbsp;</strong>Nhấn tổ hợp phím&nbsp;<strong>Windows+R&nbsp;</strong>để mở cửa sổ lệnh&nbsp;<strong>Run.</strong></p>

<p><strong>Bước 2:&nbsp;</strong>Nhập lệnh sau vào hộp thoại&nbsp;<strong>Run</strong>&nbsp;và nhấn Enter:</p>

<pre id="pre2">
lusrmgr.msc</pre>

<figure><img alt="Nhập lệnh lusrmgr.msc để mở cửa sổ Local Users and Groups" data-i="15" data-src="https://st.quantrimang.com/photos/image/2019/09/26/xoa-tai-khoan-user-window-10-12.png" data-was-processed="true" height="208" src="https://st.quantrimang.com/photos/image/2019/09/26/xoa-tai-khoan-user-window-10-12.png" width="401" />
<figcaption>Nhập lệnh lusrmgr.msc để mở cửa sổ Local Users and Groups</figcaption>
</figure>

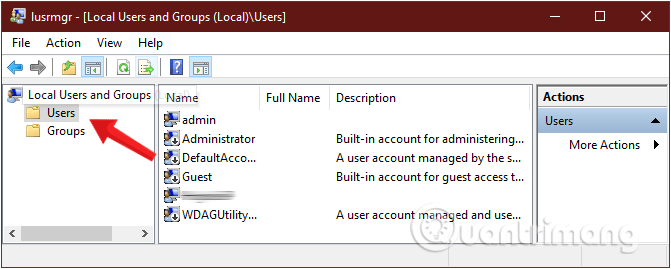
<p><strong>Bước 3:&nbsp;</strong>Ở cửa sổ&nbsp;<strong>Local Users and Groups&nbsp;</strong>hiện ra, click chọn thư mục<strong>&nbsp;User</strong>&nbsp;ở danh sách khung bên trái để mở thư mục&nbsp;<strong>User.</strong></p>

<figure><img alt="Chọn thư mục User ở cửa sổ Local Users and Groups" data-i="16" data-src="https://st.quantrimang.com/photos/image/2019/09/26/xoa-tai-khoan-user-window-10-13-1.png" data-was-processed="true" height="269" src="https://st.quantrimang.com/photos/image/2019/09/26/xoa-tai-khoan-user-window-10-13-1.png" width="671" />
<figcaption>Chọn thư mục User ở cửa sổ Local Users and Groups</figcaption>
</figure>

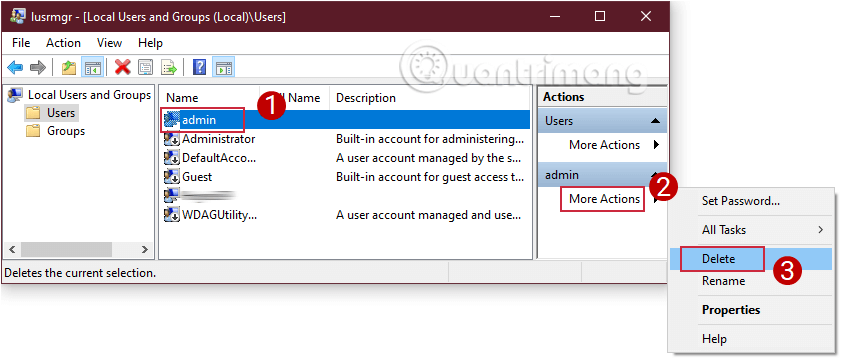
<p><strong>Bước 4:&nbsp;</strong>Tại đây bạn click chọn tài khoản&nbsp;<strong>User</strong>&nbsp;mà bạn muốn xóa ở danh sách khung ở giữa, sau đó click chọn&nbsp;<strong>More Actions</strong>&nbsp;ở khung&nbsp;<strong>Actions</strong>&nbsp;ở bên phải rồi click chọn&nbsp;<strong>Delete</strong>.</p>

<figure><img alt="Xóa tài khoản User thông qua Local Users and Groups" data-i="17" data-src="https://st.quantrimang.com/photos/image/2019/09/26/xoa-tai-khoan-user-window-10-14.png" data-was-processed="true" height="362" src="https://st.quantrimang.com/photos/image/2019/09/26/xoa-tai-khoan-user-window-10-14.png" width="841" />
<figcaption>Xóa tài khoản User thông qua Local Users and Groups</figcaption>
</figure>

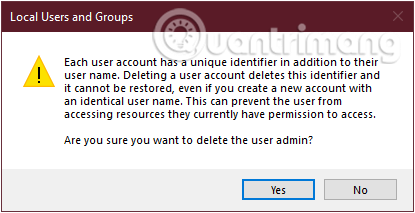
<p><strong>Bước 5:&nbsp;</strong>Lúc này trên màn hình sẽ xuất hiện hộp thoại xác nhận, click chọn&nbsp;<strong>Yes</strong>&nbsp;để đồng ý xóa tài khoản user bạn đã chọn.</p>

<figure><img alt="Click chọn Yes để đồng ý xóa tài khoản user" data-i="18" data-src="https://st.quantrimang.com/photos/image/2019/09/26/xoa-tai-khoan-user-window-10-15.png" data-was-processed="true" height="213" src="https://st.quantrimang.com/photos/image/2019/09/26/xoa-tai-khoan-user-window-10-15.png" width="415" />
<figcaption>Click chọn Yes để đồng ý xóa tài khoản user</figcaption>
</figure>
<iframe allow="autoplay" allowtransparency="true" aria-label="Advertisement" data-google-container-id="a!6" data-google-query-id="CNKA7a6s_YYDFbdgDwIdprEJJQ" data-load-complete="true" frameborder="0" height="0" hspace="0" id="aswift_5" marginheight="0" marginwidth="0" name="aswift_5" sandbox="allow-scripts allow-same-origin allow-forms allow-presentation" scrolling="no" tabindex="0" title="Advertisement" vspace="0" width="694"></iframe>

<p><strong>Bước 6:&nbsp;</strong>Sau khi hoàn tất, đóng cửa sổ&nbsp;<strong>Local Users and Groups</strong>&nbsp;lại là xong.</p>

<h2 id="mcetoc_1dlmik2u54">5. Xóa tài khoản User thông qua Netplwiz</h2>

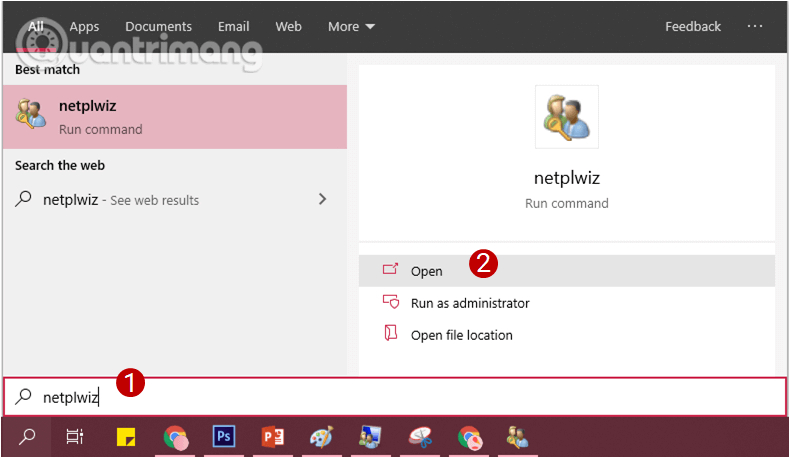
<p><strong>Bước 1:&nbsp;</strong>Nhập&nbsp;<code><strong>netplwiz</strong></code>&nbsp;vào khung Search trên Start Menu hoặc trên khung Search thanh Taskbar rồi nhấn&nbsp;<strong>Enter.</strong></p>

<figure><img alt="Tìm kiếm Netplwiz trên Start Menu" data-i="19" data-src="https://st.quantrimang.com/photos/image/2019/09/26/xoa-tai-khoan-user-window-10-16.png" data-was-processed="true" height="458" src="https://st.quantrimang.com/photos/image/2019/09/26/xoa-tai-khoan-user-window-10-16.png" width="790" />
<figcaption>Tìm kiếm Netplwiz trên Start Menu</figcaption>
</figure>

<p><strong>Bước 2:&nbsp;</strong>Nếu trên màn hình xuất hiện thông báo UAC, click chọn&nbsp;<strong>Yes</strong>&nbsp;dể xác nhận.</p>

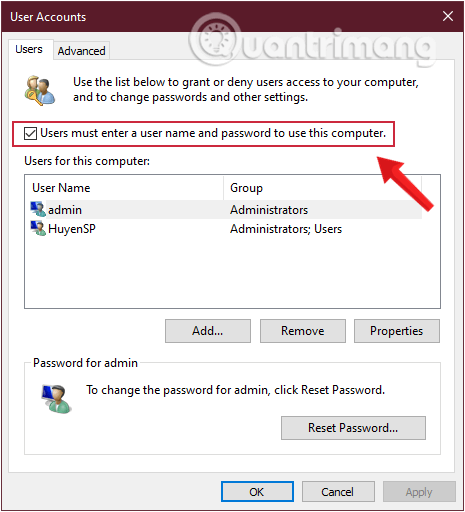
<p><strong>Bước 3:&nbsp;</strong>Tiếp theo trên cửa sổ User Account, bạn đánh tích chọn&nbsp;<strong>Users must enter a user name and password to use this computer.</strong></p>

<figure><img alt="Đánh tích chọn Users must enter a user name and password to use this computer trên cửa sổ User Account" data-i="20" data-src="https://st.quantrimang.com/photos/image/2019/09/26/xoa-tai-khoan-user-window-10-17.png" data-was-processed="true" height="512" src="https://st.quantrimang.com/photos/image/2019/09/26/xoa-tai-khoan-user-window-10-17.png" width="465" />
<figcaption>Đánh tích chọn Users must enter a user name and password to use this computer trên cửa sổ User Account</figcaption>
</figure>

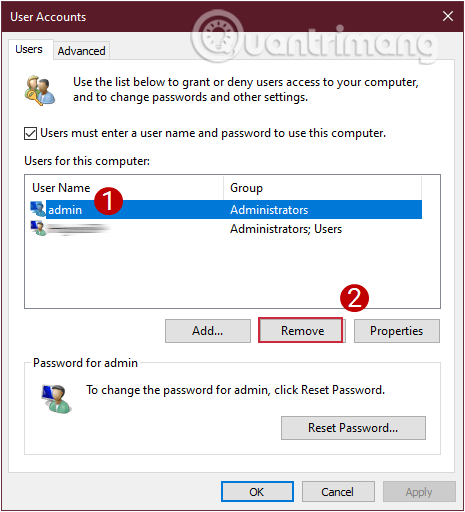
<p><strong>Bước 4:&nbsp;</strong>Tiếp theo click chọn tài khoản user bạn muốn xóa rồi click chọn&nbsp;<strong>Remove</strong>.</p>

<figure><img alt="Xóa tài khoản User bằng Netplwiz" data-i="21" data-src="https://st.quantrimang.com/photos/image/2019/09/26/xoa-tai-khoan-user-window-10-18.png" data-was-processed="true" height="512" src="https://st.quantrimang.com/photos/image/2019/09/26/xoa-tai-khoan-user-window-10-18.png" width="465" />
<figcaption>Xóa tài khoản User bằng Netplwiz</figcaption>
</figure>

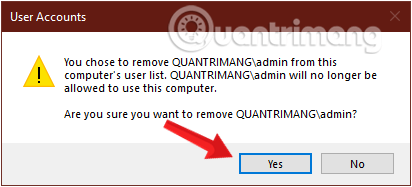
<p><strong>Bước 5:&nbsp;</strong>Click chọn<strong>&nbsp;Yes</strong>&nbsp;để xác nhận xóa.</p>

<figure><img alt="Xác nhận xóa user trên Windows" data-i="22" data-src="https://st.quantrimang.com/photos/image/2019/09/26/xoa-tai-khoan-user-window-10-19.png" data-was-processed="true" height="187" src="https://st.quantrimang.com/photos/image/2019/09/26/xoa-tai-khoan-user-window-10-19.png" width="412" />
<figcaption>Xác nhận xóa user trên&nbsp;&nbsp;Windows</figcaption>
</figure>

<p><strong>Bước 6:&nbsp;</strong>Nếu bạn thiết lập&nbsp;&nbsp;Windows&nbsp;tự động đăng nhập vào tài khoản User này trên Startup, bạn phải thiết lập lại tính năng này một lần nữa.</p>

<p><strong>Bước 7:&nbsp;</strong>Sau khi hoàn tất, đóng cửa sổ&nbsp;<strong>Netplwiz</strong>&nbsp;lại là xong.</p>

<h2 id="mcetoc_1dlmik2u55">6. Xóa user trên máy tính bằng System Properties</h2>

<p><strong>Bước 1:&nbsp;</strong>Nhấn tổ hợp phím&nbsp;<strong><code>Windows</code>+<code>R&nbsp;</code></strong>để mở cửa sổ lệnh&nbsp;<strong>Run.</strong></p>

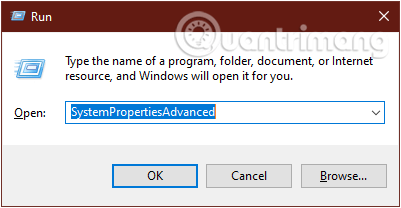
<p><strong>Bước 2:&nbsp;</strong>Nhập lệnh sau vào hộp thoại&nbsp;<strong>Run</strong>&nbsp;và nhấn Enter:</p>

<pre id="pre3">
SystemPropertiesAdvanced</pre>

<figure><img alt="Nhập lệnh SystemPropertiesAdvanced để mở cửa sổ System Properties" data-i="23" data-src="https://st.quantrimang.com/photos/image/2019/09/26/xoa-tai-khoan-user-window-10-20.png" data-was-processed="true" height="208" src="https://st.quantrimang.com/photos/image/2019/09/26/xoa-tai-khoan-user-window-10-20.png" width="401" />
<figcaption>Nhập lệnh SystemPropertiesAdvanced để mở cửa sổ System Properties</figcaption>
</figure>

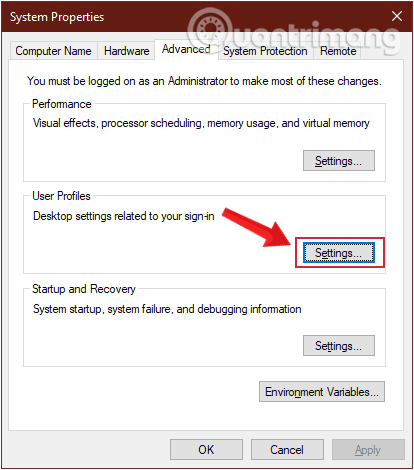
<p><strong>Bước 3:</strong>&nbsp;Ở cửa sổ&nbsp;<strong>System Properties</strong>&nbsp;hiện ra, bạn nhấn vào&nbsp;<strong>Settings</strong>&nbsp;trong phần&nbsp;<strong>User Profiles.</strong></p>

<figure><img alt="Chọn Settings trong phần User Profiles" data-i="24" data-src="https://st.quantrimang.com/photos/image/2019/09/26/xoa-tai-khoan-user-window-10-21.png" data-was-processed="true" height="470" src="https://st.quantrimang.com/photos/image/2019/09/26/xoa-tai-khoan-user-window-10-21.png" width="414" />
<figcaption>Chọn Settings trong phần User Profiles</figcaption>
</figure>

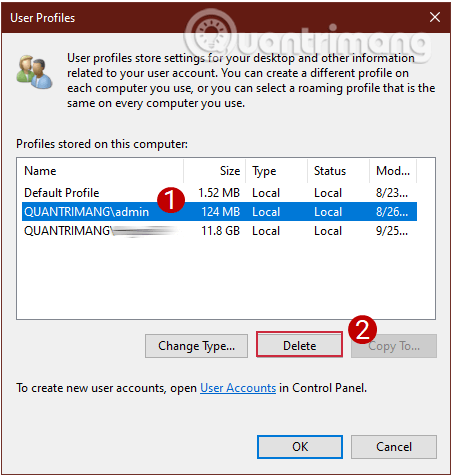
<p><strong>Bước 4:</strong>&nbsp;Trong cửa sổ&nbsp;<strong>User Profiles</strong>&nbsp;mới, chọn profile người dùng bạn muốn xóa và nhấn vào&nbsp;<strong>Delete.</strong></p>

<figure><img alt="Xóa user trên máy tính bằng System Properties" data-i="25" data-src="https://st.quantrimang.com/photos/image/2019/09/26/xoa-tai-khoan-user-window-10-22.png" data-was-processed="true" height="475" src="https://st.quantrimang.com/photos/image/2019/09/26/xoa-tai-khoan-user-window-10-22.png" width="452" />
<figcaption>Xóa user trên máy tính bằng System Properties</figcaption>
</figure>

<p><strong>Bước 5:</strong>&nbsp;Click chọn&nbsp;<strong>Yes</strong>&nbsp;ở lời nhắc hiện lên để xác nhận xóa.</p>
		</div>
				<div id="author">
						<p>
				<strong>Nguồn tin:</strong>
				Quantrimang.com:
			</p>
		</div>
	</div>
	<div id="footer" class="clearfix">
		<div id="url">
			<strong>URL của bản tin này: </strong><a href="https://www.nguoicodonvn2008.info/vi/news/savefile/kien-thuc-may-tinh/huong-dan-5-cach-xoa-tai-khoan-user-tren-windows-10-8572.html" title="Hướng dẫn 5 cách xóa tài khoản User trên Windows 10">https://www.nguoicodonvn2008.info/vi/news/savefile/kien-thuc-may-tinh/huong-dan-5-cach-xoa-tai-khoan-user-tren-windows-10-8572.html</a>

		</div>
		<div class="clear"></div>
		<div class="copyright">
			&copy; .&#x3A; Nguoicodonvn2008.info - Cõi lòng người cô đơn &#x3A;.
		</div>
		<div id="contact">
			<a href="mailto:admin@nguoicodonvn2008.info">admin@nguoicodonvn2008.info</a>
		</div>
	</div>
</div>
        <div id="timeoutsess" class="chromeframe">
            Bạn đã không sử dụng Site, <a onclick="timeoutsesscancel();" href="https://www.nguoicodonvn2008.info/#">Bấm vào đây để duy trì trạng thái đăng nhập</a>. Thời gian chờ: <span id="secField"> 60 </span> giây
        </div>
        <div id="openidResult" class="nv-alert" style="display:none"></div>
        <div id="openidBt" data-result="" data-redirect=""></div>
		</script>
		<div class="car-top">
  <span><img src="https://www.nguoicodonvn2008.info/themes/default/images/car.png" alt=""></span>
</div>
<script src="https://www.nguoicodonvn2008.info/assets/js/jquery/jquery.min.js"></script>
<script>var nv_base_siteurl="/",nv_lang_data="vi",nv_lang_interface="vi",nv_name_variable="nv",nv_fc_variable="op",nv_lang_variable="language",nv_module_name="news",nv_func_name="savefile",nv_is_user=0, nv_my_ofs=-4,nv_my_abbr="EDT",nv_cookie_prefix="nv4c_e856T",nv_check_pass_mstime=1738000,nv_area_admin=0,nv_safemode=0,theme_responsive=0,nv_recaptcha_ver=2,nv_recaptcha_sitekey="",nv_recaptcha_type="image",XSSsanitize=1;</script>
<script src="https://www.nguoicodonvn2008.info/assets/js/language/vi.js"></script>
<script src="https://www.nguoicodonvn2008.info/assets/js/DOMPurify/purify3.js"></script>
<script src="https://www.nguoicodonvn2008.info/assets/js/global.js"></script>
<script src="https://www.nguoicodonvn2008.info/assets/js/site.js"></script>
<script src="https://www.nguoicodonvn2008.info/themes/default/js/news.js"></script>
<script src="https://www.nguoicodonvn2008.info/themes/default/js/main.js"></script>
<script src="https://www.nguoicodonvn2008.info/themes/default/js/custom.js"></script>
<script type="application/ld+json">
        {
            "@context": "https://schema.org",
            "@type": "Organization",
            "url": "https://www.nguoicodonvn2008.info",
            "logo": "https://www.nguoicodonvn2008.info/uploads/angel.gif"
        }
        </script>
<script src="https://www.nguoicodonvn2008.info/themes/default/js/bootstrap.min.js"></script>
<script type="text/javascript">
var $scrolltop = $('.car-top');
$scrolltop.on('click', function () {
    $('html,body').animate({
        scrollTop: 0
    }, 800);
    $(this).addClass("car-run");
    setTimeout(function(){ $scrolltop.removeClass('car-run');}, 1000);
    return false;
});
$(window).on('scroll', function ()
{ 
    if($(window).scrollTop() >= 200)
    {
        $scrolltop.addClass("show");
        $scrolltop.addClass("car-down");
    }
    else
    {
       $scrolltop.removeClass("show");
       setTimeout(function(){ $scrolltop.removeClass('car-down');}, 300);
    }
});
</script>
</body>
</html>