<!DOCTYPE html>
    <html lang="vi" xmlns="http://www.w3.org/1999/xhtml" prefix="og: http://ogp.me/ns#">
    <head>
<title>Cách xóa thư mục Windows.old trong Windows 11</title>
<meta name="description" content="Cách xóa thư mục Windows.old trong Windows 11 - Savefile - Tin Tức -...">
<meta name="author" content=".: Nguoicodonvn2008.info - Cõi lòng người cô đơn :.">
<meta name="copyright" content=".: Nguoicodonvn2008.info - Cõi lòng người cô đơn :. [admin@nguoicodonvn2008.info]">
<meta name="robots" content="index, archive, follow, noodp">
<meta name="googlebot" content="index,archive,follow,noodp">
<meta name="msnbot" content="all,index,follow">
<meta name="generator" content="NukeViet v4.5">
<meta http-equiv="Content-Type" content="text/html; charset=utf-8">
<meta property="og:title" content="Cách xóa thư mục Windows.old trong Windows 11">
<meta property="og:type" content="website">
<meta property="og:description" content="Savefile - Tin Tức - https&#x3A;&#x002F;&#x002F;www.nguoicodonvn2008.info&#x002F;vi&#x002F;news&#x002F;savefile&#x002F;kien-thuc-may-tinh&#x002F;cach-xoa-thu-muc-windows-old-trong-windows-11-7302.html">
<meta property="og:site_name" content=".&#x3A; Nguoicodonvn2008.info - Cõi lòng người cô đơn &#x3A;.">
<meta property="og:url" content="https://www.nguoicodonvn2008.info/vi/news/savefile/kien-thuc-may-tinh/cach-xoa-thu-muc-windows-old-trong-windows-11-7302.html">
<link rel="shortcut icon" href="https://www.nguoicodonvn2008.info/favicon.ico">
<link rel="canonical" href="https://www.nguoicodonvn2008.info/vi/news/savefile/kien-thuc-may-tinh/cach-xoa-thu-muc-windows-old-trong-windows-11-7302.html">
<link rel="alternate" href="https://www.nguoicodonvn2008.info/vi/news/rss/" title="Tin Tức" type="application/rss+xml">
<link rel="alternate" href="https://www.nguoicodonvn2008.info/vi/news/rss/karaoke-dual/" title="Tin Tức - Karaoke Dual" type="application/rss+xml">
<link rel="alternate" href="https://www.nguoicodonvn2008.info/vi/news/rss/nhac-tre/" title="Tin Tức - Nhạc trẻ" type="application/rss+xml">
<link rel="alternate" href="https://www.nguoicodonvn2008.info/vi/news/rss/tru-tinh/" title="Tin Tức - Trữ tình" type="application/rss+xml">
<link rel="alternate" href="https://www.nguoicodonvn2008.info/vi/news/rss/nuoc-ngoai/" title="Tin Tức - Nước ngoài" type="application/rss+xml">
<link rel="alternate" href="https://www.nguoicodonvn2008.info/vi/news/rss/remix/" title="Tin Tức - Remix" type="application/rss+xml">
<link rel="alternate" href="https://www.nguoicodonvn2008.info/vi/news/rss/tam-su-tinh-yeu/" title="Tin Tức - Tâm sự tình yêu" type="application/rss+xml">
<link rel="alternate" href="https://www.nguoicodonvn2008.info/vi/news/rss/tho-suu-tam/" title="Tin Tức - Thơ sưu tầm" type="application/rss+xml">
<link rel="alternate" href="https://www.nguoicodonvn2008.info/vi/news/rss/cuoc-song/" title="Tin Tức - Cuộc sống" type="application/rss+xml">
<link rel="alternate" href="https://www.nguoicodonvn2008.info/vi/news/rss/phan-mem/" title="Tin Tức - Phần mềm" type="application/rss+xml">
<link rel="alternate" href="https://www.nguoicodonvn2008.info/vi/news/rss/kien-thuc-may-tinh/" title="Tin Tức - Kiến thức máy tính" type="application/rss+xml">
<link rel="alternate" href="https://www.nguoicodonvn2008.info/vi/news/rss/hoc-tap/" title="Tin Tức - Học tập" type="application/rss+xml">
<link rel="alternate" href="https://www.nguoicodonvn2008.info/vi/news/rss/tai-lieu/" title="Tin Tức - Tài liệu" type="application/rss+xml">
<link rel="alternate" href="https://www.nguoicodonvn2008.info/vi/news/rss/de-thi/" title="Tin Tức - Đề thi" type="application/rss+xml">
<link rel="preload" as="style" href="https://www.nguoicodonvn2008.info/assets/css/font-awesome.min.css" type="text/css">
<link rel="preload" as="style" href="https://www.nguoicodonvn2008.info/themes/default/css/bootstrap.non-responsive.css" type="text/css">
<link rel="preload" as="style" href="https://www.nguoicodonvn2008.info/themes/default/css/style.css" type="text/css">
<link rel="preload" as="style" href="https://www.nguoicodonvn2008.info/themes/default/css/style.non-responsive.css" type="text/css">
<link rel="preload" as="style" href="https://www.nguoicodonvn2008.info/themes/default/css/news.css" type="text/css">
<link rel="preload" as="style" href="https://www.nguoicodonvn2008.info/themes/default/css/custom.css" type="text/css">
<link rel="preload" as="script" href="https://www.nguoicodonvn2008.info/assets/js/jquery/jquery.min.js" type="text/javascript">
<link rel="preload" as="script" href="https://www.nguoicodonvn2008.info/assets/js/language/vi.js" type="text/javascript">
<link rel="preload" as="script" href="https://www.nguoicodonvn2008.info/assets/js/DOMPurify/purify3.js" type="text/javascript">
<link rel="preload" as="script" href="https://www.nguoicodonvn2008.info/assets/js/global.js" type="text/javascript">
<link rel="preload" as="script" href="https://www.nguoicodonvn2008.info/assets/js/site.js" type="text/javascript">
<link rel="preload" as="script" href="https://www.nguoicodonvn2008.info/themes/default/js/news.js" type="text/javascript">
<link rel="preload" as="script" href="https://www.nguoicodonvn2008.info/themes/default/js/main.js" type="text/javascript">
<link rel="preload" as="script" href="https://www.nguoicodonvn2008.info/themes/default/js/custom.js" type="text/javascript">
<link rel="preload" as="script" href="https://www.nguoicodonvn2008.info/themes/default/js/bootstrap.min.js" type="text/javascript">
<link rel="stylesheet" href="https://www.nguoicodonvn2008.info/assets/css/font-awesome.min.css">
<link rel="stylesheet" href="https://www.nguoicodonvn2008.info/themes/default/css/bootstrap.non-responsive.css">
<link rel="stylesheet" href="https://www.nguoicodonvn2008.info/themes/default/css/style.css">
<link rel="stylesheet" href="https://www.nguoicodonvn2008.info/themes/default/css/style.non-responsive.css">
<link rel="StyleSheet" href="https://www.nguoicodonvn2008.info/themes/default/css/news.css">
<link rel="stylesheet" href="https://www.nguoicodonvn2008.info/themes/default/css/custom.css">
<style type="text/css">
	body{background: #fff;}
</style>
    </head>
    <body>
<div id="print">
	<div id="hd_print">
		<h2 class="pull-left">.&#x3A; Nguoicodonvn2008.info - Cõi lòng người cô đơn &#x3A;.</h2>
		<p class="pull-right"><a title=".&#x3A; Nguoicodonvn2008.info - Cõi lòng người cô đơn &#x3A;." href="https://www.nguoicodonvn2008.info/">https://www.nguoicodonvn2008.info</a></p>
	</div>
	<div class="clear"></div>
	<hr />
	<div id="content">
		<h1>Cách xóa thư mục Windows.old trong Windows 11</h1>
		<ul class="list-inline">
			<li>Thứ bảy - 15/07/2023 00:54</li>
			<li class="hidden-print txtrequired"><em class="fa fa-print">&nbsp;</em><a title="In ra" href="javascript:;" onclick="window.print()">In ra</a></li>
			<li class="hidden-print txtrequired"><em class="fa fa-power-off">&nbsp;</em><a title="Đóng cửa sổ này" href="javascript:;" onclick="window.close()">Đóng cửa sổ này</a></li>
		</ul>
		<div class="clear"></div>
		<div id="hometext">
		</div>
				<div class="imghome">
			<img alt="Cách xóa thư mục Windows.old trong Windows 11" src="https://st.quantrimang.com/photos/image/2023/07/15/xoa-thu-muc-windows-old-8.jpg" width="460" class="img-thumbnail" />
		</div>
		<div class="clear"></div>
		<div id="bodytext" class="clearfix">
			<p style="text-align: justify;">Windows chiếm một lượng lớn dung lượng lưu trữ trên ổ C. Sau khi đẩy mạnh thêm các bản cập nhật bloatware và một vài phần mềm lớn, ổ C của bạn có thể hết dung lượng rất nhanh. Bạn có thể đã nhận thấy một thư mục có tên “Windows.old” trong ổ đĩa hệ thống. Nếu bạn kiểm tra kích thước của nó, nó có thể dễ dàng ngốn hết dung lượng lưu trữ 8GB trở lên.</p>

<p style="text-align: justify;">Không thể xóa thư mục một cách đơn giản và bạn phải cấp quyền sở hữu thư mục để làm như vậy. Nhưng bạn có thể xóa thư mục bằng nhiều phương pháp mà chúng ta sẽ thảo luận trong bài viết dưới đây.</p>

<h2 style="text-align: justify;">Thư mục Windows.old là gì và bạn có nên xóa nó không?</h2>

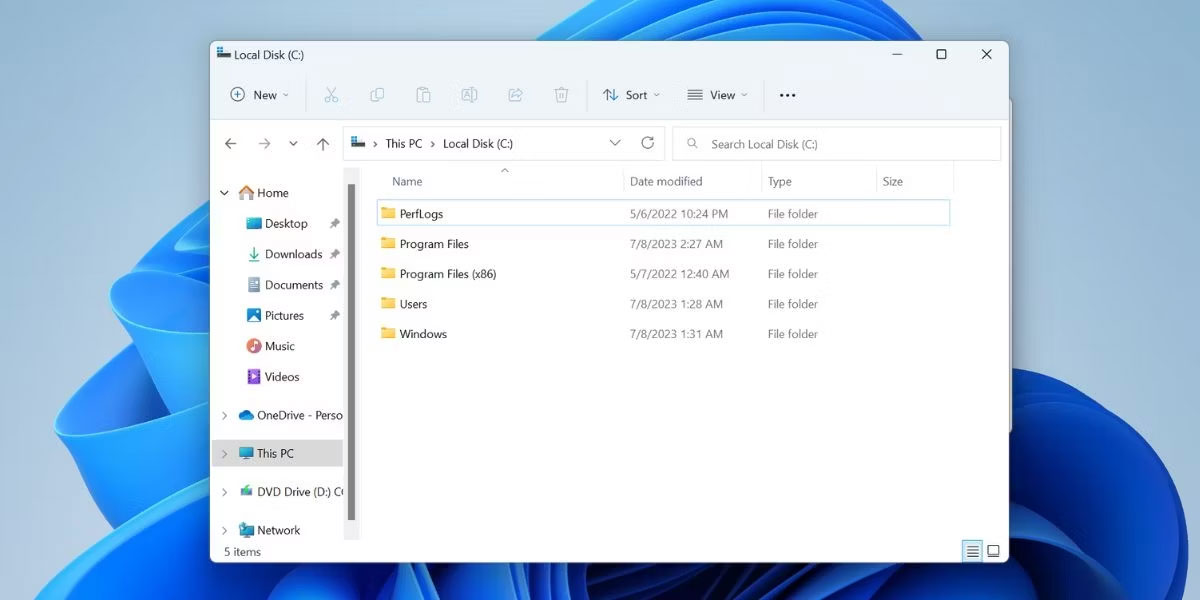
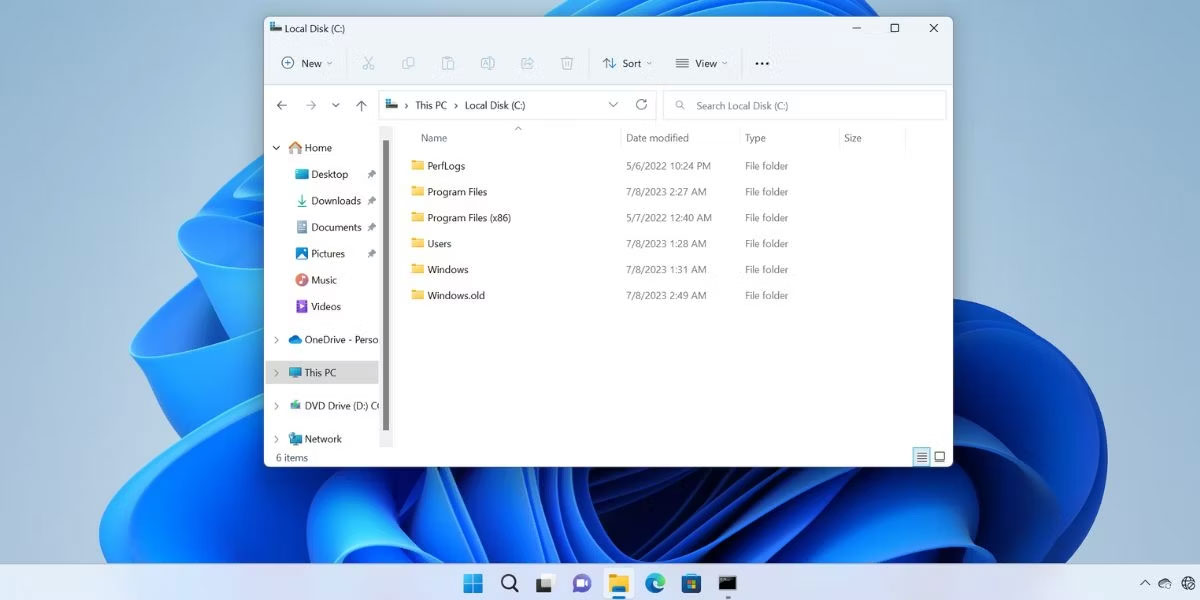
<p style="text-align: justify;">Bất cứ khi nào bạn nâng cấp lên phiên bản Windows mới (thông qua bản cập nhật Windows) hoặc thực hiện nâng cấp Windows tại chỗ, hệ điều hành sẽ tạo một thư mục Windows.old. Nó chứa tất cả các file hệ thống và file cá nhân cũ của bạn và bạn có thể sử dụng nó để hoàn nguyên về phiên bản Windows cũ nếu muốn. Nhưng thư mục này chiếm nhiều dung lượng trên ổ C, điều này có thể gây bất tiện cho người dùng mới nâng cấp PC.</p>

<figure>
<div style="text-align: justify;"><img alt="Thư mục Windows.old trong ổ C" data-i="0" data-src="https://st.quantrimang.com/photos/image/2023/07/15/xoa-thu-muc-windows-old-1.jpg" data-was-processed="true" height="600" src="https://st.quantrimang.com/photos/image/2023/07/15/xoa-thu-muc-windows-old-1.jpg" width="1200" /></div>

<figcaption>
<div style="text-align: justify;">Thư mục Windows.old trong ổ C</div>
</figcaption>
</figure>

<div style="text-align: justify;">&nbsp;</div>

<p style="text-align: justify;">Windows sẽ tự động xóa Windows.old sau 30 ngày kể từ ngày tạo. Nhưng nếu cần dung lượng lưu trữ đó ngay bây giờ, bạn có thể thử bất kỳ phương pháp nào trong số này để xóa thư mục khỏi PC của mình.</p>

<h2 style="text-align: justify;">Cách xóa thư mục Windows.old trong Windows 11</h2>

<h3 style="text-align: justify;">1. Sử dụng Storage Settings</h3>

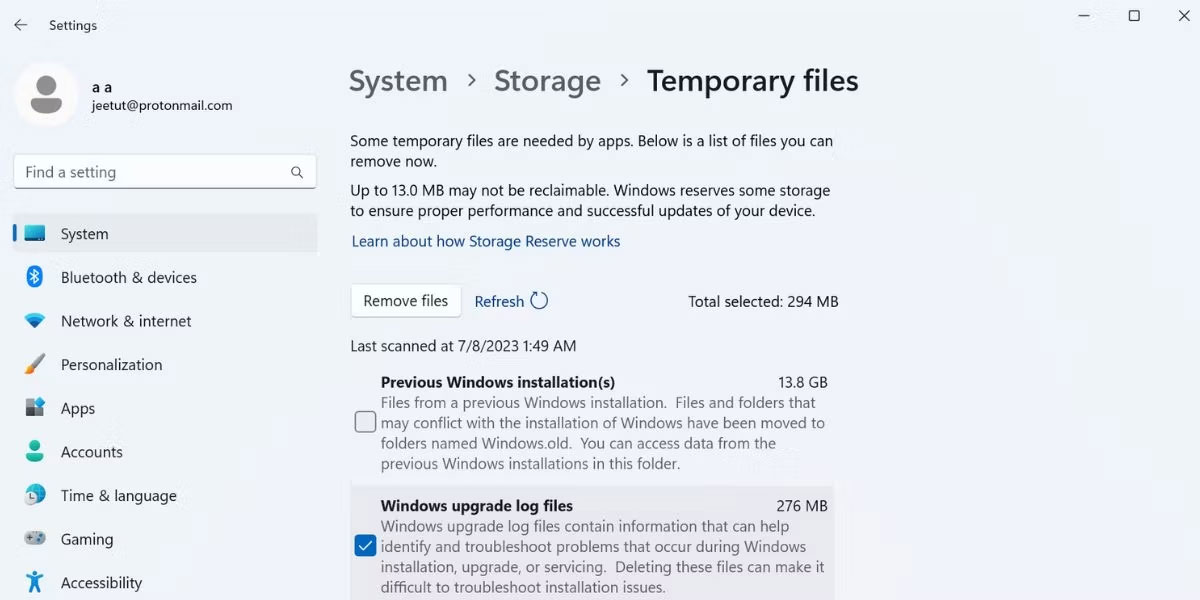
<p style="text-align: justify;">Microsoft đã giới thiệu&nbsp;<a data-type="internal" href="https://quantrimang.com/cong-nghe/cach-su-dung-storage-sense-tren-windows-10-spring-creators-update-148363" title="Cách sử dụng Storage sense trên Windows 10 để giải phóng dung lượng ổ đĩa">tính năng Storage Sense với Windows 10</a>&nbsp;và tính năng này vẫn tồn tại trong&nbsp;<a data-type="internal" href="https://quantrimang.com/cong-nghe/windows-11-tips" title="Windows 11">Windows 11</a>. Nó có thể giúp bạn&nbsp;<a data-type="internal" href="https://quantrimang.com/cong-nghe/xoa-file-rac-trong-windows-44858" title="Xoá file rác, file tạm trong Windows">xóa các file tạm thời khỏi PC</a>&nbsp;của bạn và cũng quản lý những file OneDrive. Nhưng nếu muốn dọn dẹp thủ công, bạn cần truy cập Storage Settings và xóa thư mục Windows.old khỏi đó.</p>

<p style="text-align: justify;">Làm theo các bước sau:</p>

<ol>
	<li style="text-align: justify;">Nhấp chuột phải vào nút Start để mở menu&nbsp;<strong>Quick Link</strong>. Nhấp vào tùy chọn&nbsp;<strong>Setting</strong>.</li>
	<li style="text-align: justify;">Trong phần&nbsp;<strong>System settings</strong>, cuộn xuống và nhấp vào tùy chọn&nbsp;<strong>Storage</strong>.</li>
	<li style="text-align: justify;">Đợi tính năng Storage phân tích dung lượng ổ đĩa và file. Sau đó nhấp vào tùy chọn&nbsp;<strong>Temporary Files</strong>.</li>
	<li style="text-align: justify;">Tại đây, bạn sẽ thấy danh sách tất cả các mục đang chiếm dung lượng trên ổ C và không cần thiết nữa. Nhấp vào hộp kiểm&nbsp;<strong>Previous Windows Installation(s) checkbox</strong>&nbsp;để chọn nó.</li>
	<li style="text-align: justify;">Sau đó nhấp vào nút&nbsp;<strong>Remove Files</strong>&nbsp;ở trên cùng.</li>
</ol>

<figure>
<div style="text-align: justify;"><img alt="Xóa thư mục Windows.old bằng Storage Settings" data-adbro-processed="true" data-i="1" data-src="https://st.quantrimang.com/photos/image/2023/07/15/xoa-thu-muc-windows-old-2.jpg" data-was-processed="true" height="600" src="https://st.quantrimang.com/photos/image/2023/07/15/xoa-thu-muc-windows-old-2.jpg" width="1200" /><br />
<img alt="" height="0" src="https://bs.serving-sys.com/Serving/adServer.bs?cn=display&amp;c=19&amp;pli=1079282556&amp;gdpr=${GDPR}&amp;gdpr_consent=${GDPR_CONSENT_68}&amp;us_privacy=${US_PRIVACY}&amp;adid=1090559174&amp;ebaddid=f7481d75838e48cf917e259d65c0390e&amp;ord=1689396864126" width="0" /></div>
</figure>

<div style="text-align: justify;">&nbsp;</div>

<p style="text-align: justify;">Sẽ mất một lúc để xóa thư mục Windows.old và các file tạm thời khác trên ổ C.</p>

<h3 style="text-align: justify;">2. Sử dụng Disk Cleanup</h3>

<p style="text-align: justify;">Mặc dù Storage Sense và phần cài đặt được cải tiến là một khái niệm mới nhưng Disk Cleanup cũ đáng tin cậy vẫn hoạt động. Bạn có thể sử dụng nó để tìm và xóa các file tạm thời trên Windows 11 và các hệ điều hành cũ hơn. Nó không có giao diện người dùng hiện đại nhưng có thể giúp bạn định vị và xóa thư mục Windows.old cũng như các thư mục ngốn dung lượng khác như các file Temporary Windows Update.</p>

<p style="text-align: justify;">Làm theo các bước sau để xóa thư mục Window.old bằng công cụ Disk Cleanup:</p>

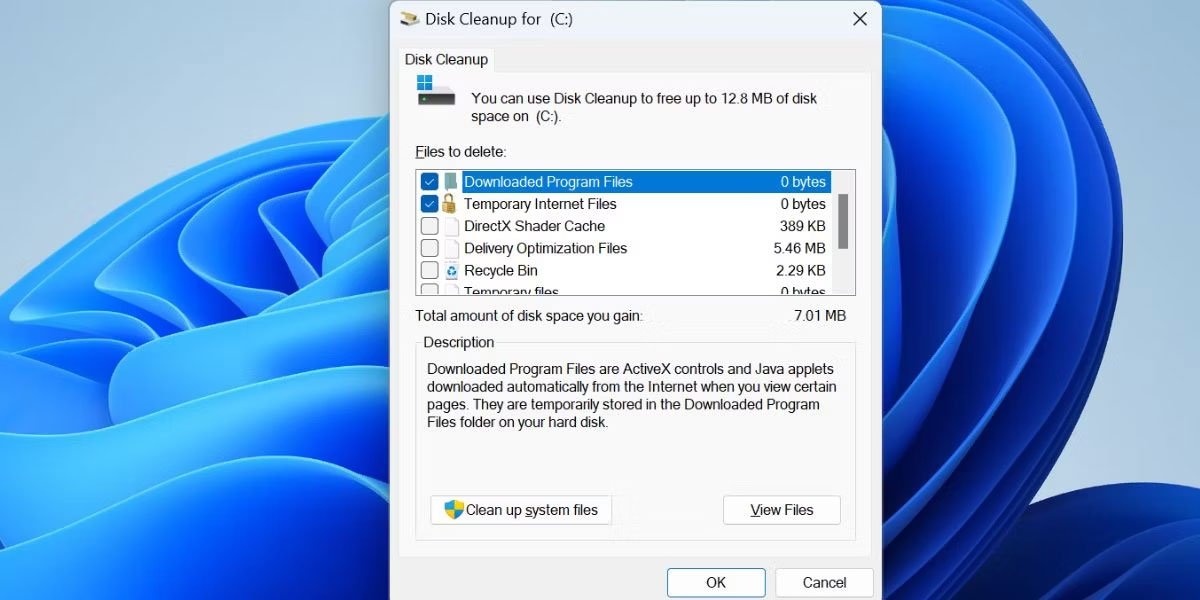
<p style="text-align: justify;">1. Nhấn&nbsp;<strong>Win + R&nbsp;</strong>để&nbsp;mở hộp thoại Run. Nhập&nbsp;<strong>cleanmgr</strong>&nbsp;và nhấn phím&nbsp;<strong>Enter</strong>&nbsp;để khởi chạy công cụ.</p>

<p style="text-align: justify;">2. Tìm nút&nbsp;<strong>Cleanup system files</strong>&nbsp;và nhấp vào nó. Đợi tiện ích quét và định vị tất cả các file tạm thời.</p>

<figure>
<div style="text-align: justify;"><img alt="Nhấp vào nút Cleanup system files" data-i="2" data-src="https://st.quantrimang.com/photos/image/2023/07/15/xoa-thu-muc-windows-old-3.jpg" data-was-processed="true" height="600" src="https://st.quantrimang.com/photos/image/2023/07/15/xoa-thu-muc-windows-old-3.jpg" width="1200" /></div>

<figcaption>
<div style="text-align: justify;">Nhấp vào nút Cleanup system files</div>
</figcaption>
</figure>

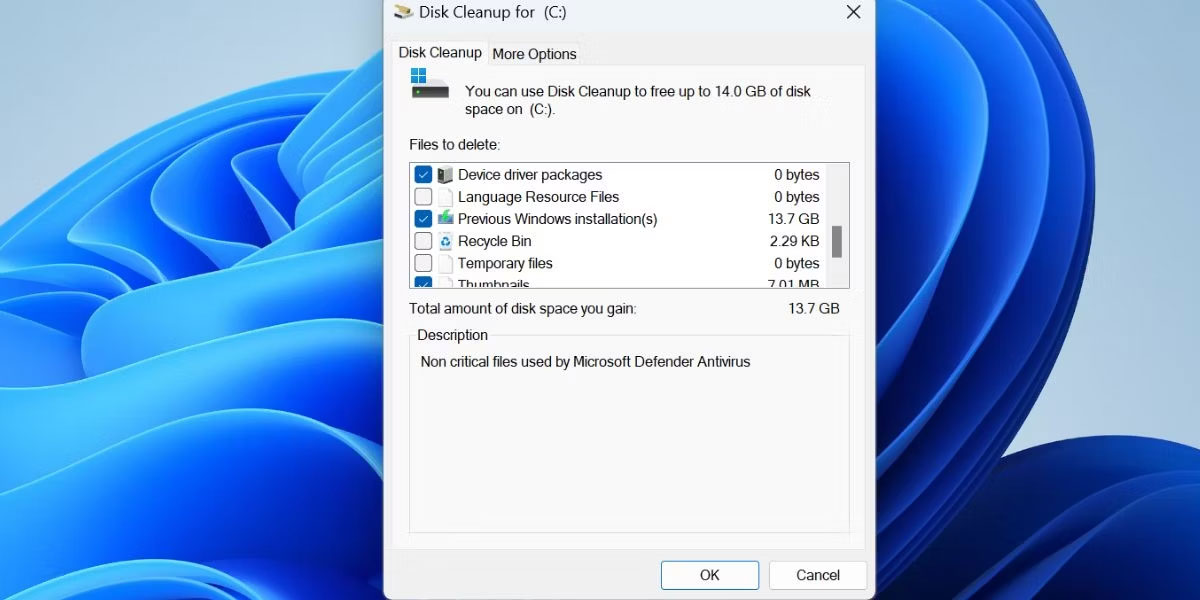
<p style="text-align: justify;">3. Cuộn danh sách&nbsp;<strong>Files to delete</strong>&nbsp;và tìm hộp kiểm&nbsp;<strong>Previous Windows Installation(s)</strong>. Bấm vào đó để chọn nó. Bạn cũng có thể chọn các file tạm thời khác.</p>

<p style="text-align: justify;">4. Bấm vào nút&nbsp;<strong>OK.</strong></p>

<figure>
<div style="text-align: justify;"><img alt="Bấm Ok để xóa file" data-i="3" data-src="https://st.quantrimang.com/photos/image/2023/07/15/xoa-thu-muc-windows-old-4.jpg" data-was-processed="true" height="600" src="https://st.quantrimang.com/photos/image/2023/07/15/xoa-thu-muc-windows-old-4.jpg" width="1200" /></div>

<figcaption>
<div style="text-align: justify;">Bấm Ok để xóa file</div>
</figcaption>
</figure>

<div style="text-align: justify;"><iframe allowtransparency="true" data-google-container-id="a!4" data-google-query-id="CP6F8931j4ADFcbTvQodTGQAMA" data-load-complete="true" frameborder="0" height="174" hspace="0" id="aswift_3" marginheight="0" marginwidth="0" name="aswift_3" sandbox="allow-forms allow-popups allow-popups-to-escape-sandbox allow-same-origin allow-scripts allow-top-navigation-by-user-activation" scrolling="no" vspace="0" width="694"></iframe></div>

<p style="text-align: justify;">5. Xác nhận hành động của bạn và nhấp vào nút&nbsp;<strong>Delete Files</strong>&nbsp;để xóa thư mục Windows.old.</p>

<h3 style="text-align: justify;">3. Sử dụng CMD</h3>

<p style="text-align: justify;">Làm theo các bước sau để xóa thư mục Window.old bằng công cụ Command Prompt:</p>

<p style="text-align: justify;">1. Nhấn&nbsp;<strong>Win + R</strong>&nbsp;để mở hộp thoại Run. Nhập&nbsp;<strong>cmd</strong>&nbsp;và nhấn&nbsp;<strong>Ctrl + Shift + Enter</strong>&nbsp;để&nbsp;<a data-type="internal" href="https://quantrimang.com/cong-nghe/huong-dan-mo-command-prompt-duoi-quyen-admin-tren-windows-8-va-10-119884" title="Cách mở và chạy cmd với quyền Admin trên Windows">mở Command Prompt với quyền admin</a>.</p>

<p style="text-align: justify;">2. Nhập lệnh sau và nhấn&nbsp;<strong>Enter</strong>:</p>

<pre id="pre0">
<code>takeown /F &quot;C:\Windows.old&quot; /A /R /D Y</code></pre>

<figure>
<div style="text-align: justify;"><img alt="Lấy quyền sở hữu tất cả các thư mục và file" data-i="4" data-src="https://st.quantrimang.com/photos/image/2023/07/15/xoa-thu-muc-windows-old-5.jpg" data-was-processed="true" height="600" src="https://st.quantrimang.com/photos/image/2023/07/15/xoa-thu-muc-windows-old-5.jpg" width="1200" /></div>

<figcaption>
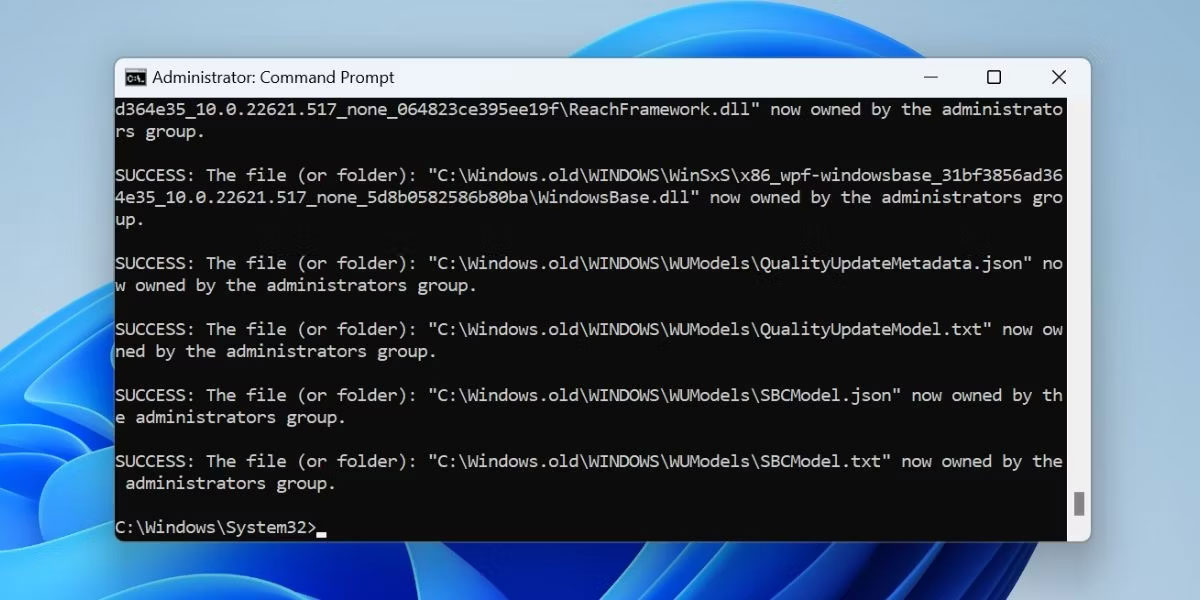
<div style="text-align: justify;">Lấy quyền sở hữu tất cả các thư mục và file</div>
</figcaption>
</figure>

<p style="text-align: justify;">3. Sẽ mất một lúc để có quyền sở hữu tất cả các thư mục và file. Sau đó gõ và thực thi lệnh sau:</p>

<pre id="pre1">
<code>icacls &quot;C:\Windows.old&quot; /grant *S-1-5-32-544:F /T /C /Q</code></pre>

<p style="text-align: justify;"><img alt="Xóa thư mục cũ của Windows bằng Command Prompt" data-i="5" data-src="https://st.quantrimang.com/photos/image/2023/07/15/xoa-thu-muc-windows-old-6.jpg" data-was-processed="true" height="161" src="https://st.quantrimang.com/photos/image/2023/07/15/xoa-thu-muc-windows-old-6.jpg" width="650" /></p>

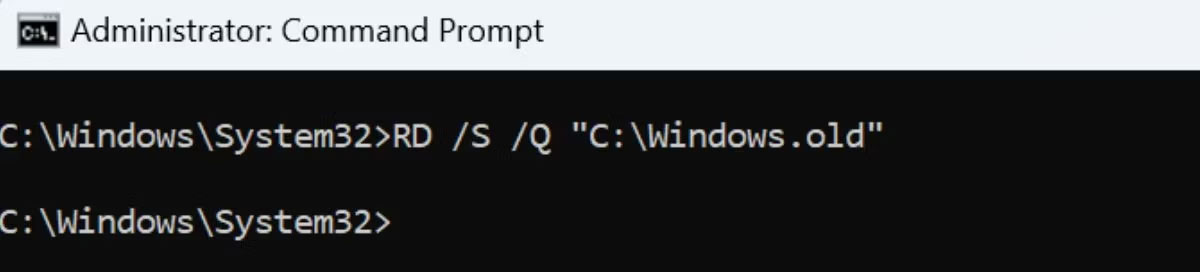
<p style="text-align: justify;">4. Cuối cùng, thực thi lệnh sau để xóa thư mục:</p>

<pre id="pre2">
<code>RD /S /Q &quot;C:\Windows.old&quot;</code></pre>

<figure>
<div style="text-align: justify;"><img alt="Xóa thư mục cũ của Windows bằng CMD " data-i="6" data-src="https://st.quantrimang.com/photos/image/2023/07/15/xoa-thu-muc-windows-old-7.jpg" data-was-processed="true" height="272" src="https://st.quantrimang.com/photos/image/2023/07/15/xoa-thu-muc-windows-old-7.jpg" width="1200" /></div>

<figcaption>
<div style="text-align: justify;">Xóa thư mục cũ của Windows bằng CMD</div>
</figcaption>
</figure>

<p style="text-align: justify;">5. Đóng cửa sổ Command Prompt.</p>

<figure>
<div style="text-align: justify;"><img alt="Thư mục Windows.old bị xóa vĩnh viễn" data-i="7" data-src="https://st.quantrimang.com/photos/image/2023/07/15/xoa-thu-muc-windows-old-8.jpg" data-was-processed="true" height="600" src="https://st.quantrimang.com/photos/image/2023/07/15/xoa-thu-muc-windows-old-8.jpg" width="1200" /></div>

<figcaption>
<div style="text-align: justify;">Thư mục Windows.old bị xóa vĩnh viễn</div>
</figcaption>
</figure>

<div style="text-align: justify;">&nbsp;</div>
		</div>
				<div id="author">
						<p>
				<strong>Nguồn tin:</strong>
				Quantrimang.com
			</p>
		</div>
	</div>
	<div id="footer" class="clearfix">
		<div id="url">
			<strong>URL của bản tin này: </strong><a href="https://www.nguoicodonvn2008.info/vi/news/savefile/kien-thuc-may-tinh/cach-xoa-thu-muc-windows-old-trong-windows-11-7302.html" title="Cách xóa thư mục Windows.old trong Windows 11">https://www.nguoicodonvn2008.info/vi/news/savefile/kien-thuc-may-tinh/cach-xoa-thu-muc-windows-old-trong-windows-11-7302.html</a>

		</div>
		<div class="clear"></div>
		<div class="copyright">
			&copy; .&#x3A; Nguoicodonvn2008.info - Cõi lòng người cô đơn &#x3A;.
		</div>
		<div id="contact">
			<a href="mailto:admin@nguoicodonvn2008.info">admin@nguoicodonvn2008.info</a>
		</div>
	</div>
</div>
        <div id="timeoutsess" class="chromeframe">
            Bạn đã không sử dụng Site, <a onclick="timeoutsesscancel();" href="https://www.nguoicodonvn2008.info/#">Bấm vào đây để duy trì trạng thái đăng nhập</a>. Thời gian chờ: <span id="secField"> 60 </span> giây
        </div>
        <div id="openidResult" class="nv-alert" style="display:none"></div>
        <div id="openidBt" data-result="" data-redirect=""></div>
		</script>
		<div class="car-top">
  <span><img src="https://www.nguoicodonvn2008.info/themes/default/images/car.png" alt=""></span>
</div>
<div id="run_cronjobs" style="visibility:hidden;display:none;"><img alt="cron" src="/index.php?second=cronjobs&amp;p=q7Y9aaIr" width="1" height="1" /></div>
<script src="https://www.nguoicodonvn2008.info/assets/js/jquery/jquery.min.js"></script>
<script>var nv_base_siteurl="/",nv_lang_data="vi",nv_lang_interface="vi",nv_name_variable="nv",nv_fc_variable="op",nv_lang_variable="language",nv_module_name="news",nv_func_name="savefile",nv_is_user=0, nv_my_ofs=-4,nv_my_abbr="EDT",nv_cookie_prefix="nv4c_e856T",nv_check_pass_mstime=1738000,nv_area_admin=0,nv_safemode=0,theme_responsive=0,nv_recaptcha_ver=2,nv_recaptcha_sitekey="",nv_recaptcha_type="image",XSSsanitize=1;</script>
<script src="https://www.nguoicodonvn2008.info/assets/js/language/vi.js"></script>
<script src="https://www.nguoicodonvn2008.info/assets/js/DOMPurify/purify3.js"></script>
<script src="https://www.nguoicodonvn2008.info/assets/js/global.js"></script>
<script src="https://www.nguoicodonvn2008.info/assets/js/site.js"></script>
<script src="https://www.nguoicodonvn2008.info/themes/default/js/news.js"></script>
<script src="https://www.nguoicodonvn2008.info/themes/default/js/main.js"></script>
<script src="https://www.nguoicodonvn2008.info/themes/default/js/custom.js"></script>
<script type="application/ld+json">
        {
            "@context": "https://schema.org",
            "@type": "Organization",
            "url": "https://www.nguoicodonvn2008.info",
            "logo": "https://www.nguoicodonvn2008.info/uploads/angel.gif"
        }
        </script>
<script src="https://www.nguoicodonvn2008.info/themes/default/js/bootstrap.min.js"></script>
<script type="text/javascript">
var $scrolltop = $('.car-top');
$scrolltop.on('click', function () {
    $('html,body').animate({
        scrollTop: 0
    }, 800);
    $(this).addClass("car-run");
    setTimeout(function(){ $scrolltop.removeClass('car-run');}, 1000);
    return false;
});
$(window).on('scroll', function ()
{ 
    if($(window).scrollTop() >= 200)
    {
        $scrolltop.addClass("show");
        $scrolltop.addClass("car-down");
    }
    else
    {
       $scrolltop.removeClass("show");
       setTimeout(function(){ $scrolltop.removeClass('car-down');}, 300);
    }
});
</script>
</body>
</html>