<!DOCTYPE html>
    <html lang="vi" xmlns="http://www.w3.org/1999/xhtml" prefix="og: http://ogp.me/ns#">
    <head>
<title>Cách vô hiệu hóa hoặc xóa Hyper-V trên Windows 11</title>
<meta name="description" content="Cách vô hiệu hóa hoặc xóa Hyper-V trên Windows 11 - Savefile - Tin Tức -...">
<meta name="author" content=".: Nguoicodonvn2008.info - Cõi lòng người cô đơn :.">
<meta name="copyright" content=".: Nguoicodonvn2008.info - Cõi lòng người cô đơn :. [admin@nguoicodonvn2008.info]">
<meta name="robots" content="index, archive, follow, noodp">
<meta name="googlebot" content="index,archive,follow,noodp">
<meta name="msnbot" content="all,index,follow">
<meta name="generator" content="NukeViet v4.5">
<meta http-equiv="Content-Type" content="text/html; charset=utf-8">
<meta property="og:title" content="Cách vô hiệu hóa hoặc xóa Hyper-V trên Windows 11">
<meta property="og:type" content="website">
<meta property="og:description" content="Savefile - Tin Tức - https&#x3A;&#x002F;&#x002F;www.nguoicodonvn2008.info&#x002F;vi&#x002F;news&#x002F;savefile&#x002F;kien-thuc-may-tinh&#x002F;cach-vo-hieu-hoa-hoac-xoa-hyper-v-tren-windows-11-6167.html">
<meta property="og:site_name" content=".&#x3A; Nguoicodonvn2008.info - Cõi lòng người cô đơn &#x3A;.">
<meta property="og:url" content="https://www.nguoicodonvn2008.info/vi/news/savefile/kien-thuc-may-tinh/cach-vo-hieu-hoa-hoac-xoa-hyper-v-tren-windows-11-6167.html">
<link rel="shortcut icon" href="https://www.nguoicodonvn2008.info/favicon.ico">
<link rel="canonical" href="https://www.nguoicodonvn2008.info/vi/news/savefile/kien-thuc-may-tinh/cach-vo-hieu-hoa-hoac-xoa-hyper-v-tren-windows-11-6167.html">
<link rel="alternate" href="https://www.nguoicodonvn2008.info/vi/news/rss/" title="Tin Tức" type="application/rss+xml">
<link rel="alternate" href="https://www.nguoicodonvn2008.info/vi/news/rss/karaoke-dual/" title="Tin Tức - Karaoke Dual" type="application/rss+xml">
<link rel="alternate" href="https://www.nguoicodonvn2008.info/vi/news/rss/nhac-tre/" title="Tin Tức - Nhạc trẻ" type="application/rss+xml">
<link rel="alternate" href="https://www.nguoicodonvn2008.info/vi/news/rss/tru-tinh/" title="Tin Tức - Trữ tình" type="application/rss+xml">
<link rel="alternate" href="https://www.nguoicodonvn2008.info/vi/news/rss/nuoc-ngoai/" title="Tin Tức - Nước ngoài" type="application/rss+xml">
<link rel="alternate" href="https://www.nguoicodonvn2008.info/vi/news/rss/remix/" title="Tin Tức - Remix" type="application/rss+xml">
<link rel="alternate" href="https://www.nguoicodonvn2008.info/vi/news/rss/tam-su-tinh-yeu/" title="Tin Tức - Tâm sự tình yêu" type="application/rss+xml">
<link rel="alternate" href="https://www.nguoicodonvn2008.info/vi/news/rss/tho-suu-tam/" title="Tin Tức - Thơ sưu tầm" type="application/rss+xml">
<link rel="alternate" href="https://www.nguoicodonvn2008.info/vi/news/rss/cuoc-song/" title="Tin Tức - Cuộc sống" type="application/rss+xml">
<link rel="alternate" href="https://www.nguoicodonvn2008.info/vi/news/rss/phan-mem/" title="Tin Tức - Phần mềm" type="application/rss+xml">
<link rel="alternate" href="https://www.nguoicodonvn2008.info/vi/news/rss/kien-thuc-may-tinh/" title="Tin Tức - Kiến thức máy tính" type="application/rss+xml">
<link rel="alternate" href="https://www.nguoicodonvn2008.info/vi/news/rss/hoc-tap/" title="Tin Tức - Học tập" type="application/rss+xml">
<link rel="alternate" href="https://www.nguoicodonvn2008.info/vi/news/rss/tai-lieu/" title="Tin Tức - Tài liệu" type="application/rss+xml">
<link rel="alternate" href="https://www.nguoicodonvn2008.info/vi/news/rss/de-thi/" title="Tin Tức - Đề thi" type="application/rss+xml">
<link rel="preload" as="style" href="https://www.nguoicodonvn2008.info/assets/css/font-awesome.min.css" type="text/css">
<link rel="preload" as="style" href="https://www.nguoicodonvn2008.info/themes/default/css/bootstrap.non-responsive.css" type="text/css">
<link rel="preload" as="style" href="https://www.nguoicodonvn2008.info/themes/default/css/style.css" type="text/css">
<link rel="preload" as="style" href="https://www.nguoicodonvn2008.info/themes/default/css/style.non-responsive.css" type="text/css">
<link rel="preload" as="style" href="https://www.nguoicodonvn2008.info/themes/default/css/news.css" type="text/css">
<link rel="preload" as="style" href="https://www.nguoicodonvn2008.info/themes/default/css/custom.css" type="text/css">
<link rel="preload" as="script" href="https://www.nguoicodonvn2008.info/assets/js/jquery/jquery.min.js" type="text/javascript">
<link rel="preload" as="script" href="https://www.nguoicodonvn2008.info/assets/js/language/vi.js" type="text/javascript">
<link rel="preload" as="script" href="https://www.nguoicodonvn2008.info/assets/js/DOMPurify/purify3.js" type="text/javascript">
<link rel="preload" as="script" href="https://www.nguoicodonvn2008.info/assets/js/global.js" type="text/javascript">
<link rel="preload" as="script" href="https://www.nguoicodonvn2008.info/assets/js/site.js" type="text/javascript">
<link rel="preload" as="script" href="https://www.nguoicodonvn2008.info/themes/default/js/news.js" type="text/javascript">
<link rel="preload" as="script" href="https://www.nguoicodonvn2008.info/themes/default/js/main.js" type="text/javascript">
<link rel="preload" as="script" href="https://www.nguoicodonvn2008.info/themes/default/js/custom.js" type="text/javascript">
<link rel="preload" as="script" href="https://www.nguoicodonvn2008.info/themes/default/js/bootstrap.min.js" type="text/javascript">
<link rel="stylesheet" href="https://www.nguoicodonvn2008.info/assets/css/font-awesome.min.css">
<link rel="stylesheet" href="https://www.nguoicodonvn2008.info/themes/default/css/bootstrap.non-responsive.css">
<link rel="stylesheet" href="https://www.nguoicodonvn2008.info/themes/default/css/style.css">
<link rel="stylesheet" href="https://www.nguoicodonvn2008.info/themes/default/css/style.non-responsive.css">
<link rel="StyleSheet" href="https://www.nguoicodonvn2008.info/themes/default/css/news.css">
<link rel="stylesheet" href="https://www.nguoicodonvn2008.info/themes/default/css/custom.css">
<style type="text/css">
	body{background: #fff;}
</style>
    </head>
    <body>
<div id="print">
	<div id="hd_print">
		<h2 class="pull-left">.&#x3A; Nguoicodonvn2008.info - Cõi lòng người cô đơn &#x3A;.</h2>
		<p class="pull-right"><a title=".&#x3A; Nguoicodonvn2008.info - Cõi lòng người cô đơn &#x3A;." href="https://www.nguoicodonvn2008.info/">https://www.nguoicodonvn2008.info</a></p>
	</div>
	<div class="clear"></div>
	<hr />
	<div id="content">
		<h1>Cách vô hiệu hóa hoặc xóa Hyper-V trên Windows 11</h1>
		<ul class="list-inline">
			<li>Thứ sáu - 07/10/2022 00:51</li>
			<li class="hidden-print txtrequired"><em class="fa fa-print">&nbsp;</em><a title="In ra" href="javascript:;" onclick="window.print()">In ra</a></li>
			<li class="hidden-print txtrequired"><em class="fa fa-power-off">&nbsp;</em><a title="Đóng cửa sổ này" href="javascript:;" onclick="window.close()">Đóng cửa sổ này</a></li>
		</ul>
		<div class="clear"></div>
		<div id="hometext">
		</div>
				<div class="imghome">
			<img alt="Cách vô hiệu hóa hoặc xóa Hyper-V trên Windows 11" src="https://st.quantrimang.com/photos/image/2022/10/06/vo-hieu-hoa-hyper-v-tren-windows-11-5.jpg" width="460" class="img-thumbnail" />
		</div>
		<div class="clear"></div>
		<div id="bodytext" class="clearfix">
			<p style="text-align: justify;">Hyper-V được cài đặt sẵn trên máy tính&nbsp;Windows 11. Mặc dù công cụ ảo hóa không có sẵn trên phiên bản Home của hệ điều hành, nhưng bạn có thể cài đặt nó bằng một batch script.</p>

<p style="text-align: justify;">Thật không may, Hyper-V có thể xung đột với các ứng dụng của bên thứ ba trên PC của bạn. Do đó, bạn có thể gặp phải lỗi liên quan đến Hyper-V khi cố khởi chạy ứng dụng, game PC hoặc tiện ích điều chỉnh phần cứng.</p>

<p style="text-align: justify;">May mắn thay, bạn có thể tắt Hyper-V trong Windows 11 với sự trợ giúp của hộp thoại Windows Features cổ điển, Command Prompt và PowerShell.</p>

<h2 style="text-align: justify;">Cách kiểm tra xem Hyper-V có đang chạy trên Windows 11 hay không</h2>

<figure>
<div style="text-align: justify;"><img alt="Kiểm tra xem Hyper-V có đang chạy trên Windows 11 hay không" data-i="0" data-src="https://st.quantrimang.com/photos/image/2022/10/06/vo-hieu-hoa-hyper-v-tren-windows-11-1.jpg" data-was-processed="true" height="364" src="https://st.quantrimang.com/photos/image/2022/10/06/vo-hieu-hoa-hyper-v-tren-windows-11-1.jpg" width="650" /></div>

<figcaption>
<div style="text-align: justify;">Kiểm tra xem Hyper-V có đang chạy trên Windows 11 hay không</div>
</figcaption>
</figure>

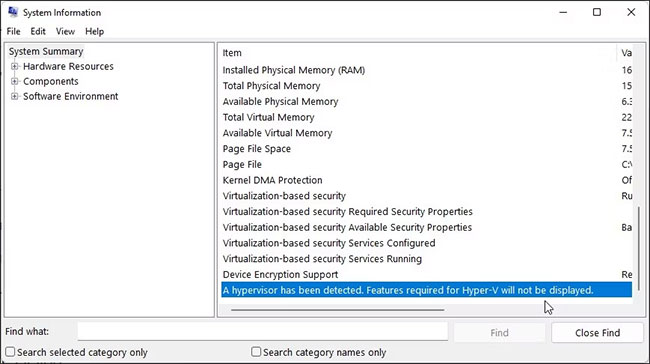
<p style="text-align: justify;">Bạn có thể truy cập ứng dụng&nbsp;<strong>System Information</strong>&nbsp;để xác định xem ảo hóa Hyper-V có đang chạy hay không. Điều này rất hữu ích nếu bạn cần xác minh trạng thái của Hyper-V sau khi vô hiệu hóa nó.</p>

<p style="text-align: justify;">Để kiểm tra trạng thái Hyper-V hiện tại trên máy tính của bạn:</p>

<p style="text-align: justify;">1. Nhấn&nbsp;<strong>Win + R</strong>&nbsp;để&nbsp;mở Run.</p>

<p style="text-align: justify;">2. Nhập&nbsp;<strong>msinfo32.exe</strong>&nbsp;và nhấp vào&nbsp;<strong>OK</strong>&nbsp;để mở ứng dụng.</p>

<p style="text-align: justify;">3. Tiếp theo, hãy kiểm tra xem mục nhập sau có sẵn ở cuối tab chi tiết hay không:</p>

<p style="text-align: justify;">4. Hypervisor đã được phát hiện. Các tính năng cần thiết cho Hyper-V sẽ không được hiển thị.</p>

<p style="text-align: justify;">5. Nếu có, bạn sẽ cần phải tắt Hyper-V, Memory integrity và tính năng Credential Guard, như được thảo luận bên dưới để sử dụng các công cụ ảo hóa khác mà không gặp rắc rối.</p>

<h2 style="text-align: justify;">Cách vô hiệu hóa Hyper-V trên Windows 11</h2>

<h3 style="text-align: justify;">1. Vô hiệu hóa Hyper-V thông qua hộp thoại Windows Features</h3>

<p style="text-align: justify;">Hộp thoại Windows Features cho phép bạn thêm các tính năng bổ sung bị tắt theo mặc định trong Windows 11. Bạn cũng có thể sử dụng hộp thoại này để tắt một số tính năng nâng cao, bao gồm Hyper-V.</p>

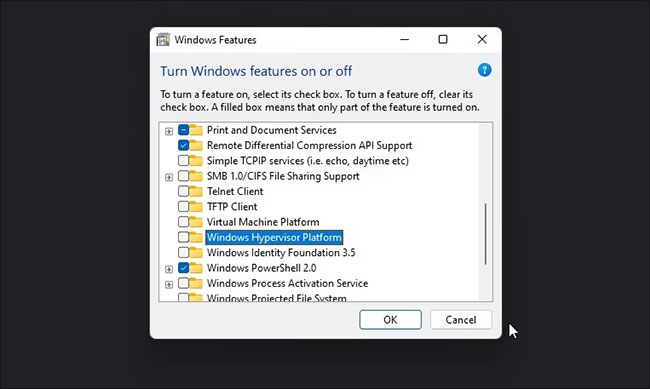
<p style="text-align: justify;">Lưu ý rằng để khắc phục lỗi liên quan đến Hyper-V, bạn sẽ cần phải tắt tính năng Virtual Machine Platform và Windows Hypervisor Platform ngoài Hyper-V.</p>

<p style="text-align: justify;">Để tắt Hyper-V bằng hộp thoại Windows Features:</p>

<p style="text-align: justify;">B1: Nhấn phím&nbsp;<strong>Win + R</strong>&nbsp;để mở hộp thoại Run.</p>

<p style="text-align: justify;">B2: Nhập&nbsp;<strong>control</strong>&nbsp;và nhấp OK để&nbsp;mở Control Panel.</p>

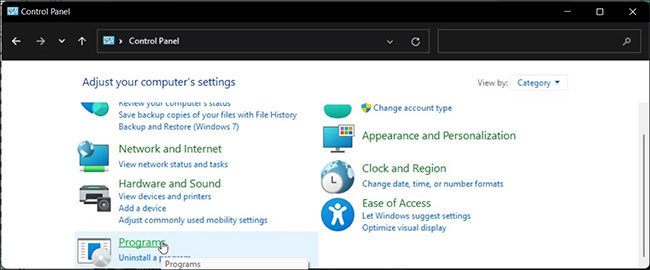
<p style="text-align: justify;">B3: Trong&nbsp;<strong>Control Panel</strong>, bấm vào&nbsp;<strong>Programs.</strong></p>

<figure>
<div style="text-align: justify;"><img alt="Programs trong Control Panel Windows 11" data-i="1" data-src="https://st.quantrimang.com/photos/image/2022/10/06/vo-hieu-hoa-hyper-v-tren-windows-11-2.jpg" data-was-processed="true" height="270" src="https://st.quantrimang.com/photos/image/2022/10/06/vo-hieu-hoa-hyper-v-tren-windows-11-2.jpg" width="650" /></div>

<figcaption>
<div style="text-align: justify;">Programs trong Control Panel Windows 11</div>
</figcaption>
</figure>

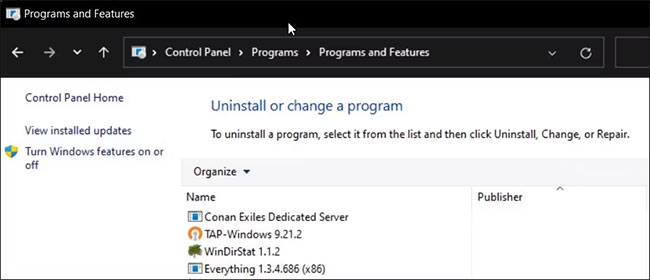
<p style="text-align: justify;">B4: Tiếp theo, nhấp vào&nbsp;<strong>Programs and Features</strong>.</p>

<p style="text-align: justify;">B5: Trong ngăn bên trái, nhấp vào&nbsp;<strong>Turn Windows features on or off</strong>.</p>

<figure>
<div style="text-align: justify;"><img alt="Nhấp vào Turn Windows features on or off" data-i="2" data-src="https://st.quantrimang.com/photos/image/2022/10/06/vo-hieu-hoa-hyper-v-tren-windows-11-3.jpg" data-was-processed="true" height="280" src="https://st.quantrimang.com/photos/image/2022/10/06/vo-hieu-hoa-hyper-v-tren-windows-11-3.jpg" width="650" /></div>

<figcaption>
<div style="text-align: justify;">Nhấp vào Turn Windows features on or off</div>
</figcaption>
</figure>

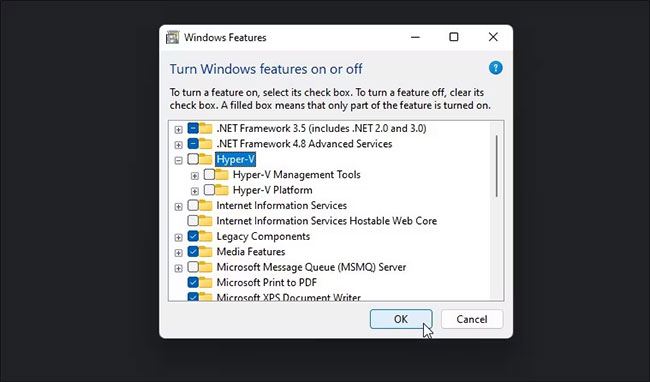
<p style="text-align: justify;">B6: Trong hộp thoại&nbsp;<strong>Windows Features</strong>, tìm&nbsp;<strong>Hyper-V.</strong></p>

<p style="text-align: justify;">B7: Bỏ chọn tùy chọn&nbsp;<strong>Hyper-V</strong>&nbsp;để tắt tính năng này.</p>

<figure>
<div style="text-align: justify;"><img alt="Bỏ chọn tùy chọn Hyper-V" data-i="3" data-src="https://st.quantrimang.com/photos/image/2022/10/06/vo-hieu-hoa-hyper-v-tren-windows-11-4.jpg" data-was-processed="true" height="382" src="https://st.quantrimang.com/photos/image/2022/10/06/vo-hieu-hoa-hyper-v-tren-windows-11-4.jpg" width="650" /></div>

<figcaption>
<div style="text-align: justify;">Bỏ chọn tùy chọn Hyper-V</div>
</figcaption>
</figure>

<p style="text-align: justify;">B8: Tiếp theo, cuộn xuống và tìm các tùy chọn&nbsp;<strong>Virtual Machine Platform</strong>&nbsp;và&nbsp;<strong>Windows Hypervisor Platform</strong>.</p>

<figure>
<div style="text-align: justify;"><img alt="Bỏ chọn Virtual Machine Platform và Windows Hypervisor Platform" data-i="4" data-src="https://st.quantrimang.com/photos/image/2022/10/06/vo-hieu-hoa-hyper-v-tren-windows-11-5.jpg" data-was-processed="true" height="389" src="https://st.quantrimang.com/photos/image/2022/10/06/vo-hieu-hoa-hyper-v-tren-windows-11-5.jpg" width="650" /></div>

<figcaption>
<div style="text-align: justify;">Bỏ chọn Virtual Machine Platform và Windows Hypervisor Platform</div>
</figcaption>
</figure>

<p style="text-align: justify;">B9: Bỏ chọn cả hai tùy chọn và nhấp vào&nbsp;<strong>OK.</strong></p>

<p style="text-align: justify;">B10: Windows sẽ gỡ cài đặt Hyper-V và các tính năng khác khỏi hệ thống của bạn.</p>

<p style="text-align: justify;">B11: Sau khi hoàn tất, hãy&nbsp;khởi động lại PC&nbsp;để áp dụng các thay đổi.</p>

<h3 style="text-align: justify;">2. Cách vô hiệu hóa Hyper-V bằng BCDEDIT</h3>

<figure>
<div style="text-align: justify;"><img alt="Vô hiệu hóa Hyper-V bằng BCDEDIT" data-i="5" data-src="https://st.quantrimang.com/photos/image/2022/10/06/vo-hieu-hoa-hyper-v-tren-windows-11-6.jpg" data-was-processed="true" height="95" src="https://st.quantrimang.com/photos/image/2022/10/06/vo-hieu-hoa-hyper-v-tren-windows-11-6.jpg" width="650" /></div>

<figcaption>
<div style="text-align: justify;">Vô hiệu hóa Hyper-V bằng BCDEDIT</div>
</figcaption>
</figure>

<p style="text-align: justify;">Bạn có thể tắt Hyper-V trong cấu hình boot bằng công cụ BCDEdit. Hữu ích nếu bạn chỉ muốn hủy kích hoạt Hyper-V chứ không phải gỡ cài đặt hoàn toàn.</p>

<p style="text-align: justify;">Để tắt Hyper-V bằng BCDEdit:</p>

<p style="text-align: justify;">B1: Nhấn phím&nbsp;<strong>Win</strong>&nbsp;và gõ&nbsp;<strong>cmd.</strong></p>

<p style="text-align: justify;">B2: Nhấp chuột phải vào&nbsp;<strong>Command Prompt</strong>&nbsp;và chọn&nbsp;<strong>Run as administrator</strong>.</p>

<p style="text-align: justify;">B3: Trong cửa sổ Command Prompt, nhập lệnh sau và nhấn&nbsp;<strong>Enter:</strong></p>

<pre id="pre0">
<code>bcdedit /set hypervisorlaunchtype off</code></pre>

<p style="text-align: justify;">B4: Khi thông báo thành công xuất hiện, hãy đóng Command Prompt và khởi động lại PC để áp dụng các thay đổi.</p>

<p style="text-align: justify;">B5: Nếu bạn cần kích hoạt lại Hyper-V, hãy sử dụng lệnh sau:</p>

<pre id="pre1">
<code>bcdedit /set hypervisorlaunchtype auto</code></pre>

<p style="text-align: justify;">B6: Đảm bảo khởi động lại PC để áp dụng các thay đổi.</p>

<p style="text-align: justify;">Ngoài ra, bạn có thể sử dụng công cụ BCDEdit để thực hiện các tác vụ nâng cao khác, chẳng hạn như xóa những tùy chọn menu boot cũ và thêm shortcut Safe Mode vào menu khởi động của Windows 11.</p>

<h3 style="text-align: justify;">3. Cách gỡ cài đặt Hyper-V bằng Command Prompt</h3>

<figure>
<div style="text-align: justify;"><img alt="Gỡ cài đặt Hyper-V bằng Command Prompt" data-i="6" data-src="https://st.quantrimang.com/photos/image/2022/10/06/vo-hieu-hoa-hyper-v-tren-windows-11-7.jpg" data-was-processed="true" height="283" src="https://st.quantrimang.com/photos/image/2022/10/06/vo-hieu-hoa-hyper-v-tren-windows-11-7.jpg" width="650" /></div>

<figcaption>
<div style="text-align: justify;">Gỡ cài đặt Hyper-V bằng Command Prompt</div>
</figcaption>
</figure>

<p style="text-align: justify;">Nếu hộp thoại Windows Features không loại bỏ được Hyper-V, bạn có thể sử dụng Command Prompt để vô hiệu hóa hypervisor này. Đây là cách để làm điều đó.</p>

<p style="text-align: justify;">B1:&nbsp;Mở Command Prompt với quyền admin.</p>

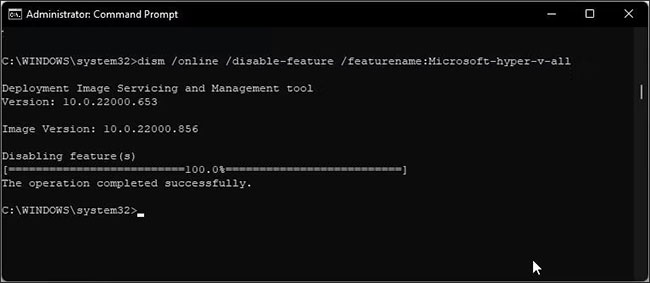
<p style="text-align: justify;">B2: Trong cửa sổ Command Prompt, nhập lệnh sau và nhấn&nbsp;<strong>Enter</strong>:</p>

<pre id="pre2">
<code>dism /online /disable-feature /featurename:Microsoft-hyper-v-all</code></pre>

<p style="text-align: justify;">B3: Sau khi thực thi, công cụ DISM sẽ vô hiệu hóa Hyper-V và hiển thị thông báo đã hoàn thành hoạt động thành công.</p>

<p style="text-align: justify;">B4: Nhập&nbsp;<strong>exit</strong>&nbsp;để đóng Command Prompt và khởi động lại PC của bạn.</p>

<p style="text-align: justify;">Sau khi khởi động lại, bạn sẽ có thể chạy game của mình và các hypervisor khác mà không gặp lỗi.</p>

<p style="text-align: justify;">Nếu không, hãy mở hộp thoại Windows Features, vô hiệu hóa các tùy chọn&nbsp;<strong>Virtual Machine Platform</strong>&nbsp;và&nbsp;<strong>Windows Hypervisor Platform</strong>, rồi khởi động lại PC.</p>

<h3 style="text-align: justify;">4. Cách vô hiệu hóa Hyper-V bằng PowerShell</h3>

<figure>
<div style="text-align: justify;"><img alt="Powershell vô hiệu hóa Hyper V" data-i="7" data-src="https://st.quantrimang.com/photos/image/2022/10/06/vo-hieu-hoa-hyper-v-tren-windows-11-8.jpg" data-was-processed="true" height="126" src="https://st.quantrimang.com/photos/image/2022/10/06/vo-hieu-hoa-hyper-v-tren-windows-11-8.jpg" width="650" /></div>

<figcaption>
<div style="text-align: justify;">Powershell vô hiệu hóa Hyper V</div>
</figcaption>
</figure>

<p style="text-align: justify;">Nếu thích&nbsp;PowerShell, bạn có thể sử dụng cmdlet WindowsOptionalFeature để vô hiệu hóa Hyper-V trong Windows 11. Để thực hiện việc này, bạn cần&nbsp;khởi chạy PowerShell với quyền admin&nbsp;và thực thi lệnh. Đây là cách để làm điều đó.</p>

<p style="text-align: justify;">B1: Nhấn phím&nbsp;<strong>Win</strong>&nbsp;và gõ&nbsp;<strong>powershell.</strong></p>

<p style="text-align: justify;">B2: Nhấp chuột phải vào&nbsp;<strong>PowerShell</strong>&nbsp;và chọn&nbsp;<strong>Run as administrator</strong>.</p>

<p style="text-align: justify;">B3: Bấm&nbsp;<strong>Yes</strong>&nbsp;khi được&nbsp;<strong>User Account Control&nbsp;</strong>nhắc.</p>

<p style="text-align: justify;">B4: Trong cửa sổ PowerShell, sao chép và dán lệnh bên dưới và nhấn&nbsp;<strong>Enter:</strong></p>

<pre id="pre3">
<code>Disable-WindowsOptionalFeature -Online -FeatureName Microsoft-Hyper-V-All</code></pre>

<p style="text-align: justify;">B5: Chờ cho quá trình hoàn tất. Sau khi hoàn tất, hãy đóng PowerShell và khởi động lại PC để áp dụng các thay đổi.</p>

<p style="text-align: justify;">Hyper-V là một tiện ích tuyệt vời nếu bạn muốn có một giải pháp ảo hóa hiện đại. Tuy nhiên, nó không phải là không có khuyết điểm. Nhiều hypervisor của bên thứ ba, bao gồm cả VirtualBox và WMware Workstations, không hoạt động với Hyper-V được kích hoạt.</p>

<p style="text-align: justify;">Nếu bạn không chắc chắn nên sử dụng hypervisor nào, hãy xem bài so sánh ba công cụ ảo hóa phổ biến bên dưới phần link tham khảo thêm để giúp bạn xác định công cụ tốt nhất.</p>
		</div>
				<div id="author">
						<p>
				<strong>Nguồn tin:</strong>
				Quantrimang.com
			</p>
		</div>
	</div>
	<div id="footer" class="clearfix">
		<div id="url">
			<strong>URL của bản tin này: </strong><a href="https://www.nguoicodonvn2008.info/vi/news/savefile/kien-thuc-may-tinh/cach-vo-hieu-hoa-hoac-xoa-hyper-v-tren-windows-11-6167.html" title="Cách vô hiệu hóa hoặc xóa Hyper-V trên Windows 11">https://www.nguoicodonvn2008.info/vi/news/savefile/kien-thuc-may-tinh/cach-vo-hieu-hoa-hoac-xoa-hyper-v-tren-windows-11-6167.html</a>

		</div>
		<div class="clear"></div>
		<div class="copyright">
			&copy; .&#x3A; Nguoicodonvn2008.info - Cõi lòng người cô đơn &#x3A;.
		</div>
		<div id="contact">
			<a href="mailto:admin@nguoicodonvn2008.info">admin@nguoicodonvn2008.info</a>
		</div>
	</div>
</div>
        <div id="timeoutsess" class="chromeframe">
            Bạn đã không sử dụng Site, <a onclick="timeoutsesscancel();" href="https://www.nguoicodonvn2008.info/#">Bấm vào đây để duy trì trạng thái đăng nhập</a>. Thời gian chờ: <span id="secField"> 60 </span> giây
        </div>
        <div id="openidResult" class="nv-alert" style="display:none"></div>
        <div id="openidBt" data-result="" data-redirect=""></div>
		</script>
		<div class="car-top">
  <span><img src="https://www.nguoicodonvn2008.info/themes/default/images/car.png" alt=""></span>
</div>
<script src="https://www.nguoicodonvn2008.info/assets/js/jquery/jquery.min.js"></script>
<script>var nv_base_siteurl="/",nv_lang_data="vi",nv_lang_interface="vi",nv_name_variable="nv",nv_fc_variable="op",nv_lang_variable="language",nv_module_name="news",nv_func_name="savefile",nv_is_user=0, nv_my_ofs=-4,nv_my_abbr="EDT",nv_cookie_prefix="nv4c_e856T",nv_check_pass_mstime=1738000,nv_area_admin=0,nv_safemode=0,theme_responsive=0,nv_recaptcha_ver=2,nv_recaptcha_sitekey="",nv_recaptcha_type="image",XSSsanitize=1;</script>
<script src="https://www.nguoicodonvn2008.info/assets/js/language/vi.js"></script>
<script src="https://www.nguoicodonvn2008.info/assets/js/DOMPurify/purify3.js"></script>
<script src="https://www.nguoicodonvn2008.info/assets/js/global.js"></script>
<script src="https://www.nguoicodonvn2008.info/assets/js/site.js"></script>
<script src="https://www.nguoicodonvn2008.info/themes/default/js/news.js"></script>
<script src="https://www.nguoicodonvn2008.info/themes/default/js/main.js"></script>
<script src="https://www.nguoicodonvn2008.info/themes/default/js/custom.js"></script>
<script type="application/ld+json">
        {
            "@context": "https://schema.org",
            "@type": "Organization",
            "url": "https://www.nguoicodonvn2008.info",
            "logo": "https://www.nguoicodonvn2008.info/uploads/angel.gif"
        }
        </script>
<script src="https://www.nguoicodonvn2008.info/themes/default/js/bootstrap.min.js"></script>
<script type="text/javascript">
var $scrolltop = $('.car-top');
$scrolltop.on('click', function () {
    $('html,body').animate({
        scrollTop: 0
    }, 800);
    $(this).addClass("car-run");
    setTimeout(function(){ $scrolltop.removeClass('car-run');}, 1000);
    return false;
});
$(window).on('scroll', function ()
{ 
    if($(window).scrollTop() >= 200)
    {
        $scrolltop.addClass("show");
        $scrolltop.addClass("car-down");
    }
    else
    {
       $scrolltop.removeClass("show");
       setTimeout(function(){ $scrolltop.removeClass('car-down');}, 300);
    }
});
</script>
</body>
</html>