<!DOCTYPE html>
    <html lang="vi" xmlns="http://www.w3.org/1999/xhtml" prefix="og: http://ogp.me/ns#">
    <head>
<title>Cách tự động hóa email Outlook bằng Python</title>
<meta name="description" content="Cách tự động hóa email Outlook bằng Python - Savefile - Tin Tức -...">
<meta name="author" content=".: Nguoicodonvn2008.info - Cõi lòng người cô đơn :.">
<meta name="copyright" content=".: Nguoicodonvn2008.info - Cõi lòng người cô đơn :. [admin@nguoicodonvn2008.info]">
<meta name="robots" content="index, archive, follow, noodp">
<meta name="googlebot" content="index,archive,follow,noodp">
<meta name="msnbot" content="all,index,follow">
<meta name="generator" content="NukeViet v4.5">
<meta http-equiv="Content-Type" content="text/html; charset=utf-8">
<meta property="og:title" content="Cách tự động hóa email Outlook bằng Python">
<meta property="og:type" content="website">
<meta property="og:description" content="Savefile - Tin Tức - https&#x3A;&#x002F;&#x002F;www.nguoicodonvn2008.info&#x002F;vi&#x002F;news&#x002F;savefile&#x002F;kien-thuc-may-tinh&#x002F;cach-tu-dong-hoa-email-outlook-bang-python-7720.html">
<meta property="og:site_name" content=".&#x3A; Nguoicodonvn2008.info - Cõi lòng người cô đơn &#x3A;.">
<meta property="og:url" content="https://www.nguoicodonvn2008.info/vi/news/savefile/kien-thuc-may-tinh/cach-tu-dong-hoa-email-outlook-bang-python-7720.html">
<link rel="shortcut icon" href="https://www.nguoicodonvn2008.info/favicon.ico">
<link rel="canonical" href="https://www.nguoicodonvn2008.info/vi/news/savefile/kien-thuc-may-tinh/cach-tu-dong-hoa-email-outlook-bang-python-7720.html">
<link rel="alternate" href="https://www.nguoicodonvn2008.info/vi/news/rss/" title="Tin Tức" type="application/rss+xml">
<link rel="alternate" href="https://www.nguoicodonvn2008.info/vi/news/rss/karaoke-dual/" title="Tin Tức - Karaoke Dual" type="application/rss+xml">
<link rel="alternate" href="https://www.nguoicodonvn2008.info/vi/news/rss/nhac-tre/" title="Tin Tức - Nhạc trẻ" type="application/rss+xml">
<link rel="alternate" href="https://www.nguoicodonvn2008.info/vi/news/rss/tru-tinh/" title="Tin Tức - Trữ tình" type="application/rss+xml">
<link rel="alternate" href="https://www.nguoicodonvn2008.info/vi/news/rss/nuoc-ngoai/" title="Tin Tức - Nước ngoài" type="application/rss+xml">
<link rel="alternate" href="https://www.nguoicodonvn2008.info/vi/news/rss/remix/" title="Tin Tức - Remix" type="application/rss+xml">
<link rel="alternate" href="https://www.nguoicodonvn2008.info/vi/news/rss/tam-su-tinh-yeu/" title="Tin Tức - Tâm sự tình yêu" type="application/rss+xml">
<link rel="alternate" href="https://www.nguoicodonvn2008.info/vi/news/rss/tho-suu-tam/" title="Tin Tức - Thơ sưu tầm" type="application/rss+xml">
<link rel="alternate" href="https://www.nguoicodonvn2008.info/vi/news/rss/cuoc-song/" title="Tin Tức - Cuộc sống" type="application/rss+xml">
<link rel="alternate" href="https://www.nguoicodonvn2008.info/vi/news/rss/phan-mem/" title="Tin Tức - Phần mềm" type="application/rss+xml">
<link rel="alternate" href="https://www.nguoicodonvn2008.info/vi/news/rss/kien-thuc-may-tinh/" title="Tin Tức - Kiến thức máy tính" type="application/rss+xml">
<link rel="alternate" href="https://www.nguoicodonvn2008.info/vi/news/rss/hoc-tap/" title="Tin Tức - Học tập" type="application/rss+xml">
<link rel="alternate" href="https://www.nguoicodonvn2008.info/vi/news/rss/tai-lieu/" title="Tin Tức - Tài liệu" type="application/rss+xml">
<link rel="alternate" href="https://www.nguoicodonvn2008.info/vi/news/rss/de-thi/" title="Tin Tức - Đề thi" type="application/rss+xml">
<link rel="preload" as="style" href="https://www.nguoicodonvn2008.info/assets/css/font-awesome.min.css" type="text/css">
<link rel="preload" as="style" href="https://www.nguoicodonvn2008.info/themes/default/css/bootstrap.non-responsive.css" type="text/css">
<link rel="preload" as="style" href="https://www.nguoicodonvn2008.info/themes/default/css/style.css" type="text/css">
<link rel="preload" as="style" href="https://www.nguoicodonvn2008.info/themes/default/css/style.non-responsive.css" type="text/css">
<link rel="preload" as="style" href="https://www.nguoicodonvn2008.info/themes/default/css/news.css" type="text/css">
<link rel="preload" as="style" href="https://www.nguoicodonvn2008.info/themes/default/css/custom.css" type="text/css">
<link rel="preload" as="script" href="https://www.nguoicodonvn2008.info/assets/js/jquery/jquery.min.js" type="text/javascript">
<link rel="preload" as="script" href="https://www.nguoicodonvn2008.info/assets/js/language/vi.js" type="text/javascript">
<link rel="preload" as="script" href="https://www.nguoicodonvn2008.info/assets/js/DOMPurify/purify3.js" type="text/javascript">
<link rel="preload" as="script" href="https://www.nguoicodonvn2008.info/assets/js/global.js" type="text/javascript">
<link rel="preload" as="script" href="https://www.nguoicodonvn2008.info/assets/js/site.js" type="text/javascript">
<link rel="preload" as="script" href="https://www.nguoicodonvn2008.info/themes/default/js/news.js" type="text/javascript">
<link rel="preload" as="script" href="https://www.nguoicodonvn2008.info/themes/default/js/main.js" type="text/javascript">
<link rel="preload" as="script" href="https://www.nguoicodonvn2008.info/themes/default/js/custom.js" type="text/javascript">
<link rel="preload" as="script" href="https://www.nguoicodonvn2008.info/themes/default/js/bootstrap.min.js" type="text/javascript">
<link rel="stylesheet" href="https://www.nguoicodonvn2008.info/assets/css/font-awesome.min.css">
<link rel="stylesheet" href="https://www.nguoicodonvn2008.info/themes/default/css/bootstrap.non-responsive.css">
<link rel="stylesheet" href="https://www.nguoicodonvn2008.info/themes/default/css/style.css">
<link rel="stylesheet" href="https://www.nguoicodonvn2008.info/themes/default/css/style.non-responsive.css">
<link rel="StyleSheet" href="https://www.nguoicodonvn2008.info/themes/default/css/news.css">
<link rel="stylesheet" href="https://www.nguoicodonvn2008.info/themes/default/css/custom.css">
<style type="text/css">
	body{background: #fff;}
</style>
    </head>
    <body>
<div id="print">
	<div id="hd_print">
		<h2 class="pull-left">.&#x3A; Nguoicodonvn2008.info - Cõi lòng người cô đơn &#x3A;.</h2>
		<p class="pull-right"><a title=".&#x3A; Nguoicodonvn2008.info - Cõi lòng người cô đơn &#x3A;." href="https://www.nguoicodonvn2008.info/">https://www.nguoicodonvn2008.info</a></p>
	</div>
	<div class="clear"></div>
	<hr />
	<div id="content">
		<h1>Cách tự động hóa email Outlook bằng Python</h1>
		<ul class="list-inline">
			<li>Thứ sáu - 03/11/2023 09:52</li>
			<li class="hidden-print txtrequired"><em class="fa fa-print">&nbsp;</em><a title="In ra" href="javascript:;" onclick="window.print()">In ra</a></li>
			<li class="hidden-print txtrequired"><em class="fa fa-power-off">&nbsp;</em><a title="Đóng cửa sổ này" href="javascript:;" onclick="window.close()">Đóng cửa sổ này</a></li>
		</ul>
		<div class="clear"></div>
		<div id="hometext">
		</div>
				<div class="imghome">
			<img alt="Cách tự động hóa email Outlook bằng Python" src="https://st.quantrimang.com/photos/image/2023/11/03/Testing-Mail.jpg" width="460" class="img-thumbnail" />
		</div>
		<div class="clear"></div>
		<div id="bodytext" class="clearfix">
			<p style="text-align: justify;">Tích hợp&nbsp;Outlook&nbsp;với các ứng dụng&nbsp;Python&nbsp;để tạo, soạn thảo và gửi email theo kế hoạch. Dưới đây là&nbsp;<strong>cách tự động hóa email Outlook bằng Python</strong>.</p>

<p style="text-align: justify;"><img alt="Tự động gửi email" data-i="0" data-src="https://st.quantrimang.com/photos/image/2023/11/03/Python-auto-email-outlook-7.jpg" data-was-processed="true" height="340" src="https://st.quantrimang.com/photos/image/2023/11/03/Python-auto-email-outlook-7.jpg" width="650" /></p>

<p style="text-align: justify;"><strong>Python</strong>&nbsp;có thể tự động hóa nhiều hoạt động và bạn có thể đạt được những chức năng mong muốn chỉ bằng vài dòng code. Ngôn ngữ này đã phổ biến ở nhiều lĩnh vực, từ phân tích dữ liệu tới quản trị hệ thống.</p>

<p style="text-align: justify;">Outlook là một client email phổ biến. Bạn có thể dùng các tính năng tự động Outlook của Python để gửi email nhanh chóng mà không cần phải tốn quá nhiều công sức.</p>

<p style="text-align: justify;">Sau đây là chi tiết cách gửi email tự động từ Python bằng Microsoft Outlook.</p>

<h2 style="text-align: justify;">Điều kiện cần có</h2>

<p style="text-align: justify;">Để bắt đầu, tải và cài những chương trình sau:</p>

<ul>
	<li style="text-align: justify;"><strong>Microsoft Outlook</strong>: Bạn có thể dùng Outlook với Gmail hoặc bất kỳ nhà cung cấp email khác.</li>
	<li style="text-align: justify;"><strong>Win32com.client</strong>: Thư viện bên thứ ba để kết nối app Microsoft.</li>
</ul>

<h2 style="text-align: justify;">Cài đặt win32com.client</h2>

<p style="text-align: justify;">Win32com.client là một phần không thể thiếu của code này. Bạn cần một thư viện đầy đủ tính năng để thiết lập kết nối giữa Microsoft Outlook và Python.</p>

<h3 style="text-align: justify;">Kiểm tra phiên bản win32com.client</h3>

<div style="text-align: justify;"><iframe allowtransparency="true" data-google-container-id="a!2" data-google-query-id="CLrmvID9p4IDFZLDfAodT78G8g" data-load-complete="true" frameborder="0" height="0" hspace="0" id="aswift_1" marginheight="0" marginwidth="0" name="aswift_1" sandbox="" scrolling="no" vspace="0" width="694"></iframe></div>

<p style="text-align: justify;">
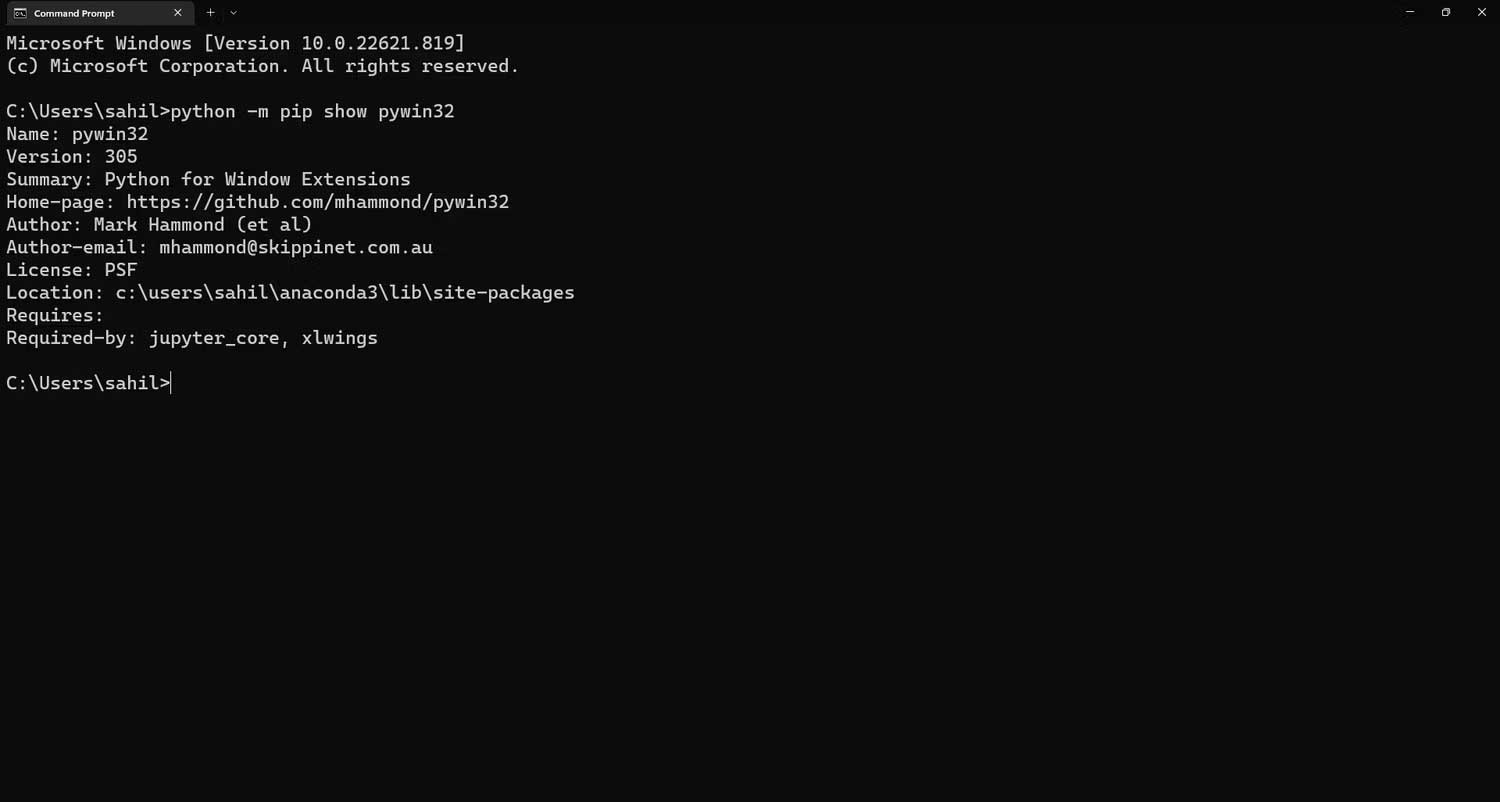
Trước khi cài đặt, bạn có thể kiểm tra xem liệu&nbsp;<strong>win32com&nbsp;</strong>đã cài trên máy. Một số phiên bản IDE mặc định cung cấp gói này. Bạn có thể kiểm tra xem liệu nó có sẵn với lệnh sau:</p>

<pre id="pre0" style="text-align: justify;">
python -m pip show pywin32</pre>

<p style="text-align: justify;">Sau khi chạy lệnh trên, nếu nhận được một số phiên bản, bạn không cần cài đặt lại nó.</p>

<p style="text-align: justify;"><img alt="Kiể tra phiên bản Win 32" data-adbro-processed="true" data-i="1" data-src="https://st.quantrimang.com/photos/image/2023/11/03/Python-Outlook-auto-1.jpg" data-was-processed="true" height="348" src="https://st.quantrimang.com/photos/image/2023/11/03/Python-Outlook-auto-1.jpg" width="650" /></p>

<p style="text-align: justify;">Sau đó, nếu nhận được thông báo lỗi sau, bạn cần cài đặt thư viện win32com trên hệ thống:</p>

<pre id="pre1" style="text-align: justify;">
&#039;pywin32&#039; is not recognized as an internal or external command, operable program, or batch file.</pre>

<h3 style="text-align: justify;">Cài đặt thư viện win32com</h3>

<p style="text-align: justify;">Mở thông báo nhắc nhở và nhập lệnh pip để cài đặt thư viện từ cửa sổ terminal.</p>

<pre id="pre2" style="text-align: justify;">
python -m pip install pywin32</pre>

<p style="text-align: justify;"><img alt="Pywin32" data-i="2" data-src="https://st.quantrimang.com/photos/image/2023/11/03/pywin32.jpg" data-was-processed="true" height="350" src="https://st.quantrimang.com/photos/image/2023/11/03/pywin32.jpg" width="650" /></p>

<p style="text-align: justify;">
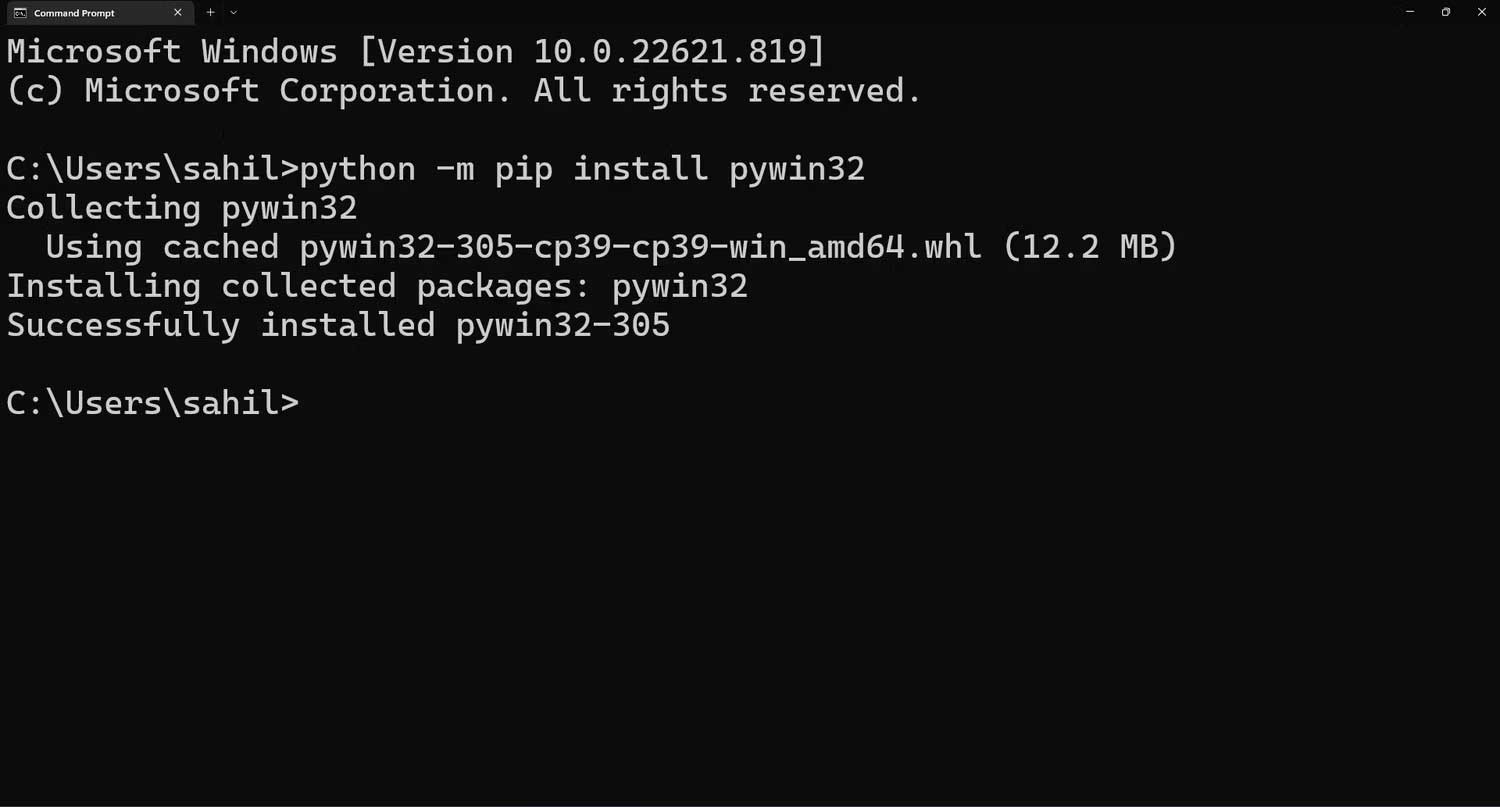
Làm theo hướng dẫn trên màn hình để hoàn tất quá trình này. Bạn có thể dùng lệnh show cài đặt trước để xác minh xem win32com đã được cài thành công trên hệ thống hay chưa.</p>

<pre id="pre3" style="text-align: justify;">
python -m pip show pywin32</pre>

<h2 style="text-align: justify;">Gửi email từ Python bằng Outlook</h2>

<p style="text-align: justify;">Microsoft Outlook là một trong số email client lâu đời và được sử dụng rộng rãi nhất. Nó nằm trong top nhà cung cấp email phổ biến nhất hiện nay, chỉ sau Gmail và Yahoo. Không có gì đáng ngạc nhiên với mối liên kết tự động giữa Outlook và Python. Chỉ bằng một số tinh chỉnh cơ bản, bạn có thể dễ dàng gửi email nhanh chóng.</p>

<div style="text-align: justify;"><iframe allowtransparency="true" data-google-container-id="a!3" data-google-query-id="CIfinIP9p4IDFe-G6QUdafoN8A" data-load-complete="true" frameborder="0" height="0" hspace="0" id="aswift_2" marginheight="0" marginwidth="0" name="aswift_2" sandbox="" scrolling="no" vspace="0" width="694"></iframe></div>

<p style="text-align: justify;">Sau khi đáp ứng đủ điều kiện trên, giờ là lúc bắt đầu viết code để tự động gửi email từ Outlook bằng Python. Để bắt đầu, bạn cần nhập thư viện<strong>&nbsp;win32com.client</strong>&nbsp;bằng lệnh<strong>&nbsp;import</strong>.</p>

<pre id="pre4" style="text-align: justify;">
import win32com.client</pre>

<p style="text-align: justify;">Giờ bạn có thể viết code kết nối Python và ứng dụng email Microsoft Outlook.</p>

<pre id="pre5" style="text-align: justify;">
ol = win32com.client.Dispatch(&#039;Outlook.Application&#039;)</pre>

<p style="text-align: justify;">Trong đó:</p>

<ul>
	<li style="text-align: justify;"><strong>ol&nbsp;</strong>chứa tham chiếu kết nối.</li>
	<li style="text-align: justify;"><strong>Win32com.client&nbsp;</strong>là một thư viện Windows mà bạn có thể dùng để thiết lập kết nối giữa Python và Outlook.</li>
	<li style="text-align: justify;"><strong>Dispatch</strong>&nbsp;là hàm tạo kết nối.</li>
	<li style="text-align: justify;"><strong>Outlook.Application</strong>&nbsp;là tên của ứng dụng kết nối.</li>
</ul>

<p style="text-align: justify;"><img alt="Trường nhập lệnh" data-i="3" data-src="https://st.quantrimang.com/photos/image/2023/11/03/import-win32.jpg" data-was-processed="true" height="68" src="https://st.quantrimang.com/photos/image/2023/11/03/import-win32.jpg" width="650" /></p>

<p style="text-align: justify;">Tiếp theo, bạn cần xác định kích thước của thông báo email mới để python hiểu nơi nội dung cần được cập nhật.</p>

<pre id="pre6" style="text-align: justify;">
# kích thước của email mới
olmailitem = 0x0</pre>

<p style="text-align: justify;">Trong đó:</p>

<p style="text-align: justify;"><strong>Olmailitem</strong>: Biến mới để chứa các kích thước.</p>

<p style="text-align: justify;"><strong>0x0</strong>: Kích thước của thông báo email mới trong bộ nhớ của Python.</p>

<p style="text-align: justify;">Các hàm của Python sẽ mở một mục email mới, ngay khi bạn xác định kích thước nội dung email.</p>

<pre id="pre7" style="text-align: justify;">
newmail = ol.CreateItem(olmailitem)</pre>

<p style="text-align: justify;">Trong đó:</p>

<ul>
	<li style="text-align: justify;"><strong>Newmail</strong>: Biến mới để chứa tham chiếu email mới.</li>
	<li style="text-align: justify;"><strong>ol</strong>: Tham chiếu của kết nối đã tạo trước đó giữa Python và Outlook.</li>
	<li style="text-align: justify;"><strong>CreateItem(olmailitem)</strong>: Lệnh tạo một bản nháp email mới.</li>
</ul>

<p style="text-align: justify;">Mỗi email cần một dòng chủ đề. Bạn có thể xác định nó trong code để Python tự động thêm nó trước khi gửi email tới người nhận.
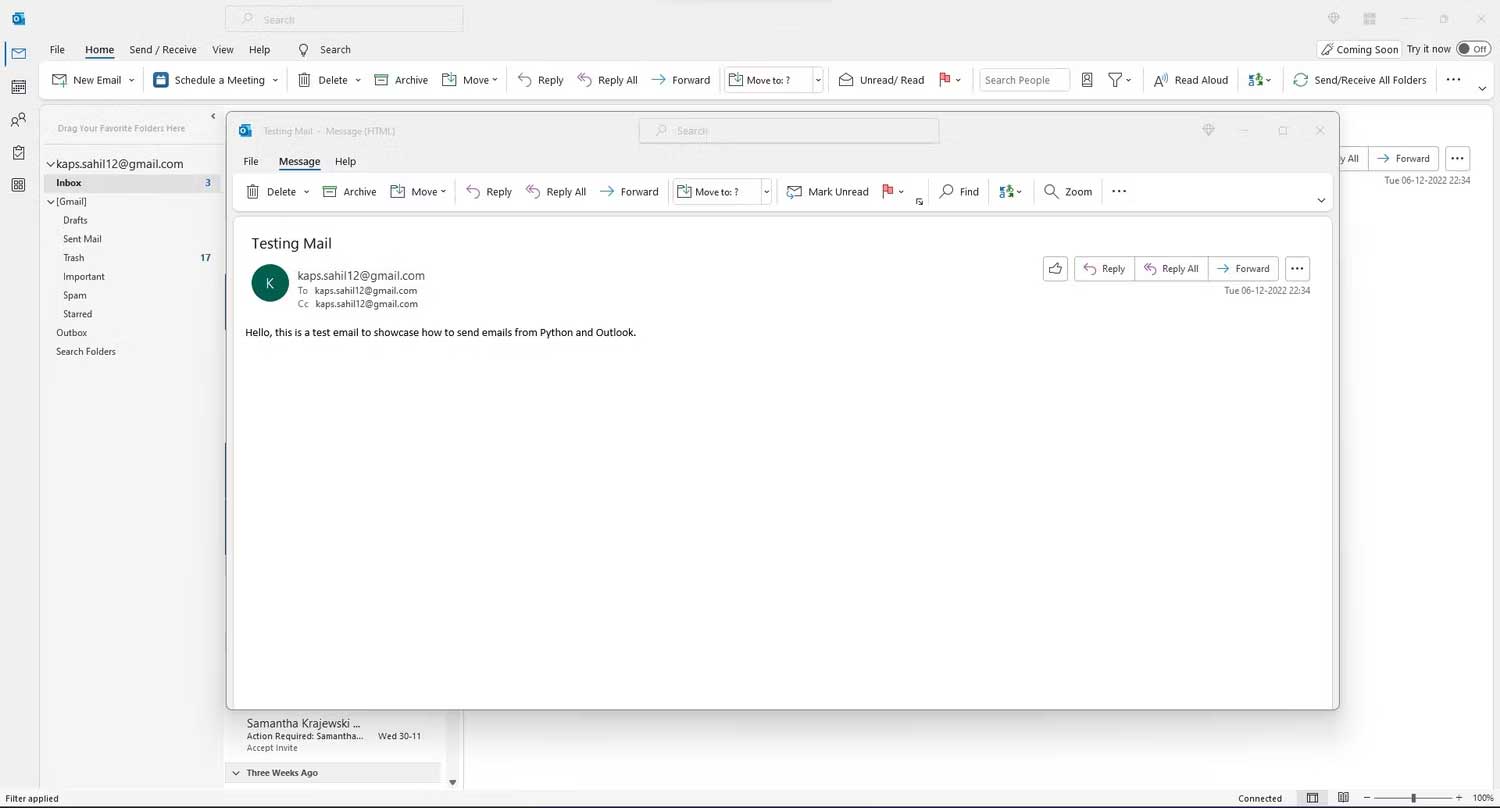
</p>

<pre id="pre8" style="text-align: justify;">
newmail.Subject = &#039;Testing Mail&#039;</pre>

<p style="text-align: justify;">Trong đó:</p>

<ul>
	<li style="text-align: justify;"><strong>Newmail</strong>: Biến để lưu trữ tham chiếu mục mail mới.</li>
	<li style="text-align: justify;"><strong>Subject</strong>: Có thể đa dạng, tùy thuộc vào điều bạn muốn làm chủ đề cho email.</li>
</ul>

<p style="text-align: justify;">Bạn có thể thêm người nhận mong muốn trong phần<strong>&nbsp;To&nbsp;</strong>và&nbsp;<strong>CC</strong>&nbsp;như sau:</p>

<pre id="pre9" style="text-align: justify;">
newmail.To = &#039;xyz@example.com&#039;
newmail.CC = &#039;xyz@example.com&#039;</pre>

<p style="text-align: justify;">Trong đó:</p>

<ul>
	<li style="text-align: justify;"><strong>To</strong>: Địa chỉ email của người nhận chính.</li>
	<li style="text-align: justify;"><strong>CC</strong>: Người nhận email đã được sao chép.</li>
</ul>

<p style="text-align: justify;">Tương tự, thậm chí bạn có thể thêm tên BCC, trong trường hợp bạn muốn gửi email ẩn danh tới người nhận. Toàn bộ việc bạn phải làm là chuyển lệnh sau ra đằng sau lệnh CC:</p>

<pre id="pre10" style="text-align: justify;">
newmail.BCC = &#039;xyz@example.com&#039;</pre>

<p style="text-align: justify;">Outlook của Python không hạn chế các khả năng và tính năng vốn có của Outlook. Ví dụ, ngay cả khi bạn đang dùng Python để quản lý các phản hồi của client email, bạn vẫn có thể gửi email tới nhiều người nhận. Chỉ cần thêm dấu phân tách (;) giữa ID email trong cột To/CC/BCC. Thế là xong!</p>

<p style="text-align: justify;">Cuối cùng, sau khi xác định chủ đề và người nhận, bạn có thể thêm nội dung email vào mục mail mới trước khi gửi nó tới người nhận trong cột&nbsp;<strong>To&nbsp;</strong>và&nbsp;<strong>CC</strong>.</p>

<pre id="pre11" style="text-align: justify;">
= &#039;Hello, this is a test email to showcase how to send emails from Python and Outlook.&#039;</pre>

<p style="text-align: justify;">Để thêm các tệp đính kèm vào email, bạn có thể dùng lệnh sau:</p>

<pre id="pre12" style="text-align: justify;">
attach = &#039;C:\\Users\\admin\\Desktop\\Python\\Sample.xlsx&#039;
newmail.Attachments.Add(attach)</pre>

<div style="text-align: justify;"><iframe allowtransparency="true" data-google-container-id="a!4" data-google-query-id="CIusyoP9p4IDFSaJ6QUdptQEzg" data-load-complete="true" frameborder="0" height="0" hspace="0" id="aswift_3" marginheight="0" marginwidth="0" name="aswift_3" sandbox="" scrolling="no" vspace="0" width="694"></iframe></div>

<p style="text-align: justify;">Giờ email đã sẵn sàng gửi đi. Bạn có hai lựa chọn để sử dụng. Nếu muốn xem trước email trước khi gửi nó tới người nhận, bạn có thể dùng lệnh&nbsp;<strong>Display()</strong>&nbsp;như sau:</p>

<pre id="pre13" style="text-align: justify;">
newmail.Display()</pre>

<p style="text-align: justify;">Ngoài ra, nếu không muốn xem trước email và gửi nó trực tiếp, bạn có thể thay lệnh&nbsp;<strong>Display()</strong>&nbsp;bằng&nbsp;<strong>Send()</strong>.</p>

<pre id="pre14" style="text-align: justify;">
newmail.Send()</pre>

<p style="text-align: justify;">Đây là code hoàn thiện:</p>

<pre id="pre15" style="text-align: justify;">
import win32com.client
ol=win32com.client.Dispatch(&quot;outlook.application&quot;)
olmailitem=0x0 #size of the new email
newmail=ol.CreateItem(olmailitem)
newmail.Subject= &#039;Testing Mail&#039;
newmail.To=&#039;xyz@example.com&#039;
newmail.CC=&#039;xyz@example.com&#039;
newmail.Body= &#039;Hello, this is a test email.&#039;

# attach=&#039;C:\\Users\\admin\\Desktop\\Python\\Sample.xlsx&#039;
# newmail.Attachments.Add(attach)

# Hiện mail trước khi gửi nó đi
# newmail.Display() 

newmail.Send()
</pre>

<p style="text-align: justify;"><img alt="Testing Mail" data-i="4" data-src="https://st.quantrimang.com/photos/image/2023/11/03/Testing-Mail.jpg" data-was-processed="true" height="350" src="https://st.quantrimang.com/photos/image/2023/11/03/Testing-Mail.jpg" width="650" /></p>

<p style="text-align: justify;">Sau khi triển khai code thành công, bạn có thể tự động gửi email. Trong trường hợp phát sinh lỗi, bạn sẽ thấy thông báo ngay thời điểm gửi email. Lúc này, bạn nên tìm hiểu nguyên nhân để có giải pháp khắc phục phù hợp.</p>

<div style="text-align: justify;">&nbsp;</div>
		</div>
				<div id="author">
						<p>
				<strong>Nguồn tin:</strong>
				Quantrimang.com
			</p>
		</div>
	</div>
	<div id="footer" class="clearfix">
		<div id="url">
			<strong>URL của bản tin này: </strong><a href="https://www.nguoicodonvn2008.info/vi/news/savefile/kien-thuc-may-tinh/cach-tu-dong-hoa-email-outlook-bang-python-7720.html" title="Cách tự động hóa email Outlook bằng Python">https://www.nguoicodonvn2008.info/vi/news/savefile/kien-thuc-may-tinh/cach-tu-dong-hoa-email-outlook-bang-python-7720.html</a>

		</div>
		<div class="clear"></div>
		<div class="copyright">
			&copy; .&#x3A; Nguoicodonvn2008.info - Cõi lòng người cô đơn &#x3A;.
		</div>
		<div id="contact">
			<a href="mailto:admin@nguoicodonvn2008.info">admin@nguoicodonvn2008.info</a>
		</div>
	</div>
</div>
        <div id="timeoutsess" class="chromeframe">
            Bạn đã không sử dụng Site, <a onclick="timeoutsesscancel();" href="https://www.nguoicodonvn2008.info/#">Bấm vào đây để duy trì trạng thái đăng nhập</a>. Thời gian chờ: <span id="secField"> 60 </span> giây
        </div>
        <div id="openidResult" class="nv-alert" style="display:none"></div>
        <div id="openidBt" data-result="" data-redirect=""></div>
		</script>
		<div class="car-top">
  <span><img src="https://www.nguoicodonvn2008.info/themes/default/images/car.png" alt=""></span>
</div>
<script src="https://www.nguoicodonvn2008.info/assets/js/jquery/jquery.min.js"></script>
<script>var nv_base_siteurl="/",nv_lang_data="vi",nv_lang_interface="vi",nv_name_variable="nv",nv_fc_variable="op",nv_lang_variable="language",nv_module_name="news",nv_func_name="savefile",nv_is_user=0, nv_my_ofs=-4,nv_my_abbr="EDT",nv_cookie_prefix="nv4c_e856T",nv_check_pass_mstime=1738000,nv_area_admin=0,nv_safemode=0,theme_responsive=0,nv_recaptcha_ver=2,nv_recaptcha_sitekey="",nv_recaptcha_type="image",XSSsanitize=1;</script>
<script src="https://www.nguoicodonvn2008.info/assets/js/language/vi.js"></script>
<script src="https://www.nguoicodonvn2008.info/assets/js/DOMPurify/purify3.js"></script>
<script src="https://www.nguoicodonvn2008.info/assets/js/global.js"></script>
<script src="https://www.nguoicodonvn2008.info/assets/js/site.js"></script>
<script src="https://www.nguoicodonvn2008.info/themes/default/js/news.js"></script>
<script src="https://www.nguoicodonvn2008.info/themes/default/js/main.js"></script>
<script src="https://www.nguoicodonvn2008.info/themes/default/js/custom.js"></script>
<script type="application/ld+json">
        {
            "@context": "https://schema.org",
            "@type": "Organization",
            "url": "https://www.nguoicodonvn2008.info",
            "logo": "https://www.nguoicodonvn2008.info/uploads/angel.gif"
        }
        </script>
<script src="https://www.nguoicodonvn2008.info/themes/default/js/bootstrap.min.js"></script>
<script type="text/javascript">
var $scrolltop = $('.car-top');
$scrolltop.on('click', function () {
    $('html,body').animate({
        scrollTop: 0
    }, 800);
    $(this).addClass("car-run");
    setTimeout(function(){ $scrolltop.removeClass('car-run');}, 1000);
    return false;
});
$(window).on('scroll', function ()
{ 
    if($(window).scrollTop() >= 200)
    {
        $scrolltop.addClass("show");
        $scrolltop.addClass("car-down");
    }
    else
    {
       $scrolltop.removeClass("show");
       setTimeout(function(){ $scrolltop.removeClass('car-down');}, 300);
    }
});
</script>
</body>
</html>