<!DOCTYPE html>
    <html lang="vi" xmlns="http://www.w3.org/1999/xhtml" prefix="og: http://ogp.me/ns#">
    <head>
<title>Cách thiết lập GUFW &#40;Graphical Uncomplicated Firewall&#41; trên Ubuntu</title>
<meta name="description" content="Cách thiết lập GUFW &#40;Graphical Uncomplicated Firewall&#41; trên Ubuntu - Savefile - Tin Tức -...">
<meta name="author" content=".: Nguoicodonvn2008.info - Cõi lòng người cô đơn :.">
<meta name="copyright" content=".: Nguoicodonvn2008.info - Cõi lòng người cô đơn :. [admin@nguoicodonvn2008.info]">
<meta name="robots" content="index, archive, follow, noodp">
<meta name="googlebot" content="index,archive,follow,noodp">
<meta name="msnbot" content="all,index,follow">
<meta name="generator" content="NukeViet v4.5">
<meta http-equiv="Content-Type" content="text/html; charset=utf-8">
<meta property="og:title" content="Cách thiết lập GUFW &#40;Graphical Uncomplicated Firewall&#41; trên Ubuntu">
<meta property="og:type" content="website">
<meta property="og:description" content="Savefile - Tin Tức - https&#x3A;&#x002F;&#x002F;www.nguoicodonvn2008.info&#x002F;vi&#x002F;news&#x002F;savefile&#x002F;kien-thuc-may-tinh&#x002F;cach-thiet-lap-gufw-graphical-uncomplicated-firewall-tren-ubuntu-10512.html">
<meta property="og:site_name" content=".&#x3A; Nguoicodonvn2008.info - Cõi lòng người cô đơn &#x3A;.">
<meta property="og:url" content="https://www.nguoicodonvn2008.info/vi/news/savefile/kien-thuc-may-tinh/cach-thiet-lap-gufw-graphical-uncomplicated-firewall-tren-ubuntu-10512.html">
<link rel="shortcut icon" href="https://www.nguoicodonvn2008.info/favicon.ico">
<link rel="canonical" href="https://www.nguoicodonvn2008.info/vi/news/savefile/kien-thuc-may-tinh/cach-thiet-lap-gufw-graphical-uncomplicated-firewall-tren-ubuntu-10512.html">
<link rel="alternate" href="https://www.nguoicodonvn2008.info/vi/news/rss/" title="Tin Tức" type="application/rss+xml">
<link rel="alternate" href="https://www.nguoicodonvn2008.info/vi/news/rss/karaoke-dual/" title="Tin Tức - Karaoke Dual" type="application/rss+xml">
<link rel="alternate" href="https://www.nguoicodonvn2008.info/vi/news/rss/nhac-tre/" title="Tin Tức - Nhạc trẻ" type="application/rss+xml">
<link rel="alternate" href="https://www.nguoicodonvn2008.info/vi/news/rss/tru-tinh/" title="Tin Tức - Trữ tình" type="application/rss+xml">
<link rel="alternate" href="https://www.nguoicodonvn2008.info/vi/news/rss/nuoc-ngoai/" title="Tin Tức - Nước ngoài" type="application/rss+xml">
<link rel="alternate" href="https://www.nguoicodonvn2008.info/vi/news/rss/remix/" title="Tin Tức - Remix" type="application/rss+xml">
<link rel="alternate" href="https://www.nguoicodonvn2008.info/vi/news/rss/tam-su-tinh-yeu/" title="Tin Tức - Tâm sự tình yêu" type="application/rss+xml">
<link rel="alternate" href="https://www.nguoicodonvn2008.info/vi/news/rss/tho-suu-tam/" title="Tin Tức - Thơ sưu tầm" type="application/rss+xml">
<link rel="alternate" href="https://www.nguoicodonvn2008.info/vi/news/rss/cuoc-song/" title="Tin Tức - Cuộc sống" type="application/rss+xml">
<link rel="alternate" href="https://www.nguoicodonvn2008.info/vi/news/rss/phan-mem/" title="Tin Tức - Phần mềm" type="application/rss+xml">
<link rel="alternate" href="https://www.nguoicodonvn2008.info/vi/news/rss/kien-thuc-may-tinh/" title="Tin Tức - Kiến thức máy tính" type="application/rss+xml">
<link rel="alternate" href="https://www.nguoicodonvn2008.info/vi/news/rss/hoc-tap/" title="Tin Tức - Học tập" type="application/rss+xml">
<link rel="alternate" href="https://www.nguoicodonvn2008.info/vi/news/rss/tai-lieu/" title="Tin Tức - Tài liệu" type="application/rss+xml">
<link rel="alternate" href="https://www.nguoicodonvn2008.info/vi/news/rss/de-thi/" title="Tin Tức - Đề thi" type="application/rss+xml">
<link rel="preload" as="style" href="https://www.nguoicodonvn2008.info/assets/css/font-awesome.min.css" type="text/css">
<link rel="preload" as="style" href="https://www.nguoicodonvn2008.info/themes/default/css/bootstrap.non-responsive.css" type="text/css">
<link rel="preload" as="style" href="https://www.nguoicodonvn2008.info/themes/default/css/style.css" type="text/css">
<link rel="preload" as="style" href="https://www.nguoicodonvn2008.info/themes/default/css/style.non-responsive.css" type="text/css">
<link rel="preload" as="style" href="https://www.nguoicodonvn2008.info/themes/default/css/news.css" type="text/css">
<link rel="preload" as="style" href="https://www.nguoicodonvn2008.info/themes/default/css/custom.css" type="text/css">
<link rel="preload" as="script" href="https://www.nguoicodonvn2008.info/assets/js/jquery/jquery.min.js" type="text/javascript">
<link rel="preload" as="script" href="https://www.nguoicodonvn2008.info/assets/js/language/vi.js" type="text/javascript">
<link rel="preload" as="script" href="https://www.nguoicodonvn2008.info/assets/js/DOMPurify/purify3.js" type="text/javascript">
<link rel="preload" as="script" href="https://www.nguoicodonvn2008.info/assets/js/global.js" type="text/javascript">
<link rel="preload" as="script" href="https://www.nguoicodonvn2008.info/assets/js/site.js" type="text/javascript">
<link rel="preload" as="script" href="https://www.nguoicodonvn2008.info/themes/default/js/news.js" type="text/javascript">
<link rel="preload" as="script" href="https://www.nguoicodonvn2008.info/themes/default/js/main.js" type="text/javascript">
<link rel="preload" as="script" href="https://www.nguoicodonvn2008.info/themes/default/js/custom.js" type="text/javascript">
<link rel="preload" as="script" href="https://www.nguoicodonvn2008.info/themes/default/js/bootstrap.min.js" type="text/javascript">
<link rel="stylesheet" href="https://www.nguoicodonvn2008.info/assets/css/font-awesome.min.css">
<link rel="stylesheet" href="https://www.nguoicodonvn2008.info/themes/default/css/bootstrap.non-responsive.css">
<link rel="stylesheet" href="https://www.nguoicodonvn2008.info/themes/default/css/style.css">
<link rel="stylesheet" href="https://www.nguoicodonvn2008.info/themes/default/css/style.non-responsive.css">
<link rel="StyleSheet" href="https://www.nguoicodonvn2008.info/themes/default/css/news.css">
<link rel="stylesheet" href="https://www.nguoicodonvn2008.info/themes/default/css/custom.css">
<style type="text/css">
	body{background: #fff;}
</style>
    </head>
    <body>
<div id="print">
	<div id="hd_print">
		<h2 class="pull-left">.&#x3A; Nguoicodonvn2008.info - Cõi lòng người cô đơn &#x3A;.</h2>
		<p class="pull-right"><a title=".&#x3A; Nguoicodonvn2008.info - Cõi lòng người cô đơn &#x3A;." href="https://www.nguoicodonvn2008.info/">https://www.nguoicodonvn2008.info</a></p>
	</div>
	<div class="clear"></div>
	<hr />
	<div id="content">
		<h1>Cách thiết lập GUFW &#40;Graphical Uncomplicated Firewall&#41; trên Ubuntu</h1>
		<ul class="list-inline">
			<li>Thứ năm - 05/06/2025 23:34</li>
			<li class="hidden-print txtrequired"><em class="fa fa-print">&nbsp;</em><a title="In ra" href="javascript:;" onclick="window.print()">In ra</a></li>
			<li class="hidden-print txtrequired"><em class="fa fa-power-off">&nbsp;</em><a title="Đóng cửa sổ này" href="javascript:;" onclick="window.close()">Đóng cửa sổ này</a></li>
		</ul>
		<div class="clear"></div>
		<div id="hometext">
		</div>
				<div class="imghome">
			<img alt="Cách thiết lập GUFW &#40;Graphical Uncomplicated Firewall&#41; trên Ubuntu" src="https://st.quantrimang.com/photos/image/2025/06/05/thiet-lap-gufw-tren-ubuntu-1.jpg" width="460" class="img-thumbnail" />
		</div>
		<div class="clear"></div>
		<div id="bodytext" class="clearfix">
			<p style="text-align: justify;">Tường lửa&nbsp;đóng vai trò quan trọng trong việc cải thiện tính bảo mật của mạng máy tính và ngăn chặn truy cập trái phép. Trong Linux, một công cụ có tên là Uncomplicated Firewall (UFW) được sử dụng để quản lý các quy tắc này một cách hiệu quả. Công cụ này cũng có giao diện đồ họa, được gọi là Graphical Uncomplicated Firewall (GUFW). Hướng dẫn này sẽ giải thích cách cài đặt và sử dụng GUFW trên Ubuntu.</p>

<p style="text-align: justify;"><strong>Lưu ý</strong>: Mặc dù các hướng dẫn bên dưới được hiển thị cho&nbsp;Ubuntu, nhưng nó cũng sẽ hoạt động với hầu hết những bản phân phối Linux.</p>

<h2 style="text-align: justify;">&nbsp;</h2>

<h2 id="mcetoc_1isvoub8f3g" style="text-align: justify;">Cài đặt GUFW trên Ubuntu qua Terminal</h2>

<p style="text-align: justify;">
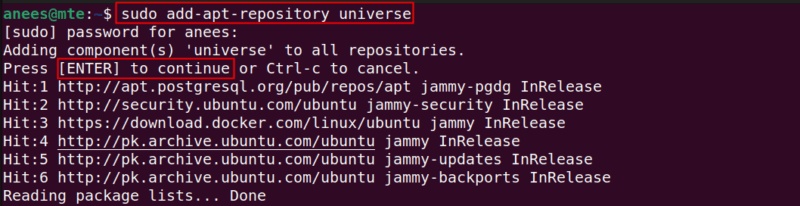
GUFW có thể dễ dàng được cài đặt trên Ubuntu bằng trình quản lý gói apt. Trước khi tiến hành cài đặt GUFW, hãy đảm bảo Universe Repository được bật trên hệ thống vì GUFW có sẵn trong kho lưu trữ này:</p>

<pre id="pre0">
<code>sudo add-apt-repository universe</code></pre>

<figure>
<div style="text-align: justify;"><img alt="Bật Universe Repository" data-i="0" data-src="https://st.quantrimang.com/photos/image/2025/06/05/thiet-lap-gufw-tren-ubuntu-1.jpg" data-was-processed="true" height="206" src="https://st.quantrimang.com/photos/image/2025/06/05/thiet-lap-gufw-tren-ubuntu-1.jpg" width="800" /></div>

<figcaption>
<div style="text-align: justify;">Bật Universe Repository</div>
</figcaption>
</figure>

<p style="text-align: justify;">Bây giờ, Universe Repository đã được thêm vào, hãy cập nhật kho lưu trữ gói:</p>

<pre id="pre1">
<code>sudo apt update</code></pre>

<p style="text-align: justify;">
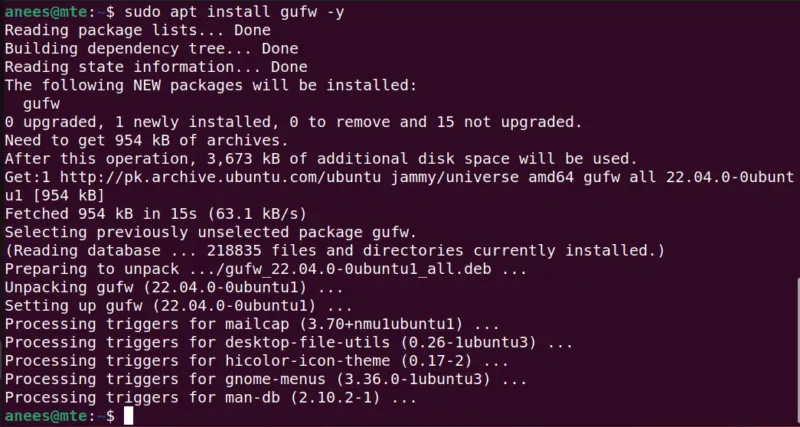
Sau khi hệ thống của bạn được cập nhật, hãy chạy lệnh bên dưới để cài đặt GUFW trên máy Ubuntu:</p>

<pre id="pre2">
<code>sudo apt install gufw -y</code></pre>

<figure>
<div style="text-align: justify;"><img alt="Cài đặt GUFW" data-i="1" data-src="https://st.quantrimang.com/photos/image/2025/06/05/thiet-lap-gufw-tren-ubuntu-2.jpg" data-was-processed="true" height="427" src="https://st.quantrimang.com/photos/image/2025/06/05/thiet-lap-gufw-tren-ubuntu-2.jpg" width="800" /></div>

<figcaption>
<div style="text-align: justify;">Cài đặt GUFW</div>
</figcaption>
</figure>

<h2 id="mcetoc_1isvoub8f3h" style="text-align: justify;">Cài đặt GUFW trên Ubuntu qua Software Center</h2>

<p style="text-align: justify;">
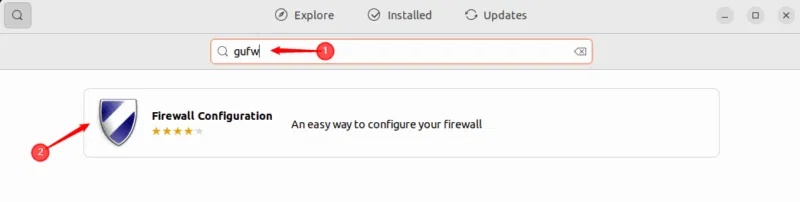
GUFW cũng có thể được cài đặt từ Ubuntu Software Center. Trước tiên, hãy mở Ubuntu Software Center, nhập GUFW vào thanh tìm kiếm và chọn ứng dụng cần cài đặt:</p>

<figure>
<div style="text-align: justify;"><img alt="Tìm kiếm GUFW trong Ubuntu Center" data-i="2" data-src="https://st.quantrimang.com/photos/image/2025/06/05/thiet-lap-gufw-tren-ubuntu-3.jpg" data-was-processed="true" height="202" src="https://st.quantrimang.com/photos/image/2025/06/05/thiet-lap-gufw-tren-ubuntu-3.jpg" width="800" /></div>

<figcaption>
<div style="text-align: justify;">Tìm kiếm GUFW trong Ubuntu Center</div>
</figcaption>
</figure>

<p style="text-align: justify;">Nhấp vào nút&nbsp;<strong>Install</strong>&nbsp;để bắt đầu quá trình cài đặt GUFW:</p>

<figure>
<div style="text-align: justify;"><img alt="Cài đặt GUFW trong Ubuntu Center" data-i="3" data-src="https://st.quantrimang.com/photos/image/2025/06/05/thiet-lap-gufw-tren-ubuntu-4.jpg" data-was-processed="true" height="244" src="https://st.quantrimang.com/photos/image/2025/06/05/thiet-lap-gufw-tren-ubuntu-4.jpg" width="800" /></div>

<figcaption>
<div style="text-align: justify;">Cài đặt GUFW trong Ubuntu Center</div>
</figcaption>
</figure>

<p style="text-align: justify;">
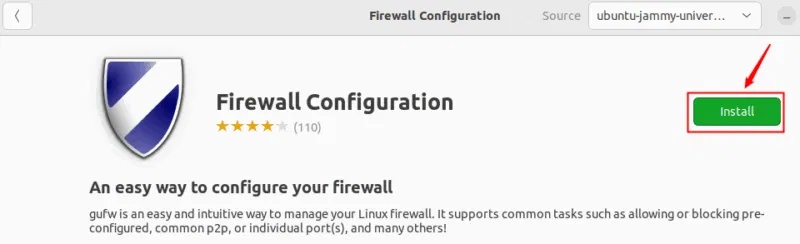
Nó sẽ được cài đặt trên hệ thống chỉ trong vài phút.</p>

<p style="text-align: justify;"><strong>Lưu ý</strong>: Nếu không sử dụng Ubuntu, bạn sẽ có thể tìm thấy GUFW trong trình quản lý gói của bản phân phối.</p>

<h2 id="mcetoc_1isvoub8f3i" style="text-align: justify;">Kích hoạt hoặc vô hiệu hóa GUFW trên Ubuntu</h2>

<p style="text-align: justify;">Sau khi cài đặt thành công GUFW, bạn có thể truy cập GUFW trên hệ thống của mình bằng cách thực thi lệnh sau:</p>

<pre id="pre3">
<code>sudo gufw</code></pre>

<p style="text-align: justify;">
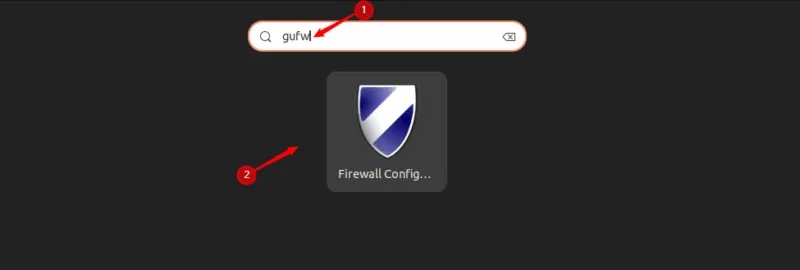
Ngoài ra, bạn có thể truy cập thông qua menu của mình. Điều hướng đến menu hệ thống, tìm kiếm GUFW và chọn ứng dụng Firewall Configuration để mở:</p>

<figure>
<div style="text-align: justify;"><img alt="Truy cập GUFW" data-i="4" data-src="https://st.quantrimang.com/photos/image/2025/06/05/thiet-lap-gufw-tren-ubuntu-5.jpg" data-was-processed="true" height="270" src="https://st.quantrimang.com/photos/image/2025/06/05/thiet-lap-gufw-tren-ubuntu-5.jpg" width="800" /></div>

<figcaption>
<div style="text-align: justify;">Truy cập GUFW</div>
</figcaption>
</figure>

<p style="text-align: justify;">
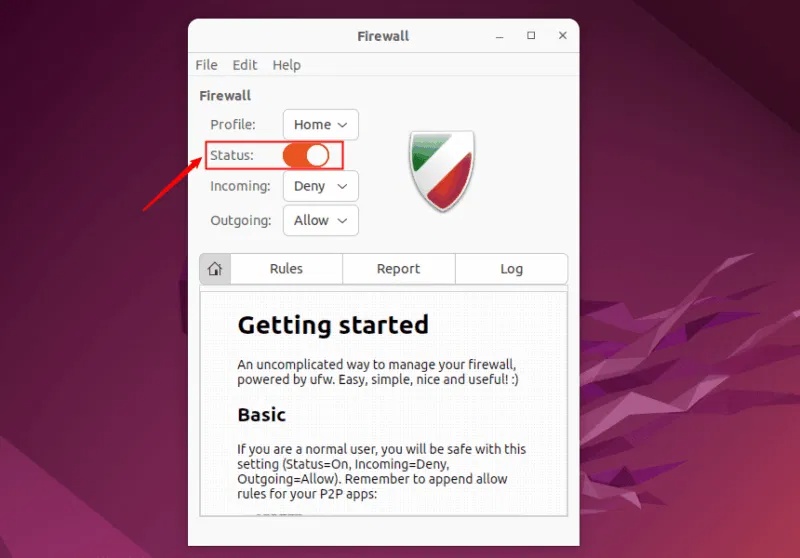
Màn hình chính GUFW hiển thị nhiều thông tin chi tiết khác nhau, chẳng hạn như profile, trạng thái và thông tin về các quy tắc lưu lượng đến và đi. Công tắc trạng thái cho biết tường lửa đang chạy hay không.</p>

<p style="text-align: justify;">Để bật hoặc tắt GUFW, bạn có thể bật hoặc tắt công tắc trạng thái:</p>

<figure>
<div style="text-align: justify;"><img alt="Kích hoạt hoặc vô hiệu hóa GUFW trên Ubuntu" data-i="5" data-src="https://st.quantrimang.com/photos/image/2025/06/05/thiet-lap-gufw-tren-ubuntu-6.jpg" data-was-processed="true" height="558" src="https://st.quantrimang.com/photos/image/2025/06/05/thiet-lap-gufw-tren-ubuntu-6.jpg" width="800" /></div>

<figcaption>
<div style="text-align: justify;">Kích hoạt hoặc vô hiệu hóa GUFW trên Ubuntu</div>
</figcaption>
</figure>

<h2 id="mcetoc_1isvoub8f3j" style="text-align: justify;">Chỉnh sửa profile GUFW</h2>

<p style="text-align: justify;">GUFW đi kèm với các thiết lập tường lửa được cấu hình sẵn khác nhau. Bạn có thể nhấp vào menu drop-down bên cạnh profile để xem các profile được cấu hình sẵn. Các profile này đại diện cho những cấp độ bảo mật khác nhau và dựa trên profile đã chọn, tường lửa sẽ áp dụng các quy tắc tương ứng để quản lý lưu lượng mạng:</p>

<figure>
<div style="text-align: justify;"><img alt="Profile được cấu hình sẵn trong GUFW" data-i="6" data-src="https://st.quantrimang.com/photos/image/2025/06/05/thiet-lap-gufw-tren-ubuntu-7.jpg" data-was-processed="true" height="569" src="https://st.quantrimang.com/photos/image/2025/06/05/thiet-lap-gufw-tren-ubuntu-7.jpg" width="800" /></div>

<figcaption>
<div style="text-align: justify;">Profile được cấu hình sẵn trong GUFW</div>
</figcaption>
</figure>

<p style="text-align: justify;">
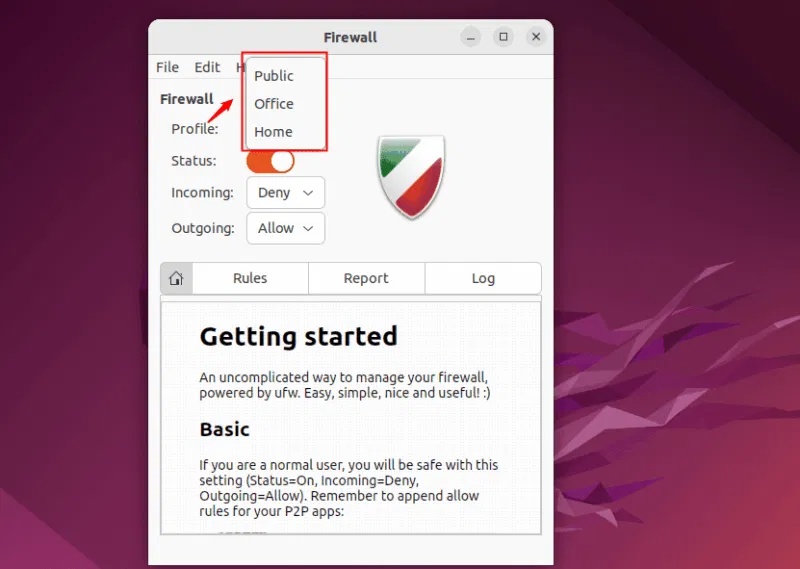
Có 3 profile được cấu hình sẵn, các chi tiết của chúng được liệt kê bên dưới:</p>

<h3 id="mcetoc_1isvoub8f3k" style="text-align: justify;">1. Public Profile</h3>

<p style="text-align: justify;">Public Profile trong GUFW được thiết kế cho các mạng không đáng tin cậy như Wi-Fi công cộng. Nó chặn tất cả các kết nối đến để giảm bề mặt tấn công và cho phép những kết nối đi, do đó bạn vẫn có thể duyệt Internet và truy cập các dịch vụ bên ngoài. Sử dụng Public Profile trên mạng công cộng giúp bảo vệ hệ thống khỏi các mối đe dọa hoặc truy cập trái phép.</p>

<h3 id="mcetoc_1isvoub8f3l" style="text-align: justify;">2. Office Profile</h3>

<p style="text-align: justify;">Nó cho phép các kết nối đi và có thể được cấu hình để hạn chế những kết nối đến dựa trên nhu cầu của tổ chức bạn. Nó phù hợp để sử dụng trong môi trường công ty hoặc văn phòng.</p>

<h3 id="mcetoc_1isvoub8f3m" style="text-align: justify;">3. Home Profile</h3>

<p style="text-align: justify;">Home Profile cho phép tất cả các kết nối đi và cho phép một số kết nối đến nhất định cho những dịch vụ đáng tin cậy như&nbsp;<a data-type="internal" href="https://quantrimang.com/cong-nghe/tim-hieu-ve-ssh-154483" title="SSH là gì?">SSH</a>&nbsp;hoặc truy cập web. Thích hợp để sử dụng trên mạng gia đình, nơi các thiết bị thường được tin cậy.</p>

<p style="text-align: justify;">Ngoài các profile được cấu hình sẵn, chúng ta cũng có thể tạo các profile tùy chỉnh và xóa bất kỳ profile không cần thiết nào.
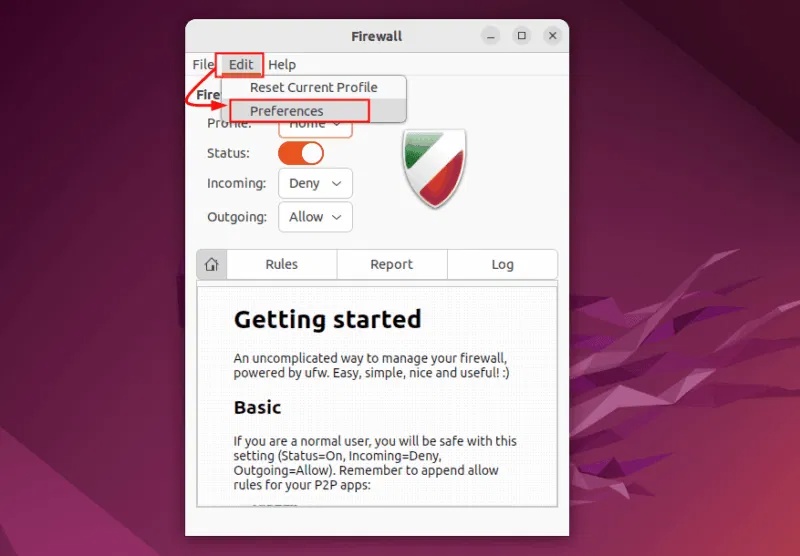
</p>

<p style="text-align: justify;">Để chỉnh sửa cấu hình, hãy vào tab&nbsp;<strong>Edit</strong>&nbsp;và chọn&nbsp;<strong>Preferences</strong>:</p>

<figure>
<div style="text-align: justify;"><img alt="Chỉnh sửa profile GUFW" data-i="7" data-src="https://st.quantrimang.com/photos/image/2025/06/05/thiet-lap-gufw-tren-ubuntu-8.jpg" data-was-processed="true" height="556" src="https://st.quantrimang.com/photos/image/2025/06/05/thiet-lap-gufw-tren-ubuntu-8.jpg" width="800" /></div>

<figcaption>
<div style="text-align: justify;">Chỉnh sửa profile GUFW</div>
</figcaption>
</figure>

<p style="text-align: justify;">
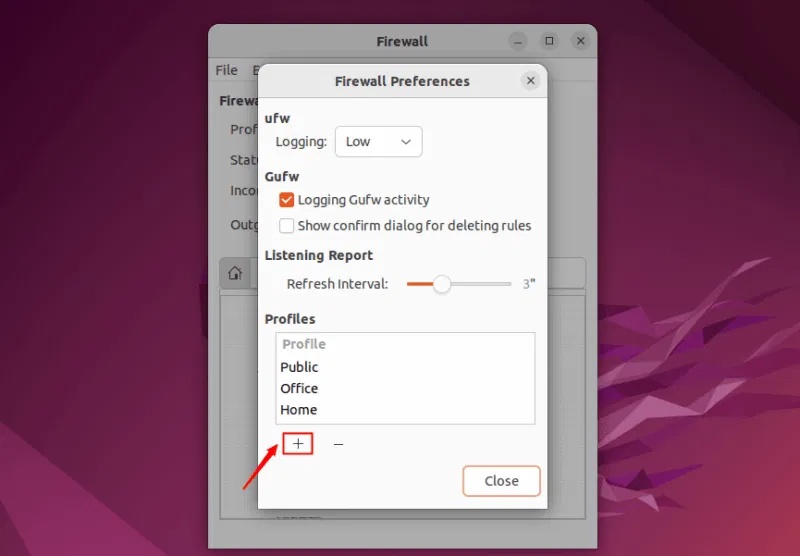
Để thêm profile mới, hãy nhấp vào biểu tượng<strong>&nbsp;+</strong>&nbsp;ở cuối cửa sổ Firewall Preferences:</p>

<figure>
<div style="text-align: justify;"><img alt="Thêm profile mới trong GUFW" data-i="8" data-src="https://st.quantrimang.com/photos/image/2025/06/05/thiet-lap-gufw-tren-ubuntu-9.jpg" data-was-processed="true" height="556" src="https://st.quantrimang.com/photos/image/2025/06/05/thiet-lap-gufw-tren-ubuntu-9.jpg" width="800" /></div>

<figcaption>
<div style="text-align: justify;">Thêm profile mới trong GUFW</div>
</figcaption>
</figure>

<p style="text-align: justify;">
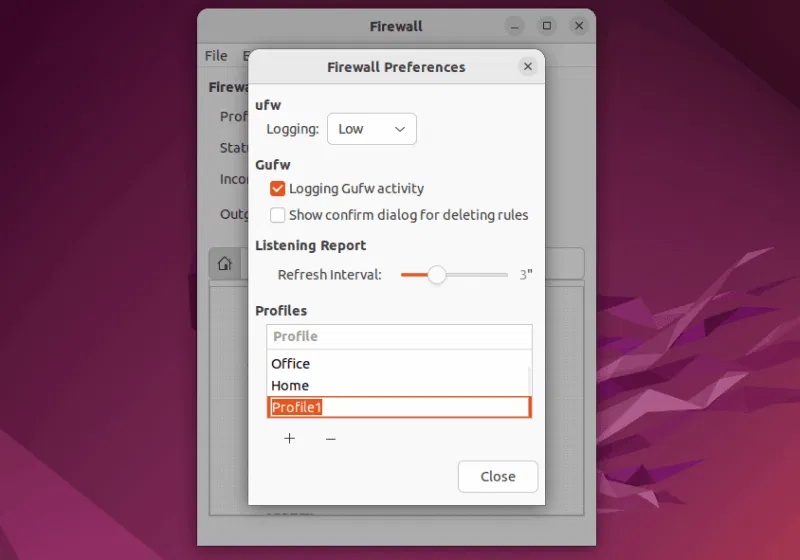
Theo mặc định, profile mới sẽ được đặt tên là Profile1, Profile2, v.v... Nhấp đúp vào profile đó để đổi tên:</p>

<figure>
<div style="text-align: justify;"><img alt="Đổi tên profile" data-i="9" data-src="https://st.quantrimang.com/photos/image/2025/06/05/thiet-lap-gufw-tren-ubuntu-10.jpg" data-was-processed="true" height="560" src="https://st.quantrimang.com/photos/image/2025/06/05/thiet-lap-gufw-tren-ubuntu-10.jpg" width="800" /></div>

<figcaption>
<div style="text-align: justify;">Đổi tên profile</div>
</figcaption>
</figure>

<p style="text-align: justify;">
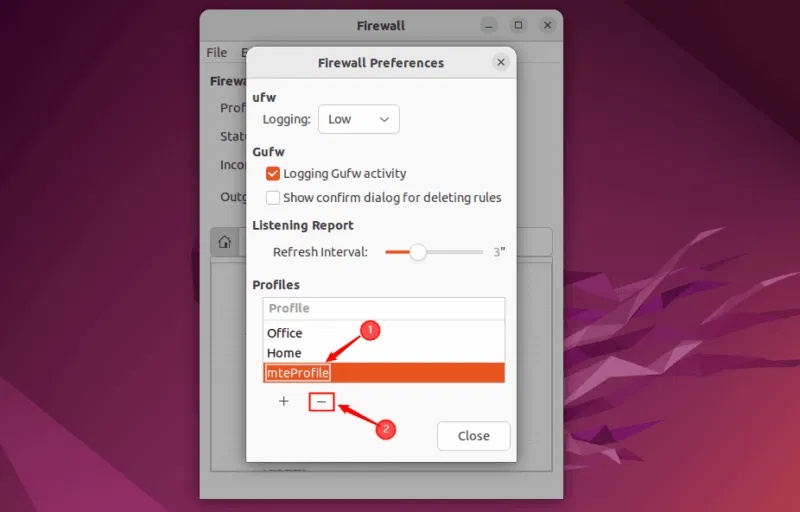
Để xóa profile, hãy chọn profile cần xóa và nhấp vào nút&nbsp;<strong>–</strong>:</p>

<figure>
<div style="text-align: justify;"><img alt="Xóa profile" data-i="10" data-src="https://st.quantrimang.com/photos/image/2025/06/05/thiet-lap-gufw-tren-ubuntu-11.jpg" data-was-processed="true" height="512" src="https://st.quantrimang.com/photos/image/2025/06/05/thiet-lap-gufw-tren-ubuntu-11.jpg" width="800" /></div>

<figcaption>
<div style="text-align: justify;">Xóa profile</div>
</figcaption>
</figure>

<p style="text-align: justify;">Bây giờ, hãy nhấp vào nút đóng để thoát khỏi Firewall preferences và tiếp tục với các quy tắc khác.</p>

<h2 id="mcetoc_1isvoub8f3n" style="text-align: justify;">Hiểu các quy tắc GUFW</h2>

<p style="text-align: justify;">GUFW cho phép bạn tạo các quy tắc tùy chỉnh cho từng profile của mình. Các quy tắc này giúp quản lý cách dữ liệu vào và ra khỏi mạng máy tính của bạn. Để thiết lập đúng quy tắc, điều quan trọng là phải hiểu thiết lập mạng của bạn và mức độ bảo mật bạn cần. Hơn nữa, việc cập nhật các quy tắc tường lửa, thường xuyên xem xét và điều chỉnh chúng giúp bạn kiểm soát tốt hơn lưu lượng mạng và chặn mọi truy cập không mong muốn.</p>

<p style="text-align: justify;">GUFW cung cấp một số loại quy tắc bạn có thể áp dụng để quản lý kết nối mạng:</p>

<ul>
	<li style="text-align: justify;"><strong>Allow:</strong>&nbsp;Cho phép tất cả dữ liệu đi qua một cổng cụ thể mà không có bất kỳ hạn chế nào.</li>
	<li style="text-align: justify;"><strong>Deny:</strong>&nbsp;Chặn tất cả dữ liệu đến qua cổng đã chọn.</li>
	<li style="text-align: justify;"><strong>Reject:</strong>&nbsp;Tương tự như Deny, nhưng nó cũng gửi lại tin nhắn cho người gửi để cho họ biết kết nối đã bị từ chối.</li>
	<li style="text-align: justify;"><strong>Limit:</strong>&nbsp;Chặn quyền truy cập nếu ai đó cố gắng kết nối quá nhiều lần trong thời gian ngắn (ví dụ, hơn 6 lần thử trong vòng 30 giây). Nó làm giảm khả năng xảy ra các cuộc tấn công tiềm ẩn như&nbsp;Brute Force.</li>
</ul>

<h2 id="mcetoc_1isvoub8f3o" style="text-align: justify;">Thêm các quy tắc GUFW</h2>

<p style="text-align: justify;">
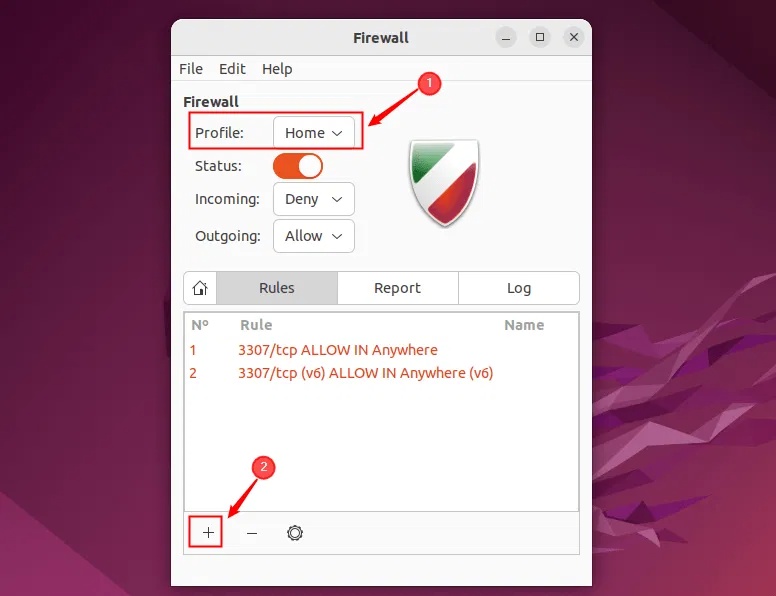
Để thêm quy tắc GUFW, trước tiên bạn cần chọn profile mà mình muốn thêm quy tắc, sau đó nhấp vào nút dấu cộng&nbsp;<strong>+</strong>:</p>

<figure>
<div style="text-align: justify;"><img alt="Thêm quy tắc GUFW" data-i="11" data-src="https://st.quantrimang.com/photos/image/2025/06/05/thiet-lap-gufw-tren-ubuntu-12.jpg" data-was-processed="true" height="596" src="https://st.quantrimang.com/photos/image/2025/06/05/thiet-lap-gufw-tren-ubuntu-12.jpg" width="776" /></div>

<figcaption>
<div style="text-align: justify;">Thêm quy tắc GUFW</div>
</figcaption>
</figure>

<p style="text-align: justify;">Một cửa sổ mới mở ra nơi bạn có thể thêm quy tắc tường lửa. Cửa sổ này được chia thành 3 tab: Preconfigured, Simple và Advanced.</p>

<ul>
	<li style="text-align: justify;"><strong>Preconfigured</strong>&nbsp;là tùy chọn dễ nhất. Tùy chọn này giúp bạn nhanh chóng cho phép hoặc chặn các dịch vụ phổ biến như HTTP hoặc SSH chỉ bằng một vài cú nhấp chuột.</li>
	<li style="text-align: justify;"><strong>Simple</strong>&nbsp;cũng thân thiện với người mới bắt đầu nhưng cung cấp cho bạn nhiều quyền kiểm soát hơn, chẳng hạn như chọn các cổng cụ thể và thiết lập hướng quy tắc.</li>
	<li style="text-align: justify;"><strong>Advanced</strong>&nbsp;dành cho những người dùng cần kiểm soát chi tiết. Tùy chọn này cho phép bạn tạo các quy tắc dựa trên&nbsp;<a data-type="internal" href="https://quantrimang.com/cong-nghe/dia-chi-ip-la-gi-143625" title="Địa chỉ IP là gì?">địa chỉ IP</a>, subnet, giao thức và interface mạng:</li>
</ul>

<figure>
<div style="text-align: justify;"><img alt="Thêm quy tắc tường lửa" data-i="12" data-src="https://st.quantrimang.com/photos/image/2025/06/05/thiet-lap-gufw-tren-ubuntu-13.jpg" data-was-processed="true" height="536" src="https://st.quantrimang.com/photos/image/2025/06/05/thiet-lap-gufw-tren-ubuntu-13.jpg" width="800" /></div>

<figcaption>
<div style="text-align: justify;">Thêm quy tắc tường lửa</div>
</figcaption>
</figure>

<p style="text-align: justify;">
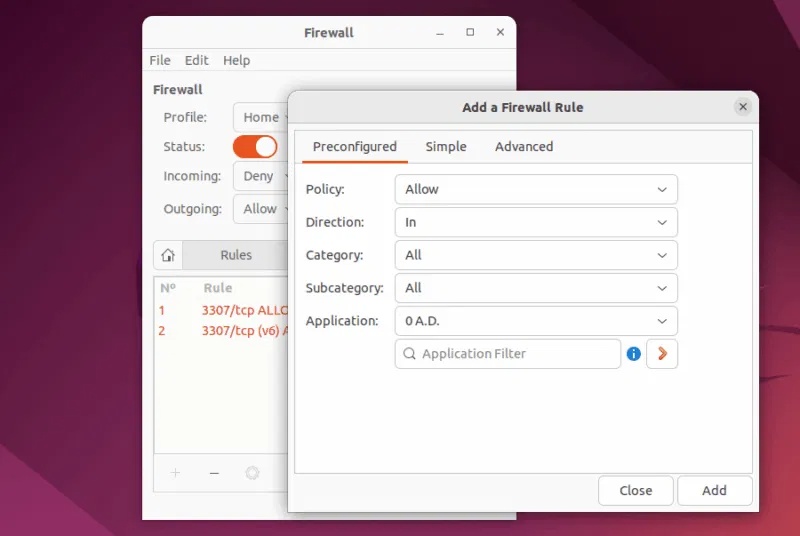
Chọn policy, hướng, danh mục, danh mục phụ và ứng dụng khi cần, sau đó nhấp vào nút&nbsp;<strong>Add</strong>&nbsp;để áp dụng quy tắc.</p>

<h2 id="mcetoc_1isvoub8f3p" style="text-align: justify;">
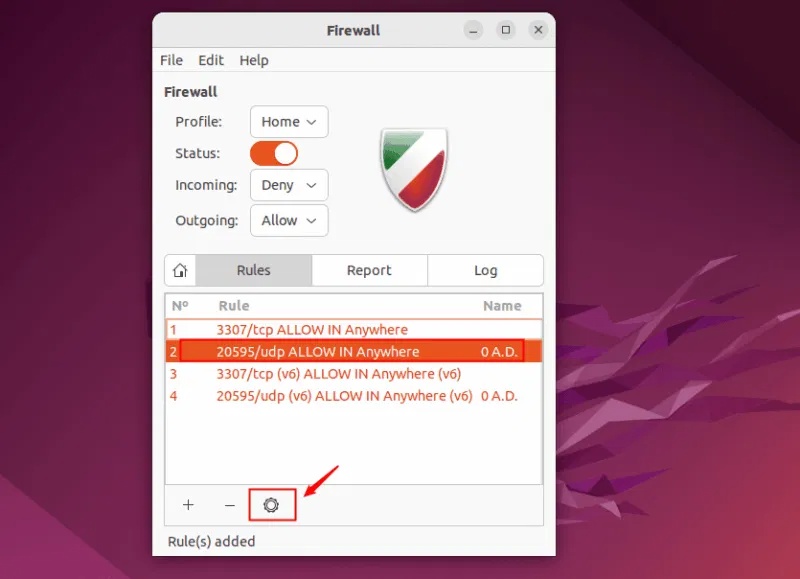
Chỉnh sửa các quy tắc GUFW</h2>

<p style="text-align: justify;">GUFW cho phép bạn chỉnh sửa một quy tắc hiện có. Để thực hiện điều đó, hãy chọn quy tắc cần chỉnh sửa và nhấp vào biểu tượng bánh răng:</p>

<figure>
<div style="text-align: justify;"><img alt="Chỉnh sửa quy tắc GUFW" data-i="13" data-src="https://st.quantrimang.com/photos/image/2025/06/05/thiet-lap-gufw-tren-ubuntu-14.jpg" data-was-processed="true" height="579" src="https://st.quantrimang.com/photos/image/2025/06/05/thiet-lap-gufw-tren-ubuntu-14.jpg" width="800" /></div>

<figcaption>
<div style="text-align: justify;">Chỉnh sửa quy tắc GUFW</div>
</figcaption>
</figure>

<p style="text-align: justify;">
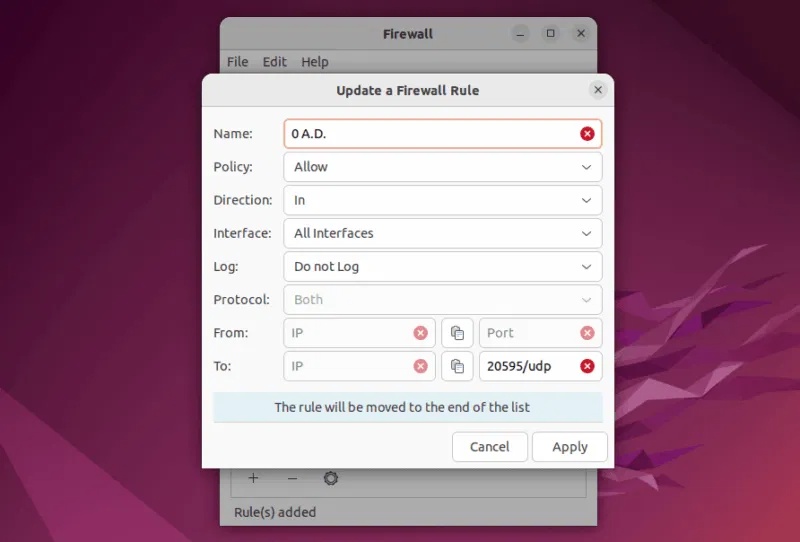
Bây giờ, trên cửa sổ pop-up, bạn có thể cập nhật quy tắc tường lửa và nhấp vào&nbsp;<strong>Apply</strong>&nbsp;để lưu các thay đổi:</p>

<figure>
<div style="text-align: justify;"><img alt="Cập nhật quy tắc GUFW" data-i="14" data-src="https://st.quantrimang.com/photos/image/2025/06/05/thiet-lap-gufw-tren-ubuntu-15.jpg" data-was-processed="true" height="542" src="https://st.quantrimang.com/photos/image/2025/06/05/thiet-lap-gufw-tren-ubuntu-15.jpg" width="800" /></div>

<figcaption>
<div style="text-align: justify;">Cập nhật quy tắc GUFW</div>
</figcaption>
</figure>

<p style="text-align: justify;">Đây là cách bạn có thể thiết lập và sử dụng Graphical Uncomplicated Firewall trên Ubuntu. Giữ tường lửa được bật và cấu hình các quy tắc phù hợp bằng GUFW là một điều nên làm. Nó giúp bạn bảo vệ hệ thống của mình khỏi truy cập trái phép trong khi vẫn cho phép kết nối an toàn. Để bảo mật hơn, bạn có thể cài đặt phần mềm diệt virus để bảo vệ hệ thống của mình khỏi các mối đe dọa tiềm ẩn và phần mềm độc hại.</p>
		</div>
				<div id="author">
						<p>
				<strong>Nguồn tin:</strong>
				Quantrimang.com:
			</p>
		</div>
	</div>
	<div id="footer" class="clearfix">
		<div id="url">
			<strong>URL của bản tin này: </strong><a href="https://www.nguoicodonvn2008.info/vi/news/savefile/kien-thuc-may-tinh/cach-thiet-lap-gufw-graphical-uncomplicated-firewall-tren-ubuntu-10512.html" title="Cách thiết lập GUFW &#40;Graphical Uncomplicated Firewall&#41; trên Ubuntu">https://www.nguoicodonvn2008.info/vi/news/savefile/kien-thuc-may-tinh/cach-thiet-lap-gufw-graphical-uncomplicated-firewall-tren-ubuntu-10512.html</a>

		</div>
		<div class="clear"></div>
		<div class="copyright">
			&copy; .&#x3A; Nguoicodonvn2008.info - Cõi lòng người cô đơn &#x3A;.
		</div>
		<div id="contact">
			<a href="mailto:admin@nguoicodonvn2008.info">admin@nguoicodonvn2008.info</a>
		</div>
	</div>
</div>
        <div id="timeoutsess" class="chromeframe">
            Bạn đã không sử dụng Site, <a onclick="timeoutsesscancel();" href="https://www.nguoicodonvn2008.info/#">Bấm vào đây để duy trì trạng thái đăng nhập</a>. Thời gian chờ: <span id="secField"> 60 </span> giây
        </div>
        <div id="openidResult" class="nv-alert" style="display:none"></div>
        <div id="openidBt" data-result="" data-redirect=""></div>
		</script>
		<div class="car-top">
  <span><img src="https://www.nguoicodonvn2008.info/themes/default/images/car.png" alt=""></span>
</div>
<div id="run_cronjobs" style="visibility:hidden;display:none;"><img alt="cron" src="/index.php?second=cronjobs&amp;p=g3W2018s" width="1" height="1" /></div>
<script src="https://www.nguoicodonvn2008.info/assets/js/jquery/jquery.min.js"></script>
<script>var nv_base_siteurl="/",nv_lang_data="vi",nv_lang_interface="vi",nv_name_variable="nv",nv_fc_variable="op",nv_lang_variable="language",nv_module_name="news",nv_func_name="savefile",nv_is_user=0, nv_my_ofs=-4,nv_my_abbr="EDT",nv_cookie_prefix="nv4c_e856T",nv_check_pass_mstime=1738000,nv_area_admin=0,nv_safemode=0,theme_responsive=0,nv_recaptcha_ver=2,nv_recaptcha_sitekey="",nv_recaptcha_type="image",XSSsanitize=1;</script>
<script src="https://www.nguoicodonvn2008.info/assets/js/language/vi.js"></script>
<script src="https://www.nguoicodonvn2008.info/assets/js/DOMPurify/purify3.js"></script>
<script src="https://www.nguoicodonvn2008.info/assets/js/global.js"></script>
<script src="https://www.nguoicodonvn2008.info/assets/js/site.js"></script>
<script src="https://www.nguoicodonvn2008.info/themes/default/js/news.js"></script>
<script src="https://www.nguoicodonvn2008.info/themes/default/js/main.js"></script>
<script src="https://www.nguoicodonvn2008.info/themes/default/js/custom.js"></script>
<script type="application/ld+json">
        {
            "@context": "https://schema.org",
            "@type": "Organization",
            "url": "https://www.nguoicodonvn2008.info",
            "logo": "https://www.nguoicodonvn2008.info/uploads/angel.gif"
        }
        </script>
<script src="https://www.nguoicodonvn2008.info/themes/default/js/bootstrap.min.js"></script>
<script type="text/javascript">
var $scrolltop = $('.car-top');
$scrolltop.on('click', function () {
    $('html,body').animate({
        scrollTop: 0
    }, 800);
    $(this).addClass("car-run");
    setTimeout(function(){ $scrolltop.removeClass('car-run');}, 1000);
    return false;
});
$(window).on('scroll', function ()
{ 
    if($(window).scrollTop() >= 200)
    {
        $scrolltop.addClass("show");
        $scrolltop.addClass("car-down");
    }
    else
    {
       $scrolltop.removeClass("show");
       setTimeout(function(){ $scrolltop.removeClass('car-down');}, 300);
    }
});
</script>
</body>
</html>