Cách thêm tính năng Hot Corners từ macOS vào Windows 11
- Thứ hai - 05/12/2022 23:51
- In ra
- Đóng cửa sổ này
Hệ điều hành macOS của Apple chứa một số tính năng hay mà Windows thiếu, chẳng hạn như công cụ "Hot Corners". Tính năng này cho phép bạn kích hoạt một số hành động nhất định bằng cách di chuyển con trỏ đến các góc của màn hình.
Thật tiếc là Windows không có tính năng gốc như vậy, nhưng ít nhất chúng ta có thể thêm các Hot Corners vào hệ điều hành này theo cách thủ công. Cả WinXCorners và Hot Corners đều là các gói phần mềm của bên thứ ba sao chép tính năng Hot Corners từ macOS rồi đưa vào hệ thống Windows.
Cách thêm các Hot Corners vào Windows bằng WinXCorners
WinXCorners là một ứng dụng miễn phí tương thích với Windows 10 và 11. Phần mềm này bao gồm 6 tác vụ mặc định mà bạn có thể áp dụng cho các góc của màn hình và phiên bản 1.2b của phần mềm cho phép thiết lập các lệnh tùy chỉnh.
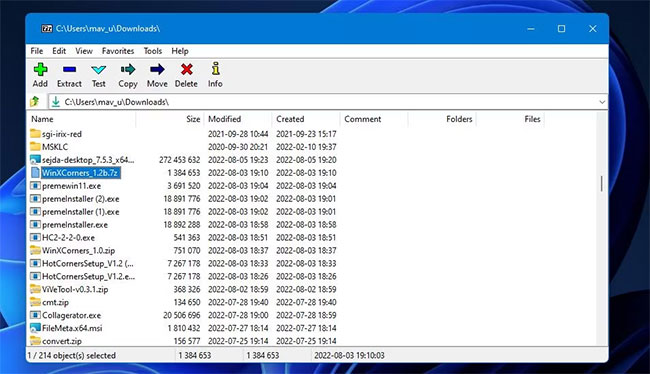
Bản tải xuống WinXCorners 1.2b có dạng kho lưu trữ 7z. Vì vậy, bạn sẽ cần một tiện ích giải nén, chẳng hạn như 7-Zip, để mở kho lưu trữ của chương trình.
Sau khi hoàn tất, bạn có thể thêm các Hot Corners vào Windows 11 bằng cách tải xuống WinXCorners và giải nén nó bằng 7-Zip như sau:
1. Mở trang web WinXCorners: https://apps.codigobit.info/2021/07/winxcorners-hot-corners-for-windows-10.html và nhấp vào liên kết tải xuống WinXCorners 1.2b trên trang web đó.
2. Mở tiện ích giải nén 7-Zip.
3. Chọn kho lưu trữ WinXCorners_1.2b trong 7-Zip.
4. Nhấp vào Extract để hiển thị cửa sổ trực tiếp bên dưới.
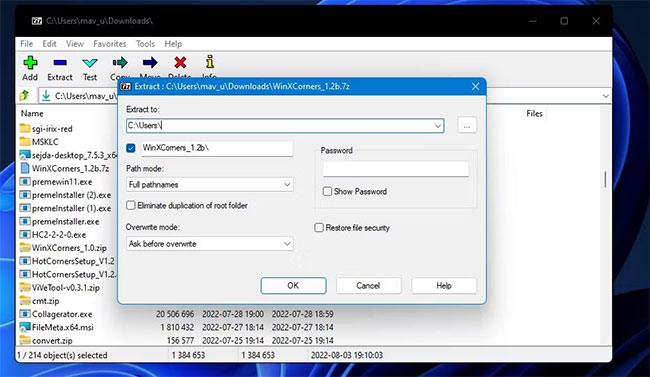
5. Nhấn nút hình elip.
6. Chọn một thư mục để đưa thư mục WinXCorners_1.2b đã giải nén vào và nhấn OK để chọn.
7. Nhấn OK trong cửa sổ Extract.
8. Mở thư mục WinXCorners_1.2b đã giải nén.
9. Nhấp đúp vào WinXCorners.exe để chạy phần mềm.
10. Nếu phần mềm bị tắt, hãy nhấp vào công tắc bật/tắt Temporarily disabled toggle trong WinXCorners để kích hoạt các Hot Corners.
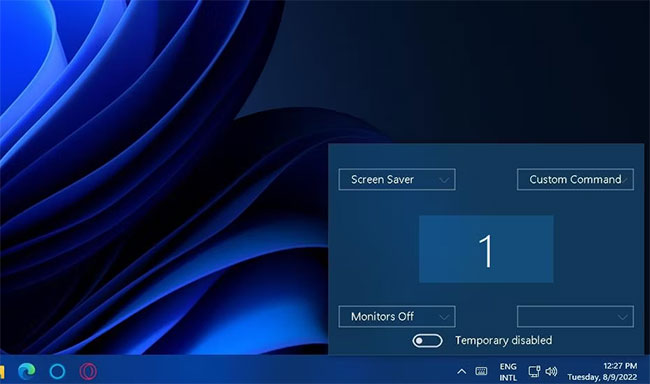
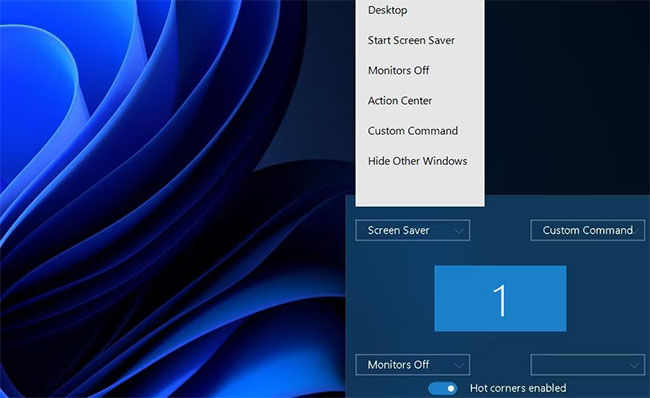
Khi công cụ đang chạy, bạn có thể chọn các hành động ở góc màn hình bằng cách nhấp vào menu drop-down để chọn các tùy chọn cho chúng. Bạn có thể gán hầu hết các hành động mặc định có sẵn cho 4 góc. Đây là những hành động mặc định mà bạn có thể chọn:
- Hide Windows: Thu nhỏ các cửa sổ phía sau cửa sổ đang hoạt động.
- Desktop: Hiển thị Desktop.
- Smart Screen Saver: Kích hoạt screen saver đã chọn.
- Action Center: Mở Action Center trong Windows.
- All Windows: Show Task View hiển thị tất cả các hình thu nhỏ của cửa sổ.
- Monitors off: Tắt màn hình (bạn có thể kích hoạt lại bằng cách nhấp vào).
Sau khi chọn các hành động, hãy di chuyển con trỏ chuột đến các góc trên cùng, dưới cùng, bên trái và bên phải của màn hình. Di chuyển con trỏ đến từng góc sẽ kích hoạt bất kỳ hành động nào bạn đã chỉ định cho nó, miễn là WinXCorners đang chạy trong nền.
Để cấu hình WinXCorners tự động chạy khi khởi động, nhấp chuột phải vào biểu tượng trên khay hệ thống của nó và chọn Start with Windows.
Bạn cũng có thể thiết lập các hot corner để mở phần mềm desktop, phần mềm này sẽ cho phép bạn mở một chương trình bằng cách di chuyển con trỏ đến một góc. Để thực hiện việc này, bạn cần thiết lập WinXCorners mở chương trình thông qua cửa sổ Advanced Options như sau:
1. Đầu tiên, chọn tùy chọn Custom Command cho một góc trên một trong các menu drop-down của WinXCorners.
2. Nhấp chuột phải vào biểu tượng khay hệ thống WinXCorners và chọn Advanced.
3. Chọn hộp lệnh Enable custom command trong cửa sổ Advanced Options.
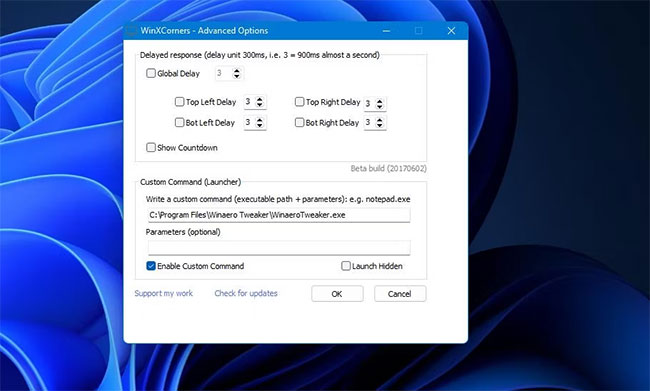
4. Dán đường dẫn đến file EXE của chương trình vào hộp Custom Command và nhấp vào nút OK.
Bây giờ, chương trình sẽ mở bất cứ khi nào bạn di chuyển con trỏ qua góc đã chọn.
Cách thêm các hot corner bằng phần mềm Hot Corners
Hot Corners là một giải pháp thay thế cho WinXCorners - chúng hoạt động giống nhau. Tuy nhiên, chương trình này có một số hành động khác nhau mà bạn có thể đặt cho các góc màn hình.
Hot Corners là một ứng dụng rất nhẹ mà bạn có thể sử dụng trên hầu hết các nền tảng Windows. Đây là cách bạn có thể thêm các hot corner vào Windows 11 bằng phần mềm Hot Corners:
1. Nhấp vào Download Now trên trang Softpedia của Hot Corners.:
https://www.softpedia.com/get/Desktop-Enhancements/Other-Desktop-Enhancements/HotCorners.shtml
2. Mở ứng dụng quản lý file bằng cách nhấn Win + E.
3. Điều hướng đến thư mục chứa trình cài đặt cho Hot Corners.
4. Nhấp chuột phải vào HC-2-2-0.exe và chọn Run as administrator.
5. Nhấn Next và Yes để chấp nhận thỏa thuận bản quyền.
6. Chọn thiết lập Run Hot Corners sau khi cài đặt xong và nhấn Next.
7. Thực hiện theo các hướng dẫn cho đến khi kết thúc.
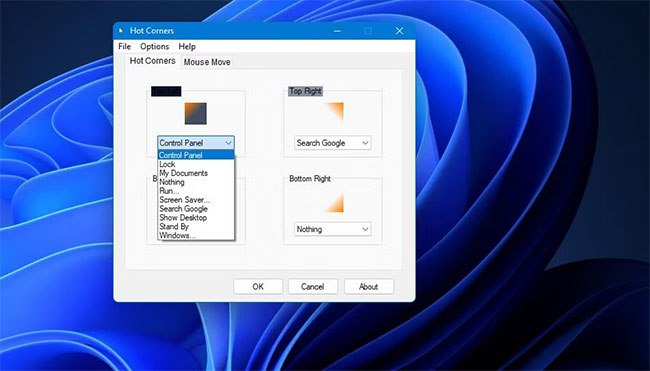
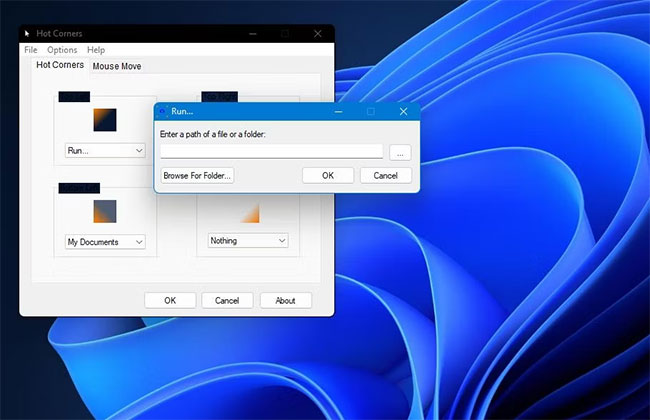
Hot Corners bao gồm chín tùy chọn hành động để lựa chọn. Ví dụ, bạn có thể thiết lập hành động để mở các vị trí hệ thống như Control Panel và My Documents hoặc bạn có thể đặt một góc để khóa PC hoặc đặt nó ở chế độ chờ.
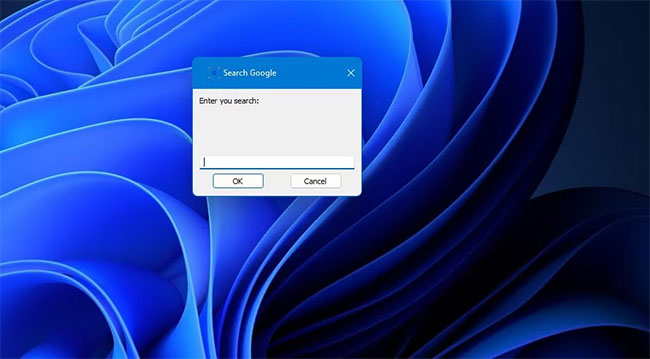
Nếu bạn chọn Search Google, hãy di chuyển con trỏ qua một góc sẽ hiển thị hộp tìm kiếm nhỏ. Nhập một từ khóa vào hộp đó sẽ hiển thị kết quả tìm kiếm của Google cho từ khóa đó trong trình duyệt mặc định.
Bạn cũng có thể đặt từng góc để mở các chương trình khác nhau với Hot Corners. Để đặt chương trình cho một góc, nhấp vào menu drop-down cho góc đó và chọn Run. Nhấp vào nút hình elip trong cửa sổ Run và chọn một chương trình. Sau đó chọn OK trên tất cả các cửa sổ.
Bạn sẽ nhận thấy Hot Corners bao gồm tab Mouse Move. Tính năng này cho phép người dùng kích hoạt các hành động bằng cách di chuyển chuột lên, xuống, trái và phải. Tuy nhiên, tính năng đó có phím nóng kích hoạt Win + X, xung đột với menu Power User của Windows 11. Do đó, tính năng đó chỉ hoạt động trong các nền tảng Windows không có menu Power User, chẳng hạn như Vista và 7.

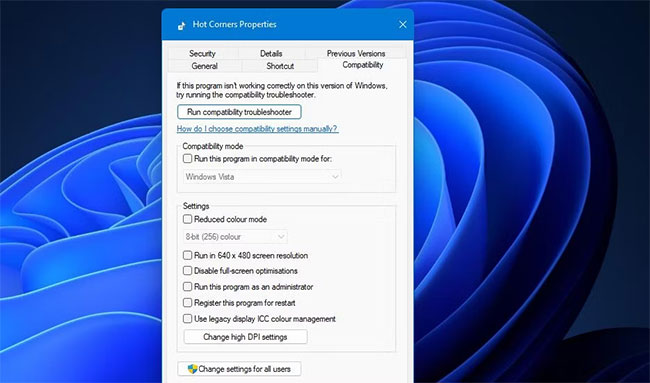
Ngoài ra, hãy lưu ý rằng Hot Corners không lưu cài đặt khi bạn không chạy nó với quyền admin. Vì vậy, hãy đảm bảo rằng bạn luôn chạy phần mềm với tư cách admin, thông qua tab Compatibility như sau:
1. Mở thư mục cài đặt cho Hot Corners.
2. Nhấp chuột phải vào file Hot Corners.exe và chọn Properties.
3. Nhấp vào Compatibility trên cửa sổ Hot Corners Properties.
4. Chọn Run this program as administrator và nhấp vào nút Apply (save).
Giờ đây, Hot Corners sẽ luôn chạy với quyền admin. Để thêm chương trình vào các mục khởi động, hãy nhấp vào Options > Settings trong Hot Corners. Chọn hộp kiểm Run on Start-up và bấm OK trên cửa sổ Settings.
