Cách tạo P2P Mesh VPN với Tinc
- Thứ sáu - 17/01/2025 22:05
- In ra
- Đóng cửa sổ này
Tinc là một adapter mạng riêng ảo (VPN) mã nguồn mở cung cấp một cách đơn giản để tạo mạng ngang hàng (P2P) riêng tư trong Linux, Windows và macOS. Tương tự như OpenVPN và Wireguard, nó có thể liên kết nhiều máy tính trên nhiều cấu trúc mạng khác nhau thành một mạng LAN ảo duy nhất. Bài viết hôm nay sẽ chỉ cho bạn những lợi ích khi sử dụng Tinc và cách cài đặt và tạo mạng mesh đơn giản dựa trên Tinc.
Cài đặt Tinc trên Linux
Bước đầu tiên trong quá trình cài đặt Tinc là đảm bảo hệ thống của bạn được cập nhật. Trong Ubuntu, hãy chạy lệnh sau:
sudo apt update && sudo apt upgrade -y
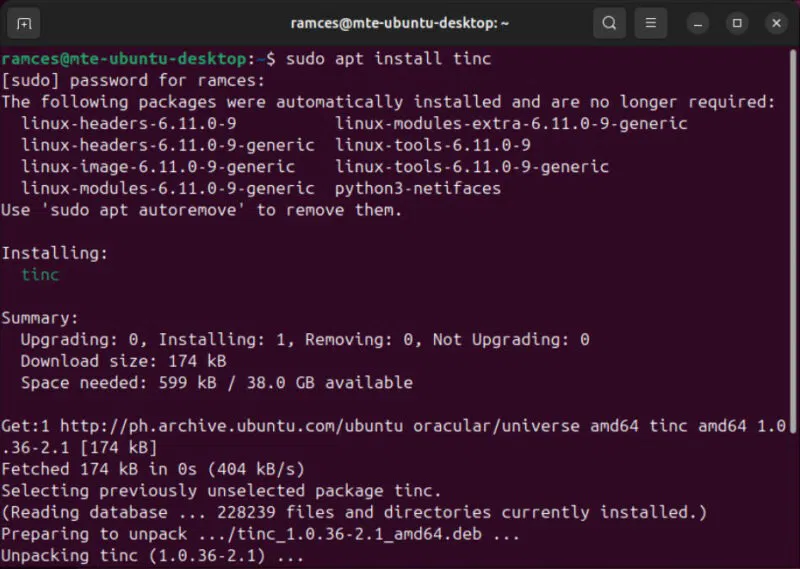
Tải xuống và cài đặt Tinc trực tiếp từ kho lưu trữ gói của Ubuntu:
sudo apt install tinc
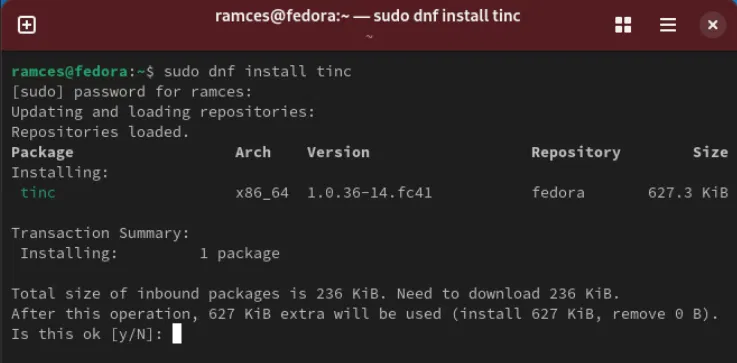
Để cài đặt Tinc trên các bản phân phối Linux khác, hãy sử dụng trình quản lý gói phù hợp cho hệ thống đó. Ví dụ, bạn cần chạy sudo dnf install tinc để tải chương trình trong Fedora.
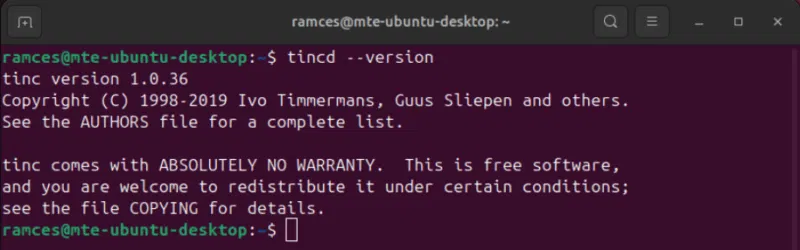
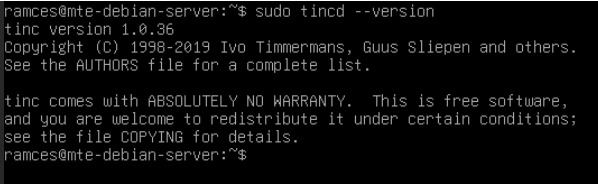
Xác nhận rằng bạn đã cài đặt Tinc đúng cách bằng cách mở phiên bản Terminal và chạy tincd --version.
Tạo mạng mesh cơ bản với Tinc
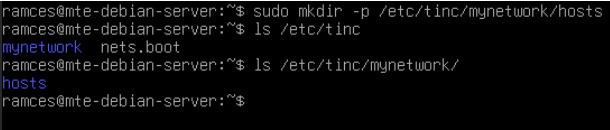
Với Tinc trên máy, giờ đây bạn có thể cấu hình mạng đầu tiên dựa trên Tinc. Tạo một thư mục mới bên trong “/etc/tinc”. Lệnh này sẽ chứa tất cả các file liên quan đến node Tinc của bạn:
sudo mkdir -p /etc/tinc/mynetwork/hosts
Tạo file cấu hình mới bằng trình soạn thảo văn bản yêu thích:
sudo nano /etc/tinc/mynetwork/tinc.conf
Dán block code sau vào file cấu hình mới:
Name = mynode
Device = /dev/net/tun

Lưu ý: Một số bản phân phối Linux có thể thay đổi vị trí của adapter tun bên trong “/dev”. Để tìm đường dẫn chính xác của nó trong hệ thống của bạn, hãy chạy:
find /dev -name *tun* -type c
Tạo file văn bản trong thư mục “hosts” với tên node Tinc của bạn và dán nội dung sau vào bên trong:
Subnet = 192.168.11.1/32
Address = ĐỊA-CHỈ-IP-MÁY-CỦA-BẠN
Port = 655
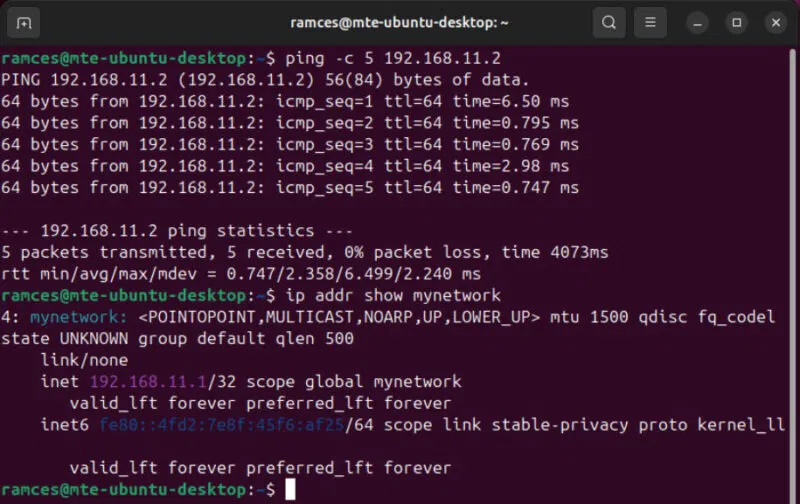
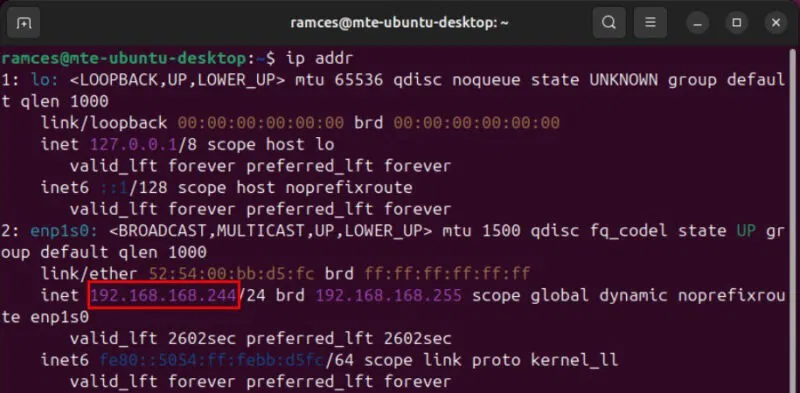
Thay thế giá trị của biến “Address” bằng địa chỉ IP của máy bạn. Bạn có thể tìm thấy điều này bằng cách chạy ip addr.
Lưu ý: Bạn cần cung cấp địa chỉ IP công khai của máy nếu bạn muốn tạo VPN có thể truy cập công khai.
Lưu file hosts của máy bạn, sau đó tạo hai file trong “/etc/tinc/mynetwork”:
sudo touch /etc/tinc/mynetwork/tinc-{up,down}
sudo chmod +x /etc/tinc/mynetwork/tinc-(up,down}
Mở file “tinc-up”, sau đó dán code Bash sau vào bên trong file. Thao tác này tạo interface mạng ảo cho Tinc và gán địa chỉ IP cho interface đó:
#!/bin/sh

ip link set $INTERFACE up
ip addr add 192.168.11.1/32 dev $INTERFACE
ip route add 192.168.11.0/24 dev $INTERFACE
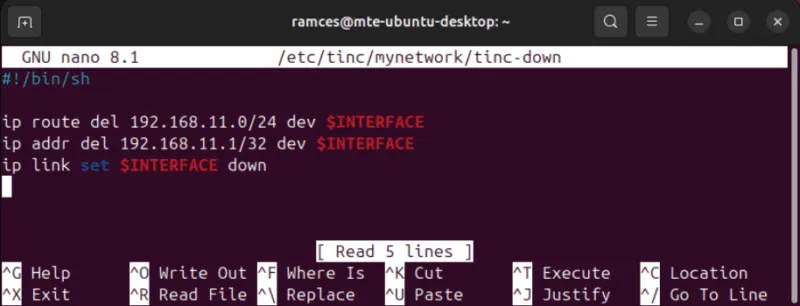
Lưu file, sau đó mở file “tinc-down” và dán nội dung sau vào bên trong file. Thao tác này thực hiện ngược lại với “tinc-up:” nó sẽ hủy gán địa chỉ IP khỏi interface Tinc của bạn và xóa interface đó khỏi máy:
#!/bin/sh

ip route del 192.168.11.0/24 dev $INTERFACE
ip addr del 192.168.11.1/32 dev $INTERFACE
ip link set $INTERFACE down
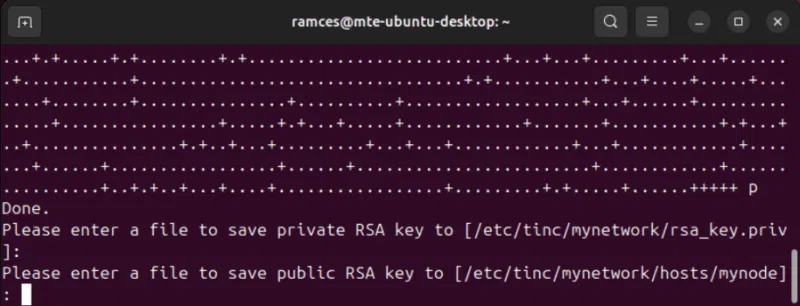
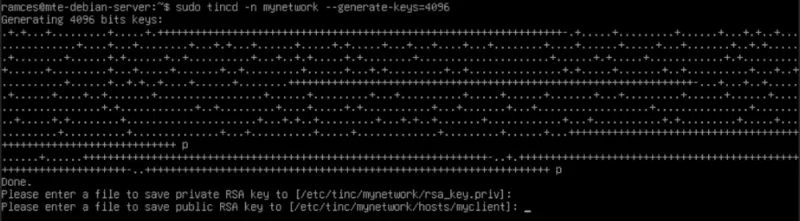
Tạo cặp key cho node Tinc của bạn bằng cách chạy tincd:
sudo tincd -n mynetwork --generate-keys=4096
Nhấn Enter 2 lần để chấp nhận vị trí lưu mặc định cho cả private và public key trên node Tinc của bạn.
Thêm Tinc client đầu tiên
Để thêm Tinc client mới, trước tiên hãy đảm bảo rằng bạn đã cài đặt Tinc đúng cách trên máy thứ hai của mình.
Tạo cấu trúc thư mục cho cấu hình Tinc của bạn bằng cách sử dụng mkdir -p.
Sử dụng trình soạn thảo văn bản yêu thích để tạo file cấu hình cho Tinc client:
sudo nano /etc/tinc/mynetwork/tinc.conf
Dán các dòng code sau vào file cấu hình của máy thứ hai:
Name = myclient
Device = /dev/net/tun
ConnectTo = mynode
Tạo file có tên máy Tinc của bạn trong “/etc/tinc/mynetwork/hosts”. Trong trường hợp này, ví dụ đặt tên máy thứ hai của mình là "myclient", vì vậy file có tên "myclient" sẽ được tạo
sudo nano /etc/tinc/mynetwork/hosts/myclient
Dán block code sau vào file hosts mới. Tương tự như node đầu tiên, điều này quyết định cấu hình mạng của daemon Tinc:
Subnet = 192.168.11.2/32
Port = 655
Lưu file hosts mới, sau đó tạo script "tinc-up" và "tinc-down" trên máy thứ hai:
sudo touch /etc/tinc/mynetwork/tinc-{up,down}
sudo chmod +x /etc/tinc/mynetwork/tinc-{up,down}

Mở file tinc-up bằng trình soạn thảo văn bản yêu thích, sau đó dán block code sau vào bên trong:
#!/bin/sh
ip link set $INTERFACE up
ip addr add 192.168.11.2/32 dev $INTERFACE
ip route add 192.168.11.0/24 dev $INTERFACE
Lưu file tinc-up của bạn, sau đó mở tinc-down và dán các dòng code sau vào bên trong:
#!/bin/sh

ip route del 192.168.11.0/24 dev $INTERFACE
ip addr del 192.168.11.2/32 dev $INTERFACE
ip link set $INTERFACE down
Hoàn tất cấu hình Tinc client bằng cách tạo cặp key của nó:
sudo tincd -n mynetwork --generate-keys=4096
Chạy mạng mesh
Lúc này, bạn đã có hai daemon Tinc được cấu hình đúng. Tuy nhiên, bạn vẫn cần liên kết hai daemon Tinc này để tạo VPN P2P trong Linux. Để làm được điều đó, bạn cần sao chép file cấu hình máy chủ từ node Tinc của mình sang client và ngược lại.
Bắt đầu bằng cách mở Terminal của node và điều hướng đến thư mục “/etc/tinc/mynetwork/hosts” của nó:
cd /etc/tinc/mynetwork/hosts
Sao chép file cấu hình bên trong thư mục này và chuyển file đó đến client. Trong trường hợp này, ví dụ sẽ sử dụng scp để gửi file này qua ssh:
scp ./mynode YOUR-CLIENT-IP-ADDRESS:~
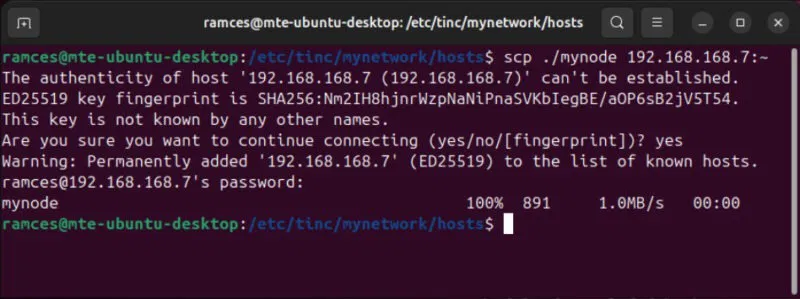
Lưu ý: Mặc dù ví dụ này đã sử dụng scp, nhưng bạn cũng có thể chuyển chúng theo cách thủ công bằng ổ flash.
Hãy đến client và sao chép file hosts mà bạn vừa chuyển đến thư mục “/etc/tinc/mynetwork/hosts” của client:
sudo cp -v ~/mynode /etc/tinc/mynetwork/hosts/
Sau đó, chạy scp trên phía client để chuyển file hosts của client trở lại node:
scp /etc/tinc/mynetwork/hosts/myclient YOUR-NODE-IP-ADDRESS:~

Sao chép file hosts của client vào thư mục hosts của node:
sudo cp ~/myclient /etc/tinc/mynetwork/hosts/
Bắt đầu mạng mesh Tinc
Bắt đầu mạng Tinc được cấu hình đầy đủ của bạn bằng cách chạy lệnh sau trên mỗi host:
sudo tincd -n mynetwork
Xác nhận rằng bạn có thể giao tiếp với các node của mình thông qua interface Tinc bằng cách thực hiện lệnh ping đơn giản:
ping -c 5 192.168.11.2
Cuối cùng, hãy bật service Tinc để đảm bảo rằng VPN của bạn sẽ hoạt động khi khởi động hệ thống:
sudo systemctl enable --now tinc@mynetwork.service

Học cách tạo P2P Mesh VPN của riêng bạn trong Linux bằng Tinc chỉ là bước đầu tiên để khám phá thế giới mạng máy tính tuyệt vời này. Chúc bạn thực hiện thành công!
