<!DOCTYPE html>
    <html lang="vi" xmlns="http://www.w3.org/1999/xhtml" prefix="og: http://ogp.me/ns#">
    <head>
<title>Cách tạo hiệu ứng màu đơn sắc trong Photoshop</title>
<meta name="description" content="Cách tạo hiệu ứng màu đơn sắc trong Photoshop - Savefile - Tin Tức -...">
<meta name="author" content=".: Nguoicodonvn2008.info - Cõi lòng người cô đơn :.">
<meta name="copyright" content=".: Nguoicodonvn2008.info - Cõi lòng người cô đơn :. [admin@nguoicodonvn2008.info]">
<meta name="robots" content="index, archive, follow, noodp">
<meta name="googlebot" content="index,archive,follow,noodp">
<meta name="msnbot" content="all,index,follow">
<meta name="generator" content="NukeViet v4.5">
<meta http-equiv="Content-Type" content="text/html; charset=utf-8">
<meta property="og:title" content="Cách tạo hiệu ứng màu đơn sắc trong Photoshop">
<meta property="og:type" content="website">
<meta property="og:description" content="Savefile - Tin Tức - https&#x3A;&#x002F;&#x002F;www.nguoicodonvn2008.info&#x002F;vi&#x002F;news&#x002F;savefile&#x002F;kien-thuc-may-tinh&#x002F;cach-tao-hieu-ung-mau-don-sac-trong-photoshop-9932.html">
<meta property="og:site_name" content=".&#x3A; Nguoicodonvn2008.info - Cõi lòng người cô đơn &#x3A;.">
<meta property="og:url" content="https://www.nguoicodonvn2008.info/vi/news/savefile/kien-thuc-may-tinh/cach-tao-hieu-ung-mau-don-sac-trong-photoshop-9932.html">
<link rel="shortcut icon" href="https://www.nguoicodonvn2008.info/favicon.ico">
<link rel="canonical" href="https://www.nguoicodonvn2008.info/vi/news/savefile/kien-thuc-may-tinh/cach-tao-hieu-ung-mau-don-sac-trong-photoshop-9932.html">
<link rel="alternate" href="https://www.nguoicodonvn2008.info/vi/news/rss/" title="Tin Tức" type="application/rss+xml">
<link rel="alternate" href="https://www.nguoicodonvn2008.info/vi/news/rss/karaoke-dual/" title="Tin Tức - Karaoke Dual" type="application/rss+xml">
<link rel="alternate" href="https://www.nguoicodonvn2008.info/vi/news/rss/nhac-tre/" title="Tin Tức - Nhạc trẻ" type="application/rss+xml">
<link rel="alternate" href="https://www.nguoicodonvn2008.info/vi/news/rss/tru-tinh/" title="Tin Tức - Trữ tình" type="application/rss+xml">
<link rel="alternate" href="https://www.nguoicodonvn2008.info/vi/news/rss/nuoc-ngoai/" title="Tin Tức - Nước ngoài" type="application/rss+xml">
<link rel="alternate" href="https://www.nguoicodonvn2008.info/vi/news/rss/remix/" title="Tin Tức - Remix" type="application/rss+xml">
<link rel="alternate" href="https://www.nguoicodonvn2008.info/vi/news/rss/tam-su-tinh-yeu/" title="Tin Tức - Tâm sự tình yêu" type="application/rss+xml">
<link rel="alternate" href="https://www.nguoicodonvn2008.info/vi/news/rss/tho-suu-tam/" title="Tin Tức - Thơ sưu tầm" type="application/rss+xml">
<link rel="alternate" href="https://www.nguoicodonvn2008.info/vi/news/rss/cuoc-song/" title="Tin Tức - Cuộc sống" type="application/rss+xml">
<link rel="alternate" href="https://www.nguoicodonvn2008.info/vi/news/rss/phan-mem/" title="Tin Tức - Phần mềm" type="application/rss+xml">
<link rel="alternate" href="https://www.nguoicodonvn2008.info/vi/news/rss/kien-thuc-may-tinh/" title="Tin Tức - Kiến thức máy tính" type="application/rss+xml">
<link rel="alternate" href="https://www.nguoicodonvn2008.info/vi/news/rss/hoc-tap/" title="Tin Tức - Học tập" type="application/rss+xml">
<link rel="alternate" href="https://www.nguoicodonvn2008.info/vi/news/rss/tai-lieu/" title="Tin Tức - Tài liệu" type="application/rss+xml">
<link rel="alternate" href="https://www.nguoicodonvn2008.info/vi/news/rss/de-thi/" title="Tin Tức - Đề thi" type="application/rss+xml">
<link rel="preload" as="style" href="https://www.nguoicodonvn2008.info/assets/css/font-awesome.min.css" type="text/css">
<link rel="preload" as="style" href="https://www.nguoicodonvn2008.info/themes/default/css/bootstrap.non-responsive.css" type="text/css">
<link rel="preload" as="style" href="https://www.nguoicodonvn2008.info/themes/default/css/style.css" type="text/css">
<link rel="preload" as="style" href="https://www.nguoicodonvn2008.info/themes/default/css/style.non-responsive.css" type="text/css">
<link rel="preload" as="style" href="https://www.nguoicodonvn2008.info/themes/default/css/news.css" type="text/css">
<link rel="preload" as="style" href="https://www.nguoicodonvn2008.info/themes/default/css/custom.css" type="text/css">
<link rel="preload" as="script" href="https://www.nguoicodonvn2008.info/assets/js/jquery/jquery.min.js" type="text/javascript">
<link rel="preload" as="script" href="https://www.nguoicodonvn2008.info/assets/js/language/vi.js" type="text/javascript">
<link rel="preload" as="script" href="https://www.nguoicodonvn2008.info/assets/js/DOMPurify/purify3.js" type="text/javascript">
<link rel="preload" as="script" href="https://www.nguoicodonvn2008.info/assets/js/global.js" type="text/javascript">
<link rel="preload" as="script" href="https://www.nguoicodonvn2008.info/assets/js/site.js" type="text/javascript">
<link rel="preload" as="script" href="https://www.nguoicodonvn2008.info/themes/default/js/news.js" type="text/javascript">
<link rel="preload" as="script" href="https://www.nguoicodonvn2008.info/themes/default/js/main.js" type="text/javascript">
<link rel="preload" as="script" href="https://www.nguoicodonvn2008.info/themes/default/js/custom.js" type="text/javascript">
<link rel="preload" as="script" href="https://www.nguoicodonvn2008.info/themes/default/js/bootstrap.min.js" type="text/javascript">
<link rel="stylesheet" href="https://www.nguoicodonvn2008.info/assets/css/font-awesome.min.css">
<link rel="stylesheet" href="https://www.nguoicodonvn2008.info/themes/default/css/bootstrap.non-responsive.css">
<link rel="stylesheet" href="https://www.nguoicodonvn2008.info/themes/default/css/style.css">
<link rel="stylesheet" href="https://www.nguoicodonvn2008.info/themes/default/css/style.non-responsive.css">
<link rel="StyleSheet" href="https://www.nguoicodonvn2008.info/themes/default/css/news.css">
<link rel="stylesheet" href="https://www.nguoicodonvn2008.info/themes/default/css/custom.css">
<style type="text/css">
	body{background: #fff;}
</style>
    </head>
    <body>
<div id="print">
	<div id="hd_print">
		<h2 class="pull-left">.&#x3A; Nguoicodonvn2008.info - Cõi lòng người cô đơn &#x3A;.</h2>
		<p class="pull-right"><a title=".&#x3A; Nguoicodonvn2008.info - Cõi lòng người cô đơn &#x3A;." href="https://www.nguoicodonvn2008.info/">https://www.nguoicodonvn2008.info</a></p>
	</div>
	<div class="clear"></div>
	<hr />
	<div id="content">
		<h1>Cách tạo hiệu ứng màu đơn sắc trong Photoshop</h1>
		<ul class="list-inline">
			<li>Thứ tư - 05/03/2025 22:50</li>
			<li class="hidden-print txtrequired"><em class="fa fa-print">&nbsp;</em><a title="In ra" href="javascript:;" onclick="window.print()">In ra</a></li>
			<li class="hidden-print txtrequired"><em class="fa fa-power-off">&nbsp;</em><a title="Đóng cửa sổ này" href="javascript:;" onclick="window.close()">Đóng cửa sổ này</a></li>
		</ul>
		<div class="clear"></div>
		<div id="hometext">
		</div>
				<div class="imghome">
			<img alt="Cách tạo hiệu ứng màu đơn sắc trong Photoshop" src="https://st.quantrimang.com/photos/image/2025/03/05/tao-hieu-ung-mau-don-sac-trong-photoshop-12.jpg" width="460" class="img-thumbnail" />
		</div>
		<div class="clear"></div>
		<div id="bodytext" class="clearfix">
			<p style="text-align: justify;">
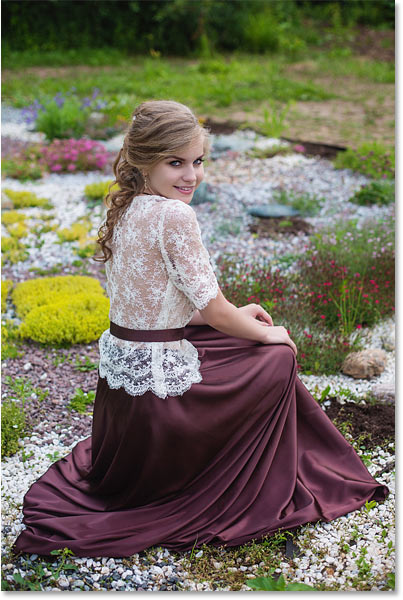
Hướng dẫn này sẽ chỉ cho bạn một cách nhanh chóng và dễ dàng để thêm hiệu ứng màu đơn sắc vào hình ảnh bằng&nbsp;Adobe Photoshop. Thuật ngữ đơn sắc có nghĩa là màu sắc trong hình ảnh bị giới hạn ở các sắc thái khác nhau của cùng một tông màu hoặc cùng một màu chính. Và đây là một cách tuyệt vời để đơn giản hóa hình ảnh hoặc truyền tải một tâm trạng hoặc cảm xúc nhất định. Nhiếp ảnh đen trắng là đơn sắc vì nó chỉ sử dụng các sắc thái của màu xám, nhưng bất kỳ màu nào cũng có thể sử dụng được.</p>

<figure>
<div style="text-align: justify;"><img alt="" data-i="0" data-src="https://st.quantrimang.com/photos/image/2025/03/05/tao-hieu-ung-mau-don-sac-trong-photoshop-1.jpg" data-was-processed="true" height="600" src="https://st.quantrimang.com/photos/image/2025/03/05/tao-hieu-ung-mau-don-sac-trong-photoshop-1.jpg" width="403" /></div>
</figure>

<figure>
<div style="text-align: justify;"><img alt="" data-i="1" data-src="https://st.quantrimang.com/photos/image/2025/03/05/tao-hieu-ung-mau-don-sac-trong-photoshop-2.jpg" data-was-processed="true" height="600" src="https://st.quantrimang.com/photos/image/2025/03/05/tao-hieu-ung-mau-don-sac-trong-photoshop-2.jpg" width="403" /></div>
</figure>

<figure>
<div style="text-align: justify;"><img alt="" data-i="2" data-src="https://st.quantrimang.com/photos/image/2025/03/05/tao-hieu-ung-mau-don-sac-trong-photoshop-3.jpg" data-was-processed="true" height="600" src="https://st.quantrimang.com/photos/image/2025/03/05/tao-hieu-ung-mau-don-sac-trong-photoshop-3.jpg" width="403" /></div>
</figure>

<h2 style="text-align: justify;">Cách chuyển đổi ảnh màu sang đơn sắc</h2>

<p style="text-align: justify;">Sau đây là cách tạo hiệu ứng màu đơn sắc cơ bản. Sau khi đã nắm được cách hoạt động, bài viết sẽ chỉ cho bạn cách kết hợp một vài bước để tăng tốc mọi thứ.</p>

<h3 style="text-align: justify;">Bước 1: Thêm fill layer Solid Color phía trên hình ảnh</h3>

<p style="text-align: justify;">Cách dễ nhất để chuyển đổi ảnh màu sang đơn sắc là sử dụng fill layer Solid Color.</p>

<p style="text-align: justify;">
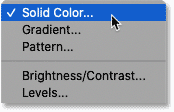
Trong bảng Layers, ảnh gốc sẽ xuất hiện trên layer Background. Thêm fill layer Solid Color phía trên hình ảnh bằng cách nhấp vào biểu tượng&nbsp;<strong>New Fill</strong>&nbsp;hoặc&nbsp;<strong>Adjustment Layer</strong>:</p>

<figure>
<div style="text-align: justify;"><img alt="Nhấp vào biểu tượng New Fill hoặc Adjustment Layer trong bảng Layers của Photoshop." data-i="3" data-src="https://st.quantrimang.com/photos/image/2025/03/05/tao-hieu-ung-mau-don-sac-trong-photoshop-4.png" data-was-processed="true" height="295" src="https://st.quantrimang.com/photos/image/2025/03/05/tao-hieu-ung-mau-don-sac-trong-photoshop-4.png" width="267" /></div>

<figcaption>
<div style="text-align: justify;">Nhấp vào biểu tượng New Fill hoặc Adjustment Layer trong bảng Layers của Photoshop.</div>
</figcaption>
</figure>

<p style="text-align: justify;">Và chọn&nbsp;<strong>Solid Color</strong>&nbsp;từ danh sách:</p>

<figure>
<div style="text-align: justify;"><img alt="Thêm fill layer Solid Color." data-i="4" data-src="https://st.quantrimang.com/photos/image/2025/03/05/tao-hieu-ung-mau-don-sac-trong-photoshop-5.png" data-was-processed="true" height="112" src="https://st.quantrimang.com/photos/image/2025/03/05/tao-hieu-ung-mau-don-sac-trong-photoshop-5.png" width="174" /></div>

<figcaption>
<div style="text-align: justify;">Thêm fill layer Solid Color.</div>
</figcaption>
</figure>

<h3 style="text-align: justify;">Bước 2: Chọn màu chính từ Color Picker</h3>

<p style="text-align: justify;">
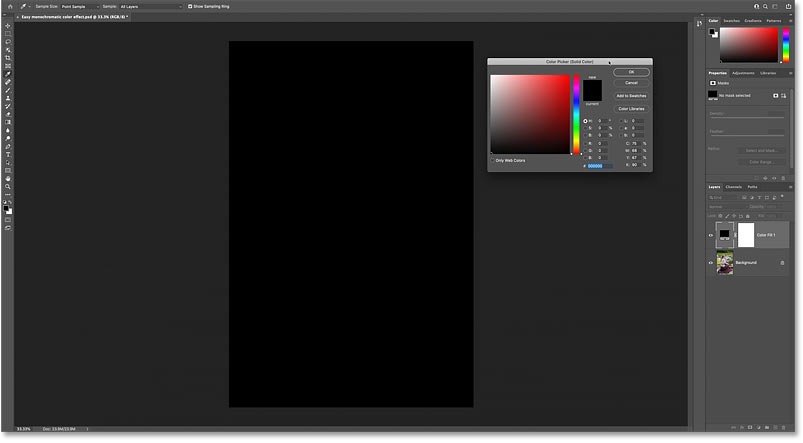
Color Picker mở ra và hình ảnh sẽ tạm thời bị chặn bởi bất kỳ màu nào hiện đang được chọn.</p>

<p style="text-align: justify;">Theo mặc định, nó có màu đen:</p>

<figure>
<div style="text-align: justify;"><img alt="Màu đã chọn trong Color Picker chặn hình ảnh khỏi chế độ xem." data-i="5" data-src="https://st.quantrimang.com/photos/image/2025/03/05/tao-hieu-ung-mau-don-sac-trong-photoshop-6.jpg" data-was-processed="true" height="443" src="https://st.quantrimang.com/photos/image/2025/03/05/tao-hieu-ung-mau-don-sac-trong-photoshop-6.jpg" width="803" /></div>

<figcaption>
<div style="text-align: justify;">Màu đã chọn trong Color Picker chặn hình ảnh khỏi chế độ xem.</div>
</figcaption>
</figure>

<p style="text-align: justify;">Trong Color Picker, hãy chọn màu bạn muốn sử dụng. Lúc này, chúng ta chỉ cần sắc thái (màu chính). Chúng ta sẽ quay lại, điều chỉnh độ bão hòa và độ sáng sau một lát nữa.</p>

<p style="text-align: justify;">Ví dụ sẽ chọn màu hồng đỏ:
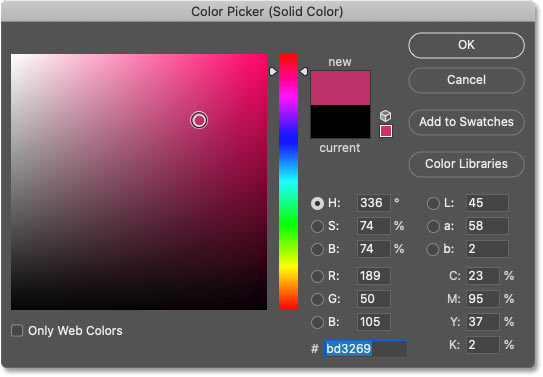
</p>

<figure>
<div style="text-align: justify;"><img alt="Chọn màu cho hiệu ứng đơn sắc từ Color Picker của Photoshop." data-adbro-processed="true" data-i="6" data-src="https://st.quantrimang.com/photos/image/2025/03/05/tao-hieu-ung-mau-don-sac-trong-photoshop-7.jpg" data-was-processed="true" height="377" src="https://st.quantrimang.com/photos/image/2025/03/05/tao-hieu-ung-mau-don-sac-trong-photoshop-7.jpg" width="543" /></div>

<figcaption>
<div style="text-align: justify;">Chọn màu cho hiệu ứng đơn sắc từ Color Picker của Photoshop.</div>
</figcaption>
</figure>

<p style="text-align: justify;">Nhấp vào&nbsp;<strong>OK</strong>&nbsp;để đóng Color Picker và bây giờ màu mới chặn hình ảnh:</p>

<figure>
<div style="text-align: justify;"><img alt="Màu được chọn, nhưng hình ảnh vẫn bị chặn." data-i="7" data-src="https://st.quantrimang.com/photos/image/2025/03/05/tao-hieu-ung-mau-don-sac-trong-photoshop-8.jpg" data-was-processed="true" height="441" src="https://st.quantrimang.com/photos/image/2025/03/05/tao-hieu-ung-mau-don-sac-trong-photoshop-8.jpg" width="803" /></div>

<figcaption>
<div style="text-align: justify;">Màu được chọn, nhưng hình ảnh vẫn bị chặn.</div>
</figcaption>
</figure>

<h3 style="text-align: justify;">Bước 3: Thay đổi blend mode của fill layer thành Color</h3>

<p style="text-align: justify;">Quay lại bảng Layers, fill layer Solid Color nằm phía trên layer Background.</p>

<p style="text-align: justify;">Để pha trộn màu từ fill layer với hình ảnh bên dưới, hãy thay đổi blend mode của fill layer từ&nbsp;<strong>Normal</strong>&nbsp;thành&nbsp;<strong>Color</strong>:</p>

<figure>
<div style="text-align: justify;"><img alt="Thay đổi blend mode của fill layer Solid Color thành Color trong bảng Layers của Photoshop." data-i="8" data-src="https://st.quantrimang.com/photos/image/2025/03/05/tao-hieu-ung-mau-don-sac-trong-photoshop-9.png" data-was-processed="true" height="237" src="https://st.quantrimang.com/photos/image/2025/03/05/tao-hieu-ung-mau-don-sac-trong-photoshop-9.png" width="276" /></div>

<figcaption>
<div style="text-align: justify;">Thay đổi blend mode của fill layer Solid Color thành Color trong bảng Layers của Photoshop.</div>
</figcaption>
</figure>

<p style="text-align: justify;">
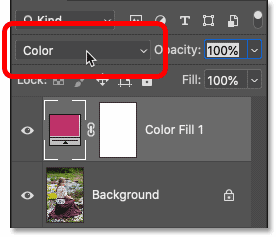
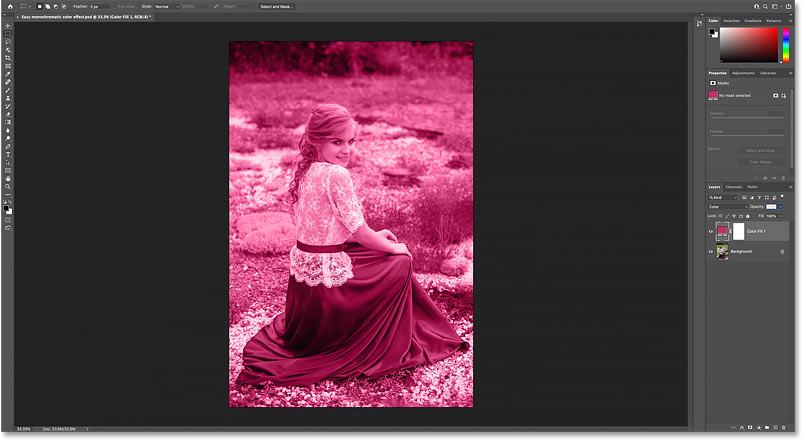
Blend mode Color giữ nguyên các giá trị tông màu (độ sáng) của hình ảnh bên dưới nhưng thay thế những màu gốc bằng màu từ fill layer, tạo ra hiệu ứng ban đầu:</p>

<figure>
<div style="text-align: justify;"><img alt="Kết quả sau khi thay đổi blend mode của fill layer thành Color." data-i="9" data-src="https://st.quantrimang.com/photos/image/2025/03/05/tao-hieu-ung-mau-don-sac-trong-photoshop-10.jpg" data-was-processed="true" height="441" src="https://st.quantrimang.com/photos/image/2025/03/05/tao-hieu-ung-mau-don-sac-trong-photoshop-10.jpg" width="803" /></div>

<figcaption>
<div style="text-align: justify;">Kết quả sau khi thay đổi blend mode của fill layer thành Color.</div>
</figcaption>
</figure>

<h3 style="text-align: justify;">Bước 4: Mở lại Color Picker</h3>

<p style="text-align: justify;">Vấn đề duy nhất, ít nhất là trong trường hợp ví dụ, là độ bão hòa của màu quá mạnh và cũng quá sáng.</p>

<p style="text-align: justify;">
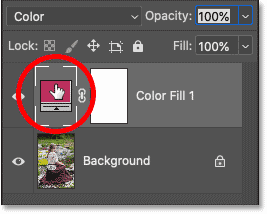
Để khắc phục điều đó, hãy mở lại Color Picker bằng cách nhấp đúp vào mẫu màu của fill layer trong bảng Layers:</p>

<figure>
<div style="text-align: justify;"><img alt="Nhấp đúp vào mẫu màu của fill layer trong bảng Layers của Photoshop." data-i="10" data-src="https://st.quantrimang.com/photos/image/2025/03/05/tao-hieu-ung-mau-don-sac-trong-photoshop-11.png" data-was-processed="true" height="214" src="https://st.quantrimang.com/photos/image/2025/03/05/tao-hieu-ung-mau-don-sac-trong-photoshop-11.png" width="267" /></div>

<figcaption>
<div style="text-align: justify;">Nhấp đúp vào mẫu màu của fill layer trong bảng Layers của Photoshop.</div>
</figcaption>
</figure>

<h3 style="text-align: justify;">Bước 5: Điều chỉnh độ bão hòa và độ sáng của màu</h3>

<p style="text-align: justify;">Sau đó điều chỉnh độ bão hòa và độ sáng khi cần.</p>

<p style="text-align: justify;">Giảm Saturation (giá trị S) xuống 30% và Brightness (giá trị B) xuống 40%. Nhấp vào&nbsp;<strong>OK</strong>&nbsp;khi bạn hoàn tất:</p>

<figure>
<div style="text-align: justify;"><img alt="Giảm độ bão hòa và độ sáng của màu trong Color Picker của Photoshop." data-i="11" data-src="https://st.quantrimang.com/photos/image/2025/03/05/tao-hieu-ung-mau-don-sac-trong-photoshop-12.jpg" data-was-processed="true" height="376" src="https://st.quantrimang.com/photos/image/2025/03/05/tao-hieu-ung-mau-don-sac-trong-photoshop-12.jpg" width="543" /></div>

<figcaption>
<div style="text-align: justify;">Giảm độ bão hòa và độ sáng của màu trong Color Picker của Photoshop.</div>
</figcaption>
</figure>

<p style="text-align: justify;">
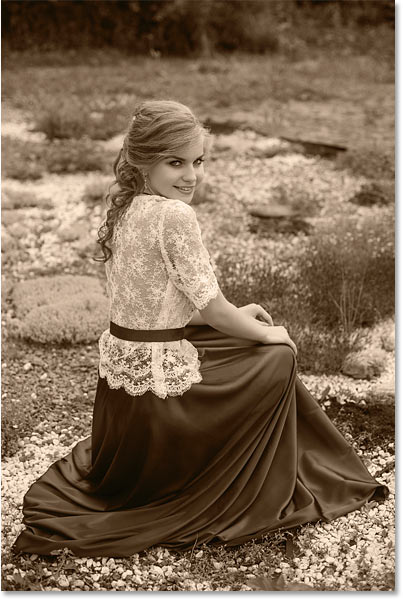
Và khi độ bão hòa và độ sáng được giảm xuống, hiệu ứng sẽ tinh tế hơn nhiều:</p>

<figure>
<div style="text-align: justify;"><img alt="Hiệu ứng màu đơn sắc được thêm vào hình ảnh trong Photoshop." data-i="12" data-src="https://st.quantrimang.com/photos/image/2025/03/05/tao-hieu-ung-mau-don-sac-trong-photoshop-14.jpg" data-was-processed="true" height="600" src="https://st.quantrimang.com/photos/image/2025/03/05/tao-hieu-ung-mau-don-sac-trong-photoshop-14.jpg" width="403" /></div>

<figcaption>
<div style="text-align: justify;">Hiệu ứng màu đơn sắc được thêm vào hình ảnh trong Photoshop.</div>
</figcaption>
</figure>

<p style="text-align: justify;">
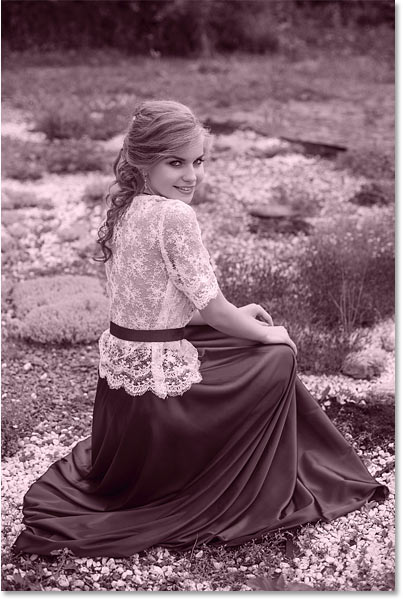
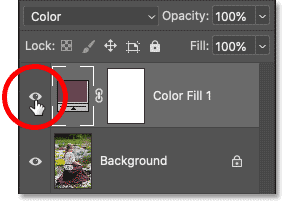
Trong bảng Layers, bạn có thể bật và tắt hiệu ứng để so sánh với ảnh gốc bằng cách nhấp vào biểu tượng hiển thị của fill layer:</p>

<figure>
<div style="text-align: justify;"><img alt="Nhấp vào biểu tượng hiển thị của fill layer để bật và tắt hiệu ứng màu đơn sắc." data-i="13" data-src="https://st.quantrimang.com/photos/image/2025/03/05/tao-hieu-ung-mau-don-sac-trong-photoshop-15.png" data-was-processed="true" height="203" src="https://st.quantrimang.com/photos/image/2025/03/05/tao-hieu-ung-mau-don-sac-trong-photoshop-15.png" width="284" /></div>

<figcaption>
<div style="text-align: justify;">Nhấp vào biểu tượng hiển thị của fill layer để bật và tắt hiệu ứng màu đơn sắc.</div>
</figcaption>
</figure>

<p style="text-align: justify;">Và đó là những điều cơ bản về cách chuyển đổi hình ảnh màu sang đơn sắc bằng cách sử dụng fill layer Solid Color trong Photoshop!</p>

<div style="text-align: justify;">&nbsp;</div>
		</div>
				<div id="author">
						<p>
				<strong>Nguồn tin:</strong>
				Quantrimang.com:
			</p>
		</div>
	</div>
	<div id="footer" class="clearfix">
		<div id="url">
			<strong>URL của bản tin này: </strong><a href="https://www.nguoicodonvn2008.info/vi/news/savefile/kien-thuc-may-tinh/cach-tao-hieu-ung-mau-don-sac-trong-photoshop-9932.html" title="Cách tạo hiệu ứng màu đơn sắc trong Photoshop">https://www.nguoicodonvn2008.info/vi/news/savefile/kien-thuc-may-tinh/cach-tao-hieu-ung-mau-don-sac-trong-photoshop-9932.html</a>

		</div>
		<div class="clear"></div>
		<div class="copyright">
			&copy; .&#x3A; Nguoicodonvn2008.info - Cõi lòng người cô đơn &#x3A;.
		</div>
		<div id="contact">
			<a href="mailto:admin@nguoicodonvn2008.info">admin@nguoicodonvn2008.info</a>
		</div>
	</div>
</div>
        <div id="timeoutsess" class="chromeframe">
            Bạn đã không sử dụng Site, <a onclick="timeoutsesscancel();" href="https://www.nguoicodonvn2008.info/#">Bấm vào đây để duy trì trạng thái đăng nhập</a>. Thời gian chờ: <span id="secField"> 60 </span> giây
        </div>
        <div id="openidResult" class="nv-alert" style="display:none"></div>
        <div id="openidBt" data-result="" data-redirect=""></div>
		</script>
		<div class="car-top">
  <span><img src="https://www.nguoicodonvn2008.info/themes/default/images/car.png" alt=""></span>
</div>
<div id="run_cronjobs" style="visibility:hidden;display:none;"><img alt="cron" src="/index.php?second=cronjobs&amp;p=p1w8Hvn9" width="1" height="1" /></div>
<script src="https://www.nguoicodonvn2008.info/assets/js/jquery/jquery.min.js"></script>
<script>var nv_base_siteurl="/",nv_lang_data="vi",nv_lang_interface="vi",nv_name_variable="nv",nv_fc_variable="op",nv_lang_variable="language",nv_module_name="news",nv_func_name="savefile",nv_is_user=0, nv_my_ofs=-4,nv_my_abbr="EDT",nv_cookie_prefix="nv4c_e856T",nv_check_pass_mstime=1738000,nv_area_admin=0,nv_safemode=0,theme_responsive=0,nv_recaptcha_ver=2,nv_recaptcha_sitekey="",nv_recaptcha_type="image",XSSsanitize=1;</script>
<script src="https://www.nguoicodonvn2008.info/assets/js/language/vi.js"></script>
<script src="https://www.nguoicodonvn2008.info/assets/js/DOMPurify/purify3.js"></script>
<script src="https://www.nguoicodonvn2008.info/assets/js/global.js"></script>
<script src="https://www.nguoicodonvn2008.info/assets/js/site.js"></script>
<script src="https://www.nguoicodonvn2008.info/themes/default/js/news.js"></script>
<script src="https://www.nguoicodonvn2008.info/themes/default/js/main.js"></script>
<script src="https://www.nguoicodonvn2008.info/themes/default/js/custom.js"></script>
<script type="application/ld+json">
        {
            "@context": "https://schema.org",
            "@type": "Organization",
            "url": "https://www.nguoicodonvn2008.info",
            "logo": "https://www.nguoicodonvn2008.info/uploads/angel.gif"
        }
        </script>
<script src="https://www.nguoicodonvn2008.info/themes/default/js/bootstrap.min.js"></script>
<script type="text/javascript">
var $scrolltop = $('.car-top');
$scrolltop.on('click', function () {
    $('html,body').animate({
        scrollTop: 0
    }, 800);
    $(this).addClass("car-run");
    setTimeout(function(){ $scrolltop.removeClass('car-run');}, 1000);
    return false;
});
$(window).on('scroll', function ()
{ 
    if($(window).scrollTop() >= 200)
    {
        $scrolltop.addClass("show");
        $scrolltop.addClass("car-down");
    }
    else
    {
       $scrolltop.removeClass("show");
       setTimeout(function(){ $scrolltop.removeClass('car-down');}, 300);
    }
});
</script>
</body>
</html>