Cách tạo chữ ký trong Outlook để email của bạn trông chuyên nghiệp hơn
- Thứ bảy - 27/09/2025 00:36
- In ra
- Đóng cửa sổ này
Bạn cần thêm chữ ký trong Outlook? Bạn chưa biết cách tạo chữ ký Outlook như thế nào? Thực tế, chúng ta hoàn toàn dễ dàng thêm chữ ký mail tùy chọn với các hình ảnh liên kết cũng như logo công ty trong Outlook dành cho Windows. Bạn có thể lựa chọn font, màu và tạo kiểu tùy ý bằng các bước hướng dẫn chi tiết dưới đây.
Tạo và thêm chữ ký email trong Outlook 2007
Sử dụng tính năng Signature của Outlook sẽ thêm chữ ký cá nhân vào tất cả các mail để bạn không phải nhập lại cùng một thông tin trong tất cả các email của mình. Các bước sau đây sẽ giúp bạn thực hiện việc này.
Tạo chữ ký
1. Từ menu Tools, chọn Options... Hộp thoại Options sẽ xuất hiện.
2. Chọn tab Mail Format.
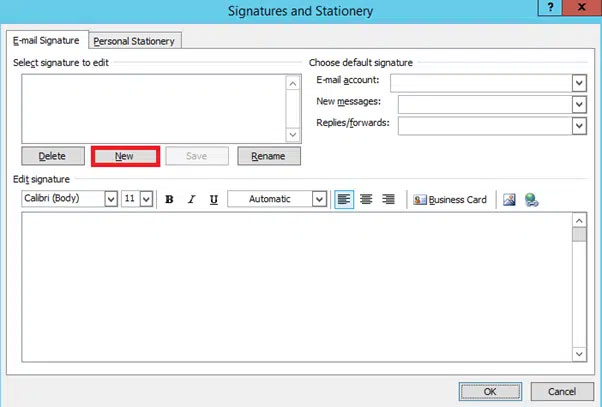
3. Trong phần Signatures, nhấp vào SIGNATURES... Hộp thoại Signatures and Stationery sẽ xuất hiện.
4. Để tạo chữ ký mới, nhấp vào NEW. Hộp thoại New Signature sẽ xuất hiện.
5. Trong hộp văn bản Type a name for this signature, hãy nhập tên mô tả ngắn cho chữ ký.
6. Nhấp vào OK.
7. Trong phần Edit signature, hãy nhập chữ ký của bạn.
8. (Tùy chọn) Để định dạng văn bản trong Signature, từ menu kéo xuống, hãy thực hiện bất kỳ thay đổi mong muốn nào
LƯU Ý: Bạn có thể thêm ảnh và liên kết vào chữ ký của mình bằng cách nhấp vào nút ADD PICTURE hoặc ADD HYPERLINK nằm ở ngoài cùng bên phải của phần Edit signatures.
9. Nhấp vào Save để lưu. Chữ ký của bạn sẽ được lưu.
LƯU Ý: Nếu chỉ có một chữ ký, nso sẽ trở thành chữ ký mặc định cho email mới.
10. Nhấp vào OK. Bạn được đưa trở lại hộp thoại Options.
11. Nhấp vào OK. Hộp thoại Options sẽ đóng lại.
Gán một chữ ký mặc định
Nếu bạn đã sử dụng tính năng Signature để tạo nhiều chữ ký, hãy sử dụng các hướng dẫn sau để đặt chữ ký mặc định. Chữ ký mặc định được thêm vào tất cả các thư gửi đi mới của bạn. Chữ ký được đặt trong danh sách drop-down Replies/forwards sẽ được thêm vào các mail gửi đi và chuyển tiếp của bạn thay vì chữ ký mặc định. Bạn cũng có thể áp dụng bất kỳ chữ ký nào mình đã tạo cho chỉ một thư.
1. Từ menu Tools, chọn Options... Hộp thoại Options sẽ xuất hiện.
2. Chọn tab Mail Format.
3. Trong phần Signatures, nhấp vào Signatures... Hộp thoại Signatures and Stationery sẽ xuất hiện.
4. Trong phần Choose default signature, từ danh sách drop-down New messages, chọn chữ ký bạn muốn đặt trên các mail mới gửi đi của mình
5. Từ danh sách drop-down Replies/forwards, chọn chữ ký bạn muốn đặt trên các thư trả lời gửi đi và chuyển tiếp của mình
LƯU Ý: Nếu bạn không chọn chữ ký từ danh sách drop-down Replies/forwards, nó sẽ không tự động thêm bất kỳ chữ ký nào vào thư trả lời gửi đi hoặc chuyển tiếp của bạn.
6. Nhấp vào OK. Hộp thoại Signatures and Stationery sẽ đóng lại.
7. Nhấp vào OK. Hộp thoại Options sẽ đóng lại.
Thêm chữ ký vào một email cụ thể
Mặc dù chữ ký mặc định có thể được sử dụng, nhưng cũng khá đơn giản để thêm một chữ ký cụ thể vào một email cụ thể mà không cần thay đổi chữ ký mặc định. Bạn có thể muốn làm điều này nếu chữ ký chỉ được yêu cầu trong những trường hợp hiếm hoi.
1. Tạo email.
2. Nếu cần xóa chữ ký hiện có:
- Chọn văn bản Signature.
- Nhấn [Delete]
3. Đặt điểm chèn ở nơi bạn muốn chữ ký mới xuất hiện
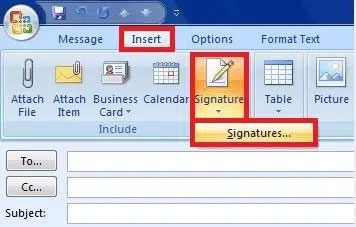
4. Trên tab Insert, chọn Signature, rồi chọn chữ ký mong muốn
HOẶC
Trên tab Message, trong nhóm Include, nhấp vào Signature và chọn chữ ký mong muốn
Chữ ký sẽ được chèn vào.
5. Khi đã sẵn sàng gửi mail, hãy nhấp vào SEND. Email của bạn sẽ được gửi đi.
Tạo và thêm chữ ký email trong Outlook 2010 - 2019
Cách tạo chữ ký trong Outlook dưới đây có thể áp dụng được với các phiên bản Outlook 2010, 2013, 2016, 2019.
Để thêm chữ ký cho email trong Outlook bạn thực hiện theo các bước sau:
Bước 1: Click Home trên thanh công cụ.
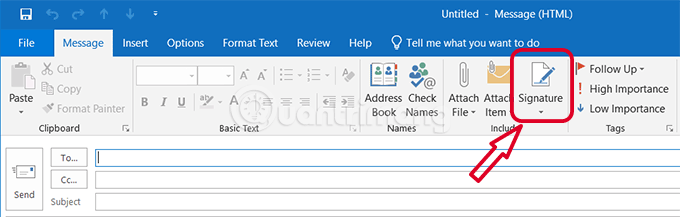
Bước 2: Click New Email ở góc trên cùng bên trái của màn hình.

Bước 3: Hộp thư mới xuất hiện, nhấp vào Message và chọn Signature trong phần Include.
Bước 4: Ở Email signature, click New.

Bước 5: Ở phần Type a name for this signature, điền tên của chữ ký.

Bước 6: Ấn OK
Bước 7: Trên màn hình tiếp theo, đánh dấu tên chữ ký trong mục Select Signature to Edit.
Bước 8: Hộp trống lớn phía dưới Edit Signaute, nhập tên, chức danh, tên công ty, địa chỉ email, thông tin mạng xã hội hoặc những thông tin cá nhân khác mà bạn muốn xuất hiện trong chữ ký mới.
- Phía dưới Edit signature, có các lựa chọn font chữ khác nhau và tùy chỉnh định dạng. Bạn có thể tạo các kiểu đáng và đường viền phong phú để tạo sự độc đáo.

Bước 9: Thêm hình ảnh tùy chỉnh như logo công ty, hãy xác định vị trí muốn chèn ảnh và kích vào biểu tượng Insert picture.
Bước 10: Lựa chọn hình ảnh trong trình duyệt file của máy tính và chọn Insert.

Bước 11: Để chèn link website vào ảnh hoặc logo, hoặc bất cứ chữ nào trong chữ ký của bạn. Đầu tiên, hãy làm nổi bật hình ảnh hoặc chữ muốn chèn.
Bước 12: Với hình ảnh được chọn, click biểu tượng Insert Hyperlink.
Bước 13: Cửa sổ mới xuất hiện, nhập đầy đủ URL của website vào ô cuối cùng. Rồi ấn OK.

Bước 14: Đặt tùy chỉnh cho New messages và Replies/Forward.
- Nếu muốn áp dụng chữ ký cho tất cả các tin nhắn mới, chọn tên chữ ký từ menu thả xuống của New messages.
- Còn nếu muốn sử dụng cho những tin nhắn trả lời hoặc chuyển tiếp, ở menu thả xuống chọn tên chữ ký của Replies/Forward.
- Hơn nữa, bạn không muốn áp dụng chữ ký cho tin nhắn mới, tin nhắn trả lời hoặc chuyển tiếp, thì chọn (none) cho menu thích hợp.

Bước 15: Sau khi thiết lập xong, ấn nút Save phía dưới.
Bước 16: Cuối cùng, chọn OK ở hộp Signatures and Stationary để lưu những thay đổi.
Khi mở hộp thư mới, thư trả lời hoặc chuyển tiếp khác, chữ ký tự động xuất hiện ở cuối trang.

Cách thêm chữ ký trong ứng dụng web Outlook 365
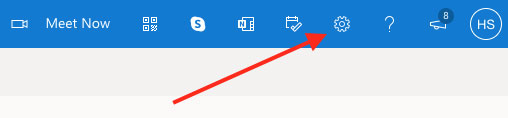
1. Nhấp vào biểu tượng bánh răng ở góc trên cùng bên phải của Outlook 365.
2. Nhập “signature” vào hộp tìm kiếm ở đầu bảng Settings.
3. Chọn kết quả "Email signature".
4. Tạo chữ ký mới bằng trình chỉnh sửa chữ ký trong ứng dụng.

5. Nhấp vào “Save” khi bạn hoàn tất.
Cách thêm chữ ký trên ứng dụng Outlook mobile
1. Khởi động ứng dụng Outlook dành cho thiết bị di động của bạn trên Android hoặc iOS.
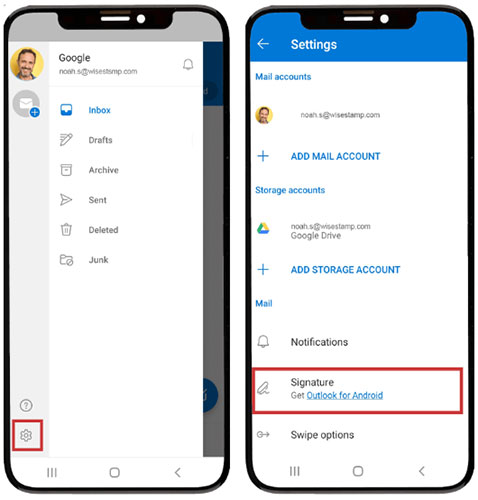
2. Nhấn vào hình ảnh tài khoản của bạn ở góc trên cùng bên trái.
3. Nhấn vào biểu tượng bánh răng ở dưới cùng bên trái để mở cài đặt Outlook.
4. Nhấn vào Signature để mở cài đặt chữ ký.
5. Nhập thông tin của bạn một cách có tổ chức.
6. Nhấn vào dấu kiểm ở trên cùng bên phải để hoàn tất thiết lập.
Vậy là bạn đã hoàn tất việc tạo chữ ký trong Outlook rồi. Bạn có thể thêm nhiều chữ ký khác nhau để sử dụng cho những đối tác khác nhau với các thao tác tương tự như trên nhé.
Cách chỉnh sửa chữ ký trong Outlook
Cho dù bạn đang sử dụng phiên bản máy tính của Outlook hay Outlook.com, thật dễ dàng để cập nhật chữ ký của bạn. Đây là cách thay đổi chữ ký trong Outlook:
Thay đổi chữ ký email trong Outlook cho Windows
Nếu bạn đang sử dụng Outlook cho Windows:
- Mở Outlook và nhấp vào tab File.
- Bấm vào Options rồi chọn Mail.
- Cuộn xuống phần Signatures và nhấp vào nút Edit.
- Thực hiện các thay đổi của bạn trong Signature Editor rồi bấm OK.
- Các thay đổi của bạn sẽ được lưu tự động.
Cập nhật chữ ký trong Outlook cho Mac
Nếu bạn đang sử dụng Outlook cho Mac:
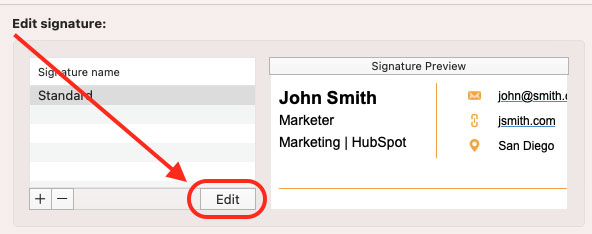
1. Mở Outlook và chuyển đến menu Preferences.
2. Nhấp vào tab Signatures và sau đó chọn chữ ký bạn muốn chỉnh sửa bên dưới signature name.
3. Nhấp vào Edit và thực hiện các thay đổi của bạn
Trong
Trống
web Outlook
trống
trong
Outlook
Outlook trên web
trông
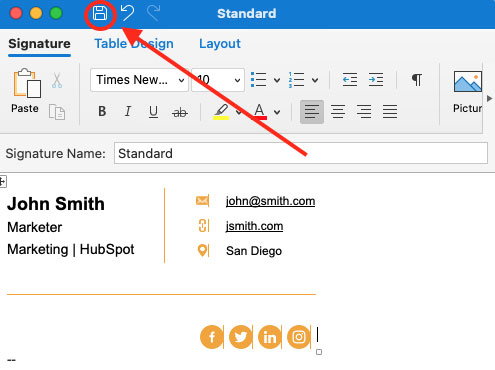
4. Nhấp vào biểu tượng Save để lưu các thay đổi của bạn rồi đóng cửa sổ.
Thay đổi chữ ký của bạn trong Outlook 365
1. Đăng nhập vào tài khoản Outlook của bạn và nhấp vào biểu tượng bánh răng ở góc trên bên phải.
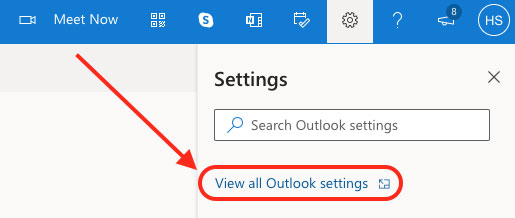
2. Chọn View all Outlook settings từ menu drop-down.
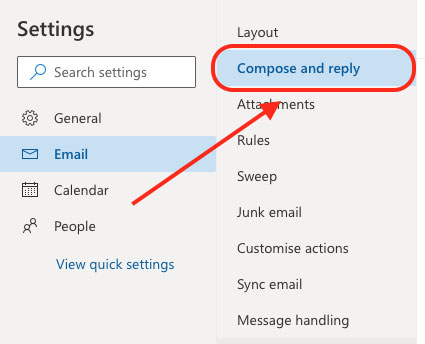
3. Nhấp vào Email ở thanh bên trái, sau đó nhấp vào Compose and Reply.
4. Bên dưới Signature, hãy nhập các thay đổi đối với chữ ký của bạn vào hộp văn bản được cung cấp.
5. Cuộn xuống cuối trang và nhấp vào Save để lưu các thay đổi của bạn.
Cập nhật chữ ký của bạn trong Outlook là một quy trình nhanh chóng và dễ dàng, chỉ mất vài phút để hoàn thành. Cho dù bạn đang sử dụng phiên bản trên máy tính, Outlook.com hay Outlook trên web, bạn có thể dễ dàng cập nhật chữ ký của mình để phản ánh mọi thay đổi.
