Cách sửa lỗi Winget không nhận dạng được trên Windows
- Thứ năm - 26/06/2025 23:30
- In ra
- Đóng cửa sổ này
Người dùng Windows thường sử dụng WinGet để cài đặt và quản lý ứng dụng thông qua PowerShell, Command Prompt và bất kỳ trình thông dịch nào khác. Đôi lúc, khi chạy lệnh WinGet, bạn có thể gặp lỗi cho biết lệnh này không được nhận dạng là lệnh cmdlet, hàm hoặc file script hợp lệ. Hướng dẫn hôm nay chỉ cách loại bỏ lỗi khó chịu này và giúp WinGet hoạt động trở lại.
1. Đăng ký lại hoặc sửa chữa WinGet
Một trong những nguyên nhân lớn nhất gây ra lỗi WinGet này là do cài đặt Windows Package Manager bị hỏng hoặc cấu hình sai. Nếu đúng như vậy, bạn có thể dễ dàng khắc phục bằng cách đăng ký lại WinGet, thao tác này sẽ reset cài đặt và có khả năng khắc phục mọi sự cố có thể xảy ra.
Nhập PowerShell vào hộp tìm kiếm và nhấp vào Run as Administrator. Khi lệnh mở ra, hãy sao chép và dán lệnh sau vào PowerShell:
Add-AppxPackage -RegisterByFamilyName -MainPackage Microsoft.DesktopAppInstaller_8wekyb3d8bbwe
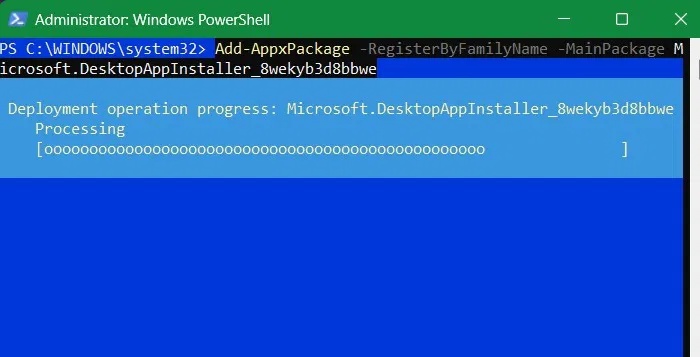
Lệnh trên yêu cầu Windows đăng ký lại App Installer từ nguồn Microsoft chính thức của nó, sau đó sẽ khôi phục chức năng WinGet.
Thay vì cài đặt lại hoàn toàn, bạn có thể sửa chữa gói WinGet hiện có bằng lệnh sau.
Add-AppxPackage -RegisterByFamilyName -MainPackage Microsoft.DesktopAppInstaller_8wekyb3d8bbwe
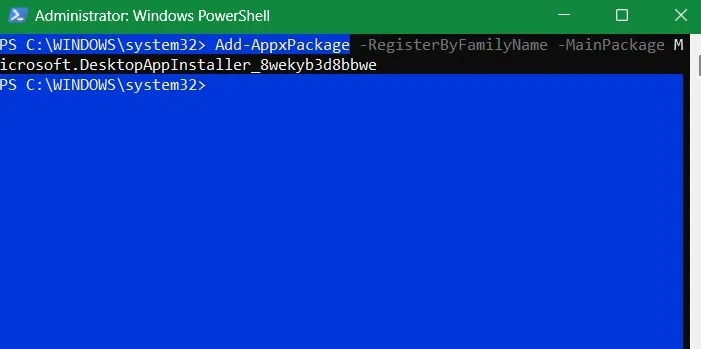
Khi được thực thi đúng, Windows sẽ nhanh chóng đăng ký lại ứng dụng WinGet và khắc phục các sự cố của Windows Package Installer như shortcut bị hỏng, thiếu phụ thuộc hoặc bất kỳ mục registry nào bị hỏng.
2. Bật App execution aliases cho Windows Package Manager
Trong ngữ cảnh dòng lệnh, tên WinGet là tên alias thực thi ứng dụng cho Windows Package Manager.
Về cơ bản, các alias thực thi ứng dụng là những lệnh CLI ở dạng rút gọn hoặc viết tắt. Nếu bạn tắt tính năng này cho Windows Package Manager, CLI có thể không nhận dạng được WinGet. Điều này cũng có thể xảy ra do các công cụ dọn dẹp của bên thứ ba hoặc trình tối ưu hóa hệ thống.
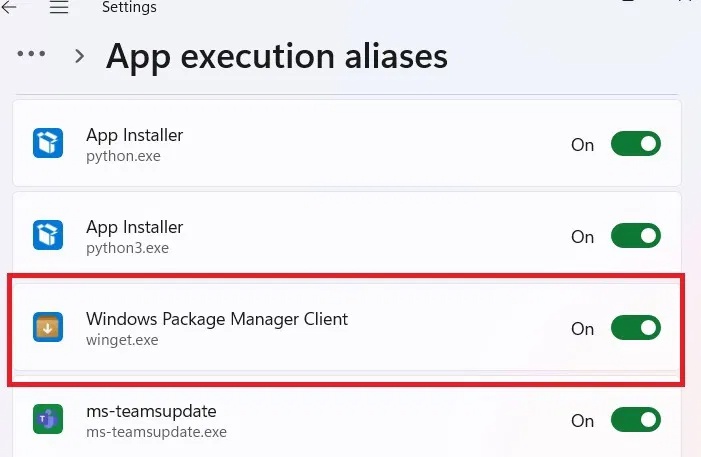
Để bật các alias thực thi ứng dụng cho Windows Package Manager, hãy nhấn Win + I để mở ứng dụng Settings, đi tới Apps -> Advanced app settings và nhấp vào App execution aliases.
Nếu nút chuyển đổi cho Windows Package Manager Client ở trạng thái Off, hãy chuyển lại về On.
Người dùng Windows 10 có thể tìm nút chuyển đổi cho Windows Package Manager Client bằng cách vào Settings -> Apps -> Apps & Features và nhấp vào liên kết App execution aliases.
3. Xác minh rằng bạn có phiên bản mới nhất của App Installer
WinGet là một phần của App Installer, gói Windows được cài đặt sẵn cho phép người dùng dễ dàng cài đặt và quản lý chương trình. Nếu App Installer bị trục trặc, nó có thể dẫn đến lỗi Winget. Để sửa App Installer, hãy cập nhật từ Microsoft Store.
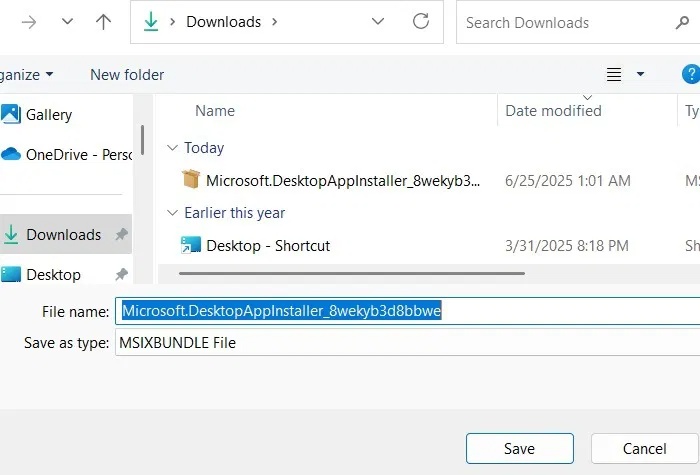
Truy cập liên kết tải xuống App Installer chính thức và nhấp vào nút Download màu xanh lam lớn. Nó sẽ tìm kiếm vị trí PC để tải xuống file MSIXBUNDLE.
https://learn.microsoft.com/en-us/windows/msix/app-installer/install-update-app-installer
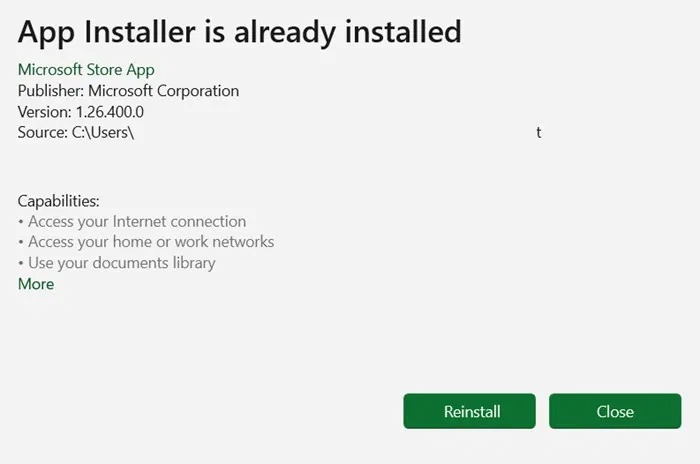
Bây giờ, bạn sẽ thấy thông báo App Installer đã được cài đặt. Bạn có thể nhấp vào Reinstall, thao tác này sẽ sửa mọi dependency bị thiếu.
Nếu không, bạn sẽ thấy tùy chọn cập nhật thông qua Microsoft Store.
4. Cài đặt lại App Installer từ GitHub
Nếu việc cập nhật App Installer không hiệu quả, có lẽ việc cài đặt lại có thể giúp khắc phục bất kỳ nguyên nhân nào khiến Winget trục trặc. Để thực hiện điều đó, hãy làm theo các bước dưới đây:
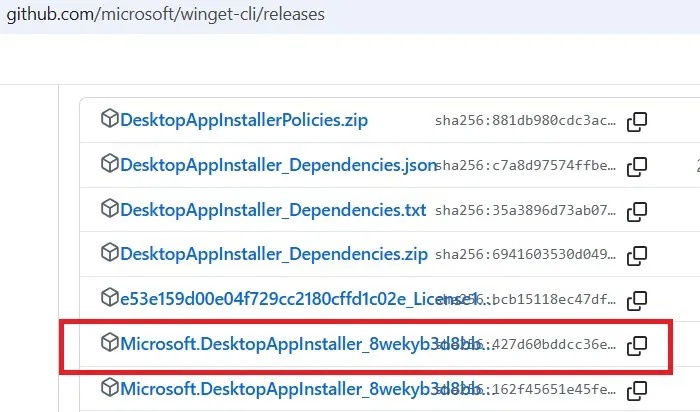
Truy cập trang GitHub của Windows Package Manager.
https://github.com/microsoft/winget-cli/releases
Cuộn xuống phần Assets và nhấp vào file MSIXBundle của Desktop App Installer để tải xuống.
Nhấp đúp vào file bạn vừa tải xuống và nhấn vào Reinstall trong cửa sổ pop-up.
Làm theo các hướng dẫn còn lại để hoàn tất cài đặt lại App Installer.
5. Tạo biến môi trường Path cho Winget
Khi bạn chạy lệnh WinGet trong Command Prompt hoặc PowerShell, Windows sẽ tìm kiếm biến PATH để tìm file cần thực thi. Nói một cách ngắn gọn, biến này duy trì danh sách các thư mục chứa những file thực thi cho nhiều lệnh khác nhau trên Windows. Nếu PATH không liệt kê thư mục chứa các file thực thi WinGet, bạn sẽ gặp lỗi.
Để khắc phục lỗi này, bạn sẽ phải thêm thủ công thư mục bị thiếu vào biến PATH:
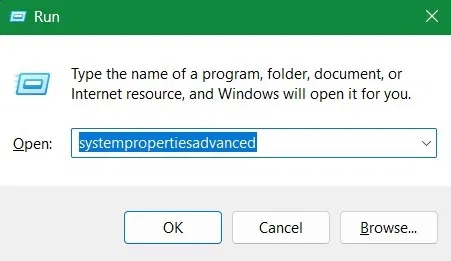
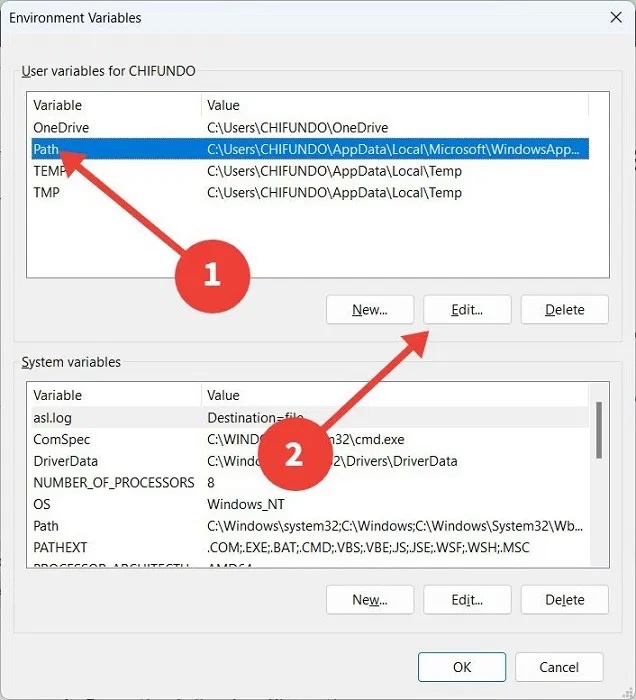
Nhấn Win + R để mở Windows Run, nhập systempropertiesadvanced vào hộp văn bản và nhấp vào OK. Thao tác này sẽ khởi chạy cửa sổ System Properties.
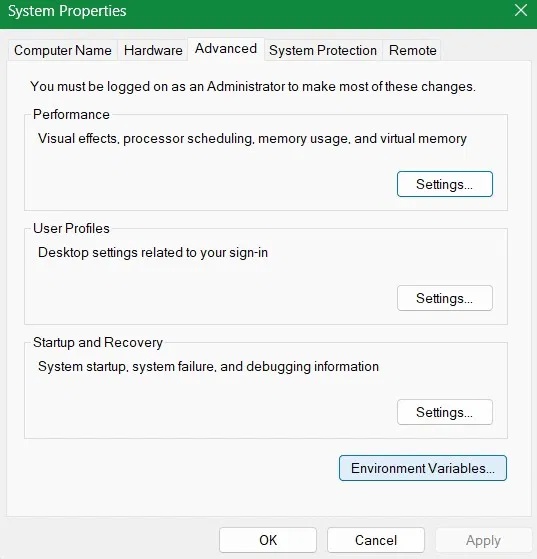
Chọn tab Advanced, sau đó nhấp vào Environment Variables.
Chọn biến Path, sau đó nhấp vào Edit để mở cửa sổ Edit environment variable.
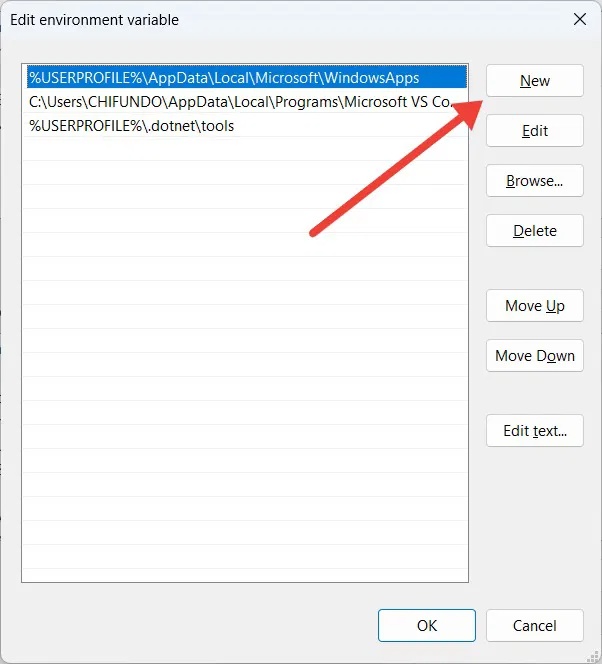
Sao chép đường dẫn file sau: %UserProfile\AppData\Local\Microsoft\WindowsApps.
Trong cửa sổ Edit environment variable, nhấp vào New. Tại đó, bạn nên dán đường dẫn file vừa sao chép ở trên, sau đó nhấp vào OK để lưu các thay đổi.
6. Bật cài đặt App Package Deployment trong Local Group Policy Editor
Trên thiết bị Windows Pro/Enterprise, hãy mở Group Policy bằng cách nhập gpedit.msc vào Run.
Điều hướng đến đường dẫn sau: Computer Configuration -> Administrative Templates -> Windows Components -> App Package Deployment.
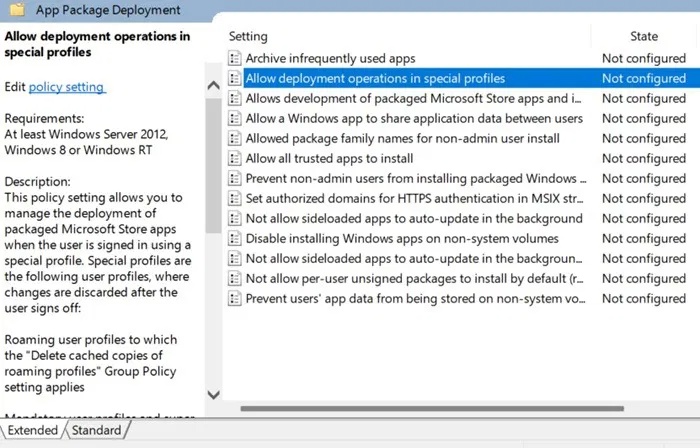
Tại đây, bạn sẽ thấy trạng thái Not configure cho hầu hết các thành phần. Những thành phần mà chúng ta cần tập trung đặc biệt là "Allow deployment operations in special profiles" và "Allow all Trusted apps to install". Nhấp đúp vào các thực thể này và trong màn hình pop-up tiếp theo, chỉ cần nhấp vào Enabled, sau đó là OK.
7. Sửa cache App Installer bằng nhiều phương pháp khác nhau
Bạn có thể sửa cache của nhiều service khác nhau. Mở Control Panel và đi tới Programs -> Programs and Features. Tìm App Installer trong danh sách.
Nếu bạn tìm thấy chương trình được liệt kê, hãy nhấp chuột phải và chọn Repair (hoặc Uninstall, sau đó cài đặt lại từ GitHub như đã trình bày trước đó.
Ngoài ra, bạn có thể mở Run và nhập wsreset.exe. Thao tác này sẽ xóa cache của Microsoft Store, cho phép bạn vận hành các lệnh WinGet một cách trơn tru.
8. Reset PC Windows về cài đặt gốc
Nếu tất cả các cách khác đều không hiệu quả, có thể có lỗi nghiêm trọng hơn hoặc cấu hình sai với hệ điều hành của bạn. Nếu bạn không biết phải làm gì, việc reset Windows về cài đặt gốc giúp bạn bắt đầu lại với các cài đặt và cấu hình có thể ảnh hưởng đến Winget. Nhưng trước khi reset PC, hãy đảm bảo rằng bạn đã sao lưu dữ liệu quan trọng của mình, vì dữ liệu sẽ mất trong quá trình này.
Làm cho Winget hoạt động trở lại trên PC
Nếu bạn thích cài đặt mọi thứ trong Command Prompt hoặc PowerShell, Winget là một tiện ích thiết yếu. Khi các công cụ dòng lệnh trên PC không thể nhận dạng được nó, điều này có thể làm giảm hiệu suất Windows. Bằng cách làm theo các bước khắc phục sự cố ở trên, bạn có thể khiến nó hoạt động trở lại.
Nếu bạn đang tìm kiếm một giải pháp thay thế cho Winget, hãy thử sử dụng Chocolatey để cài đặt nhiều ứng dụng khác nhau trên PC Windows.
