Cách sửa lỗi "No Speaker or Headphones are Plugged In" trên Windows
- Thứ ba - 14/03/2023 00:53
- In ra
- Đóng cửa sổ này
Đôi khi, bạn có thể nhận thấy có dấu X màu đỏ xuất hiện ở biểu tượng âm thanh trên thanh tác vụ Windows. Nếu bạn di chuột qua đó, nó sẽ báo lỗi không có loa hoặc cắm tai nghe được cắm. Lỗi này có thể xảy ra do sự cố với driver âm thanh hoặc service âm thanh của Windows.
Để khắc phục lỗi, hãy chạy trình khắc phục sự cố âm thanh tích hợp để tìm và khắc phục các sự cố phổ biến với thiết bị âm thanh. Nếu không, bạn có thể thực hiện khôi phục driver âm thanh hoặc cài đặt lại driver âm thanh theo cách thủ công để khôi phục âm thanh cho hệ thống.
Dưới đây là một số bước giúp bạn khắc phục lỗi "No Speaker or Headphones are Plugged In" trên Windows.
1. Chạy trình khắc phục sự cố âm thanh của Windows
Bạn có thể khắc phục sự cố âm thanh trên Windows bằng trình khắc phục sự cố âm thanh tích hợp sẵn. Nó quét hệ thống Windows của bạn để tìm các sự cố âm thanh phổ biến và cố gắng tự động khắc phục chúng.
Để chạy trình khắc phục sự cố, hãy làm như sau:
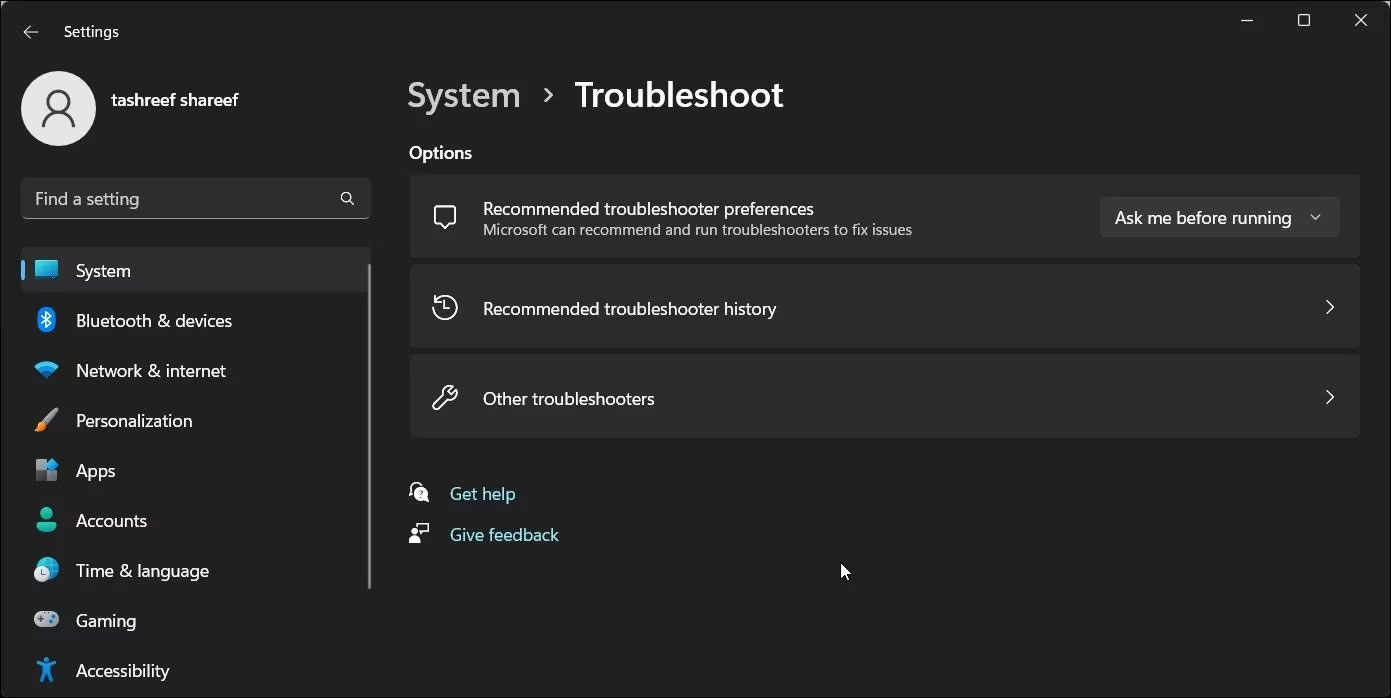
1. Nhấn Win + I để mở Settings.
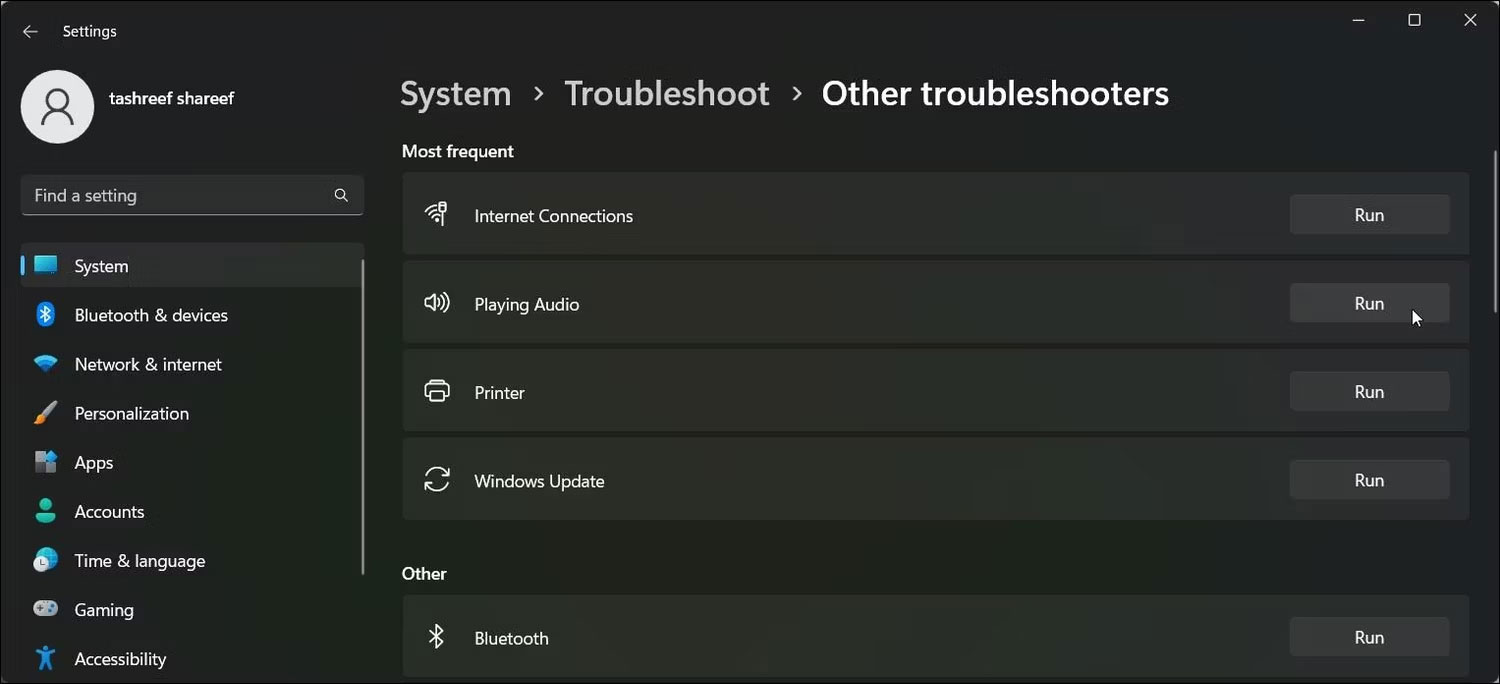
2. Trong tab System, cuộn xuống và nhấp vào Troubleshoot.
3. Tiếp theo, nhấp vào Other troubleshooters.
4. Nhấp vào nút Run cho Playing Audio. Nó sẽ kiểm tra trạng thái service âm thanh và nhắc bạn chọn thiết bị âm thanh của mình.
5. Chọn loa thiết bị của bạn và nhấp vào Next.
6. Nhấp vào NO , Do not open Audio Enhancements trong hộp thoại Turn off Sound Effects and Enhancements.
7. Áp dụng mọi bản sửa lỗi được đề xuất và kiểm tra kết quả.
2. Thực hiện khôi phục driver thiết bị âm thanh
Nếu bản cập nhật Windows hoặc driver đã làm hỏng thiết bị âm thanh của bạn, bạn có thể thực hiện khôi phục driver để sử dụng lại driver hoạt động tốt gần đây nhất. Bạn có thể sử dụng Device Manager để khôi phục driver trong Windows.
Để khôi phục driver thiết bị âm thanh, hãy làm theo hướng dẫn của Quantrimang.com về cách khôi phục driver trong Windows. Bạn có thể sẽ tìm thấy driver âm thanh của mình trong phần Sound, video, and game controllers của Device Manager.
3. Thêm Network Service và Local Service vào Local Administrator Group
Một cách khác để khắc phục lỗi này là thêm Network Service và Local Service vào Local Administrator Group. Network Service và Local Service là một phần tài khoản được xác định trước của trình quản lý kiểm soát service. Việc thêm các tài khoản này vào Local Administrator Group sẽ giúp bạn khắc phục sự cố âm thanh trên PC Windows của mình.
Lưu ý rằng Local Users and Groups không khả dụng trên phiên bản Windows Home. Tuy nhiên, người dùng Home có thể thêm Network Service và Local Service vào Local Administrator Group bằng Command Prompt.
Để thêm Network Service và Local Service vào Local Administrator Group bằng Local Users and Groups:
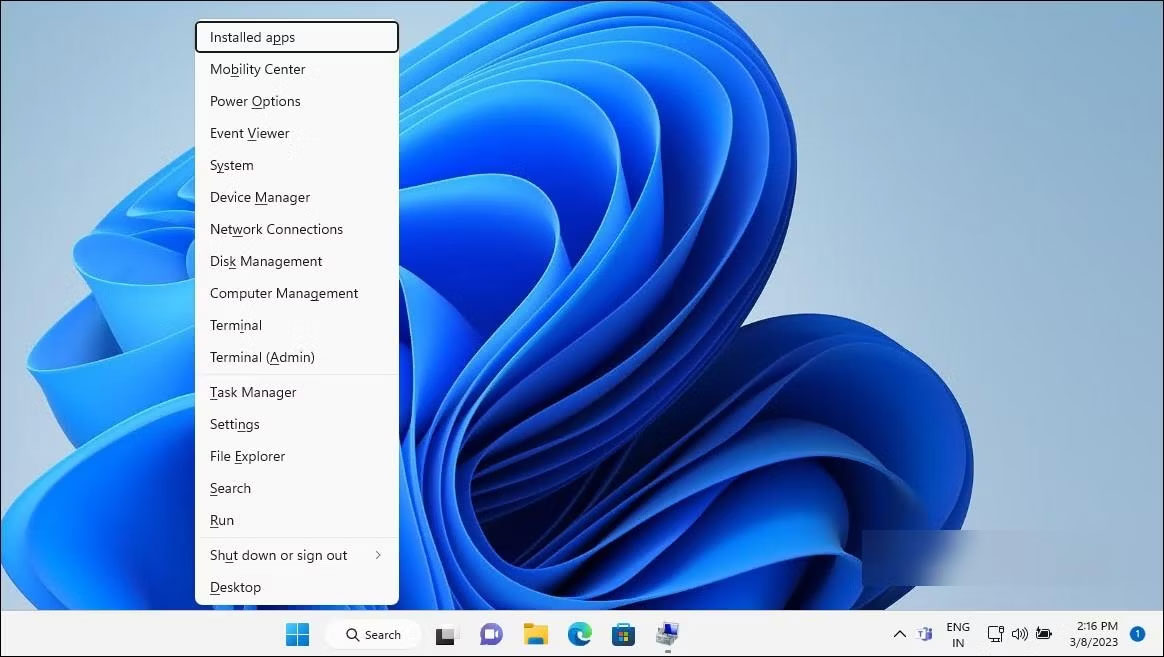
1. Nhấn Win + X để mở menu WinX.
2. Nhấp vào Computer Management.
3. Trong Computer Management, nhấp vào Local User and Groups.
4. Trong ngăn bên phải, nhấp đúp vào Groups để xem tất cả các tài khoản cục bộ.
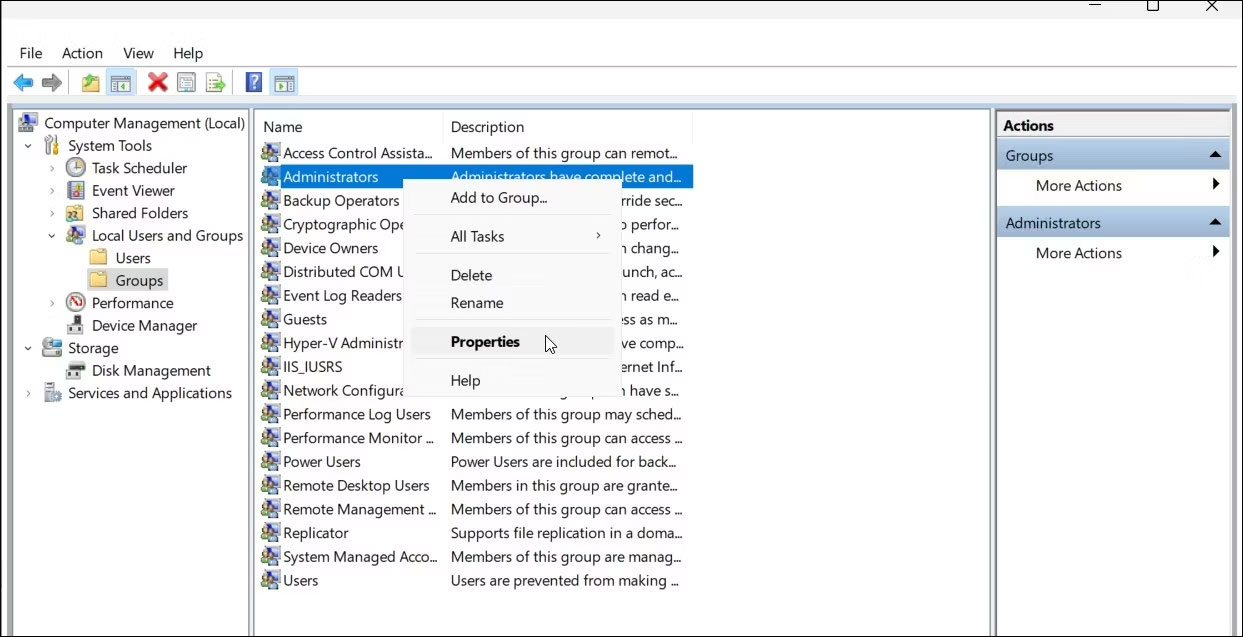
5. Chọn và nhấp chuột phải vào tài khoản Administrators và chọn Properties.

6. Nhấp vào nút Add trong hộp thoại Administrator Properties.

7. Tiếp theo, nhập network service và nhấp vào Check Names. Nó sẽ thay đổi tên đối tượng thành NETWORK SERVICE.
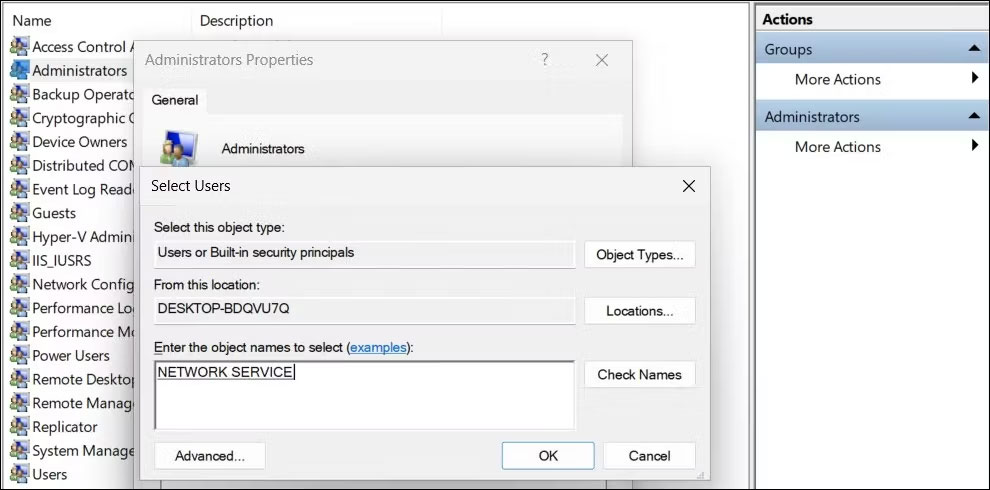
8. Bấm OK để thêm service mạng vào nhóm người dùng cục bộ.
9. Trong hộp thoại Administrator Properties, bạn sẽ thấy NT Authority\Network Service added as the member.
10. Nhấp lại vào nút Add và lặp lại các bước để thêm Local Services vào nhóm.
11. Sau khi hoàn tất, nhấp vào Apply > OK để lưu các thay đổi.
Nếu sử dụng phiên bản Windows Home, bạn có thể sử dụng Command Prompt để thêm Local Network và Local Service vào nhóm quản trị viên cục bộ. Đây là cách để làm điều đó.
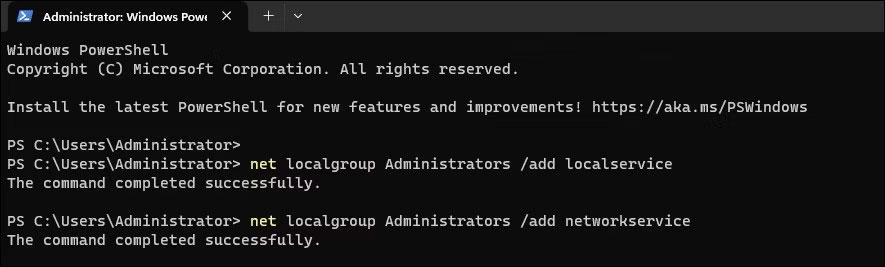
1. Nhấn phím Win và gõ cmd.
2. Mở Command Prompt với quyền admin.
3. Trong cửa sổ Command Prompt, hãy nhập nội dung sau để thêm "local service" vào Local Group Administrator:
net localgroup Administrators /add localservice
4. Tiếp theo, gõ lệnh sau để thêm "network service" vào tài khoản Local Group Administrator:
net localgroup Administrators /add networkservice
5. Nếu cả hai lệnh được thực thi thành công, hãy nhập exit và nhấn Enter để đóng Command Prompt.
6. Khởi động lại PC và kiểm tra xem lỗi đã được khắc phục chưa.
4. Gỡ cài đặt driver và thiết bị âm thanh
Sự cố tạm thời với driver thiết bị âm thanh có thể gây ra lỗi này trên Windows. Để khắc phục sự cố, hãy gỡ cài đặt thiết bị âm thanh và driver được liên kết khỏi Device Manager. Sau khi khởi động lại, Windows sẽ tự động cài đặt lại driver để giải quyết vấn đề.
Để gỡ cài đặt thiết bị âm thanh:
1. Nhấn Win + X để mở menu WinX.
2. Nhấp vào Device Manager từ menu ngữ cảnh.
3. Trong Device Manager, hãy mở rộng phần Sound, video, and game controllers.
4. Nhấp chuột phải vào thiết bị âm thanh của bạn, chẳng hạn như Realtek Audio.
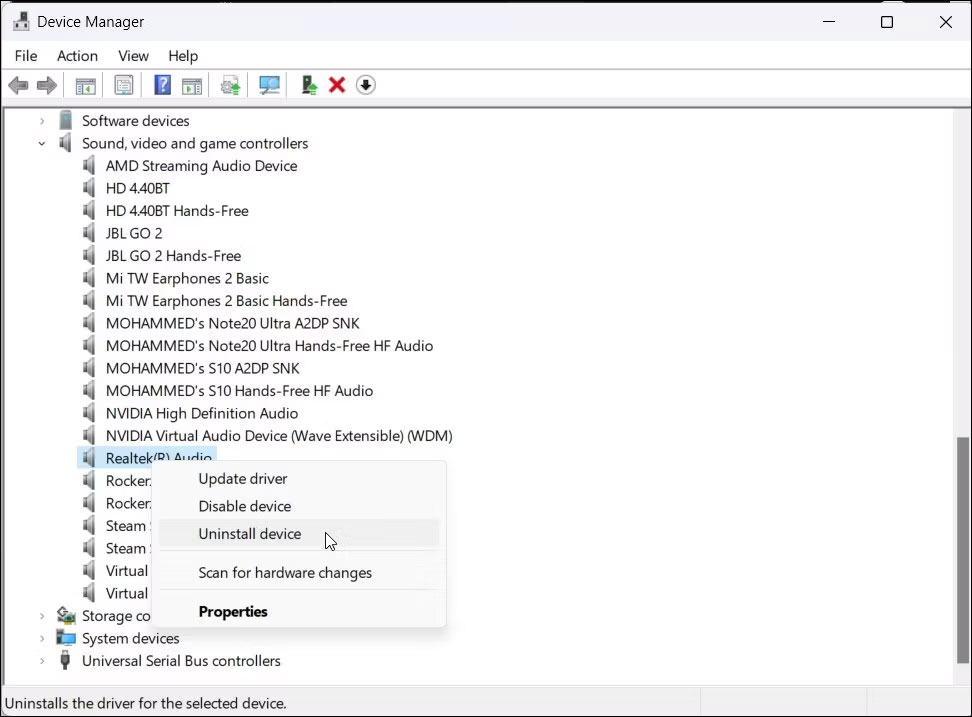
5. Chọn tùy chọn Attempt to remove the driver for this device trong hộp thoại Uninstall Device.
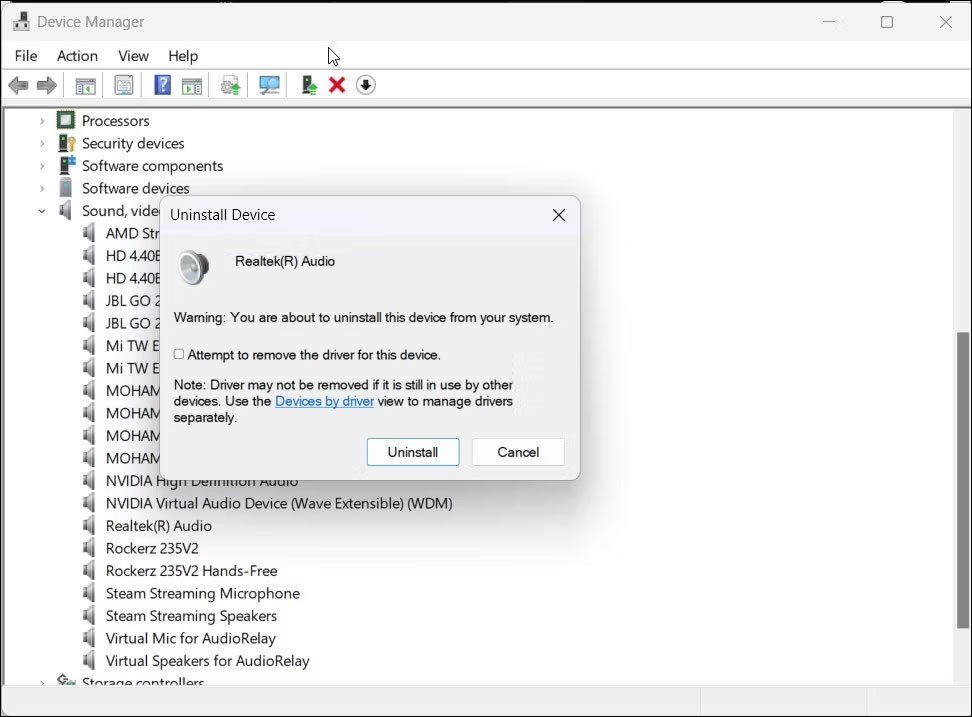
6. Nhấn Uninstall để gỡ bỏ thiết bị.
7. Sau khi gỡ cài đặt, hãy khởi động lại PC. Windows sẽ tự động cài đặt driver cần thiết cho thiết bị âm thanh của bạn.
Nếu sự cố vẫn tiếp diễn, hãy cài đặt lại thủ công driver thiết bị âm thanh từ nhà sản xuất.
5. Cài đặt lại driver thiết bị âm thanh theo cách thủ công
Nếu tính năng cài đặt lại tự động không hoạt động, hãy kiểm tra xem nhà sản xuất máy tính của bạn hoặc OEM thiết bị âm thanh có sẵn phiên bản driver ổn định hay không. Trên laptop, hãy truy cập trang web của nhà sản xuất máy tính của bạn và tải xuống driver âm thanh mới nhất từ đó. Trên máy tính để bàn, bạn có thể tải xuống driver mới nhất cho card âm thanh của mình từ trang web của nhà sản xuất. Ngoài ra, bạn cũng có thể cài đặt lại driver hiện có cho thiết bị âm thanh của mình theo cách thủ công.
Nếu sự cố vẫn tiếp diễn, hãy thay đổi thiết lập cài đặt thiết bị rồi cài đặt lại driver. Để thay đổi thiết lập cài đặt thiết bị:
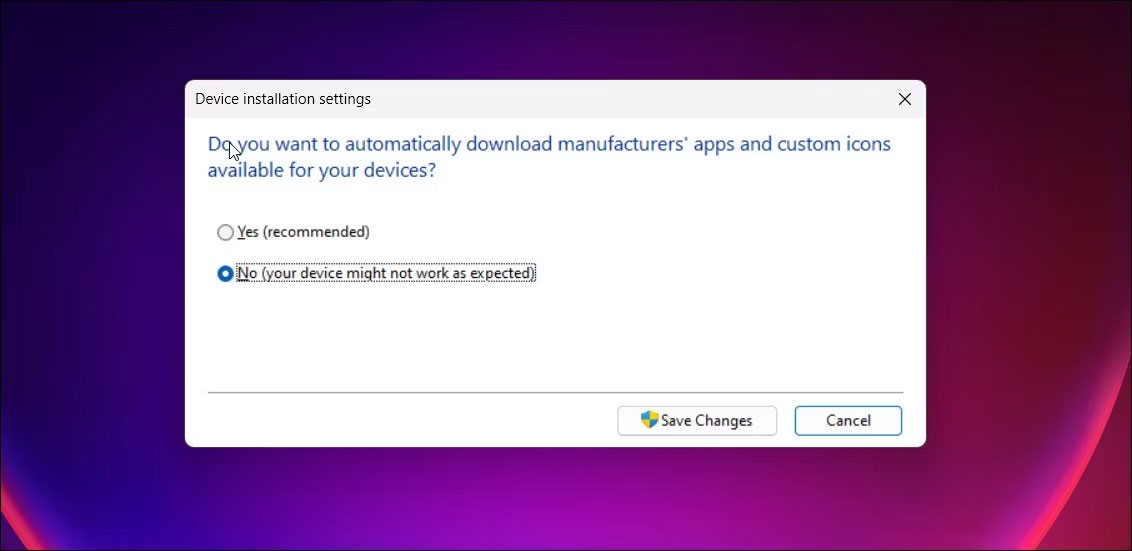
- Nhấn phím Win và nhập device installation settings.
- Tiếp theo, nhấp vào Change device installation settings từ kết quả tìm kiếm.
- Chọn tùy chọn No (your device might not work as expected) trong hộp thoại Device installation settings.
- Nhấp vào Save Changes. Nhấn Yes nếu được nhắc bởi User Account Control.
Với tính năng tải xuống driver tự động bị tắt, hãy cài đặt lại driver hiện có để khắc phục sự cố không có âm thanh.
