Cách sửa lỗi "No Audio Output Device Is Installed" trên Windows
- Thứ sáu - 03/11/2023 09:54
- In ra
- Đóng cửa sổ này

Máy tính Windows của bạn sẽ tự động phát hiện tất cả các thiết bị âm thanh được kết nối và cài đặt những driver cần thiết. Tuy nhiên, đôi khi bạn có thể gặp thông báo lỗi “No Audio Output Device Is Installed” khi di chuột qua biểu tượng âm thanh.
Lỗi này xảy ra khi Windows không phát hiện ra các thiết bị âm thanh được kết nối của bạn. Đó có thể là trục trặc tạm thời, sự cố liên quan đến driver hoặc trong một số trường hợp là do hỏng file hệ thống. Dưới đây là một số bước giúp bạn khắc phục lỗi “No Audio Output Device Is Installed”.
1. Chạy trình khắc phục sự cố âm thanh
Bạn có thể chạy trình khắc phục tích hợp để xử lý nhiều sự cố âm thanh khác nhau trong Windows. Trình khắc phục sự cố sẽ kiểm tra PC của bạn để tìm các vấn đề âm thanh phổ biến và cố gắng tự động khắc phục chúng; chẳng hạn, nó có thể giúp bạn khắc phục khi không có âm thanh trong Windows 11.
Để chạy trình khắc phục sự cố âm thanh:
1. Click chuột phải vào biểu tượng Sound (Speaker) trên thanh Taskbar.
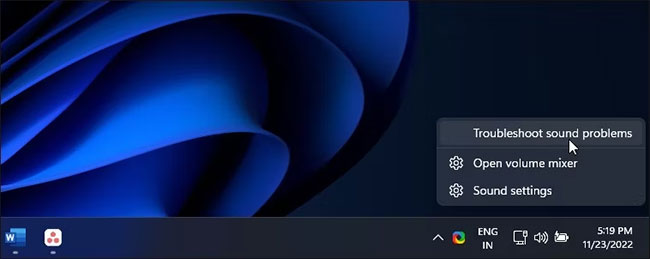
2. Chọn Troubleshoot sound problems. Trình khắc phục sự cố sẽ quét tất cả các thiết bị âm thanh được kết nối.
3. Chọn thiết bị âm thanh bạn muốn khắc phục sự cố và nhấp vào Next.
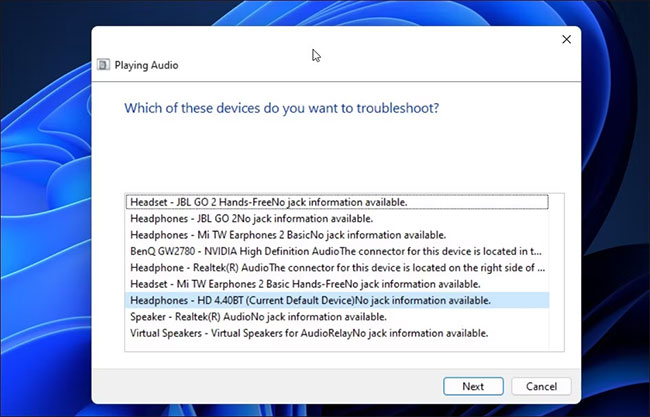
4. Tùy thuộc vào thiết bị đã chọn, Windows sẽ đề xuất một số cách khắc phục. Làm theo hướng dẫn trên màn hình để áp dụng các bản sửa lỗi và kiểm tra xem lỗi đã được xử lý chưa.
2. Sử dụng driver thiết bị âm thanh chung
Bạn có thể sửa driver bị hỏng bằng cách cài đặt lại driver đầu ra âm thanh với driver thiết bị chung. Điều này hữu ích nếu driver thiết bị âm thanh độc quyền cho thiết bị của bạn đã bị lỗi.
Bạn có thể sử dụng Device Manager để cập nhật và cài đặt lại driver thiết bị trên PC Windows của mình.
Để cài đặt lại driver thiết bị đầu ra âm thanh chung:
1. Nhấn Win + R để mở Run.
2. Nhập devmgmt.msc và nhấp vào OK để mở Device Manager.
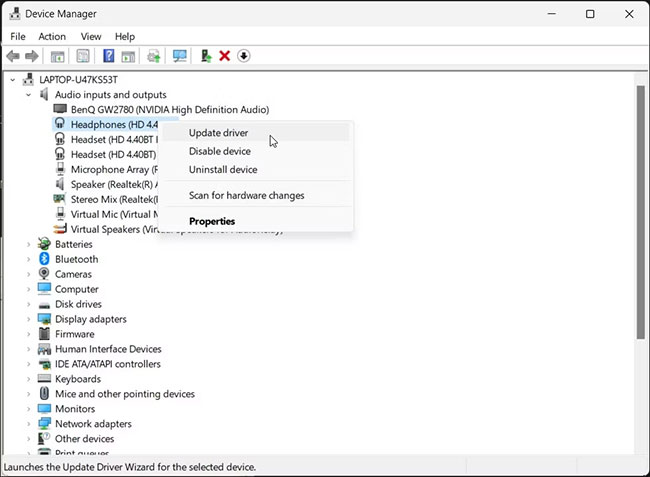
3. Trong Device Manager, hãy mở rộng phần Audio inputs and outputs.
4. Đảm bảo thiết bị đầu ra của bạn được liệt kê. Nếu không, hãy nhấp vào View và sau đó chọn Show Hidden Devices.
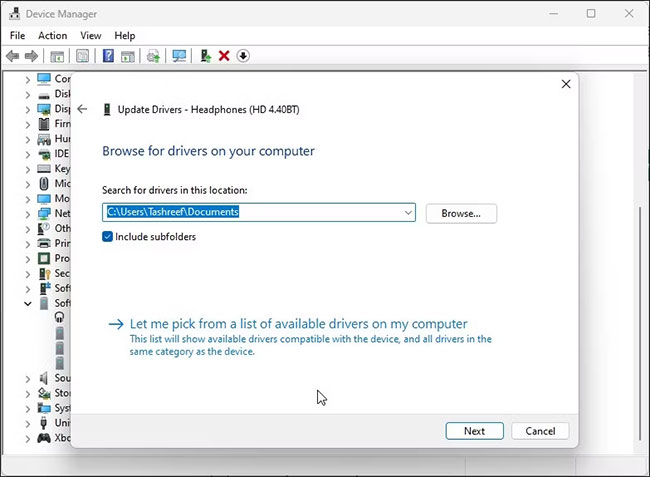
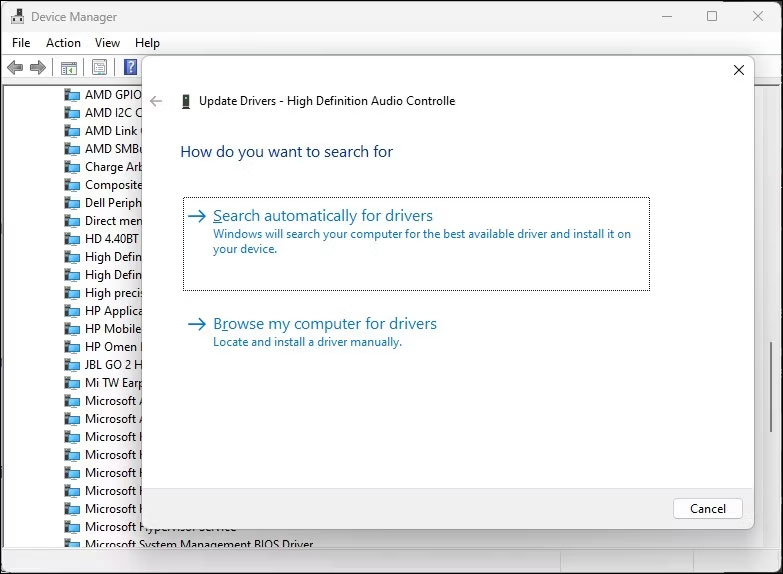
5. Tiếp theo, chọn và nhấp chuột phải vào thiết bị âm thanh của bạn, rồi nhấn Update Driver.
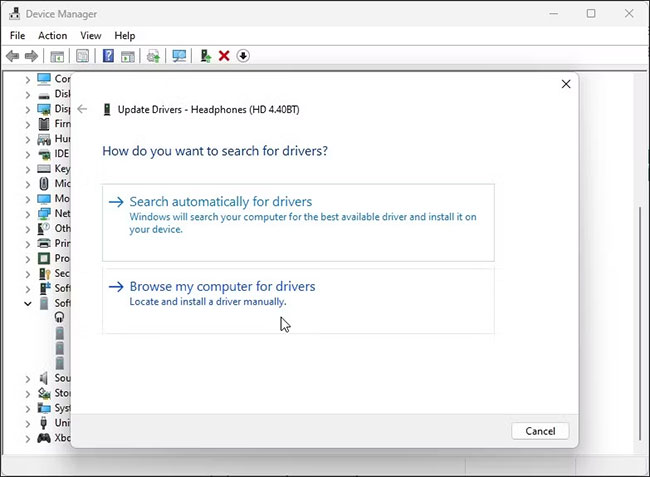
6. Nhấp vào Browse my computer for drivers.
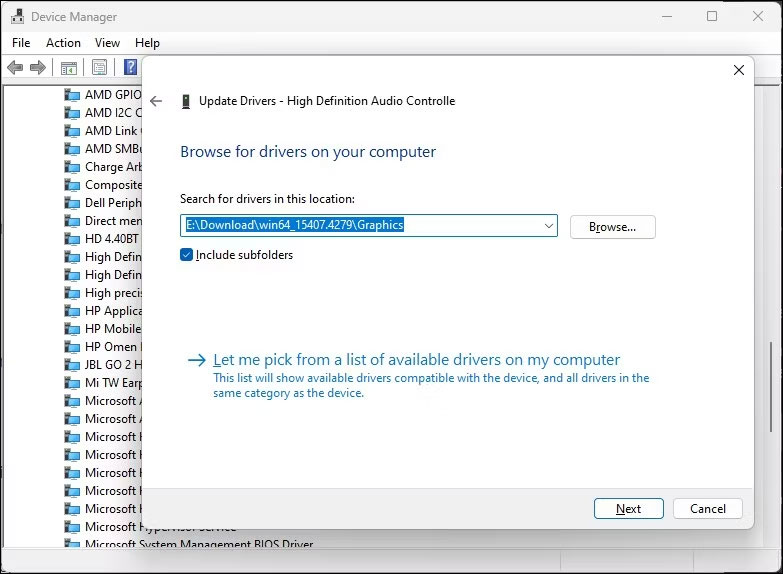
7. Tiếp theo, nhấp vào Let me pick from a list of available drivers on my computer.
8. Tích vào tùy chọn Show compatible hardware.
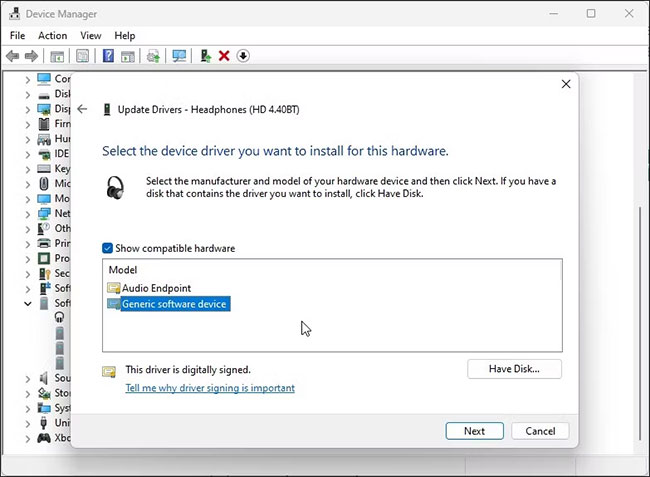
9. Tiếp theo, chọn Generic software device và nhấn Next.
10. Đợi Windows cài đặt xong driver cho thiết bị.
11. Đóng Device Manager và kiểm tra lại lỗi.
Nếu driver thiết bị âm thanh chung không giúp ích được gì, hãy kiểm tra trang web của nhà sản xuất thiết bị âm thanh để tìm driver được cập nhật. Nếu bạn đang sử dụng laptop, hãy truy cập trang web của nhà sản xuất máy tính để tìm driver mới nhất cho máy tính.
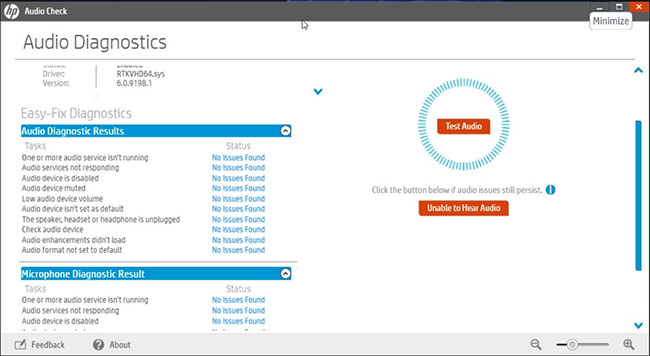
Một số nhà sản xuất máy tính bao gồm các công cụ chẩn đoán độc quyền với thiết bị của họ. Ví dụ, ứng dụng HP Support Assistant có thể kiểm tra laptop HP để tìm các sự cố khác nhau, bao gồm cả sự cố âm thanh. Lenovo, Dell, Asus, tất cả các nhà sản xuất laptop lớn đều cung cấp những công cụ tương tự đi kèm với thiết bị của họ. Chạy bất kỳ công cụ chẩn đoán nào như vậy có sẵn trên PC để xem liệu công cụ đó có giúp khôi phục âm thanh của bạn không.
3. Cài đặt lại driver thiết bị âm thanh hệ thống theo cách thủ công
Bạn có thể cài đặt lại driver thiết bị âm thanh hệ thống theo cách thủ công để khắc phục lỗi này trên máy tính Windows của mình. Đây là cách thực hiện:
1. Mở Device Manager bằng cách nhấn Win + X và chọn kết quả phù hợp nhất từ danh sách tùy chọn.
2. Trong Device Manager, mở rộng phần System devices.
3. Tiếp theo, hãy tìm và định vị bất kỳ thiết bị âm thanh nào như High Definition Audio Controller.
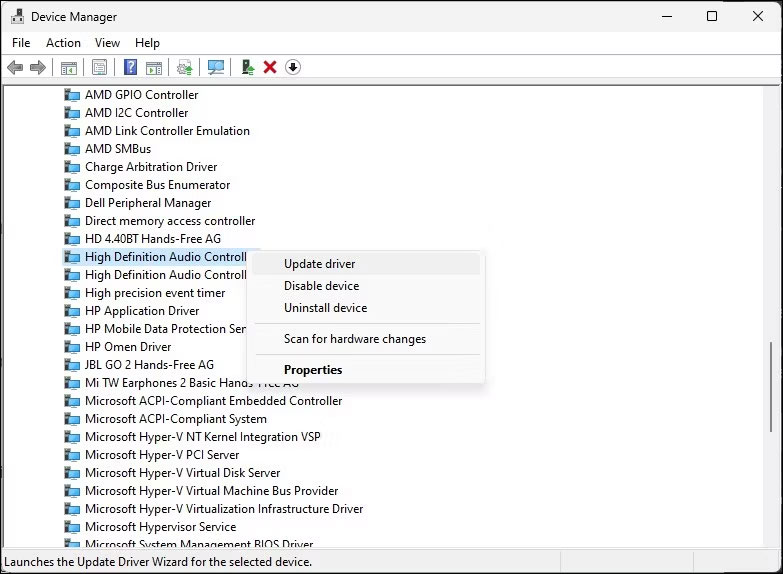
4. Nhấp chuột phải vào thiết bị âm thanh và chọn Update driver.
5. Chọn tùy chọn Browse my computer for drivers.
6. Nhấp vào tùy chọn Let me pick from a list of available drivers on my computer.
7. Chọn driver trong phần Model và nhấn Next để cài đặt driver.

Sau khi cài đặt, hãy đóng Device Manager. Điều này sẽ khắc phục lỗi và khôi phục âm thanh trên máy tính của bạn.
4. Cài đặt driver thiết bị âm thanh chung bằng Device Manager
Bạn cũng có thể cài đặt driver thiết bị âm thanh USB chung bằng cách sử dụng tùy chọn "Add legacy hardware" trong Device Manager. Đây là cách để làm điều đó.
1. Nhấn Win + X để mở menu WinX.
2. Nhấp vào Device Manager từ menu ngữ cảnh.
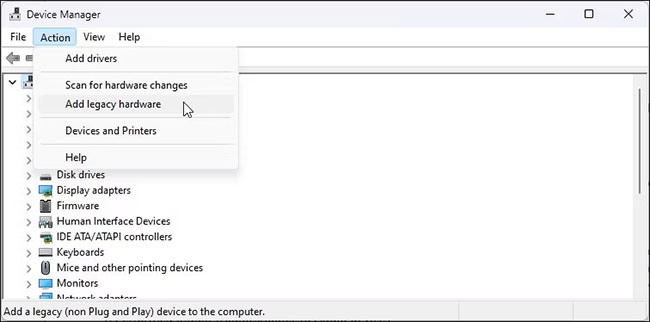
3. Trong Device Manager, chọn tên máy tính của bạn và nhấp vào Action.
4. Chọn Add legacy hardware.
5. Nhấn Next để tiếp tục.
6. Tiếp theo, chọn tùy chọn Install the hardware that I manually select from a list (Advanced).
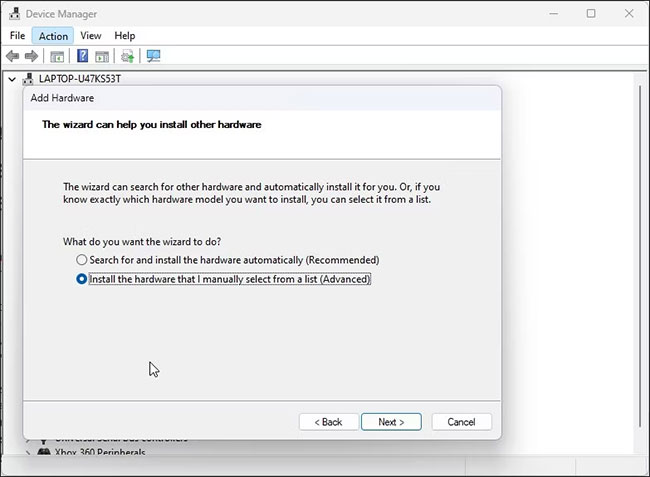
7. Nhấn Next.
8. Trong Common hardware types, cuộn xuống và chọn Sound, video and game controllers.
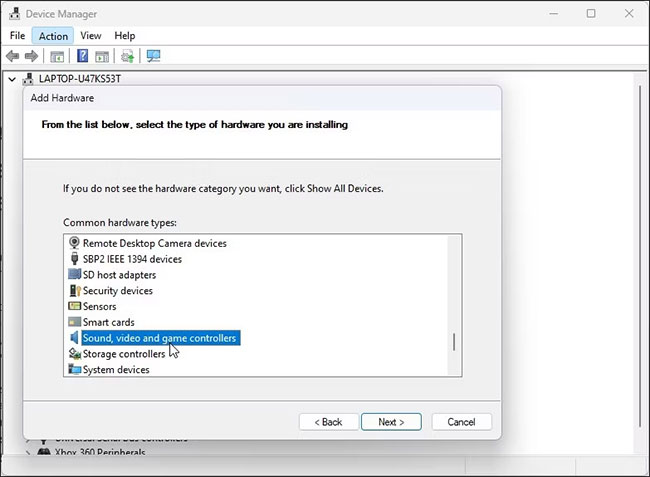
9. Nhấn Next.
10. Chọn Generic USB Audio trong Manufacturer. Trong ngăn bên phải, chọn USB Audio OEM Device.

11. Nhấn Next.
12. Nhấn Next một lần nữa để xác nhận hành động.
13. Đợi quá trình cài đặt hoàn tất và nhấp vào Finish. Khởi động lại PC và kiểm tra xem thiết bị âm thanh của bạn đã được phát hiện và hoạt động trở lại chưa.
5. Kiểm tra xem thiết bị âm thanh có bị tắt không
Hãy kiểm tra xem bạn có vô tình tắt thiết bị âm thanh của mình không. Mặc dù trình khắc phục sự cố âm thanh có thể phát hiện và đề xuất điều tương tự, nhưng bạn cũng có thể bật thiết bị âm thanh theo cách thủ công.
Để kiểm tra và bật thiết bị đầu ra âm thanh:
1. Nhấn Win + R để mở hộp thoại Run.
2. Nhập mmsys.cpl và bấm OK để mở hộp thoại Sound.
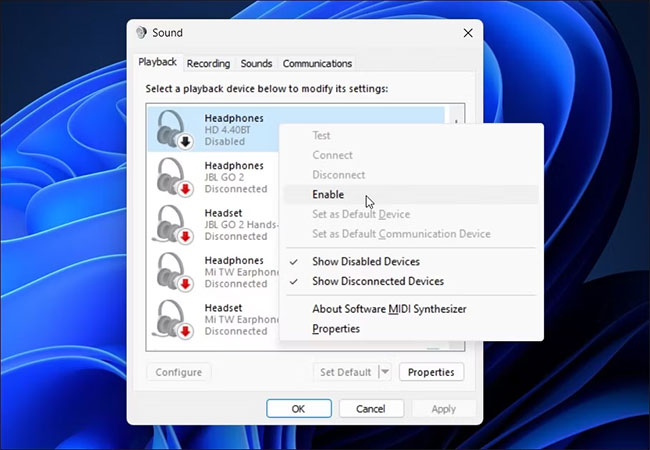
3. Trong tab Playback, tìm thiết bị đầu ra âm thanh của bạn. Nếu không có thiết bị nào được liệt kê, hãy nhấp chuột phải vào phần Playback và chọn Show disabled devices.
4. Nếu thiết bị âm thanh của bạn chuyển sang màu xám, hãy nhấp chuột phải và chọn Enable.
5. Tiếp theo, chọn thiết bị và bấm vào nút Set Default để đặt thiết bị làm mặc định.
6. Khởi động lại PC và kiểm tra xem lỗi “No Audio Output Device Is Installed” đã được giải quyết chưa.
6. Kiểm tra xem các service âm thanh có đang chạy không
Windows Audio Endpoint Service và Windows Audio Service là hai service cần thiết để âm thanh hoạt động trên PC của bạn. Nếu các service này không chạy, thiết bị âm thanh của bạn có thể không hoạt động bình thường.
Vì vậy, hãy đảm bảo hai service đang chạy và được đặt thành tự động khởi động. Thực hiện theo các bước sau:
1. Nhấn Win + R để mở Run.
2. Nhập services.msc và bấm OK để mở phần Services snap-in.
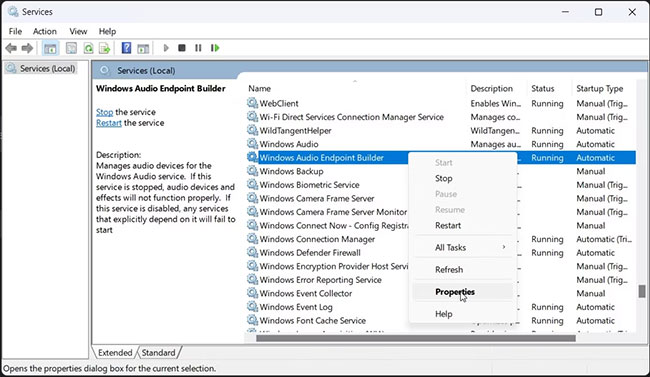
3. Tiếp theo, xác định vị trí và nhấp chuột phải vào Windows Audio Endpoint Service Builder.
4. Chọn Properties từ menu ngữ cảnh.
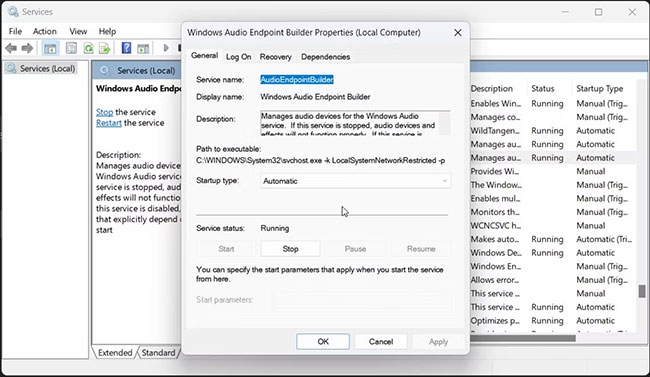
5. Nhấp vào menu drop-down Startup type và chọn Automatic.
6. Nhấn OK để lưu thay đổi.
7. Nhấp chuột phải vào service Windows Audio Endpoint Builder lần nữa rồi chọn Restart.
8. Tiếp theo, lặp lại các bước cho service Windows Audio.
9. Sau khi hoàn tất, hãy đóng Services snap-in.
7. Gỡ cài đặt hoặc vô hiệu hóa mọi công cụ cập nhật driver của bên thứ ba
Công cụ cập nhật driver của bên thứ ba cho phép bạn quét và cập nhật tất cả driver cho máy tính của mình từ một nơi. Mặc dù là một công cụ hữu ích nhưng điều này có thể xung đột với thành phần âm thanh của bạn và khả năng phát hiện thiết bị của Windows.
Để khắc phục sự cố, hãy tắt hoặc xóa mọi tiện ích cập nhật driver, chẳng hạn như Avast Driver Updater được cài đặt trên PC của bạn. Sau đó chạy lại trình khắc phục sự cố âm thanh để xem điều đó có giải quyết được sự cố không. Đôi khi, bạn có thể cần phải xóa ứng dụng cập nhật để vô hiệu hóa nó hoàn toàn.
8. Sửa chữa image Windows bằng DISM
Deployment Image Service Management (DISM) là một tiện ích dòng lệnh sửa chữa image Windows tích hợp sẵn. Nếu sự cố âm thanh xảy ra do vấn đề với image hệ thống, thì công cụ này có thể sửa chữa image để khôi phục chức năng âm thanh trên PC.
Khi được kết nối, Windows sẽ phát hiện tất cả các thiết bị đầu vào và đầu ra âm thanh, sau đó tự động cài đặt các driver cần thiết. Để khắc phục lỗi “No Audio Output Device Is Installed”, hãy đảm bảo thiết bị âm thanh của bạn được bật trong cài đặt Sound.
Nếu lỗi đã được khắc phục nhưng âm thanh vẫn không hoạt động, hãy đảm bảo rằng bạn đã đặt đúng thiết bị âm thanh làm mặc định. Ngoài ra, hãy thử cài đặt lại driver bị ảnh hưởng, khởi động lại các service âm thanh và kiểm tra thiết bị âm thanh để tìm lỗi phần cứng.
