Cách mở Component Services trong Windows 1
- Thứ năm - 29/12/2022 23:49
- In ra
- Đóng cửa sổ này
Component Services trên Windows có thể giúp bạn duy trì tính bảo mật và hiệu suất của máy tính. Tuy nhiên, làm cách nào để bạn tìm và mở Component Services trong Windows 11?
Trong bài viết này, Quantrimang.com sẽ chỉ cho bạn một số cách nhanh chóng để mở Windows Component Services.
1. Cách mở Component Services qua Windows Search
Windows 11 có tính năng tìm kiếm mạnh mẽ giúp tìm kiếm các công cụ và tính năng bạn cần nhanh chóng và dễ dàng. Bạn cũng có thể sử dụng tính năng này để mở nhanh Component Services cũng như các công cụ và tính năng khác trong thiết bị Windows. Đây là cách để làm điều đó:
1. Nhấn Win + S trên bàn phím để truy cập Windows Search hoặc sử dụng một trong nhiều cách để mở Windows Search.
2. Tiếp theo, nhập "Component Services" vào hộp tìm kiếm.
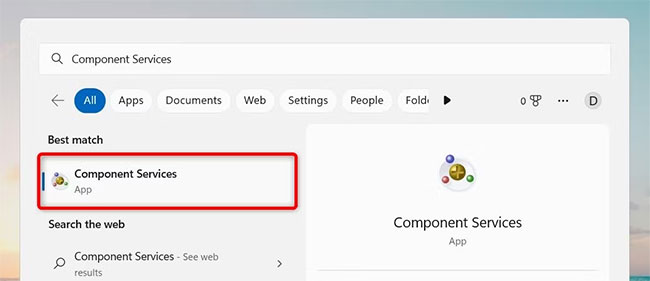
3. Danh sách kết quả sẽ bao gồm "Component Services". Chỉ cần nhấp vào nó để mở Component Services!
2. Cách mở Component Services bằng lệnh Run
Bạn cũng có thể khởi chạy ứng dụng này bằng hộp thoại Run. Điều này giúp tiết kiệm thời gian vì bạn không phải điều hướng các menu và menu con. Đây là cách để làm điều này:
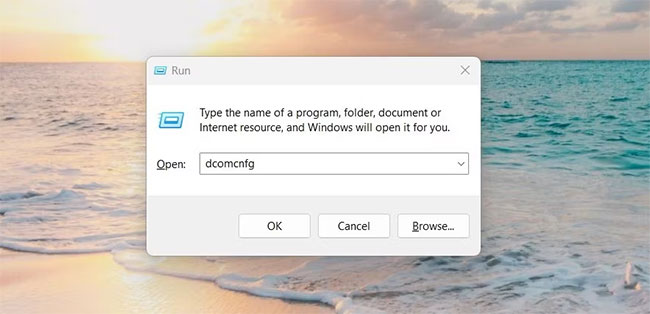
1. Nhấn Win + R trên bàn phím để mở hộp thoại Run.
2. Khi bạn đang ở trong cửa sổ Run, hãy nhập dcomcnfg vào trường văn bản và nhấn Enter.
Cửa sổ Component Services sẽ xuất hiện trên màn hình của bạn. Tại đây, bạn sẽ tìm thấy các tùy chọn để quản lý những công cụ quản trị như Event Viewer, Services, v.v…
3. Cách mở Component Services từ menu Start
Menu Start là một cách khác để truy cập các tính năng của Windows trong Windows 11. Để mở công cụ Component Services bằng menu Start, hãy làm theo các bước sau:
1. Mở menu Start.
2. Nhấp vào All apps ở góc trên bên phải.
3. Cuộn xuống và nhấp vào Windows Tools ở cuối màn hình.

4. Tiếp theo, nhấm đúp vào Component Services để mở nó.
4. Cách mở Component Services bằng File Explorer
Sử dụng File Explorer là một cách thuận tiện để truy cập và quản lý các file Windows 11 của bạn. Nó cho phép bạn nhanh chóng tìm, mở, di chuyển hoặc xóa các file trên máy tính của mình. Ngoài ra, bạn cũng có thể sử dụng công cụ này để mở Component Services một cách nhanh chóng. Đây là cách thực hiện:
1. Nhấn Win + E hoặc nhấp vào Start và tìm kiếm File Explorer.
2. Trong File Explorer, nhập dcomcnfg vào thanh địa chỉ và nhấn Enter.
Cửa sổ Component Services sẽ mở ra.
5. Cách mở Component Services thông qua Command Prompt
Nếu là người thích sử dụng các phương pháp dòng lệnh, bạn có thể sử dụng Command Prompt để khởi chạy Component Services trên PC của mình.
Đây là cách mở Component Services từ Command Prompt chỉ bằng vài cú nhấp chuột.
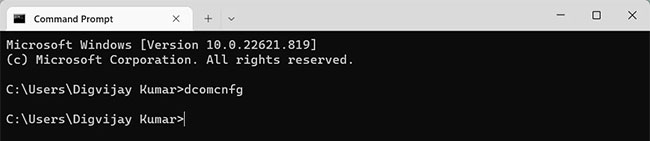
1. Nhấn Win + Q trên bàn phím và nhập "cmd" vào trường tìm kiếm.
2. Chọn Command Prompt từ danh sách ở trên cùng.
3. Khi cửa sổ Command Prompt mở ra, hãy nhập dcomcnfg và nhấn Enter.
Thao tác này sẽ mở ra cửa sổ Component Services để bạn khám phá thêm. Bây giờ, bạn có thể đóng cửa sổ Command Prompt.
6. Cách mở Component Services bằng Windows PowerShell
PowerShell là một công cụ dòng lệnh khác để quản lý hệ thống Windows. Nó cung cấp những lợi thế đáng kể so với Command Prompt.
Nếu thích sử dụng Windows PowerShell, bạn có thể chạy lệnh để mở Component Services. Để làm điều này, hãy thực hiện theo các bước sau:
1. Chuyển đến menu Start và tìm kiếm Windows PowerShell.
2. Chọn Windows PowerShell từ danh sách xuất hiện.
3. Trong Windows PowerShell, nhập dcomcnfg, rồi nhấn Enter.

Bây giờ, bạn có thể sử dụng cửa sổ Component Services.
7. Cách mở Component Services thông qua Task Manager
Task Manager là một công cụ mạnh mẽ trên Windows, hữu ích để phân tích việc sử dụng bộ nhớ và CPU, cũng như chấm dứt các chương trình có vấn đề. Tuy nhiên, bạn cũng có thể sử dụng công cụ này để truy cập hầu hết các ứng dụng trên thiết bị Windows của mình.
Để mở công cụ Component Services trong Task Manager, hãy làm theo các bước sau:
1. Nhấp chuột phải vào Taskbar và chọn Task Manager. Bạn cũng có thể nhấn Ctrl + Shift + Esc trên bàn phím để mở trực tiếp Task Manager.
2. Khi bạn đang ở trong Task Manager, hãy nhấp vào nút Run new task ở đầu cửa sổ.
3. Nhập dcomcnfg vào hộp văn bản và nhấp vào OK.

Công cụ Component Services bây giờ sẽ được mở và sẵn sàng để sử dụng!
8. Cách mở Component Services bằng desktop shortcut
Desktop shortcut giúp bạn dễ dàng truy cập các chương trình, file và thư mục mà bạn sử dụng thường xuyên nhất. Việc tìm ứng dụng theo cách này sẽ dễ dàng hơn vì bạn sẽ có sẵn ứng dụng ngay trong tầm tay.
Để mở Component Services bằng desktop shortcut, hãy làm theo các bước sau:
1. Nhấp chuột phải vào vùng trống trên màn hình desktop và chọn New > Shortcut.
2. Trong cửa sổ "Create Shortcut", nhập dcomcnfg.exe và nhấp vào Next.
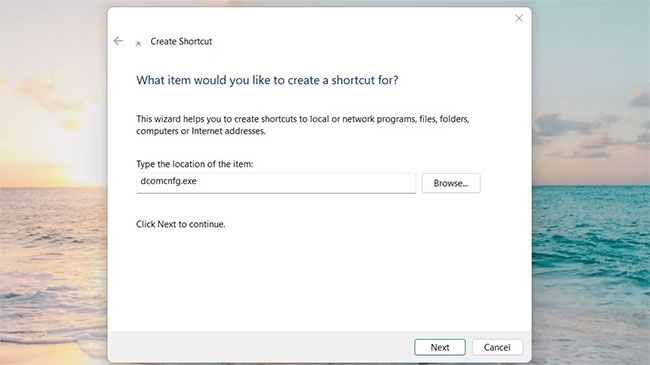
3. Đặt tên cho shortcut của bạn là Component Services.
4. Cuối cùng, nhấp vào Finish để lưu các thay đổi của bạn.
Component Services sẽ xuất hiện dưới dạng shortcut trên desktop; nhấp đúp vào nó để khởi chạy công cụ.
Ngoài ra, bạn có thể tạo desktop shortcut bằng File Explorer. Hãy làm như sau:
- Mở File Explorer và điều hướng đến vị trí sau: C:\Windows\System32\
- Trong hộp tìm kiếm, nhập dcomcnfg.exe và nhấn Enter.
- Nhấp chuột phải vào file thực thi và chọn Show more options > Create shortcut.
- Nhấn Yes để xác nhận tạo shortcut. Bạn sẽ thấy lối desktop shortcut trên màn hình máy tính của mình.
9. Cách mở Component Services bằng phím tắt
Phím tắt là sự kết hợp của hai hoặc nhiều phím giúp truy cập nhanh vào các chức năng nhất định. Với việc sử dụng các phím tắt, bạn có thể mở Component Services một cách nhanh chóng và dễ dàng. Đây là cách thực hiện:
1. Tạo shortcut trên màn hình cho Component Services theo hướng dẫn ở trên.
2. Khi bạn thực hiện xong, hãy nhấp chuột phải vào biểu tượng shortcut và chọn Properties.
3. Nhập bất kỳ chữ cái hoặc số nào vào trường Shortcut.
4. Nhấp vào Apply > OK để tạo phím tắt.
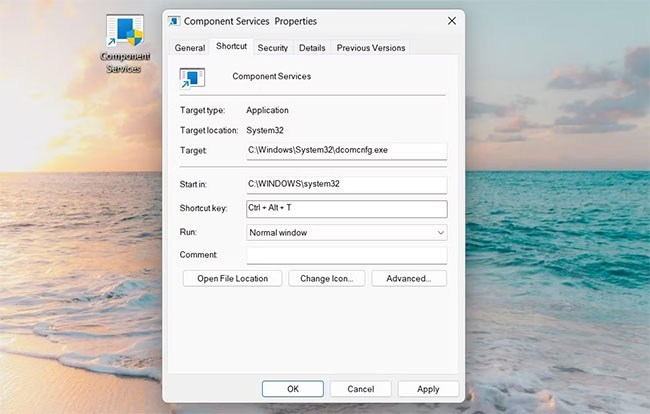
Khi bạn đã hoàn tất, hãy nhấn Ctrl + Alt và nhập chữ cái hoặc số của bạn. Ví dụ, nếu chọn T trong các bước trên, bạn sẽ cần nhấn Ctrl + Alt + T để truy cập Component Services.
10. Cách ghim Component Services vào Taskbar
Ngoài ra, bạn cũng có thể ghim ứng dụng Component Services vào Taskbar. Để làm đươc như vậy, hãy tuân theo những bước sau:
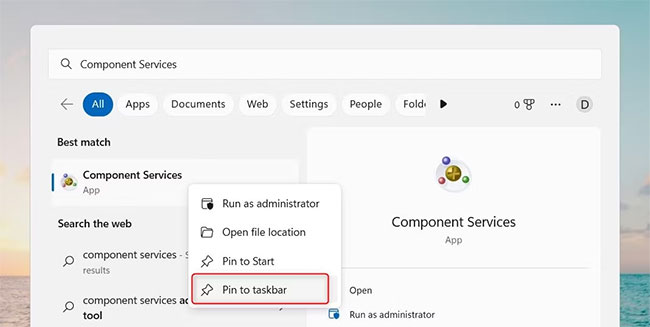
1. Nhấp vào Start và nhập Component Services.
2. Nhấp chuột phải vào kết quả tìm kiếm và chọn Pin to taskbar.
Mở Component Services trong Windows 11 là một nhiệm vụ dễ dàng, đòi hỏi thời gian và công sức tối thiểu. Có một số phương pháp để làm như vậy, cho phép bạn chọn cách phù hợp nhất với nhu cầu của mình. Chúc bạn thực hiện thành công!
