Cách kích hoạt/vô hiệu hóa Active Hours trên Windows 10
- Thứ bảy - 25/07/2020 00:52
- In ra
- Đóng cửa sổ này
Để kiểm soát khi Windows 10 cài đặt các bản cập nhật và khởi động lại hệ thống, bạn nên kích hoạt Active Hours trong Windows 10. Dưới đây là cách thực hiện.
Active Hours là gì?
Các bản cập nhật tự động trong Windows 10 khá hữu ích. Chúng đảm bảo máy của bạn luôn được cập nhật và vá lỗi. Tuy nhiên, một nhược điểm lớn của cập nhật tự động là hệ thống có thể buộc khởi động lại để hoàn tất cài đặt cập nhật. Mặc dù đây không phải là vấn đề đối với đại đa số người dùng, nhưng đôi khi nó có thể gây phiền phức. Để tránh loại hành vi này, bạn cần bật tính năng Active Hours.
Như bạn có thể đoán từ tên gọi, Active Hours là thời gian bạn sử dụng máy tính. Sau khi kích hoạt, Windows sẽ chỉ cài đặt các bản cập nhật ngoài giờ hoạt động. Ví dụ, nếu bạn làm việc trên hệ thống của mình cả ngày, từ 7 giờ sáng đến 10 giờ tối, bạn có thể đặt khoảng thời gian đó làm Active Hours (giờ hoạt động). Sau khi thiết lập Active Hours, Windows sẽ không cài đặt các bản cập nhật cho đến thời điểm sau 10 giờ tối và trước 7 giờ sáng.
Tính năng Active Hours khá hữu ích. Đặc biệt đối với người dùng gia đình thường tắt hệ thống vào ban đêm.
Kích hoạt/Vô hiệu hóa Windows Update Active Hours trong Settings
1. Mở Settings, sau đó click chọn biểu tượng Update & Security.
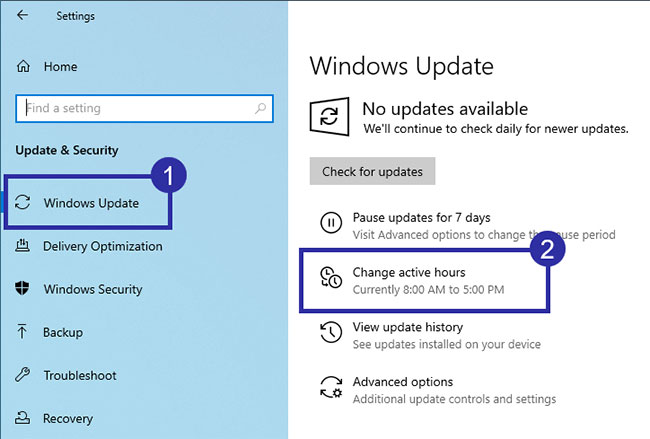
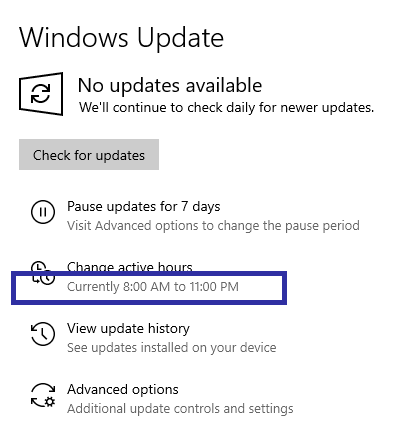
2. Tiếp theo click chọn Windows Update ở danh sách khung bên trái, rồi click chọn liên kết Change active hours.
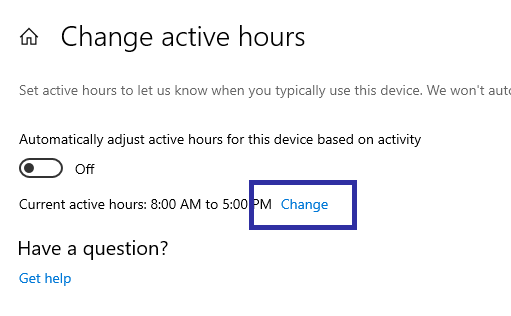
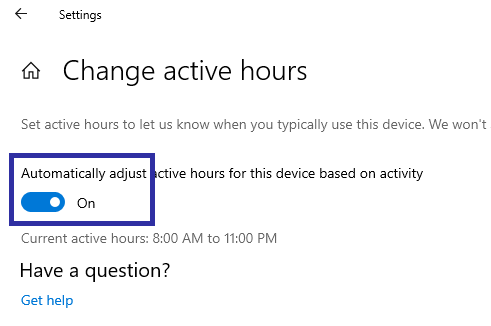
3. Tắt tùy chọn Automatically adjust active hours based on activity.
4. Bây giờ, nhấp vào liên kết Change.
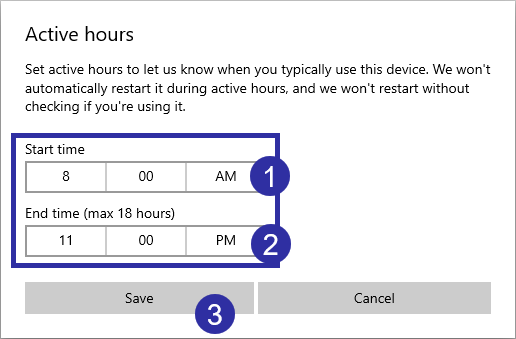
5. Thiết lập thời gian bắt đầu và kết thúc trong mục Start time và End time. Khoảng thời gian tối đa là 18 giờ.
6. Cuối cùng click chọn Save.
7. Bật công tắc chuyển đổi bên dưới tùy chọn Automatically adjust active hours based on activity.
8. Đóng Settings.
9. Khởi động lại Windows 10.
Bạn đã bật thành công Active Hours và cấu hình nó để khởi động lại khi bạn không sử dụng hệ thống. Nếu mở ứng dụng Settings và đi đến Update & Security > Windows Security, bạn sẽ thấy giờ hoạt động hiện tại trong tùy chọn "Change active hours".
Kích hoạt/vô hiệu hóa Active Hours bằng trình Registry Editor
Để kích hoạt/vô hiệu hóa Windows Update Active Hours trên Windows 10, bạn thực hiện theo các bước dưới đây:
1. Mở menu Start bằng cách nhấn phím Win.
2. Nhập registry editor và nhấn vào kết quả để mở Registry Editor.
3. Trên giao diện Registry Editor, sao chép đường dẫn registry sau:
HKLM\Software\Policies\Microsoft\Windows\WindowsUpdate
4. Dán đường dẫn đã sao chép vào thanh địa chỉ của Registry Editor và nhấn Enter.
5. Nhấp chuột phải vào thư mục WindowsUpdate và chọn New > Dword (32-bit) Value.
6. Đặt tên giá trị là SetActiveHours.
7. Nhấp đúp vào SetActiveHours.
8. Nhập 1 vào trường Value Data và nhấn OK.
9. Nhấp chuột phải vào thư mục WindowsUpdate một lần nữa và chọn New > Dword value.
10. Đặt tên giá trị là ActiveHoursStart.
11. Nhấp đúp vào giá trị ActiveHoursStart.
12. Trong trường Value Data, nhập một số trong khoảng từ 0 đến 23. Phạm vi số biểu thị 24 giờ, trong đó 0 là 12 giờ sáng và 23 là 11 giờ tối. Ví dụ, để đặt thời gian bắt đầu thành 7 giờ sáng, hãy nhập 7 vào trường Value Data.
13. Nhấn OK.
14. Nhấp chuột phải vào thư mục WindowsUpdate một lần nữa và chọn New > Dword value.
15. Đặt tên giá trị là ActiveHoursEnd.
16. Nhấp đúp vào giá trị ActiveHoursEnd.
17. Trong trường Value Data, nhập một số trong khoảng từ 0 đến 23. Phạm vi số biểu thị 24 giờ trong đó 0 là 12 giờ sáng và 23 là 11 giờ tối. Ví dụ, để đặt thời gian kết thúc thành 9 giờ tối, hãy nhập 21 vào trường Value Data.
24. Nhấn OK.
25. Đóng Registry Editor.
26. Khởi động lại Windows.
Bạn đã hoàn tất việc tạo registry key để kích hoạt Active Hours. Từ giờ trở đi, Windows sẽ tự động khởi động lại ngoài giờ hoạt động để cài đặt các bản cập nhật Windows.
Để tắt Active Hours, nhấp đúp vào giá trị SetActiveHours, nhập 0 vào trường Value Datavà nhấn OK. Ngoài ra, bạn cũng có thể xóa cả 3 giá trị.
Kích hoạt/vô hiệu hóa Active Hours GPO trong Group Policy Editor
Bạn có thể kích hoạt và cấu hình Active Hours trong Group Policy Editor bằng cách sử dụng policy GPO turn-off auto-start. Điều này đặc biệt hữu ích nếu bạn muốn thực thi các quy tắc và không cho phép thay đổi trong ứng dụng Settings. Hãy nhớ rằng Group Policy Editor chỉ khả dụng cho phiên bản Windows 10 Pro và Enterprise.
Dưới đây là các bước để bật Active Hours trong Group Policy Editor.
1. Mở menu Start bằng cách nhấn phím Win.
2. Nhập Edit Group Policy vào thanh tìm kiếm và chọn nó từ menu Start.
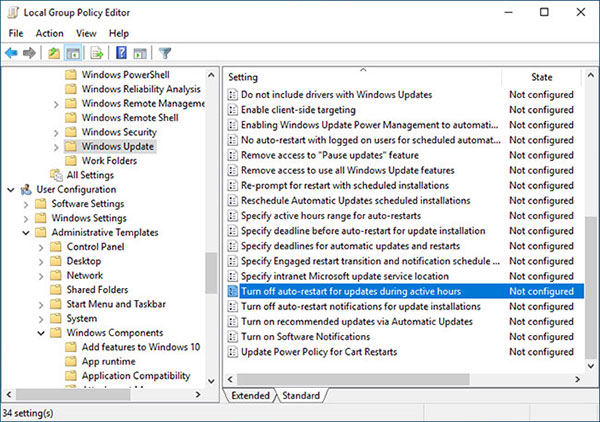
3. Sau khi mở Group Policy Editor, hãy chuyển đến thư mục Computer Configuration > Administrative Templates > Windows Components > Windows Update.
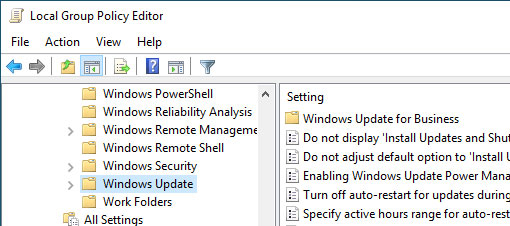
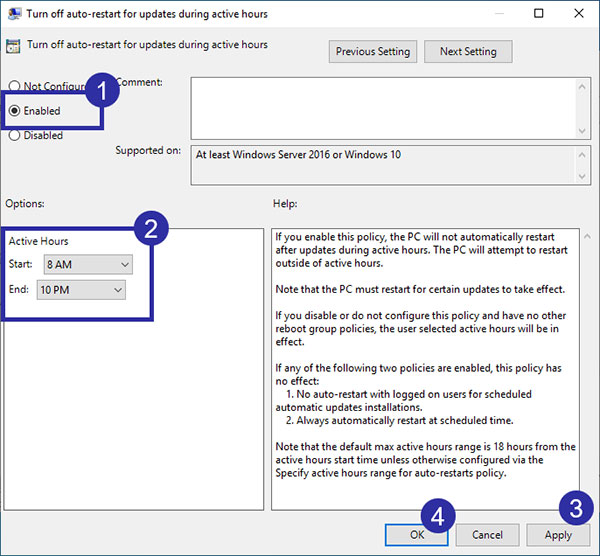
4. Trên bảng điều khiển bên phải, nhấp đúp vào policy Turn-off auto-restart for updates during active hours.
5. Trong cửa sổ này, chọn tùy chọn Enabled.
6. Trong phần tùy chọn trong cùng một cửa sổ, đặt Start time và End time bằng các menu drop-down.
7. Nhấp vào nút Apply > OK.
8. Đóng Group Policy Editor.
9. Khởi động lại Windows để áp dụng các cài đặt policy.
Sau khi khởi động lại hệ thống, group policy Active Hours sẽ được áp dụng tự động. Từ giờ trở đi, Windows sẽ chỉ tự động khởi động lại hệ thống ngoài giờ hoạt động để cài đặt các bản cập nhật.
Để vô hiệu hóa Active Hours, chọn Not configured trong cửa sổ Policy Properties.
Chúc các bạn thành công!
