<!DOCTYPE html>
    <html lang="vi" xmlns="http://www.w3.org/1999/xhtml" prefix="og: http://ogp.me/ns#">
    <head>
<title>Cách khôi phục các file đã xóa trên Linux</title>
<meta name="description" content="Cách khôi phục các file đã xóa trên Linux - Savefile - Tin Tức -...">
<meta name="author" content=".: Nguoicodonvn2008.info - Cõi lòng người cô đơn :.">
<meta name="copyright" content=".: Nguoicodonvn2008.info - Cõi lòng người cô đơn :. [admin@nguoicodonvn2008.info]">
<meta name="robots" content="index, archive, follow, noodp">
<meta name="googlebot" content="index,archive,follow,noodp">
<meta name="msnbot" content="all,index,follow">
<meta name="generator" content="NukeViet v4.5">
<meta http-equiv="Content-Type" content="text/html; charset=utf-8">
<meta property="og:title" content="Cách khôi phục các file đã xóa trên Linux">
<meta property="og:type" content="website">
<meta property="og:description" content="Savefile - Tin Tức - https&#x3A;&#x002F;&#x002F;www.nguoicodonvn2008.info&#x002F;vi&#x002F;news&#x002F;savefile&#x002F;kien-thuc-may-tinh&#x002F;cach-khoi-phuc-cac-file-da-xoa-tren-linux-5608.html">
<meta property="og:site_name" content=".&#x3A; Nguoicodonvn2008.info - Cõi lòng người cô đơn &#x3A;.">
<meta property="og:url" content="https://www.nguoicodonvn2008.info/vi/news/savefile/kien-thuc-may-tinh/cach-khoi-phuc-cac-file-da-xoa-tren-linux-5608.html">
<link rel="shortcut icon" href="https://www.nguoicodonvn2008.info/favicon.ico">
<link rel="canonical" href="https://www.nguoicodonvn2008.info/vi/news/savefile/kien-thuc-may-tinh/cach-khoi-phuc-cac-file-da-xoa-tren-linux-5608.html">
<link rel="alternate" href="https://www.nguoicodonvn2008.info/vi/news/rss/" title="Tin Tức" type="application/rss+xml">
<link rel="alternate" href="https://www.nguoicodonvn2008.info/vi/news/rss/karaoke-dual/" title="Tin Tức - Karaoke Dual" type="application/rss+xml">
<link rel="alternate" href="https://www.nguoicodonvn2008.info/vi/news/rss/nhac-tre/" title="Tin Tức - Nhạc trẻ" type="application/rss+xml">
<link rel="alternate" href="https://www.nguoicodonvn2008.info/vi/news/rss/tru-tinh/" title="Tin Tức - Trữ tình" type="application/rss+xml">
<link rel="alternate" href="https://www.nguoicodonvn2008.info/vi/news/rss/nuoc-ngoai/" title="Tin Tức - Nước ngoài" type="application/rss+xml">
<link rel="alternate" href="https://www.nguoicodonvn2008.info/vi/news/rss/remix/" title="Tin Tức - Remix" type="application/rss+xml">
<link rel="alternate" href="https://www.nguoicodonvn2008.info/vi/news/rss/tam-su-tinh-yeu/" title="Tin Tức - Tâm sự tình yêu" type="application/rss+xml">
<link rel="alternate" href="https://www.nguoicodonvn2008.info/vi/news/rss/tho-suu-tam/" title="Tin Tức - Thơ sưu tầm" type="application/rss+xml">
<link rel="alternate" href="https://www.nguoicodonvn2008.info/vi/news/rss/cuoc-song/" title="Tin Tức - Cuộc sống" type="application/rss+xml">
<link rel="alternate" href="https://www.nguoicodonvn2008.info/vi/news/rss/phan-mem/" title="Tin Tức - Phần mềm" type="application/rss+xml">
<link rel="alternate" href="https://www.nguoicodonvn2008.info/vi/news/rss/kien-thuc-may-tinh/" title="Tin Tức - Kiến thức máy tính" type="application/rss+xml">
<link rel="alternate" href="https://www.nguoicodonvn2008.info/vi/news/rss/hoc-tap/" title="Tin Tức - Học tập" type="application/rss+xml">
<link rel="alternate" href="https://www.nguoicodonvn2008.info/vi/news/rss/tai-lieu/" title="Tin Tức - Tài liệu" type="application/rss+xml">
<link rel="alternate" href="https://www.nguoicodonvn2008.info/vi/news/rss/de-thi/" title="Tin Tức - Đề thi" type="application/rss+xml">
<link rel="preload" as="style" href="https://www.nguoicodonvn2008.info/assets/css/font-awesome.min.css" type="text/css">
<link rel="preload" as="style" href="https://www.nguoicodonvn2008.info/themes/default/css/bootstrap.non-responsive.css" type="text/css">
<link rel="preload" as="style" href="https://www.nguoicodonvn2008.info/themes/default/css/style.css" type="text/css">
<link rel="preload" as="style" href="https://www.nguoicodonvn2008.info/themes/default/css/style.non-responsive.css" type="text/css">
<link rel="preload" as="style" href="https://www.nguoicodonvn2008.info/themes/default/css/news.css" type="text/css">
<link rel="preload" as="style" href="https://www.nguoicodonvn2008.info/themes/default/css/custom.css" type="text/css">
<link rel="preload" as="script" href="https://www.nguoicodonvn2008.info/assets/js/jquery/jquery.min.js" type="text/javascript">
<link rel="preload" as="script" href="https://www.nguoicodonvn2008.info/assets/js/language/vi.js" type="text/javascript">
<link rel="preload" as="script" href="https://www.nguoicodonvn2008.info/assets/js/DOMPurify/purify3.js" type="text/javascript">
<link rel="preload" as="script" href="https://www.nguoicodonvn2008.info/assets/js/global.js" type="text/javascript">
<link rel="preload" as="script" href="https://www.nguoicodonvn2008.info/assets/js/site.js" type="text/javascript">
<link rel="preload" as="script" href="https://www.nguoicodonvn2008.info/themes/default/js/news.js" type="text/javascript">
<link rel="preload" as="script" href="https://www.nguoicodonvn2008.info/themes/default/js/main.js" type="text/javascript">
<link rel="preload" as="script" href="https://www.nguoicodonvn2008.info/themes/default/js/custom.js" type="text/javascript">
<link rel="preload" as="script" href="https://www.nguoicodonvn2008.info/themes/default/js/bootstrap.min.js" type="text/javascript">
<link rel="stylesheet" href="https://www.nguoicodonvn2008.info/assets/css/font-awesome.min.css">
<link rel="stylesheet" href="https://www.nguoicodonvn2008.info/themes/default/css/bootstrap.non-responsive.css">
<link rel="stylesheet" href="https://www.nguoicodonvn2008.info/themes/default/css/style.css">
<link rel="stylesheet" href="https://www.nguoicodonvn2008.info/themes/default/css/style.non-responsive.css">
<link rel="StyleSheet" href="https://www.nguoicodonvn2008.info/themes/default/css/news.css">
<link rel="stylesheet" href="https://www.nguoicodonvn2008.info/themes/default/css/custom.css">
<style type="text/css">
	body{background: #fff;}
</style>
    </head>
    <body>
<div id="print">
	<div id="hd_print">
		<h2 class="pull-left">.&#x3A; Nguoicodonvn2008.info - Cõi lòng người cô đơn &#x3A;.</h2>
		<p class="pull-right"><a title=".&#x3A; Nguoicodonvn2008.info - Cõi lòng người cô đơn &#x3A;." href="https://www.nguoicodonvn2008.info/">https://www.nguoicodonvn2008.info</a></p>
	</div>
	<div class="clear"></div>
	<hr />
	<div id="content">
		<h1>Cách khôi phục các file đã xóa trên Linux</h1>
		<ul class="list-inline">
			<li>Thứ bảy - 14/05/2022 00:43</li>
			<li class="hidden-print txtrequired"><em class="fa fa-print">&nbsp;</em><a title="In ra" href="javascript:;" onclick="window.print()">In ra</a></li>
			<li class="hidden-print txtrequired"><em class="fa fa-power-off">&nbsp;</em><a title="Đóng cửa sổ này" href="javascript:;" onclick="window.close()">Đóng cửa sổ này</a></li>
		</ul>
		<div class="clear"></div>
		<div id="hometext">
		</div>
				<div class="imghome">
			<img alt="Cách khôi phục các file đã xóa trên Linux" src="https://st.quantrimang.com/photos/image/2022/05/14/khoi-phuc-file-da-xoa-tren-linux-1.jpg" width="460" class="img-thumbnail" />
		</div>
		<div class="clear"></div>
		<div id="bodytext" class="clearfix">
			<p style="text-align: justify;">Mất dữ liệu là điều mà tất cả người dùng PC tại một thời điểm nào đó phải đối mặt. Dù là sự cố ổ cứng hay do vô tình xóa, tất cả chúng ta đều đã từng ở trong những tình huống mà ước gì mình có thể lấy lại dữ liệu đã xóa.</p>

<p style="text-align: justify;">May mắn thay, việc khôi phục các file đã xóa trên Linux đơn giản hơn so với những hệ điều hành khác. Bạn có thể dễ dàng khôi phục các file đã xóa bằng những công cụ như TestDisk, PhotoRec và Foremost.</p>

<h2 style="text-align: justify;">Khôi phục các file đã xóa trên Linux bằng TestDisk</h2>

<p style="text-align: justify;">TestDisk&nbsp;là một chương trình khôi phục dữ liệu mã nguồn mở có thể khôi phục hiệu quả các file hoặc phân vùng đã bị xóa vĩnh viễn. Nó được tích hợp nhiều tính năng hữu ích và cung cấp giao diện dễ sử dụng. Bạn có thể cài đặt TestDisk trên Linux bằng các lệnh sau:</p>

<pre id="pre0">
<code># Ubuntu and Debian
sudo apt install testdisk

# RHEL and CentOS
sudo yum install epel-release
sudo yum install testdisk

# Arch Linux
sudo pacman -S testdisk</code></pre>

<p style="text-align: justify;">Sau khi cài đặt, hãy khởi động TestDisk bằng cách&nbsp;mở Terminal&nbsp;và nhập lệnh&nbsp;<strong>testdisk.</strong></p>

<pre id="pre1">
<code>sudo testdisk</code></pre>

<p style="text-align: justify;">
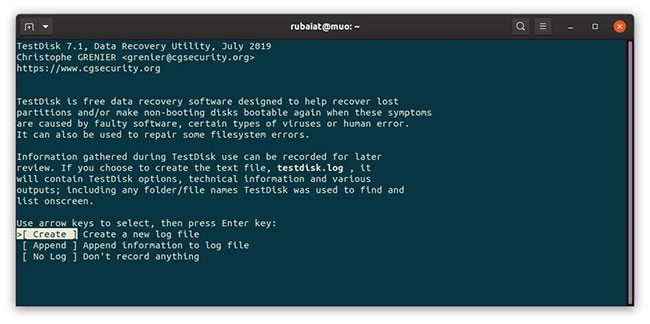
Sử dụng các phím mũi tên trên bàn phím của bạn để điều hướng và nhấn&nbsp;<strong>Enter</strong>&nbsp;để chọn các tùy chọn. Tùy chọn khả dụng đầu tiên là tạo file nhật ký. Hãy tiếp tục và tạo một file.</p>

<figure>
<div style="text-align: justify;"><img alt="Menu Start trong Testdisk trên Linux" data-i="0" data-src="https://st.quantrimang.com/photos/image/2022/05/14/khoi-phuc-file-da-xoa-tren-linux-1.jpg" data-was-processed="true" height="324" src="https://st.quantrimang.com/photos/image/2022/05/14/khoi-phuc-file-da-xoa-tren-linux-1.jpg" width="650" /></div>

<figcaption>
<div style="text-align: justify;">Menu Start trong Testdisk trên Linux</div>
</figcaption>
</figure>

<p style="text-align: justify;">
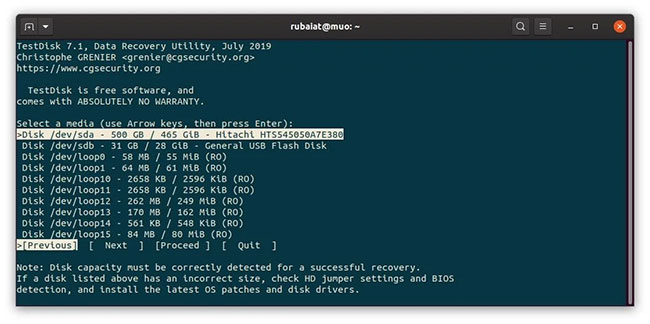
Màn hình sau sẽ hiển thị danh sách các phương tiện lưu trữ được kết nối với hệ thống của bạn. Chọn thiết bị có chứa các file đã xóa. Ví dụ đang sử dụng phương tiện&nbsp;<strong>/dev/sdb</strong>&nbsp;cho hướng dẫn này. Chọn phương tiện phù hợp của bạn và nhấn&nbsp;<strong>Proceed.</strong></p>

<figure>
<div style="text-align: justify;"><img alt="Danh sách ổ TeskDisk trên Linux" data-i="1" data-src="https://st.quantrimang.com/photos/image/2022/05/14/khoi-phuc-file-da-xoa-tren-linux-2.jpg" data-was-processed="true" height="324" src="https://st.quantrimang.com/photos/image/2022/05/14/khoi-phuc-file-da-xoa-tren-linux-2.jpg" width="650" /></div>

<figcaption>
<div style="text-align: justify;">Danh sách ổ TeskDisk trên Linux</div>
</figcaption>
</figure>

<p style="text-align: justify;">
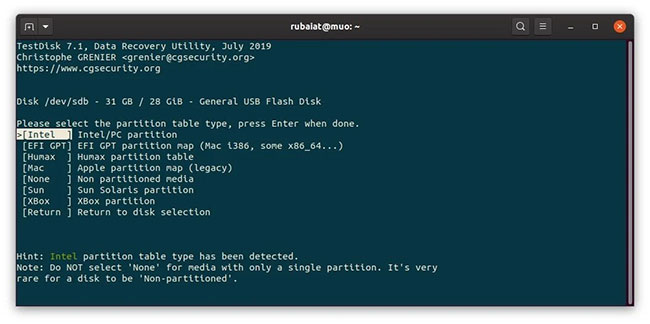
Màn hình tiếp theo sẽ nhắc bạn chọn loại phân vùng cho ổ đĩa. Chọn một loại phân vùng chính xác cho ổ đĩa của bạn. Lưu ý rằng TestDisk sẽ cố gắng tự phát hiện đúng loại. Vì vậy, nếu bạn không chắc chắn, hãy chuyển sang loại phân vùng được TestDisk phát hiện.</p>

<figure>
<div style="text-align: justify;"><img alt="Menu tùy chọn phân vùng TestDisk" data-i="2" data-src="https://st.quantrimang.com/photos/image/2022/05/14/khoi-phuc-file-da-xoa-tren-linux-3.jpg" data-was-processed="true" height="324" src="https://st.quantrimang.com/photos/image/2022/05/14/khoi-phuc-file-da-xoa-tren-linux-3.jpg" width="650" /></div>

<figcaption>
<div style="text-align: justify;">Menu tùy chọn phân vùng TestDisk</div>
</figcaption>
</figure>

<p style="text-align: justify;">
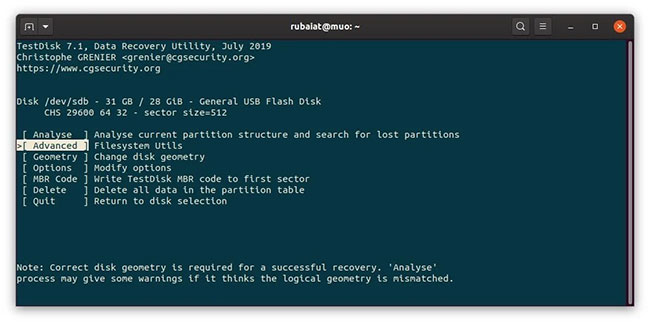
Bạn sẽ thấy một số tùy chọn có sẵn trên màn hình sau. Tùy chọn&nbsp;<strong>Analyse</strong>&nbsp;rất hữu ích để khôi phục các phân vùng bị mất. Tuy nhiên, ví dụ sẽ sử dụng tùy chọn&nbsp;<strong>Advanced</strong>&nbsp;để khôi phục các file đã xóa.</p>

<figure>
<div style="text-align: justify;"><img alt="Tùy chọn khôi phục dữ liệu ổ đĩa TeskDisk" data-i="3" data-src="https://st.quantrimang.com/photos/image/2022/05/14/khoi-phuc-file-da-xoa-tren-linux-4.jpg" data-was-processed="true" height="324" src="https://st.quantrimang.com/photos/image/2022/05/14/khoi-phuc-file-da-xoa-tren-linux-4.jpg" width="650" /></div>

<figcaption>
<div style="text-align: justify;">Tùy chọn khôi phục dữ liệu ổ đĩa TeskDisk</div>
</figcaption>
</figure>

<p style="text-align: justify;">Tiếp theo, bạn sẽ thấy danh sách tất cả các phân vùng có trên thiết bị đã chọn của mình. Chọn phân vùng chứa dữ liệu đã xóa của bạn và chọn&nbsp;<strong>Undelete</strong>&nbsp;từ menu dưới cùng.</p>

<figure>
<div style="text-align: justify;"><img alt="Menu phục hồi TestDisk" data-i="4" data-src="https://st.quantrimang.com/photos/image/2022/05/14/khoi-phuc-file-da-xoa-tren-linux-5.jpg" data-was-processed="true" height="324" src="https://st.quantrimang.com/photos/image/2022/05/14/khoi-phuc-file-da-xoa-tren-linux-5.jpg" width="650" /></div>

<figcaption>
<div style="text-align: justify;">Menu phục hồi TestDisk</div>
</figcaption>
</figure>

<p style="text-align: justify;">
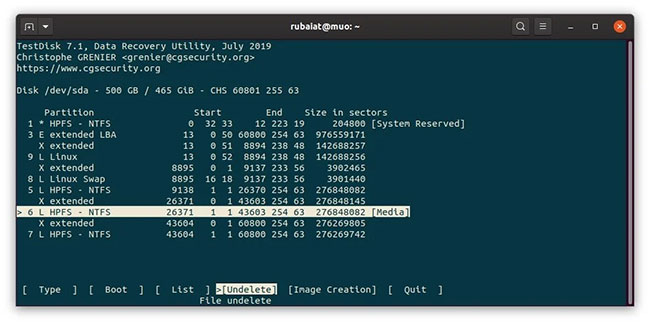
TestDisk sẽ quét các mục MFT để tìm những file đã xóa trên phân vùng này và liệt kê chúng ở đây. Ví dụ đang tìm file picture.jpg hiển thị trên màn hình này.</p>

<figure>
<div style="text-align: justify;"><img alt="Khôi phục file trong TestDisk" data-i="5" data-src="https://st.quantrimang.com/photos/image/2022/05/14/khoi-phuc-file-da-xoa-tren-linux-6.jpg" data-was-processed="true" height="324" src="https://st.quantrimang.com/photos/image/2022/05/14/khoi-phuc-file-da-xoa-tren-linux-6.jpg" width="650" /></div>

<figcaption>
<div style="text-align: justify;">Khôi phục file trong TestDisk</div>
</figcaption>
</figure>

<p style="text-align: justify;">Bạn có thể chọn/bỏ chọn các file cụ thể bằng cách sử dụng<strong>&nbsp;:</strong>&nbsp;và tất cả các file bằng cách sử dụng&nbsp;<strong>a</strong>. Sau khi chọn các file cần khôi phục, hãy nhấn C để sao chép chúng.</p>

<figure>
<div style="text-align: justify;"><img alt="Menu lựa chọn điểm đích khôi phục file" data-i="6" data-src="https://st.quantrimang.com/photos/image/2022/05/14/khoi-phuc-file-da-xoa-tren-linux-7.jpg" data-was-processed="true" height="324" src="https://st.quantrimang.com/photos/image/2022/05/14/khoi-phuc-file-da-xoa-tren-linux-7.jpg" width="650" /></div>

<figcaption>
<div style="text-align: justify;">Menu lựa chọn điểm đích khôi phục file</div>
</figcaption>
</figure>

<p style="text-align: justify;">
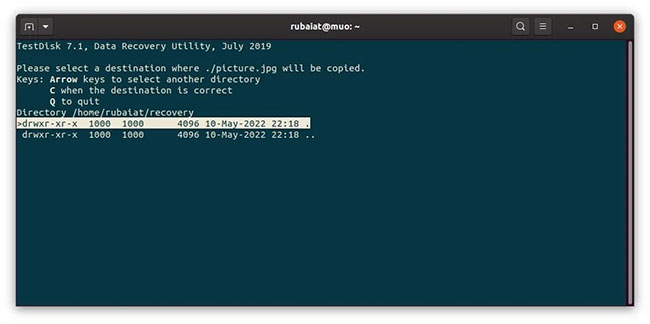
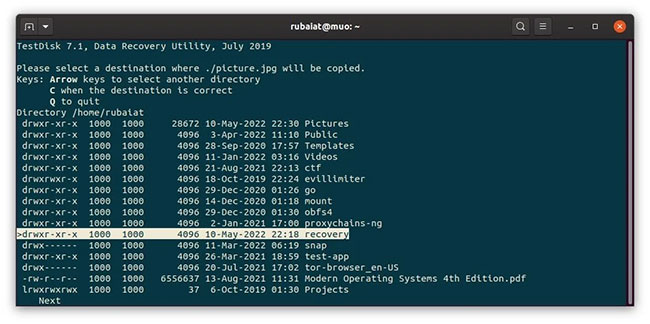
Bạn sẽ được nhắc chọn điểm đích khôi phục. Điều hướng đến đó và nhấn&nbsp;<strong>C&nbsp;</strong>để lưu file.</p>

<figure>
<div style="text-align: justify;"><img alt="Nhấn C để lưu file" data-i="7" data-src="https://st.quantrimang.com/photos/image/2022/05/14/khoi-phuc-file-da-xoa-tren-linux-8.jpg" data-was-processed="true" height="324" src="https://st.quantrimang.com/photos/image/2022/05/14/khoi-phuc-file-da-xoa-tren-linux-8.jpg" width="650" /></div>

<figcaption>
<div style="text-align: justify;">Nhấn C để lưu file</div>
</figcaption>
</figure>

<h2 style="text-align: justify;">Khôi phục các file đã xóa trên Linux bằng PhotoRec</h2>

<p style="text-align: justify;">PhotoRec là một chương trình khôi phục dữ liệu mạnh mẽ khác được tạo ra bởi các nhà phát triển của TestDisk. Nó được phát triển để khôi phục ảnh đã xóa trên Linux nhưng hiện đã phát triển thành một chương trình chính thức có thể sử dụng PhotoRec để khôi phục tất cả các loại file đã xóa.</p>

<p style="text-align: justify;">Sự khác biệt giữa TestDisk và PhotoRec là PhotoRec có thể truy xuất file ngay cả từ những ổ đĩa đã bị hỏng không thể sửa chữa. Nó sử dụng chữ ký file để phát hiện các file đã xóa, điều này làm cho công cụ trở nên vô cùng mạnh mẽ. Tuy nhiên, các file được truy xuất qua PhotoRec không giữ lại tên file gốc của chúng.</p>

<p style="text-align: justify;">Bạn có thể cài đặt PhotoRec trên các bản phân phối Linux khác nhau bằng cách sử dụng những lệnh tương tự được sử dụng để cài đặt TestDisk. Vì vậy, nếu bạn đã cài đặt TestDisk, bạn không cần cài đặt lại PhotoRec. Nếu bạn không cài đặt TestDisk trước đó, hãy xem phần trên và cài đặt gói testdisk.</p>

<pre id="pre2">
<code>sudo photorec</code></pre>

<p style="text-align: justify;">
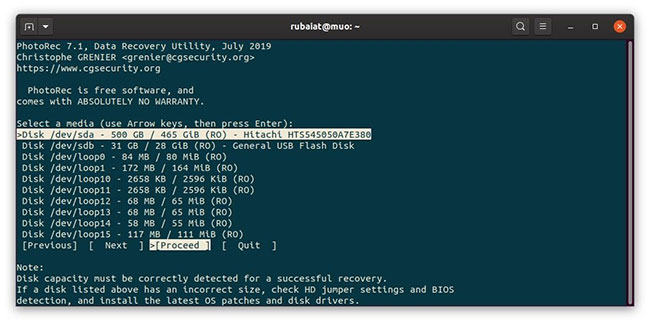
Lệnh này sẽ khởi động PhotoRec và đưa bạn đến menu Start. Bố cục tương tự như TestDisk và việc điều hướng cũng vậy. Bạn sẽ được nhắc chọn phương tiện ổ đĩa. Chọn đúng cái bạn muốn và nhấn&nbsp;<strong>Proceed.</strong></p>

<figure>
<div style="text-align: justify;"><img alt="Menu Start trong Photorec" data-i="8" data-src="https://st.quantrimang.com/photos/image/2022/05/14/khoi-phuc-file-da-xoa-tren-linux-9.jpg" data-was-processed="true" height="324" src="https://st.quantrimang.com/photos/image/2022/05/14/khoi-phuc-file-da-xoa-tren-linux-9.jpg" width="650" /></div>

<figcaption>
<div style="text-align: justify;">Menu Start trong Photorec</div>
</figcaption>
</figure>

<p style="text-align: justify;">
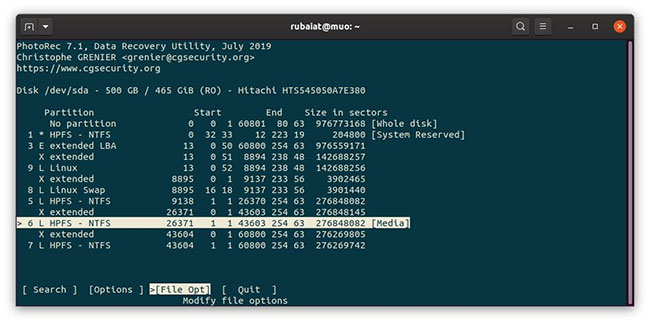
Sau đó, bạn sẽ cần phải chọn phân vùng nguồn. Chọn phân vùng thích hợp và chọn&nbsp;<strong>File Opt</strong>&nbsp;từ menu dưới cùng.</p>

<figure>
<div style="text-align: justify;"><img alt="Menu lựa chọn phân vùng trong Photorec" data-i="9" data-src="https://st.quantrimang.com/photos/image/2022/05/14/khoi-phuc-file-da-xoa-tren-linux-10.jpg" data-was-processed="true" height="324" src="https://st.quantrimang.com/photos/image/2022/05/14/khoi-phuc-file-da-xoa-tren-linux-10.jpg" width="650" /></div>

<figcaption>
<div style="text-align: justify;">Menu lựa chọn phân vùng trong Photorec</div>
</figcaption>
</figure>

<p style="text-align: justify;">
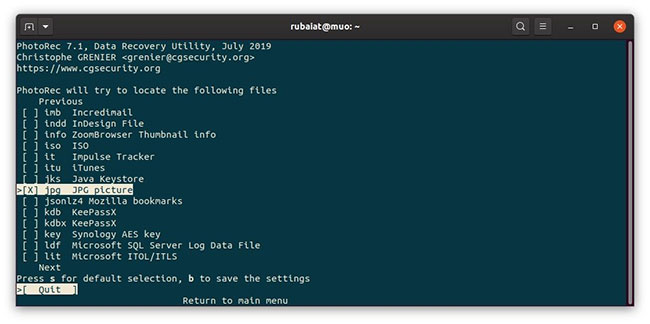
Tại đây, bạn có thể chỉ định loại của các file đã xóa. PhotoRec chọn tất cả các loại file theo mặc định. Bạn có thể vô hiệu hóa tất cả bằng cách sử dụng&nbsp;<strong>s&nbsp;</strong>và chọn một loại cụ thể bằng cách sử dụng&nbsp;<strong>x</strong>. Ví dụ đang chọn jpg để khôi phục file hình ảnh.</p>

<figure>
<div style="text-align: justify;"><img alt="Loại file Photorec" data-i="10" data-src="https://st.quantrimang.com/photos/image/2022/05/14/khoi-phuc-file-da-xoa-tren-linux-11.jpg" data-was-processed="true" height="324" src="https://st.quantrimang.com/photos/image/2022/05/14/khoi-phuc-file-da-xoa-tren-linux-11.jpg" width="650" /></div>

<figcaption>
<div style="text-align: justify;">Loại file Photorec</div>
</figcaption>
</figure>

<p style="text-align: justify;">
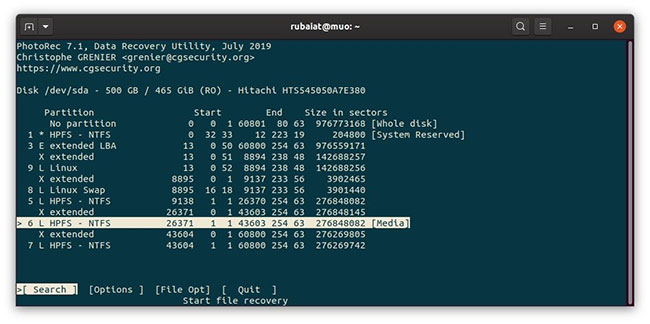
Bây giờ, quay lại bằng q và chọn tùy chọn&nbsp;<strong>Search</strong>&nbsp;để bắt đầu khôi phục file trên Linux.</p>

<figure>
<div style="text-align: justify;"><img alt="Tìm kiếm file trong Photorec" data-i="11" data-src="https://st.quantrimang.com/photos/image/2022/05/14/khoi-phuc-file-da-xoa-tren-linux-12.jpg" data-was-processed="true" height="324" src="https://st.quantrimang.com/photos/image/2022/05/14/khoi-phuc-file-da-xoa-tren-linux-12.jpg" width="650" /></div>

<figcaption>
<div style="text-align: justify;">Tìm kiếm file trong Photorec</div>
</figcaption>
</figure>

<p style="text-align: justify;">
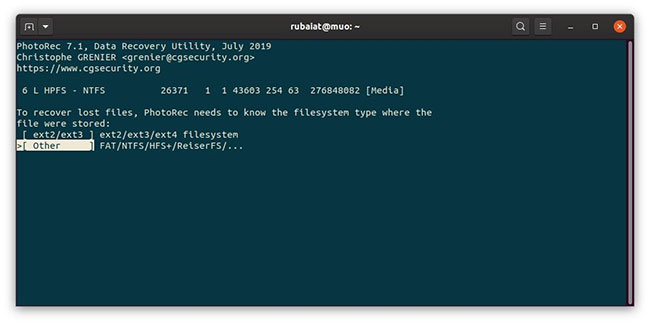
Sau đó, bạn sẽ cần chọn loại hệ thống file. Chọn&nbsp;<strong>Other</strong>&nbsp;nếu phân vùng nguồn không phải là&nbsp;<strong>ext3/ext4.</strong></p>

<figure>
<div style="text-align: justify;"><img alt="Lựa chọn hệ thống file Photorec" data-i="12" data-src="https://st.quantrimang.com/photos/image/2022/05/14/khoi-phuc-file-da-xoa-tren-linux-13.jpg" data-was-processed="true" height="324" src="https://st.quantrimang.com/photos/image/2022/05/14/khoi-phuc-file-da-xoa-tren-linux-13.jpg" width="650" /></div>

<figcaption>
<div style="text-align: justify;">Lựa chọn hệ thống file Photorec</div>
</figcaption>
</figure>

<p style="text-align: justify;">Tại bước này, bạn phải chỉ định xem nên tìm kiếm các loại file đã chọn trong toàn bộ phân vùng hay chỉ trong phần dung lượng trống. Ví dụ đang chọn tùy chọn&nbsp;<strong>Free Space</strong>&nbsp;để tìm kiếm nhanh hơn.</p>

<figure>
<div style="text-align: justify;"><img alt="Tùy chọn quét Photorec" data-i="13" data-src="https://st.quantrimang.com/photos/image/2022/05/14/khoi-phuc-file-da-xoa-tren-linux-14.jpg" data-was-processed="true" height="324" src="https://st.quantrimang.com/photos/image/2022/05/14/khoi-phuc-file-da-xoa-tren-linux-14.jpg" width="650" /></div>

<figcaption>
<div style="text-align: justify;">Tùy chọn quét Photorec</div>
</figcaption>
</figure>

<p style="text-align: justify;">Bước tiếp theo yêu cầu người dùng chọn thư mục đích. Đảm bảo không lưu file trên cùng một phân vùng mà bạn đang quét. Điều hướng đến vị trí mong muốn bằng các phím mũi tên và nhấn C để lưu.</p>

<figure>
<div style="text-align: justify;"><img alt="Điểm đích khôi phục trong Photorec" data-i="14" data-src="https://st.quantrimang.com/photos/image/2022/05/14/khoi-phuc-file-da-xoa-tren-linux-15.jpg" data-was-processed="true" height="324" src="https://st.quantrimang.com/photos/image/2022/05/14/khoi-phuc-file-da-xoa-tren-linux-15.jpg" width="650" /></div>

<figcaption>
<div style="text-align: justify;">Điểm đích khôi phục trong Photorec</div>
</figcaption>
</figure>

<p style="text-align: justify;">
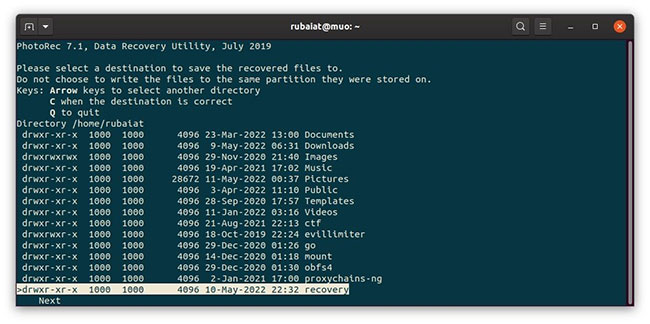
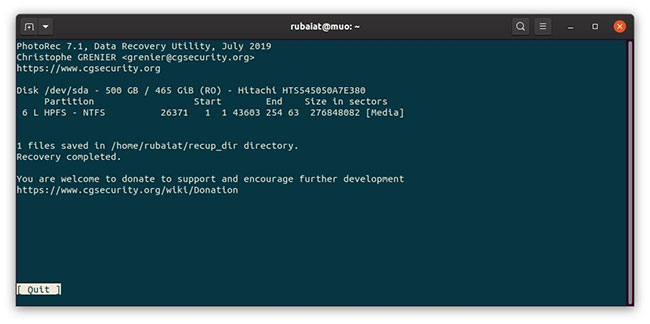
PhotoRec bây giờ sẽ quét các sector trống và lưu các file đã khôi phục vào đích đã chọn. Nó sẽ lưu các file đã khôi phục trong một thư mục có tên là&nbsp;<strong>recup_dir.</strong></p>

<figure>
<div style="text-align: justify;"><img alt="Các file đã khôi phục trong một thư mục có tên là recup_dir" data-i="15" data-src="https://st.quantrimang.com/photos/image/2022/05/14/khoi-phuc-file-da-xoa-tren-linux-16.jpg" data-was-processed="true" height="324" src="https://st.quantrimang.com/photos/image/2022/05/14/khoi-phuc-file-da-xoa-tren-linux-16.jpg" width="650" /></div>

<figcaption>
<div style="text-align: justify;">Các file đã khôi phục trong một thư mục có tên là recup_dir</div>
</figcaption>
</figure>

<h2 style="text-align: justify;">Khôi phục các file đã xóa bằng Foremost trên Linux</h2>

<p style="text-align: justify;">Foremost là một công cụ khôi phục dữ liệu miễn phí cho Linux. Nó đi kèm với một giao diện CLI đơn giản. Mặc dù phần mềm không tương tác như TestDisk hoặc PhotoRec, nhưng nó vẫn tỏ ra hữu ích trong một số trường hợp nhất định.</p>

<p style="text-align: justify;">Nhờ có rất nhiều chương trình khôi phục dữ liệu chất lượng cao, việc khôi phục các file đã xóa khá dễ dàng trên Linux. Bạn có thể chọn bất kỳ công cụ nào ở trên dựa trên loại file đã xóa và cấu hình phân vùng hệ thống của bạn. Tuy nhiên, bài viết khuyên dùng TestDisk và PhotoRec vì chúng cung cấp lời nhắc tương tác đơn giản và rõ ràng.</p>

<p style="text-align: justify;">Vì khôi phục dữ liệu có thể là một cơn ác mộng đối với nhiều người, bạn nên luôn lưu trữ các bản sao lưu trên thiết bị bên ngoài. Nó sẽ giúp lấy lại dữ liệu đã xóa chỉ với một vài cú nhấp chuột.</p>
		</div>
				<div id="author">
						<p>
				<strong>Nguồn tin:</strong>
				Quantrimang.com
			</p>
		</div>
	</div>
	<div id="footer" class="clearfix">
		<div id="url">
			<strong>URL của bản tin này: </strong><a href="https://www.nguoicodonvn2008.info/vi/news/savefile/kien-thuc-may-tinh/cach-khoi-phuc-cac-file-da-xoa-tren-linux-5608.html" title="Cách khôi phục các file đã xóa trên Linux">https://www.nguoicodonvn2008.info/vi/news/savefile/kien-thuc-may-tinh/cach-khoi-phuc-cac-file-da-xoa-tren-linux-5608.html</a>

		</div>
		<div class="clear"></div>
		<div class="copyright">
			&copy; .&#x3A; Nguoicodonvn2008.info - Cõi lòng người cô đơn &#x3A;.
		</div>
		<div id="contact">
			<a href="mailto:admin@nguoicodonvn2008.info">admin@nguoicodonvn2008.info</a>
		</div>
	</div>
</div>
        <div id="timeoutsess" class="chromeframe">
            Bạn đã không sử dụng Site, <a onclick="timeoutsesscancel();" href="https://www.nguoicodonvn2008.info/#">Bấm vào đây để duy trì trạng thái đăng nhập</a>. Thời gian chờ: <span id="secField"> 60 </span> giây
        </div>
        <div id="openidResult" class="nv-alert" style="display:none"></div>
        <div id="openidBt" data-result="" data-redirect=""></div>
		</script>
		<div class="car-top">
  <span><img src="https://www.nguoicodonvn2008.info/themes/default/images/car.png" alt=""></span>
</div>
<script src="https://www.nguoicodonvn2008.info/assets/js/jquery/jquery.min.js"></script>
<script>var nv_base_siteurl="/",nv_lang_data="vi",nv_lang_interface="vi",nv_name_variable="nv",nv_fc_variable="op",nv_lang_variable="language",nv_module_name="news",nv_func_name="savefile",nv_is_user=0, nv_my_ofs=-4,nv_my_abbr="EDT",nv_cookie_prefix="nv4c_e856T",nv_check_pass_mstime=1738000,nv_area_admin=0,nv_safemode=0,theme_responsive=0,nv_recaptcha_ver=2,nv_recaptcha_sitekey="",nv_recaptcha_type="image",XSSsanitize=1;</script>
<script src="https://www.nguoicodonvn2008.info/assets/js/language/vi.js"></script>
<script src="https://www.nguoicodonvn2008.info/assets/js/DOMPurify/purify3.js"></script>
<script src="https://www.nguoicodonvn2008.info/assets/js/global.js"></script>
<script src="https://www.nguoicodonvn2008.info/assets/js/site.js"></script>
<script src="https://www.nguoicodonvn2008.info/themes/default/js/news.js"></script>
<script src="https://www.nguoicodonvn2008.info/themes/default/js/main.js"></script>
<script src="https://www.nguoicodonvn2008.info/themes/default/js/custom.js"></script>
<script type="application/ld+json">
        {
            "@context": "https://schema.org",
            "@type": "Organization",
            "url": "https://www.nguoicodonvn2008.info",
            "logo": "https://www.nguoicodonvn2008.info/uploads/angel.gif"
        }
        </script>
<script src="https://www.nguoicodonvn2008.info/themes/default/js/bootstrap.min.js"></script>
<script type="text/javascript">
var $scrolltop = $('.car-top');
$scrolltop.on('click', function () {
    $('html,body').animate({
        scrollTop: 0
    }, 800);
    $(this).addClass("car-run");
    setTimeout(function(){ $scrolltop.removeClass('car-run');}, 1000);
    return false;
});
$(window).on('scroll', function ()
{ 
    if($(window).scrollTop() >= 200)
    {
        $scrolltop.addClass("show");
        $scrolltop.addClass("car-down");
    }
    else
    {
       $scrolltop.removeClass("show");
       setTimeout(function(){ $scrolltop.removeClass('car-down');}, 300);
    }
});
</script>
</body>
</html>