<!DOCTYPE html>
    <html lang="vi" xmlns="http://www.w3.org/1999/xhtml" prefix="og: http://ogp.me/ns#">
    <head>
<title>Cách ép xung Raspberry Pi 4</title>
<meta name="description" content="Cách ép xung Raspberry Pi 4 - Savefile - Tin Tức - https&#x3A;&#x002F;&#x002F;www.nguoicodonvn2008.info&#x002F;vi&#x002F;news&#x002F;savefile&#x002F;kien-thuc-may-tinh&#x002F;cach-ep-xung-raspberry-pi-4-1861.html">
<meta name="author" content=".: Nguoicodonvn2008.info - Cõi lòng người cô đơn :.">
<meta name="copyright" content=".: Nguoicodonvn2008.info - Cõi lòng người cô đơn :. [admin@nguoicodonvn2008.info]">
<meta name="robots" content="index, archive, follow, noodp">
<meta name="googlebot" content="index,archive,follow,noodp">
<meta name="msnbot" content="all,index,follow">
<meta name="generator" content="NukeViet v4.5">
<meta http-equiv="Content-Type" content="text/html; charset=utf-8">
<meta property="og:title" content="Cách ép xung Raspberry Pi 4">
<meta property="og:type" content="website">
<meta property="og:description" content="Savefile - Tin Tức - https&#x3A;&#x002F;&#x002F;www.nguoicodonvn2008.info&#x002F;vi&#x002F;news&#x002F;savefile&#x002F;kien-thuc-may-tinh&#x002F;cach-ep-xung-raspberry-pi-4-1861.html">
<meta property="og:site_name" content=".&#x3A; Nguoicodonvn2008.info - Cõi lòng người cô đơn &#x3A;.">
<meta property="og:url" content="https://www.nguoicodonvn2008.info/vi/news/savefile/kien-thuc-may-tinh/cach-ep-xung-raspberry-pi-4-1861.html">
<link rel="shortcut icon" href="https://www.nguoicodonvn2008.info/favicon.ico">
<link rel="canonical" href="https://www.nguoicodonvn2008.info/vi/news/savefile/kien-thuc-may-tinh/cach-ep-xung-raspberry-pi-4-1861.html">
<link rel="alternate" href="https://www.nguoicodonvn2008.info/vi/news/rss/" title="Tin Tức" type="application/rss+xml">
<link rel="alternate" href="https://www.nguoicodonvn2008.info/vi/news/rss/karaoke-dual/" title="Tin Tức - Karaoke Dual" type="application/rss+xml">
<link rel="alternate" href="https://www.nguoicodonvn2008.info/vi/news/rss/nhac-tre/" title="Tin Tức - Nhạc trẻ" type="application/rss+xml">
<link rel="alternate" href="https://www.nguoicodonvn2008.info/vi/news/rss/tru-tinh/" title="Tin Tức - Trữ tình" type="application/rss+xml">
<link rel="alternate" href="https://www.nguoicodonvn2008.info/vi/news/rss/nuoc-ngoai/" title="Tin Tức - Nước ngoài" type="application/rss+xml">
<link rel="alternate" href="https://www.nguoicodonvn2008.info/vi/news/rss/remix/" title="Tin Tức - Remix" type="application/rss+xml">
<link rel="alternate" href="https://www.nguoicodonvn2008.info/vi/news/rss/tam-su-tinh-yeu/" title="Tin Tức - Tâm sự tình yêu" type="application/rss+xml">
<link rel="alternate" href="https://www.nguoicodonvn2008.info/vi/news/rss/tho-suu-tam/" title="Tin Tức - Thơ sưu tầm" type="application/rss+xml">
<link rel="alternate" href="https://www.nguoicodonvn2008.info/vi/news/rss/cuoc-song/" title="Tin Tức - Cuộc sống" type="application/rss+xml">
<link rel="alternate" href="https://www.nguoicodonvn2008.info/vi/news/rss/phan-mem/" title="Tin Tức - Phần mềm" type="application/rss+xml">
<link rel="alternate" href="https://www.nguoicodonvn2008.info/vi/news/rss/kien-thuc-may-tinh/" title="Tin Tức - Kiến thức máy tính" type="application/rss+xml">
<link rel="alternate" href="https://www.nguoicodonvn2008.info/vi/news/rss/hoc-tap/" title="Tin Tức - Học tập" type="application/rss+xml">
<link rel="alternate" href="https://www.nguoicodonvn2008.info/vi/news/rss/tai-lieu/" title="Tin Tức - Tài liệu" type="application/rss+xml">
<link rel="alternate" href="https://www.nguoicodonvn2008.info/vi/news/rss/de-thi/" title="Tin Tức - Đề thi" type="application/rss+xml">
<link rel="preload" as="style" href="https://www.nguoicodonvn2008.info/assets/css/font-awesome.min.css" type="text/css">
<link rel="preload" as="style" href="https://www.nguoicodonvn2008.info/themes/default/css/bootstrap.non-responsive.css" type="text/css">
<link rel="preload" as="style" href="https://www.nguoicodonvn2008.info/themes/default/css/style.css" type="text/css">
<link rel="preload" as="style" href="https://www.nguoicodonvn2008.info/themes/default/css/style.non-responsive.css" type="text/css">
<link rel="preload" as="style" href="https://www.nguoicodonvn2008.info/themes/default/css/news.css" type="text/css">
<link rel="preload" as="style" href="https://www.nguoicodonvn2008.info/themes/default/css/custom.css" type="text/css">
<link rel="preload" as="script" href="https://www.nguoicodonvn2008.info/assets/js/jquery/jquery.min.js" type="text/javascript">
<link rel="preload" as="script" href="https://www.nguoicodonvn2008.info/assets/js/language/vi.js" type="text/javascript">
<link rel="preload" as="script" href="https://www.nguoicodonvn2008.info/assets/js/DOMPurify/purify3.js" type="text/javascript">
<link rel="preload" as="script" href="https://www.nguoicodonvn2008.info/assets/js/global.js" type="text/javascript">
<link rel="preload" as="script" href="https://www.nguoicodonvn2008.info/assets/js/site.js" type="text/javascript">
<link rel="preload" as="script" href="https://www.nguoicodonvn2008.info/themes/default/js/news.js" type="text/javascript">
<link rel="preload" as="script" href="https://www.nguoicodonvn2008.info/themes/default/js/main.js" type="text/javascript">
<link rel="preload" as="script" href="https://www.nguoicodonvn2008.info/themes/default/js/custom.js" type="text/javascript">
<link rel="preload" as="script" href="https://www.nguoicodonvn2008.info/themes/default/js/bootstrap.min.js" type="text/javascript">
<link rel="stylesheet" href="https://www.nguoicodonvn2008.info/assets/css/font-awesome.min.css">
<link rel="stylesheet" href="https://www.nguoicodonvn2008.info/themes/default/css/bootstrap.non-responsive.css">
<link rel="stylesheet" href="https://www.nguoicodonvn2008.info/themes/default/css/style.css">
<link rel="stylesheet" href="https://www.nguoicodonvn2008.info/themes/default/css/style.non-responsive.css">
<link rel="StyleSheet" href="https://www.nguoicodonvn2008.info/themes/default/css/news.css">
<link rel="stylesheet" href="https://www.nguoicodonvn2008.info/themes/default/css/custom.css">
<style type="text/css">
	body{background: #fff;}
</style>
    </head>
    <body>
<div id="print">
	<div id="hd_print">
		<h2 class="pull-left">.&#x3A; Nguoicodonvn2008.info - Cõi lòng người cô đơn &#x3A;.</h2>
		<p class="pull-right"><a title=".&#x3A; Nguoicodonvn2008.info - Cõi lòng người cô đơn &#x3A;." href="https://www.nguoicodonvn2008.info/">https://www.nguoicodonvn2008.info</a></p>
	</div>
	<div class="clear"></div>
	<hr />
	<div id="content">
		<h1>Cách ép xung Raspberry Pi 4</h1>
		<ul class="list-inline">
			<li>Thứ năm - 19/03/2020 01:07</li>
			<li class="hidden-print txtrequired"><em class="fa fa-print">&nbsp;</em><a title="In ra" href="javascript:;" onclick="window.print()">In ra</a></li>
			<li class="hidden-print txtrequired"><em class="fa fa-power-off">&nbsp;</em><a title="Đóng cửa sổ này" href="javascript:;" onclick="window.close()">Đóng cửa sổ này</a></li>
		</ul>
		<div class="clear"></div>
		<div id="hometext">
		</div>
				<div class="imghome">
			<img alt="Cách ép xung Raspberry Pi 4" src="https://st.quantrimang.com/photos/image/2020/03/18/ep-xung-raspberry-pi-4-3.jpg" width="460" class="img-thumbnail" />
		</div>
		<div class="clear"></div>
		<div id="bodytext" class="clearfix">
			<p style="text-align: justify;">Được bán lẻ với mức giá khoảng $40 (920.000VND),&nbsp;Raspberry Pi 4&nbsp;đã mang lại rất nhiều lợi ích, nhưng bạn có thể tận dụng được nhiều hơn từ chiếc máy tính đơn bo mạnh mẽ này bằng cách ép xung nó.</p>

<p style="text-align: justify;">Việc ép xung CPU và GPU thường có thể mang lại hiệu suất tăng đáng chú ý, đặc biệt hữu ích nếu bạn thực hiện các tác vụ tốn nhiều tài nguyên, như chơi game, stream nội dung media có độ phân giải cao hoặc sử dụng Raspberry Pi làm máy tính xách tay mini.</p>

<div style="text-align: justify;">&nbsp;</div>

<h2 style="text-align: justify;">Mọi thứ cần biết về việc ép xung</h2>

<p style="text-align: justify;">Ép xung có nghĩa là thiết lập CPU và bộ nhớ chạy ở tốc độ cao hơn cấp tốc độ chính thức của chúng.</p>

<p style="text-align: justify;">Mặc dù có lợi ích về hiệu suất, nhiều người tránh ép xung vì sợ làm mất hiệu lực bảo hành. Không giống như một số tổ chức, Raspberry Pi Foundation hỗ trợ ép xung, vì vậy bạn có thể làm theo hướng dẫn này mà không phải lo lắng về vấn đề bảo hành. Tuy nhiên, bạn cũng nên xem xét kỹ hướng dẫn của Raspberry Pi Foundation Foundation để đảm bảo bạn không vô tình làm mất hiệu lực bảo hành!</p>

<h2 style="text-align: justify;">Những thứ cần chuẩn bị</h2>

<p style="text-align: justify;">Để hoàn thành hướng dẫn này, bạn sẽ cần:</p>

<ul>
	<li style="text-align: justify;">Raspberry Pi 4</li>
	<li style="text-align: justify;">Bàn phím và cách để gắn bàn phím này vào Raspberry Pi</li>
	<li style="text-align: justify;">Màn hình</li>
	<li style="text-align: justify;">Cáp micro HDMI</li>
	<li style="text-align: justify;">Thẻ SD tương thích với model Raspberry Pi. Bạn sẽ xóa sạch thẻ SD này, vì vậy hãy chắc chắn rằng nó không chứa bất cứ thứ gì bạn muốn giữ.</li>
	<li style="text-align: justify;">Một bộ nguồn chất lượng tốt. Nếu bạn sẽ ép xung Raspberry Pi, thì bạn nên chọn Raspberry Pi Universal Power Supply chính thức. Bằng cách sử dụng nguồn điện chính thức, bạn có thể tự tin rằng Raspberry Pi của mình đủ năng lượng để chạy ở tốc độ ép xung.
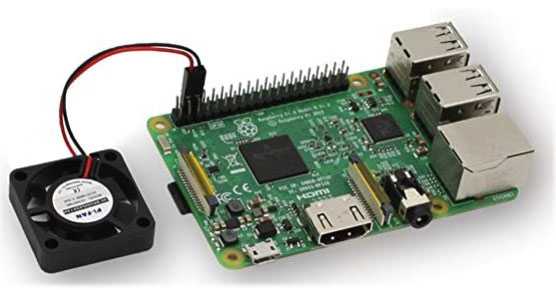
</li>
</ul>

<figure>
<div style="text-align: justify;"><img alt="Bạn nên chọn Raspberry Pi Universal Power Supply chính thức" data-i="0" data-src="https://st.quantrimang.com/photos/image/2020/03/18/ep-xung-raspberry-pi-4-1.jpg" data-was-processed="true" height="375" src="https://st.quantrimang.com/photos/image/2020/03/18/ep-xung-raspberry-pi-4-1.jpg" width="556" /></div>

<figcaption>
<div style="text-align: justify;">Bạn nên chọn Raspberry Pi Universal Power Supply chính thức</div>
</figcaption>
</figure>

<ul>
	<li style="text-align: justify;">Một cách để&nbsp;làm mát Raspberry Pi. Khi bộ xử lý làm việc “nặng” hơn, nó sẽ nóng hơn. Nếu không giảm nhiệt do Raspberry Pi tạo ra, bạn sẽ không giành được lợi ích của việc ép xung. Có nhiều lựa chọn khác nhau để làm mát Raspberry Pi, bao gồm tản nhiệt, quạt độc lập hoặc vỏ có quạt, hoặc thậm chí bạn có thể muốn phiêu lưu và tự tạo thiết lập làm mát bằng nước của riêng mình!</li>
</ul>

<figure>
<div style="text-align: justify;"><img alt="Thiết bị làm mát Raspberry Pi" data-i="1" data-src="https://st.quantrimang.com/photos/image/2020/03/18/ep-xung-raspberry-pi-4-2.jpg" data-was-processed="true" height="290" src="https://st.quantrimang.com/photos/image/2020/03/18/ep-xung-raspberry-pi-4-2.jpg" width="556" /></div>

<figcaption>
<div style="text-align: justify;">Thiết bị làm mát Raspberry Pi</div>
</figcaption>
</figure>

<h2 style="text-align: justify;">Cài đặt hệ điều hành Raspberry Pi&nbsp;chính thức</h2>

<p style="text-align: justify;">Với mục đích của hướng dẫn này, ta sẽ ghi hệ điều hành Raspbian vào thẻ SD, sử dụng Etcher. Nếu bạn không cài đặt Etcher, thì bạn có thể tải xuống miễn phí từ trang web của Balena.</p>

<ul>
	<li style="text-align: justify;">Truy cập trang web Raspbian:&nbsp;<strong><span style="color:rgb(192, 57, 43);">https://www.raspberrypi.org/downloads/raspbian/&nbsp;</span></strong>và tải xuống phiên bản mới nhất.</li>
	<li style="text-align: justify;">Lắp thẻ SD vào laptop hoặc máy tính.</li>
	<li style="text-align: justify;">
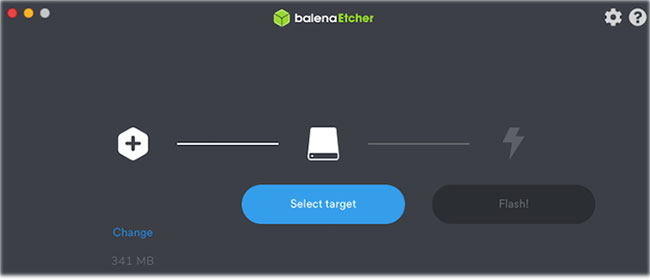
Khởi chạy ứng dụng Etcher.</li>
	<li style="text-align: justify;">Trong Etcher, nhấp vào&nbsp;<strong>Select image</strong>&nbsp;và sau đó chọn image hệ thống Raspbian bạn vừa tải xuống.</li>
</ul>

<figure>
<div style="text-align: justify;"><img alt="Chọn image hệ thống Raspbian bạn vừa tải xuống" data-i="2" data-src="https://st.quantrimang.com/photos/image/2020/03/18/ep-xung-raspberry-pi-4-3.jpg" data-was-processed="true" height="280" src="https://st.quantrimang.com/photos/image/2020/03/18/ep-xung-raspberry-pi-4-3.jpg" width="650" /></div>

<figcaption>
<div style="text-align: justify;">Chọn image hệ thống Raspbian bạn vừa tải xuống</div>
</figcaption>
</figure>

<ul>
	<li style="text-align: justify;">Nhấp vào&nbsp;<strong>Select target</strong>&nbsp;và chọn phương tiện khởi động mục tiêu, trong trường hợp này là thẻ SD.</li>
</ul>

<p style="text-align: justify;">Bây giờ, Etcher sẽ flash image hệ thống Raspbian vào thẻ SD.</p>

<h2 style="text-align: justify;">Khởi động vào Raspbian</h2>

<p style="text-align: justify;">Khi Raspbian được cài đặt:</p>

<ul>
	<li style="text-align: justify;">Tháo thẻ SD khỏi máy tính và lắp thẻ vào Raspberry Pi.</li>
	<li style="text-align: justify;">Gắn màn hình vào Raspberry Pi bằng cáp micro HDMI.</li>
	<li style="text-align: justify;">Gắn bàn phím vào thiết bị Raspberry Pi.</li>
	<li style="text-align: justify;">Cắm Raspberry Pi vào nguồn điện.</li>
	<li style="text-align: justify;">Raspbian bây giờ sẽ tự động khởi động.</li>
</ul>

<div style="text-align: justify;">&nbsp;</div>

<h2 style="text-align: justify;">Xem xét cập nhật lên bản phát hành mới nhất</h2>

<p style="text-align: justify;">Nếu muốn trải nghiệm khả năng ép xung tốt nhất, thì bạn sẽ cần nâng cấp Raspbian lên bản dựng firmware thử nghiệm mới nhất. Lưu ý rằng các bản phát hành thử nghiệm có khả năng chứa lỗi, sai sót và nhiều vấn đề khác, vì vậy bạn không nên sử dụng chúng trong môi trường sản xuất.</p>

<p style="text-align: justify;">&nbsp;</p>

<h2 style="text-align: justify;">Benchmark Raspberry Pi</h2>

<p style="text-align: justify;">Trước khi bạn ép xung thiết bị, bạn có thể muốn ghi lại một số thông tin về hiệu suất hiện tại của thiết bị để so sánh sau!</p>

<p style="text-align: justify;">Có rất nhiều công cụ benchmark trên thị trường, nhưng bài viết sẽ sử dụng&nbsp;<strong>Sysbench.</strong></p>

<p style="text-align: justify;">Ngoài ra, bạn có thể bỏ qua bước này hoàn toàn và chuyển thẳng sang ép xung.</p>

<p style="text-align: justify;">Trong thanh công cụ Raspbian, hãy chọn biểu tượng Terminal. Nhập lệnh sau vào Terminal:</p>

<pre id="pre0">
<code>sudo apt-get install sysbench</code></pre>

<p style="text-align: justify;">Khi Sysbench được cài đặt, bạn có thể nhận được những thông tin cơ bản về hiệu suất của Raspberry Pi, bằng cách nhập lệnh sau vào Terminal:</p>

<pre id="pre1">
<code>sysbench --test=cpu --cpu-max-prime=2000 --num-threads=4 run &gt; pre-benchmark.txt</code></pre>

<p style="text-align: justify;">Lệnh này sẽ tạo ra một file văn bản&nbsp;<strong>“pre-benchmark”</strong>&nbsp;có chứa thông tin về hiệu suất hiện tại của Raspberry Pi.</p>

<h2 style="text-align: justify;">Ép xung CPU</h2>

<p style="text-align: justify;">Khi ép xung CPU, bạn sẽ tăng tốc độ xung nhịp của bộ xử lý trung tâm, giúp tăng hiệu suất. Hầu hết khối lượng công việc trên Raspberry Pi bị ảnh hưởng bởi tốc độ xung nhịp thay vì đơn vị xử lý đồ họa. Sau khi ép xung CPU, bạn sẽ trải nghiệm sự cải thiện hiệu năng rõ rệt, bất kể sử dụng Raspberry Pi như thế nào.</p>

<p style="text-align: justify;">Để chỉnh sửa file config.txt của Raspberry Pi, hãy chạy lệnh Terminal sau:</p>

<pre id="pre2">
<code>sudo nano /boot/config.txt</code></pre>

<p style="text-align: justify;">Bây giờ, file&nbsp;<strong>config.txt</strong>&nbsp;sẽ mở trong trình soạn thảo văn bản Nano của Raspbian với các quyền root.</p>

<p style="text-align: justify;">Bạn có thể ép xung CPU bằng cách thực hiện một số thay đổi đối với các cài đặt cấu hình lõi này:</p>

<p style="text-align: justify;">1. Di chuyển xuống dưới cùng của file và tìm phần được đánh dấu&nbsp;<strong>&#91;pi4&#93;.</strong></p>

<p style="text-align: justify;">2. Trên một dòng mới ngay bên dưới&nbsp;<strong>&#91;pi4&#93;</strong>, thêm thông tin sau:</p>

<pre id="pre3">
<code>over_voltage=2arm_freq=1750</code></pre>

<p style="text-align: justify;">Ngoài ra, nếu bạn đã cài đặt phần mềm thử nghiệm mới nhất, thì bạn có thể thử các giá trị này thay thế:</p>

<pre id="pre4">
<code>over_voltage=6arm_freq=2147</code></pre>

<p style="text-align: justify;">3. Lưu các thay đổi bằng&nbsp;<code>Ctrl</code>+<code>O</code>&nbsp;và thoát file bằng phím tắt&nbsp;<code>Ctrl</code>+<code>X</code>.</p>

<p style="text-align: justify;">Bạn cần phải khởi động lại Raspberry Pi 4 trước khi các cài đặt cấu hình mới này được load, vì vậy hãy chạy lệnh sau trong cửa sổ Terminal:</p>

<pre id="pre5">
<code>sudo reboot</code></pre>

<p style="text-align: justify;">Nếu việc ép xung thành công, thì Raspbian sẽ bắt đầu sử dụng các cài đặt cấu hình mới.</p>

<h2 style="text-align: justify;">Kiểm tra kết quả!</h2>

<p style="text-align: justify;">Nếu bạn đã dành thời gian để tạo báo cáo trước khi ép xung, thì bây giờ là lúc để tạo báo cáo thứ hai và so sánh kết quả.</p>

<p style="text-align: justify;">Khởi chạy một cửa sổ Terminal bằng cách nhấp vào biểu tượng nhỏ trên thanh công cụ, sau đó chạy lệnh sau:</p>

<pre id="pre6">
<code>sysbench --test=cpu --cpu-max-prime=2000 --num-threads=4 run &gt; post-benchmark.txt</code></pre>

<p style="text-align: justify;">Điều này sẽ tạo ra một báo cáo&nbsp;<strong>“post-benchmark”.</strong>&nbsp;Để xem các báo cáo, hãy chọn biểu tượng file trong thanh công cụ Raspbian và mở các file&nbsp;<strong>“pre-benchmark”</strong>&nbsp;và&nbsp;<strong>“post-benchmark”.</strong>&nbsp;Bây giờ, bạn có thể so sánh các báo cáo này để xem chính xác mức tăng CPU đã đạt được!</p>

<h2 style="text-align: justify;">Ép xung GPU</h2>

<p style="text-align: justify;">Bây giờ, hãy để chuyển sang GPU:</p>

<p style="text-align: justify;">1. Mở Terminal và chạy lệnh sau:</p>

<pre id="pre7">
<code>sudo nano /boot/config.txt</code></pre>

<p style="text-align: justify;">2. Di chuyển đến phần&nbsp;<strong>&#91;pi4&#93;</strong>&nbsp;và thêm phần sau vào dòng mới:</p>

<pre id="pre8">
<code>gpu_freq=600</code></pre>

<p style="text-align: justify;">Nếu có firmware thử nghiệm mới nhất, thì bạn có thể thử tăng số này lên&nbsp;<strong>750.</strong></p>

<pre id="pre9">
<code>gpu_freq=750</code></pre>

<p style="text-align: justify;">3. Nếu bạn ép xung cả CPU và GPU, hãy tìm dòng&nbsp;<code>over_voltage=2</code>&nbsp;và thay đổi nó thành:</p>

<pre id="pre10">
<code>over_voltage=6</code></pre>

<p style="text-align: justify;">4. Lưu các thay đổi bằng phím tắt&nbsp;<code>Ctrl</code>+<code>O</code>&nbsp;và thoát khỏi ứng dụng Nano bằng phím tắt&nbsp;<code>Ctrl</code>+<code>X</code>.</p>

<p style="text-align: justify;">Bây giờ, tất cả những gì bạn cần làm là khởi động lại Raspberry Pi và những thay đổi sẽ có hiệu lực!</p>
		</div>
				<div id="author">
						<p>
				<strong>Nguồn tin:</strong>
				Quantrimang.com
			</p>
		</div>
	</div>
	<div id="footer" class="clearfix">
		<div id="url">
			<strong>URL của bản tin này: </strong><a href="https://www.nguoicodonvn2008.info/vi/news/savefile/kien-thuc-may-tinh/cach-ep-xung-raspberry-pi-4-1861.html" title="Cách ép xung Raspberry Pi 4">https://www.nguoicodonvn2008.info/vi/news/savefile/kien-thuc-may-tinh/cach-ep-xung-raspberry-pi-4-1861.html</a>

		</div>
		<div class="clear"></div>
		<div class="copyright">
			&copy; .&#x3A; Nguoicodonvn2008.info - Cõi lòng người cô đơn &#x3A;.
		</div>
		<div id="contact">
			<a href="mailto:admin@nguoicodonvn2008.info">admin@nguoicodonvn2008.info</a>
		</div>
	</div>
</div>
        <div id="timeoutsess" class="chromeframe">
            Bạn đã không sử dụng Site, <a onclick="timeoutsesscancel();" href="https://www.nguoicodonvn2008.info/#">Bấm vào đây để duy trì trạng thái đăng nhập</a>. Thời gian chờ: <span id="secField"> 60 </span> giây
        </div>
        <div id="openidResult" class="nv-alert" style="display:none"></div>
        <div id="openidBt" data-result="" data-redirect=""></div>
		</script>
		<div class="car-top">
  <span><img src="https://www.nguoicodonvn2008.info/themes/default/images/car.png" alt=""></span>
</div>
<script src="https://www.nguoicodonvn2008.info/assets/js/jquery/jquery.min.js"></script>
<script>var nv_base_siteurl="/",nv_lang_data="vi",nv_lang_interface="vi",nv_name_variable="nv",nv_fc_variable="op",nv_lang_variable="language",nv_module_name="news",nv_func_name="savefile",nv_is_user=0, nv_my_ofs=-4,nv_my_abbr="EDT",nv_cookie_prefix="nv4c_e856T",nv_check_pass_mstime=1738000,nv_area_admin=0,nv_safemode=0,theme_responsive=0,nv_recaptcha_ver=2,nv_recaptcha_sitekey="",nv_recaptcha_type="image",XSSsanitize=1;</script>
<script src="https://www.nguoicodonvn2008.info/assets/js/language/vi.js"></script>
<script src="https://www.nguoicodonvn2008.info/assets/js/DOMPurify/purify3.js"></script>
<script src="https://www.nguoicodonvn2008.info/assets/js/global.js"></script>
<script src="https://www.nguoicodonvn2008.info/assets/js/site.js"></script>
<script src="https://www.nguoicodonvn2008.info/themes/default/js/news.js"></script>
<script src="https://www.nguoicodonvn2008.info/themes/default/js/main.js"></script>
<script src="https://www.nguoicodonvn2008.info/themes/default/js/custom.js"></script>
<script type="application/ld+json">
        {
            "@context": "https://schema.org",
            "@type": "Organization",
            "url": "https://www.nguoicodonvn2008.info",
            "logo": "https://www.nguoicodonvn2008.info/uploads/angel.gif"
        }
        </script>
<script src="https://www.nguoicodonvn2008.info/themes/default/js/bootstrap.min.js"></script>
<script type="text/javascript">
var $scrolltop = $('.car-top');
$scrolltop.on('click', function () {
    $('html,body').animate({
        scrollTop: 0
    }, 800);
    $(this).addClass("car-run");
    setTimeout(function(){ $scrolltop.removeClass('car-run');}, 1000);
    return false;
});
$(window).on('scroll', function ()
{ 
    if($(window).scrollTop() >= 200)
    {
        $scrolltop.addClass("show");
        $scrolltop.addClass("car-down");
    }
    else
    {
       $scrolltop.removeClass("show");
       setTimeout(function(){ $scrolltop.removeClass('car-down');}, 300);
    }
});
</script>
</body>
</html>