<!DOCTYPE html>
    <html lang="vi" xmlns="http://www.w3.org/1999/xhtml" prefix="og: http://ogp.me/ns#">
    <head>
<title>Cách di chuyển thư mục người dùng trên Windows 10</title>
<meta name="description" content="Cách di chuyển thư mục người dùng trên Windows 10 - Savefile - Tin Tức -...">
<meta name="author" content=".: Nguoicodonvn2008.info - Cõi lòng người cô đơn :.">
<meta name="copyright" content=".: Nguoicodonvn2008.info - Cõi lòng người cô đơn :. [admin@nguoicodonvn2008.info]">
<meta name="robots" content="index, archive, follow, noodp">
<meta name="googlebot" content="index,archive,follow,noodp">
<meta name="msnbot" content="all,index,follow">
<meta name="generator" content="NukeViet v4.5">
<meta http-equiv="Content-Type" content="text/html; charset=utf-8">
<meta property="og:title" content="Cách di chuyển thư mục người dùng trên Windows 10">
<meta property="og:type" content="website">
<meta property="og:description" content="Savefile - Tin Tức - https&#x3A;&#x002F;&#x002F;www.nguoicodonvn2008.info&#x002F;vi&#x002F;news&#x002F;savefile&#x002F;kien-thuc-may-tinh&#x002F;cach-di-chuyen-thu-muc-nguoi-dung-tren-windows-10-644.html">
<meta property="og:site_name" content=".&#x3A; Nguoicodonvn2008.info - Cõi lòng người cô đơn &#x3A;.">
<meta property="og:url" content="https://www.nguoicodonvn2008.info/vi/news/savefile/kien-thuc-may-tinh/cach-di-chuyen-thu-muc-nguoi-dung-tren-windows-10-644.html">
<link rel="shortcut icon" href="https://www.nguoicodonvn2008.info/favicon.ico">
<link rel="canonical" href="https://www.nguoicodonvn2008.info/vi/news/savefile/kien-thuc-may-tinh/cach-di-chuyen-thu-muc-nguoi-dung-tren-windows-10-644.html">
<link rel="alternate" href="https://www.nguoicodonvn2008.info/vi/news/rss/" title="Tin Tức" type="application/rss+xml">
<link rel="alternate" href="https://www.nguoicodonvn2008.info/vi/news/rss/karaoke-dual/" title="Tin Tức - Karaoke Dual" type="application/rss+xml">
<link rel="alternate" href="https://www.nguoicodonvn2008.info/vi/news/rss/nhac-tre/" title="Tin Tức - Nhạc trẻ" type="application/rss+xml">
<link rel="alternate" href="https://www.nguoicodonvn2008.info/vi/news/rss/tru-tinh/" title="Tin Tức - Trữ tình" type="application/rss+xml">
<link rel="alternate" href="https://www.nguoicodonvn2008.info/vi/news/rss/nuoc-ngoai/" title="Tin Tức - Nước ngoài" type="application/rss+xml">
<link rel="alternate" href="https://www.nguoicodonvn2008.info/vi/news/rss/remix/" title="Tin Tức - Remix" type="application/rss+xml">
<link rel="alternate" href="https://www.nguoicodonvn2008.info/vi/news/rss/tam-su-tinh-yeu/" title="Tin Tức - Tâm sự tình yêu" type="application/rss+xml">
<link rel="alternate" href="https://www.nguoicodonvn2008.info/vi/news/rss/tho-suu-tam/" title="Tin Tức - Thơ sưu tầm" type="application/rss+xml">
<link rel="alternate" href="https://www.nguoicodonvn2008.info/vi/news/rss/cuoc-song/" title="Tin Tức - Cuộc sống" type="application/rss+xml">
<link rel="alternate" href="https://www.nguoicodonvn2008.info/vi/news/rss/phan-mem/" title="Tin Tức - Phần mềm" type="application/rss+xml">
<link rel="alternate" href="https://www.nguoicodonvn2008.info/vi/news/rss/kien-thuc-may-tinh/" title="Tin Tức - Kiến thức máy tính" type="application/rss+xml">
<link rel="alternate" href="https://www.nguoicodonvn2008.info/vi/news/rss/hoc-tap/" title="Tin Tức - Học tập" type="application/rss+xml">
<link rel="alternate" href="https://www.nguoicodonvn2008.info/vi/news/rss/tai-lieu/" title="Tin Tức - Tài liệu" type="application/rss+xml">
<link rel="alternate" href="https://www.nguoicodonvn2008.info/vi/news/rss/de-thi/" title="Tin Tức - Đề thi" type="application/rss+xml">
<link rel="preload" as="style" href="https://www.nguoicodonvn2008.info/assets/css/font-awesome.min.css" type="text/css">
<link rel="preload" as="style" href="https://www.nguoicodonvn2008.info/themes/default/css/bootstrap.non-responsive.css" type="text/css">
<link rel="preload" as="style" href="https://www.nguoicodonvn2008.info/themes/default/css/style.css" type="text/css">
<link rel="preload" as="style" href="https://www.nguoicodonvn2008.info/themes/default/css/style.non-responsive.css" type="text/css">
<link rel="preload" as="style" href="https://www.nguoicodonvn2008.info/themes/default/css/news.css" type="text/css">
<link rel="preload" as="style" href="https://www.nguoicodonvn2008.info/themes/default/css/custom.css" type="text/css">
<link rel="preload" as="script" href="https://www.nguoicodonvn2008.info/assets/js/jquery/jquery.min.js" type="text/javascript">
<link rel="preload" as="script" href="https://www.nguoicodonvn2008.info/assets/js/language/vi.js" type="text/javascript">
<link rel="preload" as="script" href="https://www.nguoicodonvn2008.info/assets/js/DOMPurify/purify3.js" type="text/javascript">
<link rel="preload" as="script" href="https://www.nguoicodonvn2008.info/assets/js/global.js" type="text/javascript">
<link rel="preload" as="script" href="https://www.nguoicodonvn2008.info/assets/js/site.js" type="text/javascript">
<link rel="preload" as="script" href="https://www.nguoicodonvn2008.info/themes/default/js/news.js" type="text/javascript">
<link rel="preload" as="script" href="https://www.nguoicodonvn2008.info/themes/default/js/main.js" type="text/javascript">
<link rel="preload" as="script" href="https://www.nguoicodonvn2008.info/themes/default/js/custom.js" type="text/javascript">
<link rel="preload" as="script" href="https://www.nguoicodonvn2008.info/themes/default/js/bootstrap.min.js" type="text/javascript">
<link rel="stylesheet" href="https://www.nguoicodonvn2008.info/assets/css/font-awesome.min.css">
<link rel="stylesheet" href="https://www.nguoicodonvn2008.info/themes/default/css/bootstrap.non-responsive.css">
<link rel="stylesheet" href="https://www.nguoicodonvn2008.info/themes/default/css/style.css">
<link rel="stylesheet" href="https://www.nguoicodonvn2008.info/themes/default/css/style.non-responsive.css">
<link rel="StyleSheet" href="https://www.nguoicodonvn2008.info/themes/default/css/news.css">
<link rel="stylesheet" href="https://www.nguoicodonvn2008.info/themes/default/css/custom.css">
<style type="text/css">
	body{background: #fff;}
</style>
    </head>
    <body>
<div id="print">
	<div id="hd_print">
		<h2 class="pull-left">.&#x3A; Nguoicodonvn2008.info - Cõi lòng người cô đơn &#x3A;.</h2>
		<p class="pull-right"><a title=".&#x3A; Nguoicodonvn2008.info - Cõi lòng người cô đơn &#x3A;." href="https://www.nguoicodonvn2008.info/">https://www.nguoicodonvn2008.info</a></p>
	</div>
	<div class="clear"></div>
	<hr />
	<div id="content">
		<h1>Cách di chuyển thư mục người dùng trên Windows 10</h1>
		<ul class="list-inline">
			<li>Thứ sáu - 02/08/2019 07:19</li>
			<li class="hidden-print txtrequired"><em class="fa fa-print">&nbsp;</em><a title="In ra" href="javascript:;" onclick="window.print()">In ra</a></li>
			<li class="hidden-print txtrequired"><em class="fa fa-power-off">&nbsp;</em><a title="Đóng cửa sổ này" href="javascript:;" onclick="window.close()">Đóng cửa sổ này</a></li>
		</ul>
		<div class="clear"></div>
		<div id="hometext">
		</div>
				<div class="imghome">
			<img alt="Cách di chuyển thư mục người dùng trên Windows 10" src="https://st.quantrimang.com/photos/image/2019/08/02/di-chuyen-thu-muc-nguoi-dung-1.png" width="460" class="img-thumbnail" />
		</div>
		<div class="clear"></div>
		<div id="bodytext" class="clearfix">
			<p style="text-align: justify;">Bài viết này sẽ hướng dẫn các bạn cách di chuyển thư mục&nbsp;<strong>Users</strong>&nbsp;chính gồm tất cả profile và thư mục người dùng trong khi cài đặt mới Windows, chưa có bất cứ tài khoản người dùng nào cũng như trên Windows được cài đặt trước, đã có tài khoản trên hệ thống.</p>

<p>Ưu điểm của phương pháp này là nó thay đổi giá trị của một trong các biến môi trường (environment variable) bên trong Windows 10. Việc thay đổi biến liên quan đến tất cả các profile người dùng, xác định chúng khi tạo ổ đĩa hoặc phân vùng được chọn.</p>

<p>Khi Windows 10 được cài đặt, 5 hoặc 6 thư mục hệ thống được tạo tùy thuộc vào phiên bản bit được chọn:</p>

<ul>
	<li><strong>PerfLogs&nbsp;</strong>(Performance Logs): nơi Windows lưu trữ nhật ký hiệu suất và độ tin cậy.</li>
	<li><strong>Program Files</strong>: nơi các ứng dụng và phần mềm được cài đặt. Windows x86 (32 bit) lưu trữ tất cả các ứng dụng tại đây, Windows x64 (64 bit) chỉ lưu các ứng dụng 64 bit gốc.</li>
	<li><strong>Program Files (x86)</strong>&nbsp;chỉ có trên Windows x64, tất cả các ứng dụng không phải x64 sẽ được lưu ở đây.</li>
	<li><strong>Windows</strong>: chứa các file và driver hệ điều hành.</li>
	<li><strong>ProgramData</strong>: một số ứng dụng chứa cài đặt ứng dụng, người dùng cụ thể, file cấu hình.&nbsp;</li>
	<li><strong>Users</strong>: Đây là “nhà” của tất cả profile người dùng. Khi&nbsp;tạo tài khoản người dùng mớivà khi đăng nhập lần đầu, Windows tạo một bộ thư mục người dùng cụ thể (Users\Username).</li>
</ul>

<p>Microsoft không khuyến nghị người dùng di chuyển thư mục&nbsp;<strong>ProgramData, Program Files, Program Files (x86)</strong>&nbsp;và&nbsp;<strong>Windows</strong>. Tùy thuộc vào thông tin, dữ liệu được lưu trữ trên thư mục này và việc di chuyển chúng có thể gây ra vấn đề nghiêm trọng. Tuy nhiên, không có vấn đề gì khi chúng ta di chuyển thư mục&nbsp;<strong>Users</strong>&nbsp;và những dữ liệu chứa trong đó gồm cả thư mục&nbsp;<strong>Temp</strong>&nbsp;và&nbsp;<strong>AppData</strong>. Bài viết sẽ hướng dẫn bạn cách di chuyển thư mục&nbsp;<strong>Users</strong>&nbsp;bằng cách thay đổi biến môi trường Windows bên trong.</p>

<p>Di chuyển thư mục&nbsp;<strong>Users</strong>&nbsp;có thể tiết kiệm rất nhiều không gian trên ổ đĩa hệ thống. Ảnh, video, tài liệu, v.v… chứa trong thư mục này làm tăng thư mục con lên đến hàng chục và dung lượng đôi khi lên đến hàng trăm GB.</p>

<p>Khi cài đặt Windows, nếu sử dụng chế độ Audit Mode để di chuyển thư mục&nbsp;<strong>Users</strong>, ổ đĩa hệ thống chỉ lưu Windows và ứng dụng.</p>

<p>Lưu ý, bạn chỉ có thể di chuyển thư mục Users sang ổ HDD hoặc&nbsp;SSD&nbsp;trong.</p>

<h2 id="mcetoc_1dh8scnn20">1. Di chuyển thư mục người dùng trong khi cài đặt hệ điều hành</h2>

<h3 id="mcetoc_1dh8scnn21">Bước 1. Cài đặt Windows 10</h3>

<p>Để cài đặt mới Windows 10, xem hướng dẫn&nbsp;Cách cài đặt Windows 10 từ USB bằng file ISO.&nbsp;Nếu không có phương tiện cài đặt Windows 10,&nbsp;tải file ISO Windows 10:&nbsp;<br  />
<strong><span style="background-color:rgb(192, 57, 43);">quantrimang.com/da-co-cach-tai-file-iso-cua-windows-10-tu-microsoft-116913</span></strong></p>

<p>Vì một số lý do, đôi khi không thể thực hiện&nbsp;Sysprep&nbsp;khi Windows được cài đặt với kết nối mạng. Bạn có thể&nbsp;cài đặt Windows ngoại tuyến, chỉ kết nối Windows với mạng khi truy cập vào chế độ Audit Mode.
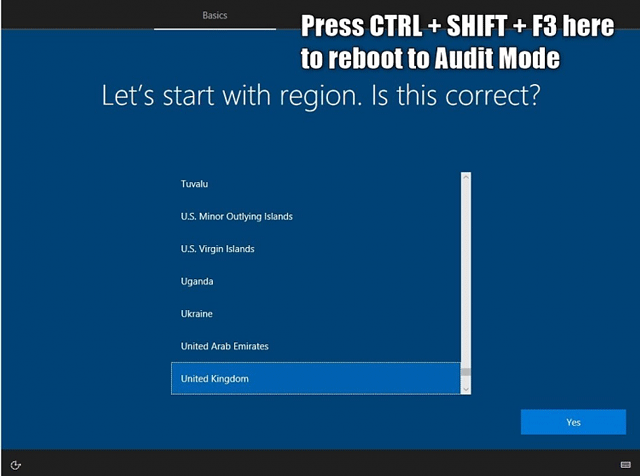
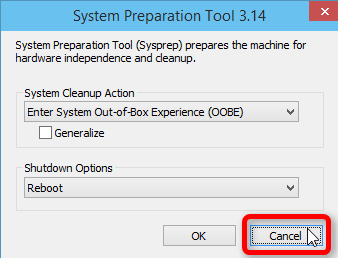
</p>
&nbsp;

<p>Khi cài đặt đến màn hình&nbsp;<strong>Region Selection</strong>, nhấn&nbsp;<code>Ctrl</code>+<code>Shift</code>+<code>F3</code>.&nbsp;</p>

<p><img alt="Truy cập vào chế độ Audit Mode" data-i="0" height="476" src="https://st.quantrimang.com/photos/image/2019/08/02/di-chuyen-thu-muc-nguoi-dung-1.png" width="640" /></p>

<p>Bây giờ, Windows sẽ khởi động lại vào chế độ Audit Mode sử dụng tài khoản quản trị tích hợp. Khi Windows Desktop hiện ra, bạn sẽ thấy hộp thoại&nbsp;<strong>System Preparation Tool</strong>&nbsp;ở giữa màn hình. Đóng nó bằng cách nhấn nút&nbsp;<strong>Cancel</strong>.</p>

<p><img alt="Click vào Cancel " data-i="1" height="258" src="https://st.quantrimang.com/photos/image/2019/08/02/di-chuyen-thu-muc-nguoi-dung-2.png" width="338" /></p>

<h3 id="mcetoc_1dh8scnn22">Bước 2. Tạo file unattended answer</h3>

<p>Nếu cài đặt Windows không có kết nối Internet, bạn có thể kết nối lại Internet bây giờ.&nbsp;</p>

<p>Quá trình di chuyển sẽ được thực hiện với công cụ Windows 10 gốc được gọi là System Preparation Tool (Sysprep). Sysprep cần hướng dẫn và hướng dẫn này chứa trong file script XML, file unattended answer.</p>

<p>Trong ví dụ này, chúng ta cần một file answer đơn giản chứa hai thông tin quan trọng hướng dẫn cho Sysprep:</p>

<ul>
	<li>Phiên bản bit của Windows (<a href="https://quantrimang.com/khac-biet-giua-windows-32bit-va-64bit-67517" title="Khác biệt giữa Windows 32-bit và 64-bit?">32 bit hoặc 64 bit</a>)</li>
	<li>Vị trí mới của thư mục&nbsp;<strong>Users</strong>&nbsp;(Ví dụ: D:\Users thay cho C:\Users).</li>
</ul>

<p>Mở Notepad, dán code sau vào file mới.</p>

<pre id="pre0">
<code>&lt;?xml version=&quot;1.0&quot; encoding=&quot;utf-8&quot;?&gt;
 &lt;unattend xmlns=&quot;urn:schemas-microsoft-com:unattend&quot;&gt;
 &lt;settings pass=&quot;oobeSystem&quot;&gt;
 &lt;component name=&quot;Microsoft-Windows-Shell-Setup&quot; processorArchitecture=&quot;amd64&quot; publicKeyToken=&quot;31bf3856ad364e35&quot; language=&quot;neutral&quot; versionScope=&quot;nonSxS&quot; xmlns:wcm=&quot;http://schemas.microsoft.com/WMIConfig/2002/State&quot; xmlns:xsi=&quot;http://www.w3.org/2001/XMLSchema-instance&quot;&gt;
 &lt;FolderLocations&gt;
 &lt;ProfilesDirectory&gt;D:\Users&lt;/ProfilesDirectory&gt;
 &lt;/FolderLocations&gt;
 &lt;/component&gt;
 &lt;/settings&gt;
 &lt;/unattend&gt;</code></pre>

<p>Thay đổi thông tin sau nếu cần:</p>

<ul>
	<li>Dòng 4: Giá trị biến&nbsp;<strong>ProcessorArchitecture</strong>&nbsp;phải là&nbsp;<strong>adm64</strong>&nbsp;nếu bạn cài đặt Windows 64 bit trên bộ xử lý Intel hoặc AMD và x86 nếu cài đặt Windows 32 bit.</li>
	<li>Dòng 6: Giá trị trong tag&nbsp;<strong>ProfilesDirectory</strong>&nbsp;là vị trí mới cho thư mục&nbsp;<strong>Users</strong>. Trong ví dụ này là&nbsp;<strong>D:\Users</strong>. Bạn cần đảm bảo ổ đĩa di chuyển thư mục&nbsp;<strong>Users</strong>&nbsp;sang phải trống hoặc ít nhất không chứa bất kỳ thư mục hệ thống Windows nào, đặc biệt là thư mục&nbsp;<strong>Users</strong>&nbsp;hoặc một phần của thư mục đó từ các cài đặt Windows trước hoặc hiện tại.</li>
</ul>

<p><strong>Cảnh báo:</strong>&nbsp;Bạn nên đọc trước khi tiến hành.</p>

<p>Windows thích đặt ký tự ID ổ đĩa như thế này:</p>

<ul>
	<li>Ổ C:&gt;, ổ đĩa hệ thống cài đặt Windows.</li>
	<li>Ổ D:&gt;, ổ đĩa quang đầu tiên (ổ đĩa CD/DVD).</li>
	<li>Ổ E:&gt;, phân vùng thứ hai trên cùng một ổ đĩa C: hoặc trong trường hợp ổ đĩa chỉ có một phân vùng, nó là phân vùng đầu tiên trên ổ đĩa thứ cấp.</li>
</ul>

<p>Bây giờ, khi bạn sử dụng sysprep nói hệ thống di chuyển thư mục&nbsp;<strong>Users</strong>&nbsp;đến một ổ đĩa cụ thể, sau khi khởi động lại, Windows có thể tìm thấy ổ đĩa định chuyển thư mục người dùng này có ký tự ID ổ đĩa khác và ổ D: bạn dự định chuyển thư mục người dùng đó giờ thành E:. Sysprep không thể di chuyển thư mục người dùng và bạn phải cài đặt lại.</p>

<p>Để đảm bảo bạn có thể sử dụng phân vùng đã chọn để di chuyển thư mục&nbsp;<strong>Users</strong>&nbsp;và cần thiết lập ký tự ổ đĩa thủ công trước khi chạy Sysprep. Trong chế độ Audit Mode, bạn có thể thay đổi ký tự thủ công bằng&nbsp;Disk Management.</p>

<p>Ví dụ, để đảm bảo thư mục&nbsp;<strong>Users</strong>&nbsp;chuyển sang ổ D, thực hiện:</p>

<ul>
	<li>Thay đổi ký tự ổ đĩa quang thành chữ cái ở cuối bảng chữ cái, chẳng hạn như W:.&nbsp;</li>
	<li>Thay đổi ký tự ổ đĩa của phân vùng hoặc ổ đĩa bạn định sử dụng cho thư mục&nbsp;<strong>Users</strong>thành D:.&nbsp;</li>
	<li>Nếu phân vùng hoặc ổ đĩa bạn muốn sử dụng đã là ký tự D:, thay đổi nó thành ký tự khác, đóng Disk Management, sau đó mở lại nó và thay đổi lại thành D:.</li>
</ul>

<p>
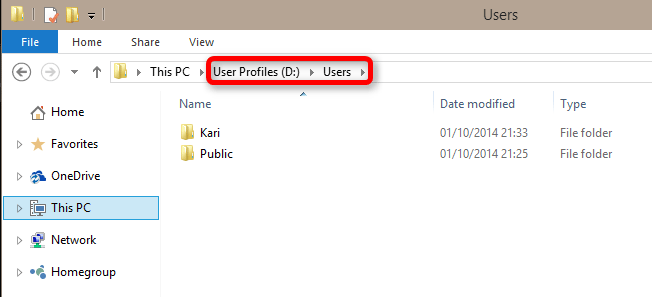
Lưu file dưới dạng file XML vào thư mục gốc của bất kỳ ổ đĩa nào trừ ổ C:. Trong ví dụ này, chúng ta đã đổi tên ổ D: thành User Profiles và lưu file answer vào&nbsp;<strong>D:\relocate.xml</strong>:</p>

<p><img alt="Lưu file vào bất kỳ ổ đĩa nào trừ ổ C" data-i="2" height="469" src="https://st.quantrimang.com/photos/image/2019/08/02/di-chuyen-thu-muc-nguoi-dung-3.png" width="618" /></p>

<h3 id="mcetoc_1dh8scnn23">3. Chạy Sysprep</h3>

<p><a href="https://quantrimang.com/huong-dan-mo-command-prompt-duoi-quyen-admin-tren-windows-8-va-10-119884" title="Cách mở và chạy cmd với quyền Admin trên Windows">Mở Command Prompt với quyền quản trị</a>. Để dừng WMP Network Sharing Service, chạy lệnh sau:</p>

<pre id="pre1">
<code>net stop wmpnetworksvc</code></pre>

<p>Dịch vụ này không được chạy, nếu không Sysprep sẽ không chạy thành công.</p>

<p>Bây giờ chạy lệnh Sysprep bằng cách sao chép lệnh sau vào&nbsp;<a href="https://quantrimang.com/huong-dan-su-dung-command-prompt-85301" title="Hướng dẫn sử dụng Command Prompt">Command Prompt</a>.</p>

<pre id="pre2">
<code>%windir%\system32\sysprep\sysprep.exe /oobe /reboot /unattend:d:\relocate.xml</code></pre>

<p><img alt="Chạy lệnh Sysprep" data-i="3" height="233" src="https://st.quantrimang.com/photos/image/2019/08/02/di-chuyen-thu-muc-nguoi-dung-4.png" width="640" /></p>

<p>
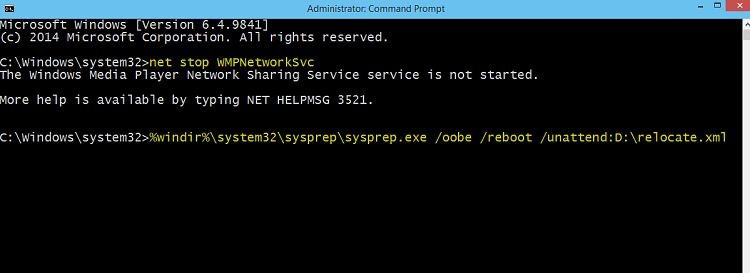
Lệnh trên sẽ nói với hệ thống chạy Sysprep từ thư mục Windows\System32\Sysprep đọc hướng dẫn từ file unattended answer D:\relocate.xml, chuẩn bị máy tính để khởi động OOBE (OOBE: khởi động lần đầu cho Windows cài đặt mới).</p>

<p>Nhấn&nbsp;<strong>Enter</strong>, bạn sẽ thấy Sysprep bắt đầu chạy.</p>

<p><img alt="Sysprep bắt đầu chạy" data-i="4" height="144" src="https://st.quantrimang.com/photos/image/2019/08/02/di-chuyen-thu-muc-nguoi-dung-5.png" width="234" /></p>

<p>
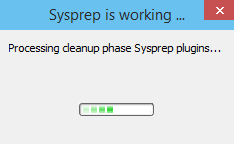
Bây giờ Windows sẽ thực hiện khởi động OOBE First Run và bạn thực hiện tiếp tục các bước để cài đặt Windows. Khi đã cài đặt xong, bạn sẽ thấy thư mục profile chính và tài khoản người dùng của bạn đã được chuyển sang ổ D: (Hoặc bất cứ ổ nào mà bạn chọn).</p>

<p><img alt="Thư mục người dùng đã được chuyển sang ổ khác" data-i="5" height="292" src="https://st.quantrimang.com/photos/image/2019/08/02/di-chuyen-thu-muc-nguoi-dung-6.png" width="640" /></p>

<h2 id="mcetoc_1dh8scnn24">2. Di chuyển thư mục Users trên Windows đã được cài đặt sẵn</h2>

<p><strong>Cảnh báo:&nbsp;</strong>Không nên tiến hành di chuyển trước khi tạo image hệ thống.</p>

<p>Thực hiện chạy Sysprep trên Windows đã được cài đặt trước là khá rủi ro. Các nhà sản xuất có thể có file unattended answer của họ và bỏ qua file unattended answer tùy chỉnh của bạn. Do đó bạn không nên thực hiện chạy Sysprep trên hệ thống Windows được cài đặt trước.</p>

<p>Nếu vẫn quyết định làm và nếu có vấn đề xảy ra, bạn cần khôi phục image hệ thống đã tạo trước khi thực hiện.</p>

<p>Tóm lại, di chuyển thư mục&nbsp;<strong>Users</strong>&nbsp;với Sysprep chỉ nên thực hiện khi cài đặt mới Windows. Nếu thử phương pháp thứ hai di chuyển thư mục người dùng trên bản cài đặt sẵn, có thể bạn phải cài đặt lại hoàn toàn hoặc khôi phục máy tính về trạng thái xuất xưởng.</p>

<p>Dưới đây là video về cách di chuyển thư mục&nbsp;<strong>Users</strong>&nbsp;trên Windows được cài đặt trước.&nbsp;</p>

<p style="text-align: center;"><iframe allowfullscreen="allowfullscreen" frameborder="0" height="315" scrolling="no" src="https://www.youtube.com/embed/OGNqR8lylzk" width="560"></iframe>&nbsp;</p>

<p><strong>Lưu ý</strong>: Với Windows 10 phiên bản 1703 trở lên, bạn không cần phải vô hiệu hóa tài khoản người dùng hiện tại như trong video. Thực tế, khi làm như vậy, bạn có thể bị khóa hoàn toàn khỏi Windows, buộc phải cài đặt lại.</p>

<p>Phiên bản 1703 (build 15063 trở đi), bạn cũng không vô hiệu hóa, hủy kích hoạt tài khoản người dùng hiện có như trong video.</p>

<h3 id="mcetoc_1dh8scnn25">1. Tạo file unattended answer</h3>

<p>Tạo file answer như Bước 2 Cách 1.</p>

<h3 id="mcetoc_1dh8scnn26">2. Chạy Run Sysprep</h3>

<p>Chạy Sysprep như Bước 3 Cách 1.</p>

<h3 id="mcetoc_1dh8scnn27">3. Khởi động OOBE</h3>

<p>Mặc dù bạn đã cài đặt Windows 10 nhưng khởi động OOBE lần đầu luôn chạy, nghĩa là Windows trải qua quá trình thiết lập ban đầu. Bây giờ bạn tiếp tục các bước để cài đặt Windows mới.</p>

<p>Tuy nhiên, có hai điều cần ghi nhớ:
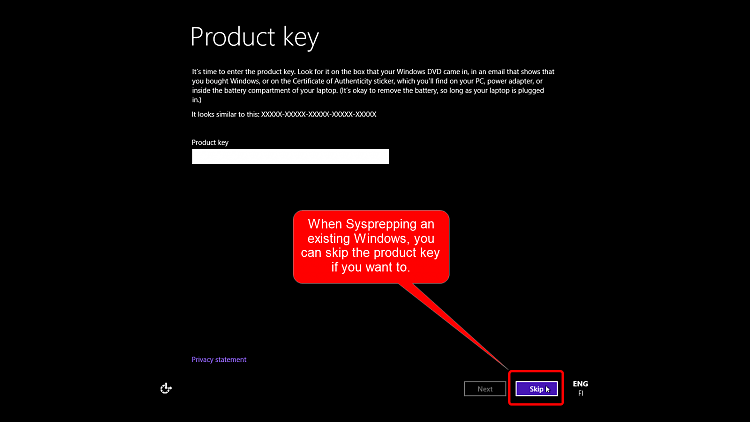
</p>

<ul>
	<li>Bạn không cần phải nhập&nbsp;key phần mềm, ngay cả khi Windows yêu cầu. Việc nhập key phần mềm cũng không gây hại gì nhưng nếu muốn tiết kiệm thời gian, bạn chỉ cần click vào nút&nbsp;<strong>Skip</strong>.</li>
</ul>

<p><img alt="Click vào Skip" data-i="6" height="360" src="https://st.quantrimang.com/photos/image/2019/08/02/di-chuyen-thu-muc-nguoi-dung-7.png" width="640" /></p>

<ul>
	<li>Tài khoản người dùng gốc của bạn không biến mất, mọi thứ vẫn ở đó. Tuy nhiên, khi khởi động OOBE yêu cầu tạo tài khoản người dùng nhưng nếu bạn thử tài khoản đã có, tài khoản cục bộ hoặc&nbsp;<a href="https://quantrimang.com/huong-dan-lap-tai-khoan-microsoft-nhanh-nhat-116973" title="Hướng dẫn tạo tài khoản Microsoft nhanh nhất">tài khoản Microsoft</a>, bạn sẽ nhận được thông báo lỗi như sau:</li>
</ul>

<p><img alt="Thông báo lỗi " data-i="7" height="139" src="https://st.quantrimang.com/photos/image/2019/08/02/di-chuyen-thu-muc-nguoi-dung-8.png" width="640" /></p>

<p>Để khắc phục điều này, chỉ cần thiết lập một tài khoản cục bộ giả. Sau đó, bạn có thể đăng nhập vào tài khoản ban đầu của mình và xóa tài khoản cục bộ giả này.</p>

<h2 id="mcetoc_1dh8scnn28">3. Di chuyển thư mục người dùng trên Windows 10 được nâng cấp từ Windows 7,8 hoặc 8.1</h2>

<p><strong>Lưu ý:</strong></p>

<p>Với build 10586 (TH2 phiên bản 1511) trở đi, không có vấn đề gì việc nâng cấp ngay cả khi thư mục Users đã được di chuyển.</p>

<p>Nếu cập nhật từ Windows 7 mà đã di chuyển thư mục&nbsp;<strong>Users</strong>&nbsp;và thư mục&nbsp;<strong>ProgramData</strong>, bạn phải chuyển&nbsp;<strong>ProgramData</strong>&nbsp;trở lại ổ C: trước khi nâng cấp. Windows 10 không hỗ trợ việc di chuyển ProgramData. Bạn không cần phải chuyển lại thư mục Users nếu không di chuyển thư mục này.</p>

<h3 id="mcetoc_1dh8scnn29">1. Chuyển thư mục Users về ổ C:</h3>

<p>Mở Notepad, dán code sau vào file mới.&nbsp;</p>

<pre id="pre3">
<code>&lt;?xml version=&quot;1.0&quot; encoding=&quot;utf-8&quot;?&gt;
 &lt;unattend xmlns=&quot;urn:schemas-microsoft-com:unattend&quot;&gt;
 &lt;settings pass=&quot;oobeSystem&quot;&gt;
 &lt;component name=&quot;Microsoft-Windows-Shell-Setup&quot; processorArchitecture=&quot;amd64&quot; publicKeyToken=&quot;31bf3856ad364e35&quot; language=&quot;neutral&quot; versionScope=&quot;nonSxS&quot; xmlns:wcm=&quot;http://schemas.microsoft.com/WMIConfig/2002/State&quot; xmlns:xsi=&quot;http://www.w3.org/2001/XMLSchema-instance&quot;&gt;
 &lt;FolderLocations&gt;
 &lt;ProgramData&gt;C:\ProgramData&lt;/ProgramData&gt;
 &lt;/FolderLocations&gt;
 &lt;/component&gt;
 &lt;/settings&gt;
 &lt;/unattend&gt;</code></pre>

<p>Thay đổi các thông tin sau nếu cần:</p>

<ul>
	<li>Giá trị của biến&nbsp;<strong>ProcessorArchitecture</strong>&nbsp;phải là&nbsp;<strong>amd64</strong>&nbsp;nếu cài đặt Windows 64 bit với bộ xử lý Intel hoặc AMD và&nbsp;<strong>x86</strong>&nbsp;trên Windows 32 bit.</li>
</ul>

<p>Lưu file dưới dạng XML vào thư mục gốc của bất kỳ ổ đĩa nào.</p>

<p><img alt="Lưu file XML vào thư mục gốc" data-i="8" height="469" src="https://st.quantrimang.com/photos/image/2019/08/02/di-chuyen-thu-muc-nguoi-dung-9.png" width="618" /></p>

<p>Thực hiện bước 2, 3 như Cách 2 trên.</p>

<h3 id="mcetoc_1dh8scnn2a">2. Chỉnh sửa Registry</h3>

<p>Khi chạy Sysprep trên Windows được nâng cấp, bạn sẽ nhận thông báo lỗi về việc Sysprep không thể xác thực cài đặt Windows, và nó sẽ không chạy. Kiểm tra file nhật ký bạn sẽ tìm thấy nguyên nhân.</p>

<pre id="pre4">
<code>Sysprep will not run on an upgraded OS. You can only run Sysprep on a custom (clean) install version of Windows.</code></pre>

<p>(File nhật ký: C:\Windows\System32\Sysprep\Panther\setupact.log)</p>

<p>
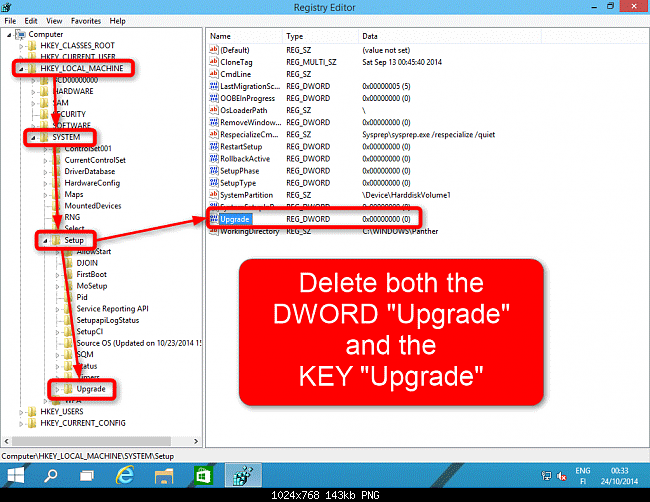
Bạn cần chỉnh sửa registry để đánh lừa Windows nghĩ đây là cài đặt mới thay vì nâng cấp. Để làm điều này,&nbsp;<a href="https://quantrimang.com/cach-mo-registry-editor-tren-windows-143522" title="Cách mở Registry Editor trên Windows">mở Registry Editor</a>&nbsp;(<code>Win</code>+<code>R</code>, gõ&nbsp;<strong>regedit</strong>, nhấn&nbsp;<strong>Enter</strong>), duyệt đến key sau:</p>

<pre id="pre5">
<code>HKEY_LOCAL_MACHINE\SYSTEM\Setup</code></pre>

<p>Xóa DWORD<strong>&nbsp;Upgrade</strong>&nbsp;(khung bên phải) và key&nbsp;<strong>Upgrade</strong>&nbsp;(khung bên trái). Hệ thống cảnh báo có thể xảy ra vấn đề nếu xóa hai mục này, bạn chỉ cần chấp nhận và xóa nó.</p>

<p><img alt="Cảnh báo khi xóa mục registry" data-i="9" height="494" src="https://st.quantrimang.com/photos/image/2019/08/02/di-chuyen-thu-muc-nguoi-dung-10.png" width="640" /></p>

<p>Vẫn trên Registry Editor, duyệt đến key sau:</p>

<pre id="pre6">
<code>HKEY_LOCAL_MACHINE\SYSTEM\Setup\Status\SysprepStatus</code></pre>

<p>Nếu DWORD CleanupState hoặc DWORD GeneralizationState có giá trị lớn hơn 7, thay đổi nó thành 7 bằng cách click đúp vào DWORD đó và nhập giá trị mới:</p>

<p><img alt="Thay đổi giá trị thành 7" data-i="10" height="494" src="https://st.quantrimang.com/photos/image/2019/08/02/di-chuyen-thu-muc-nguoi-dung-11.png" width="640" /></p>

<p>Đóng Registry Editor, mở Command Prompt, gõ&nbsp;<strong>slmgr /dli</strong>&nbsp;và nhấn&nbsp;<strong>Enter</strong>&nbsp;để mở Software License Manager. Đóng nó ngay sau khi mở và đóng Command Prompt.</p>

<p>Bây giờ bạn có thể nâng cấp lên bản build tiếp theo và khi nâng cấp xong, bạn có thể thực hiện sysprep Windows đã được nâng cấp. Sau khi nâng cấp xong&nbsp;khởi động lại máy tính, lặp lại bước này (chỉnh sửa registry và&nbsp;<strong>slmgr /dli</strong>&nbsp;như trên), sau đó thực hiện Cách 2 như ở trên.</p>

<p><strong>Lưu ý</strong>: Nếu chuyển thư mục Users trở lại ổ đĩa cũ trước khi nâng cấp, đảm bảo sao lưu và xóa ổ đĩa. Nó cần được trống trước khi chuyển Users từ C:, sau khi di chuyển, bạn có thể sao chép file từ thư mục tương ứng vào thư mục Users mới.</p>

<p>Chúc các bạn thực hiện thành công!&nbsp;</p>
		</div>
				<div id="author">
						<p>
				<strong>Nguồn tin:</strong>
				Quantrimang.com
			</p>
		</div>
	</div>
	<div id="footer" class="clearfix">
		<div id="url">
			<strong>URL của bản tin này: </strong><a href="https://www.nguoicodonvn2008.info/vi/news/savefile/kien-thuc-may-tinh/cach-di-chuyen-thu-muc-nguoi-dung-tren-windows-10-644.html" title="Cách di chuyển thư mục người dùng trên Windows 10">https://www.nguoicodonvn2008.info/vi/news/savefile/kien-thuc-may-tinh/cach-di-chuyen-thu-muc-nguoi-dung-tren-windows-10-644.html</a>

		</div>
		<div class="clear"></div>
		<div class="copyright">
			&copy; .&#x3A; Nguoicodonvn2008.info - Cõi lòng người cô đơn &#x3A;.
		</div>
		<div id="contact">
			<a href="mailto:admin@nguoicodonvn2008.info">admin@nguoicodonvn2008.info</a>
		</div>
	</div>
</div>
        <div id="timeoutsess" class="chromeframe">
            Bạn đã không sử dụng Site, <a onclick="timeoutsesscancel();" href="https://www.nguoicodonvn2008.info/#">Bấm vào đây để duy trì trạng thái đăng nhập</a>. Thời gian chờ: <span id="secField"> 60 </span> giây
        </div>
        <div id="openidResult" class="nv-alert" style="display:none"></div>
        <div id="openidBt" data-result="" data-redirect=""></div>
		</script>
		<div class="car-top">
  <span><img src="https://www.nguoicodonvn2008.info/themes/default/images/car.png" alt=""></span>
</div>
<script src="https://www.nguoicodonvn2008.info/assets/js/jquery/jquery.min.js"></script>
<script>var nv_base_siteurl="/",nv_lang_data="vi",nv_lang_interface="vi",nv_name_variable="nv",nv_fc_variable="op",nv_lang_variable="language",nv_module_name="news",nv_func_name="savefile",nv_is_user=0, nv_my_ofs=-4,nv_my_abbr="EDT",nv_cookie_prefix="nv4c_e856T",nv_check_pass_mstime=1738000,nv_area_admin=0,nv_safemode=0,theme_responsive=0,nv_recaptcha_ver=2,nv_recaptcha_sitekey="",nv_recaptcha_type="image",XSSsanitize=1;</script>
<script src="https://www.nguoicodonvn2008.info/assets/js/language/vi.js"></script>
<script src="https://www.nguoicodonvn2008.info/assets/js/DOMPurify/purify3.js"></script>
<script src="https://www.nguoicodonvn2008.info/assets/js/global.js"></script>
<script src="https://www.nguoicodonvn2008.info/assets/js/site.js"></script>
<script src="https://www.nguoicodonvn2008.info/themes/default/js/news.js"></script>
<script src="https://www.nguoicodonvn2008.info/themes/default/js/main.js"></script>
<script src="https://www.nguoicodonvn2008.info/themes/default/js/custom.js"></script>
<script type="application/ld+json">
        {
            "@context": "https://schema.org",
            "@type": "Organization",
            "url": "https://www.nguoicodonvn2008.info",
            "logo": "https://www.nguoicodonvn2008.info/uploads/angel.gif"
        }
        </script>
<script src="https://www.nguoicodonvn2008.info/themes/default/js/bootstrap.min.js"></script>
<script type="text/javascript">
var $scrolltop = $('.car-top');
$scrolltop.on('click', function () {
    $('html,body').animate({
        scrollTop: 0
    }, 800);
    $(this).addClass("car-run");
    setTimeout(function(){ $scrolltop.removeClass('car-run');}, 1000);
    return false;
});
$(window).on('scroll', function ()
{ 
    if($(window).scrollTop() >= 200)
    {
        $scrolltop.addClass("show");
        $scrolltop.addClass("car-down");
    }
    else
    {
       $scrolltop.removeClass("show");
       setTimeout(function(){ $scrolltop.removeClass('car-down');}, 300);
    }
});
</script>
</body>
</html>