<!DOCTYPE html>
    <html lang="vi" xmlns="http://www.w3.org/1999/xhtml" prefix="og: http://ogp.me/ns#">
    <head>
<title>Cách biến ảnh thành bản phác thảo bút chì trong Photoshop</title>
<meta name="description" content="Cách biến ảnh thành bản phác thảo bút chì trong Photoshop - Savefile - Tin Tức -...">
<meta name="author" content=".: Nguoicodonvn2008.info - Cõi lòng người cô đơn :.">
<meta name="copyright" content=".: Nguoicodonvn2008.info - Cõi lòng người cô đơn :. [admin@nguoicodonvn2008.info]">
<meta name="robots" content="index, archive, follow, noodp">
<meta name="googlebot" content="index,archive,follow,noodp">
<meta name="msnbot" content="all,index,follow">
<meta name="generator" content="NukeViet v4.5">
<meta http-equiv="Content-Type" content="text/html; charset=utf-8">
<meta property="og:title" content="Cách biến ảnh thành bản phác thảo bút chì trong Photoshop">
<meta property="og:type" content="website">
<meta property="og:description" content="Savefile - Tin Tức - https&#x3A;&#x002F;&#x002F;www.nguoicodonvn2008.info&#x002F;vi&#x002F;news&#x002F;savefile&#x002F;kien-thuc-may-tinh&#x002F;cach-bien-anh-thanh-ban-phac-thao-but-chi-trong-photoshop-10010.html">
<meta property="og:site_name" content=".&#x3A; Nguoicodonvn2008.info - Cõi lòng người cô đơn &#x3A;.">
<meta property="og:url" content="https://www.nguoicodonvn2008.info/vi/news/savefile/kien-thuc-may-tinh/cach-bien-anh-thanh-ban-phac-thao-but-chi-trong-photoshop-10010.html">
<link rel="shortcut icon" href="https://www.nguoicodonvn2008.info/favicon.ico">
<link rel="canonical" href="https://www.nguoicodonvn2008.info/vi/news/savefile/kien-thuc-may-tinh/cach-bien-anh-thanh-ban-phac-thao-but-chi-trong-photoshop-10010.html">
<link rel="alternate" href="https://www.nguoicodonvn2008.info/vi/news/rss/" title="Tin Tức" type="application/rss+xml">
<link rel="alternate" href="https://www.nguoicodonvn2008.info/vi/news/rss/karaoke-dual/" title="Tin Tức - Karaoke Dual" type="application/rss+xml">
<link rel="alternate" href="https://www.nguoicodonvn2008.info/vi/news/rss/nhac-tre/" title="Tin Tức - Nhạc trẻ" type="application/rss+xml">
<link rel="alternate" href="https://www.nguoicodonvn2008.info/vi/news/rss/tru-tinh/" title="Tin Tức - Trữ tình" type="application/rss+xml">
<link rel="alternate" href="https://www.nguoicodonvn2008.info/vi/news/rss/nuoc-ngoai/" title="Tin Tức - Nước ngoài" type="application/rss+xml">
<link rel="alternate" href="https://www.nguoicodonvn2008.info/vi/news/rss/remix/" title="Tin Tức - Remix" type="application/rss+xml">
<link rel="alternate" href="https://www.nguoicodonvn2008.info/vi/news/rss/tam-su-tinh-yeu/" title="Tin Tức - Tâm sự tình yêu" type="application/rss+xml">
<link rel="alternate" href="https://www.nguoicodonvn2008.info/vi/news/rss/tho-suu-tam/" title="Tin Tức - Thơ sưu tầm" type="application/rss+xml">
<link rel="alternate" href="https://www.nguoicodonvn2008.info/vi/news/rss/cuoc-song/" title="Tin Tức - Cuộc sống" type="application/rss+xml">
<link rel="alternate" href="https://www.nguoicodonvn2008.info/vi/news/rss/phan-mem/" title="Tin Tức - Phần mềm" type="application/rss+xml">
<link rel="alternate" href="https://www.nguoicodonvn2008.info/vi/news/rss/kien-thuc-may-tinh/" title="Tin Tức - Kiến thức máy tính" type="application/rss+xml">
<link rel="alternate" href="https://www.nguoicodonvn2008.info/vi/news/rss/hoc-tap/" title="Tin Tức - Học tập" type="application/rss+xml">
<link rel="alternate" href="https://www.nguoicodonvn2008.info/vi/news/rss/tai-lieu/" title="Tin Tức - Tài liệu" type="application/rss+xml">
<link rel="alternate" href="https://www.nguoicodonvn2008.info/vi/news/rss/de-thi/" title="Tin Tức - Đề thi" type="application/rss+xml">
<link rel="preload" as="style" href="https://www.nguoicodonvn2008.info/assets/css/font-awesome.min.css" type="text/css">
<link rel="preload" as="style" href="https://www.nguoicodonvn2008.info/themes/default/css/bootstrap.non-responsive.css" type="text/css">
<link rel="preload" as="style" href="https://www.nguoicodonvn2008.info/themes/default/css/style.css" type="text/css">
<link rel="preload" as="style" href="https://www.nguoicodonvn2008.info/themes/default/css/style.non-responsive.css" type="text/css">
<link rel="preload" as="style" href="https://www.nguoicodonvn2008.info/themes/default/css/news.css" type="text/css">
<link rel="preload" as="style" href="https://www.nguoicodonvn2008.info/themes/default/css/custom.css" type="text/css">
<link rel="preload" as="script" href="https://www.nguoicodonvn2008.info/assets/js/jquery/jquery.min.js" type="text/javascript">
<link rel="preload" as="script" href="https://www.nguoicodonvn2008.info/assets/js/language/vi.js" type="text/javascript">
<link rel="preload" as="script" href="https://www.nguoicodonvn2008.info/assets/js/DOMPurify/purify3.js" type="text/javascript">
<link rel="preload" as="script" href="https://www.nguoicodonvn2008.info/assets/js/global.js" type="text/javascript">
<link rel="preload" as="script" href="https://www.nguoicodonvn2008.info/assets/js/site.js" type="text/javascript">
<link rel="preload" as="script" href="https://www.nguoicodonvn2008.info/themes/default/js/news.js" type="text/javascript">
<link rel="preload" as="script" href="https://www.nguoicodonvn2008.info/themes/default/js/main.js" type="text/javascript">
<link rel="preload" as="script" href="https://www.nguoicodonvn2008.info/themes/default/js/custom.js" type="text/javascript">
<link rel="preload" as="script" href="https://www.nguoicodonvn2008.info/themes/default/js/bootstrap.min.js" type="text/javascript">
<link rel="stylesheet" href="https://www.nguoicodonvn2008.info/assets/css/font-awesome.min.css">
<link rel="stylesheet" href="https://www.nguoicodonvn2008.info/themes/default/css/bootstrap.non-responsive.css">
<link rel="stylesheet" href="https://www.nguoicodonvn2008.info/themes/default/css/style.css">
<link rel="stylesheet" href="https://www.nguoicodonvn2008.info/themes/default/css/style.non-responsive.css">
<link rel="StyleSheet" href="https://www.nguoicodonvn2008.info/themes/default/css/news.css">
<link rel="stylesheet" href="https://www.nguoicodonvn2008.info/themes/default/css/custom.css">
<style type="text/css">
	body{background: #fff;}
</style>
    </head>
    <body>
<div id="print">
	<div id="hd_print">
		<h2 class="pull-left">.&#x3A; Nguoicodonvn2008.info - Cõi lòng người cô đơn &#x3A;.</h2>
		<p class="pull-right"><a title=".&#x3A; Nguoicodonvn2008.info - Cõi lòng người cô đơn &#x3A;." href="https://www.nguoicodonvn2008.info/">https://www.nguoicodonvn2008.info</a></p>
	</div>
	<div class="clear"></div>
	<hr />
	<div id="content">
		<h1>Cách biến ảnh thành bản phác thảo bút chì trong Photoshop</h1>
		<ul class="list-inline">
			<li>Thứ ba - 18/03/2025 23:59</li>
			<li class="hidden-print txtrequired"><em class="fa fa-print">&nbsp;</em><a title="In ra" href="javascript:;" onclick="window.print()">In ra</a></li>
			<li class="hidden-print txtrequired"><em class="fa fa-power-off">&nbsp;</em><a title="Đóng cửa sổ này" href="javascript:;" onclick="window.close()">Đóng cửa sổ này</a></li>
		</ul>
		<div class="clear"></div>
		<div id="hometext">
		</div>
				<div class="imghome">
			<img alt="Cách biến ảnh thành bản phác thảo bút chì trong Photoshop" src="https://st.quantrimang.com/photos/image/2025/03/18/bien-anh-thanh-ban-phac-thao-but-chi-trong-photoshop-70.jpg" width="460" class="img-thumbnail" />
		</div>
		<div class="clear"></div>
		<div id="bodytext" class="clearfix">
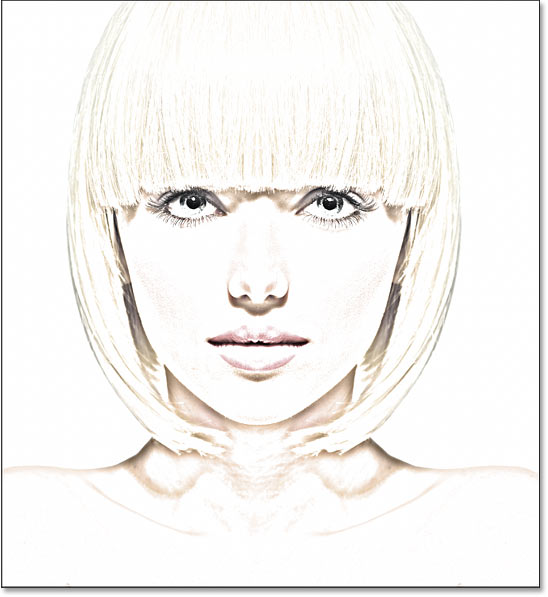
			<p style="text-align: justify;">Hướng dẫn này sẽ chỉ cho bạn cách dễ dàng để biến ảnh thành bản phác thảo bút chì bằng&nbsp;Adobe Photoshop. Chúng ta sẽ bắt đầu bằng cách biến ảnh thành bản phác thảo đen trắng, sau đó bài viết sẽ chỉ cho bạn 3 cách khác nhau để thêm màu vào bản phác thảo của bạn, bao gồm cách sử dụng màu gốc của ảnh, một màu duy nhất và một gradient!</p>

<h2 style="text-align: justify;">&nbsp;</h2>

<h2 id="mcetoc_1imkcm0o85t" style="text-align: justify;">Cách biến ảnh thành bản phác thảo bút chì</h2>

<p style="text-align: justify;">Bài viết đã sử dụng Photoshop 2021 nhưng mọi bước đều hoạt động với Photoshop 2022 và 2023. Các bước đầu tiên này sẽ biến ảnh thành bản phác thảo đen trắng.</p>

<h3 id="mcetoc_1imkcm0o85u" style="text-align: justify;">Bước 1: Nhân đôi layer Background</h3>

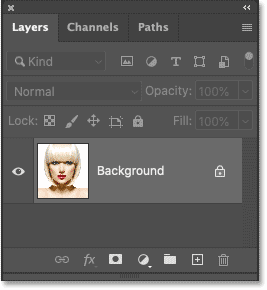
<p style="text-align: justify;">Chúng ta sẽ bắt đầu trong bảng Layers của Photoshop, nơi hình ảnh xuất hiện trên layer Background:</p>

<figure>
<div style="text-align: justify;"><img alt="Bảng Layers của Photoshop hiển thị ảnh trên layer Background." data-i="0" data-src="https://st.quantrimang.com/photos/image/2025/03/18/bien-anh-thanh-ban-phac-thao-but-chi-trong-photoshop-1.png" data-was-processed="true" height="290" src="https://st.quantrimang.com/photos/image/2025/03/18/bien-anh-thanh-ban-phac-thao-but-chi-trong-photoshop-1.png" width="267" /></div>

<figcaption>
<div style="text-align: justify;">Bảng Layers của Photoshop hiển thị ảnh trên layer Background.</div>
</figcaption>
</figure>

<p style="text-align: justify;">Chúng ta sẽ cần hình ảnh này khi thêm màu vào bản phác thảo sau này. Vì vậy, để giữ an&nbsp;<a data-google-interstitial="false" data-google-vignette="false" href="https://quantrimang.com/hoc/bien-anh-thanh-ban-phac-thao-but-chi-trong-photoshop-208060#">&nbsp;toàn</a>, chúng ta sẽ tạo một bản sao của nó.</p>

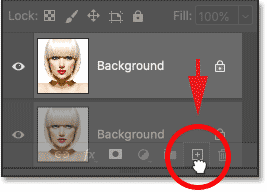
<p style="text-align: justify;">Nhấp vào layer&nbsp;<strong>Background</strong>&nbsp;và kéo xuống biểu tượng&nbsp;<strong>New Layer</strong>:</p>

<figure>
<div style="text-align: justify;"><img alt="Kéo layer Background vào biểu tượng New Layer." data-i="1" data-src="https://st.quantrimang.com/photos/image/2025/03/18/bien-anh-thanh-ban-phac-thao-but-chi-trong-photoshop-2.png" data-was-processed="true" height="192" src="https://st.quantrimang.com/photos/image/2025/03/18/bien-anh-thanh-ban-phac-thao-but-chi-trong-photoshop-2.png" width="267" /></div>

<figcaption>
<div style="text-align: justify;">Kéo layer Background vào biểu tượng New Layer.</div>
</figcaption>
</figure>

<p style="text-align: justify;">Tạo một bản sao của layer Background.</p>

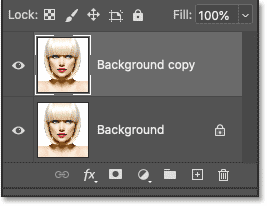
<p style="text-align: justify;">Một bản sao xuất hiện phía trên bản gốc:</p>

<figure>
<div style="text-align: justify;"><img alt="Một layer Background copy xuất hiện phía trên layer Background gốc" data-i="2" data-src="https://st.quantrimang.com/photos/image/2025/03/18/bien-anh-thanh-ban-phac-thao-but-chi-trong-photoshop-3.png" data-was-processed="true" height="206" src="https://st.quantrimang.com/photos/image/2025/03/18/bien-anh-thanh-ban-phac-thao-but-chi-trong-photoshop-3.png" width="267" /></div>

<figcaption>
<div style="text-align: justify;">Một layer Background copy xuất hiện phía trên layer Background gốc</div>
</figcaption>
</figure>

<h3 id="mcetoc_1imkcm0o85v" style="text-align: justify;">Bước 2: Làm mất bão hòa layer</h3>

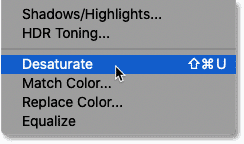
<p style="text-align: justify;">Tiếp theo, chúng ta sẽ xóa toàn bộ màu khỏi layer Background copy bằng lệnh Desaturate của Photoshop.</p>

<p style="text-align: justify;">Đi tới menu&nbsp;<strong>Image</strong>&nbsp;trong thanh menu dọc theo đầu màn hình, chọn&nbsp;<strong>Adjustments</strong>, rồi chọn&nbsp;<strong>Desaturate</strong>:</p>

<figure>
<div style="text-align: justify;"><img alt="Chọn lệnh Desaturate trong Photoshop." data-i="3" data-src="https://st.quantrimang.com/photos/image/2025/03/18/bien-anh-thanh-ban-phac-thao-but-chi-trong-photoshop-4.png" data-was-processed="true" height="144" src="https://st.quantrimang.com/photos/image/2025/03/18/bien-anh-thanh-ban-phac-thao-but-chi-trong-photoshop-4.png" width="244" /></div>

<figcaption>
<div style="text-align: justify;">Chọn lệnh Desaturate trong Photoshop.</div>
</figcaption>
</figure>

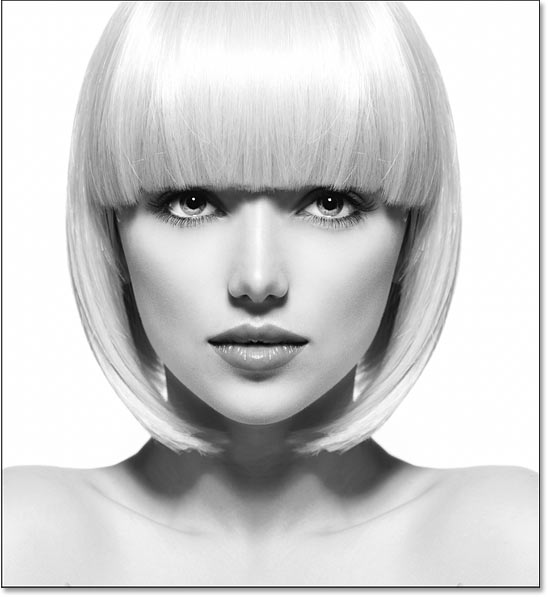
<p style="text-align: justify;">Photoshop làm mất bão hòa hình ảnh, để lại cho chúng ta phiên bản ảnh đen trắng:</p>

<figure>
<div style="text-align: justify;"><img alt="Hình ảnh sau khi làm mất bão hòa màu." data-i="4" data-src="https://st.quantrimang.com/photos/image/2025/03/18/bien-anh-thanh-ban-phac-thao-but-chi-trong-photoshop-5.jpg" data-was-processed="true" height="597" src="https://st.quantrimang.com/photos/image/2025/03/18/bien-anh-thanh-ban-phac-thao-but-chi-trong-photoshop-5.jpg" width="548" /></div>

<figcaption>
<div style="text-align: justify;">Hình ảnh sau khi làm mất bão hòa màu.</div>
</figcaption>
</figure>

<h3 id="mcetoc_1imkcm0o860" style="text-align: justify;">Bước 3: Nhân đôi layer mất bão hòa</h3>

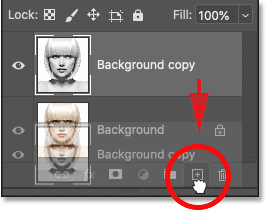
<p style="text-align: justify;">Quay lại bảng Layers, tạo một bản sao của phiên bản mất bão hòa bằng cách kéo layer Background copy xuống biểu tượng layer mới:</p>

<figure>
<div style="text-align: justify;"><img alt="Kéo layer Background copy vào biểu tượng layer mới." data-i="5" data-src="https://st.quantrimang.com/photos/image/2025/03/18/bien-anh-thanh-ban-phac-thao-but-chi-trong-photoshop-6.png" data-was-processed="true" height="212" src="https://st.quantrimang.com/photos/image/2025/03/18/bien-anh-thanh-ban-phac-thao-but-chi-trong-photoshop-6.png" width="267" /></div>

<figcaption>
<div style="text-align: justify;">Kéo layer Background copy vào biểu tượng layer mới.</div>
</figcaption>
</figure>

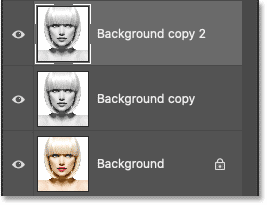
<p style="text-align: justify;">Và một lần nữa, bản sao xuất hiện ở trên bản gốc:</p>

<figure>
<div style="text-align: justify;"><img alt="Layer Background copy 2 mới xuất hiện ở trên các layer khác." data-i="6" data-src="https://st.quantrimang.com/photos/image/2025/03/18/bien-anh-thanh-ban-phac-thao-but-chi-trong-photoshop-7.png" data-was-processed="true" height="205" src="https://st.quantrimang.com/photos/image/2025/03/18/bien-anh-thanh-ban-phac-thao-but-chi-trong-photoshop-7.png" width="267" /></div>

<figcaption>
<div style="text-align: justify;">Layer Background copy 2 mới xuất hiện ở trên các layer khác.</div>
</figcaption>
</figure>

<h3 id="mcetoc_1imkcm0o861" style="text-align: justify;">Bước 4: Đảo ngược layer</h3>

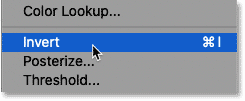
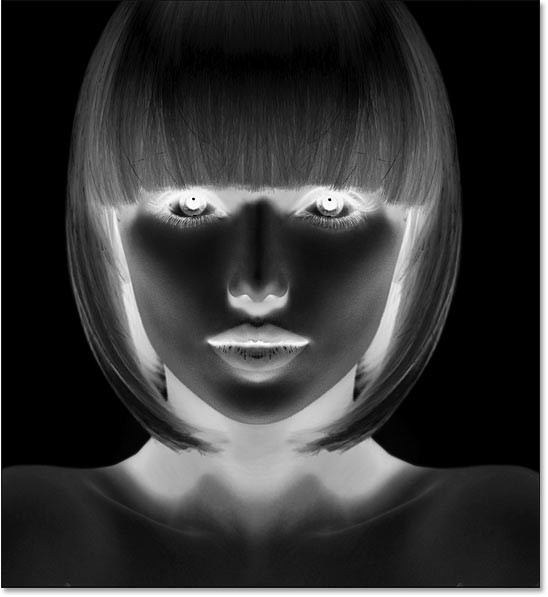
<p style="text-align: justify;">Chúng ta cần đảo ngược mức độ sáng trên layer này, làm cho vùng sáng tối và vùng tối sáng. Để làm được điều đó, chúng ta sẽ sử dụng lệnh Invert của Photoshop.</p>

<p style="text-align: justify;">Vào menu&nbsp;<strong>Image</strong>, chọn&nbsp;<strong>Adjustments</strong>, rồi chọn&nbsp;<strong>Invert</strong>:</p>

<figure>
<div style="text-align: justify;"><img alt="Chọn lệnh Invert trong Photoshop." data-i="7" data-src="https://st.quantrimang.com/photos/image/2025/03/18/bien-anh-thanh-ban-phac-thao-but-chi-trong-photoshop-8.png" data-was-processed="true" height="101" src="https://st.quantrimang.com/photos/image/2025/03/18/bien-anh-thanh-ban-phac-thao-but-chi-trong-photoshop-8.png" width="245" /></div>

<figcaption>
<div style="text-align: justify;">Chọn lệnh Invert trong Photoshop.</div>
</figcaption>
</figure>

<p style="text-align: justify;">Thao tác này đảo ngược hình ảnh, tạo hiệu ứng film âm bản:</p>

<figure>
<div style="text-align: justify;"><img alt="Hình ảnh sau khi đảo ngược độ sáng." data-adbro-processed="true" data-i="8" data-src="https://st.quantrimang.com/photos/image/2025/03/18/bien-anh-thanh-ban-phac-thao-but-chi-trong-photoshop-9.jpg" data-was-processed="true" height="597" src="https://st.quantrimang.com/photos/image/2025/03/18/bien-anh-thanh-ban-phac-thao-but-chi-trong-photoshop-9.jpg" width="548" /></div>

<figcaption>
<div style="text-align: justify;">Hình ảnh sau khi đảo ngược độ sáng.</div>
</figcaption>
</figure>

<h3 id="mcetoc_1imkcm0o862" style="text-align: justify;">Bước 5: Thay đổi blend mode của layer thành Color Dodge</h3>

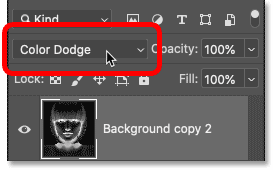
<p style="text-align: justify;">Trong bảng Layers, hãy thay đổi blend mode của layer đảo ngược từ&nbsp;<strong>Normal</strong>&nbsp;(mặc định) thành&nbsp;<strong>Color Dodge</strong>:</p>

<figure>
<div style="text-align: justify;"><img alt="Đổi blend mode của layer thành Color Dodge." data-i="9" data-src="https://st.quantrimang.com/photos/image/2025/03/18/bien-anh-thanh-ban-phac-thao-but-chi-trong-photoshop-10.png" data-was-processed="true" height="170" src="https://st.quantrimang.com/photos/image/2025/03/18/bien-anh-thanh-ban-phac-thao-but-chi-trong-photoshop-10.png" width="273" /></div>

<figcaption>
<div style="text-align: justify;">Đổi blend mode của layer thành Color Dodge.</div>
</figcaption>
</figure>

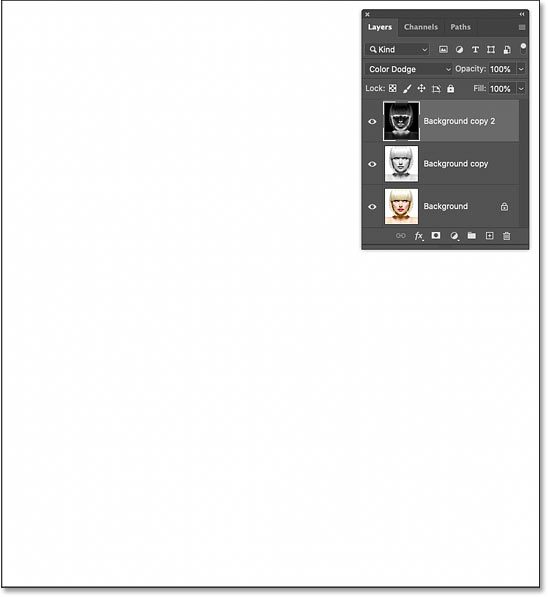
<p style="text-align: justify;">Tài liệu chuyển sang màu trắng hoàn toàn, mặc dù bạn có thể thấy một vài vùng màu đen rải rác tùy thuộc vào hình ảnh của bạn:</p>

<figure>
<div style="text-align: justify;"><img alt="Kết quả sau khi thay đổi blend mode thành Color Dodge." data-i="10" data-src="https://st.quantrimang.com/photos/image/2025/03/18/bien-anh-thanh-ban-phac-thao-but-chi-trong-photoshop-11.jpg" data-was-processed="true" height="597" src="https://st.quantrimang.com/photos/image/2025/03/18/bien-anh-thanh-ban-phac-thao-but-chi-trong-photoshop-11.jpg" width="548" /></div>

<figcaption>
<div style="text-align: justify;">Kết quả sau khi thay đổi blend mode thành Color Dodge.</div>
</figcaption>
</figure>

<h3 id="mcetoc_1imkcm0o863" style="text-align: justify;">Bước 6: Chuyển đổi layer thành smart object</h3>

<p style="text-align: justify;">Để tạo hiệu ứng phác thảo, chúng ta sẽ làm mờ layer đảo ngược bằng bộ lọc Gaussian Blur của Photoshop. Nhưng để giữ cho các thiết lập bộ lọc có thể chỉnh sửa được, chúng ta sẽ áp dụng Gaussian Blur làm bộ lọc thông minh. Và để làm điều đó, trước tiên chúng ta cần chuyển đổi layer thành smart object.</p>

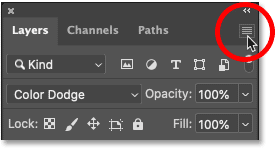
<p style="text-align: justify;">Trong bảng Layers, nhấp vào biểu tượng menu ở góc trên bên phải:</p>

<figure>
<div style="text-align: justify;"><img alt="Nhấp vào biểu tượng menu trong bảng Layers của Photoshop." data-i="11" data-src="https://st.quantrimang.com/photos/image/2025/03/18/bien-anh-thanh-ban-phac-thao-but-chi-trong-photoshop-12.png" data-was-processed="true" height="149" src="https://st.quantrimang.com/photos/image/2025/03/18/bien-anh-thanh-ban-phac-thao-but-chi-trong-photoshop-12.png" width="277" /></div>

<figcaption>
<div style="text-align: justify;">Nhấp vào biểu tượng menu trong bảng Layers của Photoshop.</div>
</figcaption>
</figure>

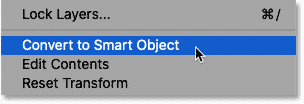
<p style="text-align: justify;">Và chọn&nbsp;<strong>Convert to Smart Object</strong>&nbsp;từ menu:</p>

<figure>
<div style="text-align: justify;"><img alt="Chọn lệnh Convert to Smart Object từ menu bảng Layers của Photoshop." data-i="12" data-src="https://st.quantrimang.com/photos/image/2025/03/18/bien-anh-thanh-ban-phac-thao-but-chi-trong-photoshop-13.png" data-was-processed="true" height="104" src="https://st.quantrimang.com/photos/image/2025/03/18/bien-anh-thanh-ban-phac-thao-but-chi-trong-photoshop-13.png" width="304" /></div>

<figcaption>
<div style="text-align: justify;">Chọn lệnh Convert to Smart Object từ menu bảng Layers của Photoshop.</div>
</figcaption>
</figure>

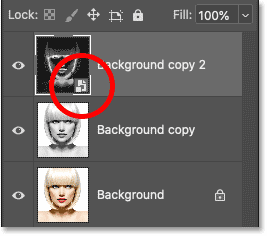
<p style="text-align: justify;">Một biểu tượng xuất hiện trong hình thu nhỏ xem trước của layer, cho chúng ta biết rằng layer hiện là smart object và chúng ta đã sẵn sàng áp dụng bộ lọc:</p>

<figure>
<div style="text-align: justify;"><img alt="Biểu tượng smart object trong hình thu nhỏ xem trước layer." data-i="13" data-src="https://st.quantrimang.com/photos/image/2025/03/18/bien-anh-thanh-ban-phac-thao-but-chi-trong-photoshop-14.png" data-was-processed="true" height="236" src="https://st.quantrimang.com/photos/image/2025/03/18/bien-anh-thanh-ban-phac-thao-but-chi-trong-photoshop-14.png" width="267" /></div>

<figcaption>
<div style="text-align: justify;">Biểu tượng smart object trong hình thu nhỏ xem trước layer.</div>
</figcaption>
</figure>

<h3 id="mcetoc_1imkcm0o864" style="text-align: justify;">Bước 7: Áp dụng bộ lọc Gaussian Blur</h3>

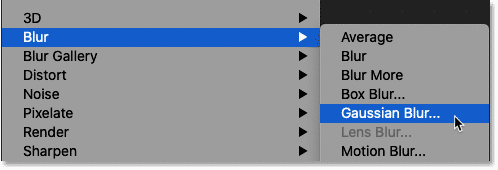
<p style="text-align: justify;">Đi đến menu&nbsp;<strong>Filter</strong>&nbsp;trong thanh menu, chọn&nbsp;<strong>Blur</strong>, rồi chọn&nbsp;<strong>Gaussian Blur</strong>:</p>

<figure>
<div style="text-align: justify;"><img alt="Chọn bộ lọc Gaussian Blur trong Photoshop." data-i="14" data-src="https://st.quantrimang.com/photos/image/2025/03/18/bien-anh-thanh-ban-phac-thao-but-chi-trong-photoshop-15.png" data-was-processed="true" height="170" src="https://st.quantrimang.com/photos/image/2025/03/18/bien-anh-thanh-ban-phac-thao-but-chi-trong-photoshop-15.png" width="498" /></div>

<figcaption>
<div style="text-align: justify;">Chọn bộ lọc Gaussian Blur trong Photoshop.</div>
</figcaption>
</figure>

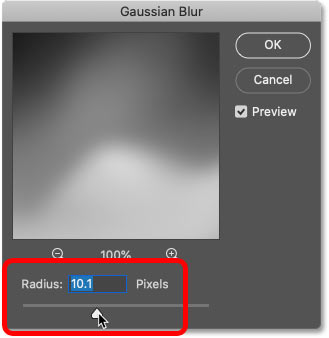
<p style="text-align: justify;">Sau đó, trong hộp thoại&nbsp;<strong>Gaussian Blur</strong>, kéo thanh trượt&nbsp;<strong>Radius</strong>&nbsp;dọc theo phía dưới để làm mờ nội dung của layer. Hiệu ứng phác thảo bạn đạt được sẽ phụ thuộc vào lượng làm mờ bạn áp dụng. Giá trị bán kính thấp hơn sẽ tạo ra bản phác thảo với các đường mỏng mịn, trong khi giá trị lớn hơn sẽ tạo ra bản phác thảo chân thực hơn.</p>

<p style="text-align: justify;">Ví dụ, nếu chọn giá trị bán kính khá thấp là 10 pixel:</p>

<figure>
<div style="text-align: justify;"><img alt="Đặt giá trị bán kính thấp trong hộp thoại Gaussian Blur của Photoshop." data-i="15" data-src="https://st.quantrimang.com/photos/image/2025/03/18/bien-anh-thanh-ban-phac-thao-but-chi-trong-photoshop-16.jpg" data-was-processed="true" height="338" src="https://st.quantrimang.com/photos/image/2025/03/18/bien-anh-thanh-ban-phac-thao-but-chi-trong-photoshop-16.jpg" width="329" /></div>

<figcaption>
<div style="text-align: justify;">Đặt giá trị bán kính thấp trong hộp thoại Gaussian Blur của Photoshop.</div>
</figcaption>
</figure>

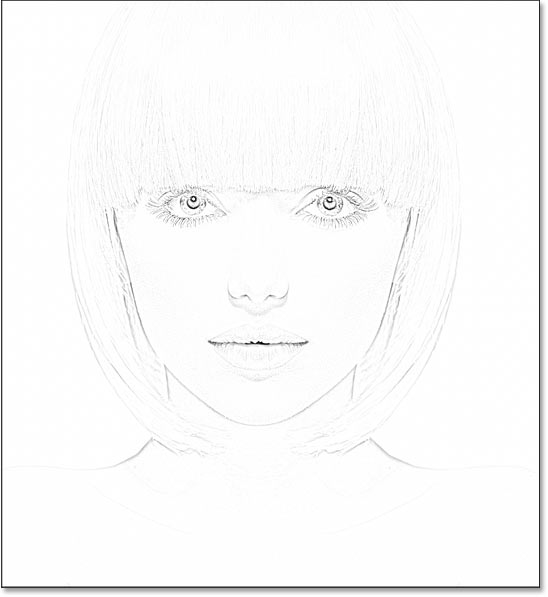
<p style="text-align: justify;">Kết thúc với hiệu ứng này ở đây với các đường rất mịn:</p>

<figure>
<div style="text-align: justify;"><img alt="Hiệu ứng ảnh thành bản phác thảo sử dụng giá trị Radius thấp" data-i="16" data-src="https://st.quantrimang.com/photos/image/2025/03/18/bien-anh-thanh-ban-phac-thao-but-chi-trong-photoshop-17.jpg" data-was-processed="true" height="597" src="https://st.quantrimang.com/photos/image/2025/03/18/bien-anh-thanh-ban-phac-thao-but-chi-trong-photoshop-17.jpg" width="548" /></div>

<figcaption>
<div style="text-align: justify;">Hiệu ứng ảnh thành bản phác thảo sử dụng giá trị Radius thấp</div>
</figcaption>
</figure>

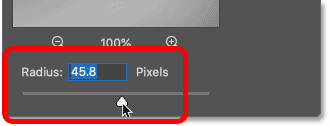
<p style="text-align: justify;">Nhưng nếu tăng giá trị lên mức cao hơn nhiều, chẳng hạn như 45 pixel:</p>

<figure>
<div style="text-align: justify;"><img alt="Tăng giá trị bán kính trong hộp thoại Gaussian Blur." data-i="17" data-src="https://st.quantrimang.com/photos/image/2025/03/18/bien-anh-thanh-ban-phac-thao-but-chi-trong-photoshop-18.png" data-was-processed="true" height="126" src="https://st.quantrimang.com/photos/image/2025/03/18/bien-anh-thanh-ban-phac-thao-but-chi-trong-photoshop-18.png" width="329" /></div>

<figcaption>
<div style="text-align: justify;">Tăng giá trị bán kính trong hộp thoại Gaussian Blur.</div>
</figcaption>
</figure>

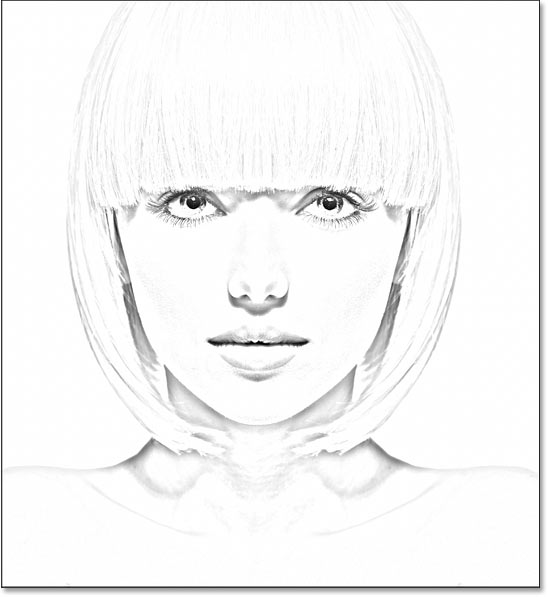
<p style="text-align: justify;">Hiệu ứng trông giống ảnh gốc hơn. Giá trị bán kính bạn cần sẽ phụ thuộc vào ảnh và diện mạo bạn muốn. Vì vậy, hãy chú ý đến ảnh khi bạn kéo thanh trượt để đánh giá kết quả.</p>

<p style="text-align: justify;">Trong trường hợp này, ví dụ sẽ sử dụng phiên bản thứ hai, chân thực hơn. Nhấp vào&nbsp;<strong>OK</strong>&nbsp;khi bạn hoàn tất để đóng hộp thoại Gaussian Blur:</p>

<figure>
<div style="text-align: justify;"><img alt="Ảnh phác thảo hiệu ứng khi sử dụng giá trị Radius lớn." data-i="18" data-src="https://st.quantrimang.com/photos/image/2025/03/18/bien-anh-thanh-ban-phac-thao-but-chi-trong-photoshop-19.jpg" data-was-processed="true" height="597" src="https://st.quantrimang.com/photos/image/2025/03/18/bien-anh-thanh-ban-phac-thao-but-chi-trong-photoshop-19.jpg" width="548" /></div>

<figcaption>
<div style="text-align: justify;">Ảnh phác thảo hiệu ứng khi sử dụng giá trị Radius lớn.</div>
</figcaption>
</figure>

<p style="text-align: justify;"><strong>Cách chỉnh sửa cài đặt Gaussian Blur</strong></p>

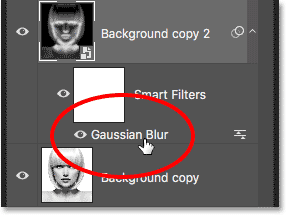
<p style="text-align: justify;">Vì chúng tôi đã áp dụng bộ lọc Gaussian Blur cho một smart object nên bảng Layers sẽ hiển thị bộ lọc này được liệt kê là bộ lọc thông minh bên dưới smart object. Bạn có thể nhấp đúp vào từ Gaussian Blur bất kỳ lúc nào để mở lại hộp thoại của bộ lọc và thử nghiệm với các thiết lập khác nhau:</p>

<figure>
<div style="text-align: justify;"><img alt="Bảng Layers của Photoshop hiển thị bộ lọc thông minh Gaussian Blur." data-i="19" data-src="https://st.quantrimang.com/photos/image/2025/03/18/bien-anh-thanh-ban-phac-thao-but-chi-trong-photoshop-20.gif" data-was-processed="true" height="215" src="https://st.quantrimang.com/photos/image/2025/03/18/bien-anh-thanh-ban-phac-thao-but-chi-trong-photoshop-20.gif" width="286" /></div>

<figcaption>
<div style="text-align: justify;">Bảng Layers của Photoshop hiển thị bộ lọc thông minh Gaussian Blur.</div>
</figcaption>
</figure>

<h3 id="mcetoc_1imkcm0o865" style="text-align: justify;">Bước 8: Thêm layer điều chỉnh Levels</h3>

<p style="text-align: justify;">Lúc này, bản phác thảo có thể trông quá sáng với độ tương phản quá thấp. Nhưng chúng ta có thể làm tối nó rất dễ dàng bằng cách sử dụng layer điều chỉnh Levels và blend mode layer.</p>

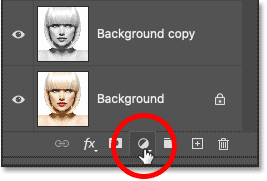
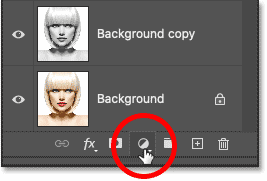
<p style="text-align: justify;">Vẫn trong bảng&nbsp;<strong>Layers</strong>, nhấp vào biểu tượng&nbsp;<strong>New Fill</strong>&nbsp;hoặc&nbsp;<strong>Adjustment Layer</strong>:</p>

<figure>
<div style="text-align: justify;"><img alt="Nhấp vào biểu tượng New Fill hoặc Adjustment Layer trong bảng Layers của Photoshop" data-i="20" data-src="https://st.quantrimang.com/photos/image/2025/03/18/bien-anh-thanh-ban-phac-thao-but-chi-trong-photoshop-21.png" data-was-processed="true" height="181" src="https://st.quantrimang.com/photos/image/2025/03/18/bien-anh-thanh-ban-phac-thao-but-chi-trong-photoshop-21.png" width="267" /></div>

<figcaption>
<div style="text-align: justify;">Nhấp vào biểu tượng New Fill hoặc Adjustment Layer trong bảng Layers của Photoshop</div>
</figcaption>
</figure>

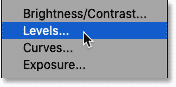
<p style="text-align: justify;">Và chọn&nbsp;<strong>Levels</strong>&nbsp;từ danh sách:</p>

<figure>
<div style="text-align: justify;"><img alt="Chọn layer điều chỉnh Levels." data-i="21" data-src="https://st.quantrimang.com/photos/image/2025/03/18/bien-anh-thanh-ban-phac-thao-but-chi-trong-photoshop-22.png" data-was-processed="true" height="87" src="https://st.quantrimang.com/photos/image/2025/03/18/bien-anh-thanh-ban-phac-thao-but-chi-trong-photoshop-22.png" width="176" /></div>

<figcaption>
<div style="text-align: justify;">Chọn layer điều chỉnh Levels.</div>
</figcaption>
</figure>

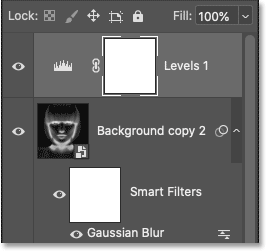
<p style="text-align: justify;">Photoshop thêm layer điều chỉnh Levels phía trên smart object:</p>

<figure>
<div style="text-align: justify;"><img alt="Layer điều chỉnh Levels mới trong bảng Layers của Photoshop" data-i="22" data-src="https://st.quantrimang.com/photos/image/2025/03/18/bien-anh-thanh-ban-phac-thao-but-chi-trong-photoshop-23.png" data-was-processed="true" height="252" src="https://st.quantrimang.com/photos/image/2025/03/18/bien-anh-thanh-ban-phac-thao-but-chi-trong-photoshop-23.png" width="267" /></div>

<figcaption>
<div style="text-align: justify;">Layer điều chỉnh Levels mới trong bảng Layers của Photoshop</div>
</figcaption>
</figure>

<h3 id="mcetoc_1imkcm0o866" style="text-align: justify;">Bước 9: Thay đổi blend mode thành Multiply</h3>

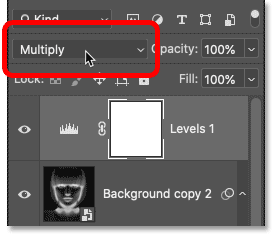
<p style="text-align: justify;">Sau đó, để làm tối bản phác thảo, chỉ cần thay đổi blend mode của layer điều chỉnh từ&nbsp;<strong>Normal</strong>&nbsp;thành&nbsp;<strong>Multiply</strong>:</p>

<figure>
<div style="text-align: justify;"><img alt="Thay đổi blend mode của layer điều chỉnh Levels thành Multiply." data-i="23" data-src="https://st.quantrimang.com/photos/image/2025/03/18/bien-anh-thanh-ban-phac-thao-but-chi-trong-photoshop-24.png" data-was-processed="true" height="235" src="https://st.quantrimang.com/photos/image/2025/03/18/bien-anh-thanh-ban-phac-thao-but-chi-trong-photoshop-24.png" width="273" /></div>

<figcaption>
<div style="text-align: justify;">Thay đổi blend mode của layer điều chỉnh Levels thành Multiply.</div>
</figcaption>
</figure>

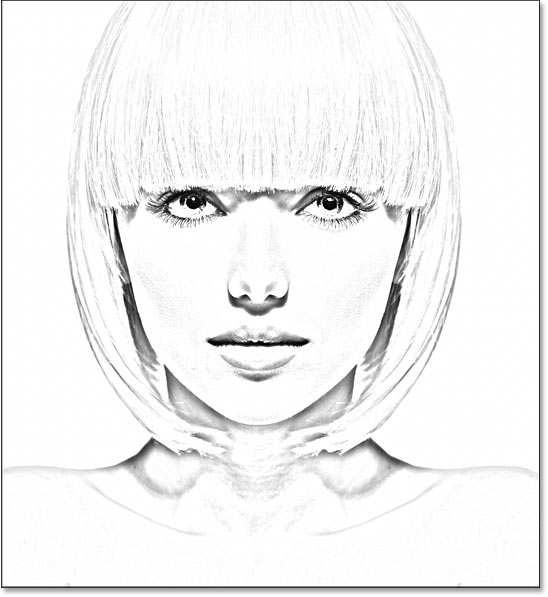
<p style="text-align: justify;">Blend mode Multiply là một trong nhóm các blend mode làm tối&nbsp;<a data-google-interstitial="false" data-google-vignette="false" href="https://quantrimang.com/hoc/bien-anh-thanh-ban-phac-thao-but-chi-trong-photoshop-208060#">&nbsp;toàn</a>&nbsp;bộ hình ảnh. Và ngay lập tức, bản phác thảo trông tối hơn nhiều:</p>

<figure>
<div style="text-align: justify;"><img alt="Hiệu ứng phác thảo sau khi thay đổi blend mode thành Multiply." data-i="24" data-src="https://st.quantrimang.com/photos/image/2025/03/18/bien-anh-thanh-ban-phac-thao-but-chi-trong-photoshop-25.jpg" data-was-processed="true" height="597" src="https://st.quantrimang.com/photos/image/2025/03/18/bien-anh-thanh-ban-phac-thao-but-chi-trong-photoshop-25.jpg" width="548" /></div>

<figcaption>
<div style="text-align: justify;">Hiệu ứng phác thảo sau khi thay đổi blend mode thành Multiply.</div>
</figcaption>
</figure>

<p style="text-align: justify;"><strong>Cách tinh chỉnh độ sáng</strong></p>

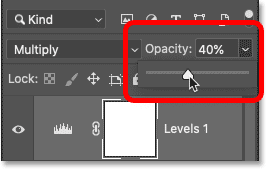
<p style="text-align: justify;">Nếu bản phác thảo trông quá tối, hãy giảm giá trị&nbsp;<strong>Opacity</strong>&nbsp;của layer điều chỉnh, nằm ngay đối diện với tùy chọn blend mode trong bảng Layers. Bạn càng giảm độ mờ từ 100%, các layer bên dưới layer điều chỉnh sẽ càng hiển thị rõ hơn, làm sáng lại bản phác thảo.</p>

<p style="text-align: justify;">Ví dụ sẽ giảm của mình xuống khoảng 40%:</p>

<figure>
<div style="text-align: justify;"><img alt="Giảm độ mờ của layer điều chỉnh Levels." data-i="25" data-src="https://st.quantrimang.com/photos/image/2025/03/18/bien-anh-thanh-ban-phac-thao-but-chi-trong-photoshop-26.png" data-was-processed="true" height="170" src="https://st.quantrimang.com/photos/image/2025/03/18/bien-anh-thanh-ban-phac-thao-but-chi-trong-photoshop-26.png" width="267" /></div>

<figcaption>
<div style="text-align: justify;">Giảm độ mờ của layer điều chỉnh Levels.</div>
</figcaption>
</figure>

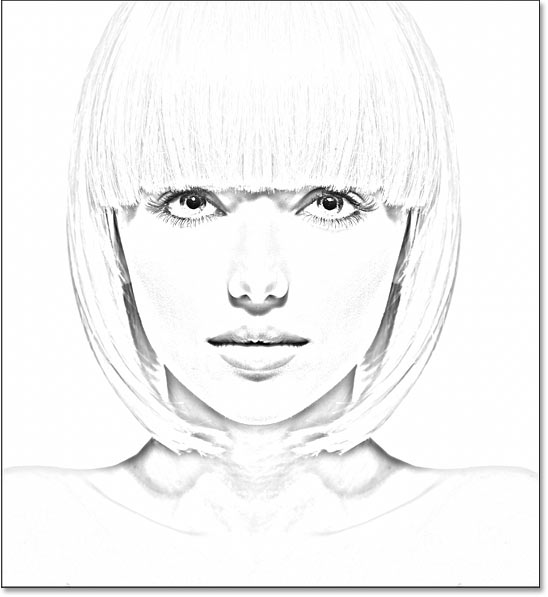
<p style="text-align: justify;">Và với điều đó, chúng ta có phiên bản phác thảo đen trắng! Tiếp theo, bài viết sẽ chỉ cho bạn một vài cách khác nhau để thêm màu:</p>

<figure>
<div style="text-align: justify;"><img alt="Hiệu ứng phác thảo đen trắng cuối cùng." data-i="26" data-src="https://st.quantrimang.com/photos/image/2025/03/18/bien-anh-thanh-ban-phac-thao-but-chi-trong-photoshop-27.jpg" data-was-processed="true" height="597" src="https://st.quantrimang.com/photos/image/2025/03/18/bien-anh-thanh-ban-phac-thao-but-chi-trong-photoshop-27.jpg" width="548" /></div>

<figcaption>
<div style="text-align: justify;">Hiệu ứng phác thảo đen trắng cuối cùng.</div>
</figcaption>
</figure>

<h2 id="mcetoc_1imkcm0o867" style="text-align: justify;">Tô màu phác thảo bằng màu gốc của ảnh</h2>

<p style="text-align: justify;">Các bước tiếp theo này sẽ thêm màu cho phác thảo bằng cách sử dụng màu từ ảnh gốc. Sau đó, bài viết sẽ chỉ cho bạn cách tô màu phác thảo bằng một màu duy nhất, rồi bằng hiệu ứng chuyển màu.</p>

<h3 id="mcetoc_1imkcm0o868" style="text-align: justify;">Bước 10: Nhân đôi layer Background một lần nữa</h3>

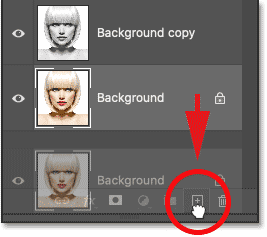
<p style="text-align: justify;">Trong bảng Layers, tạo một bản sao của ảnh gốc bằng cách kéo layer Background (layer gốc ở dưới cùng) xuống biểu tượng&nbsp;<strong>New Layer</strong>:</p>

<figure>
<div style="text-align: justify;"><img alt="Tạo một bản sao khác của layer Background." data-i="27" data-src="https://st.quantrimang.com/photos/image/2025/03/18/bien-anh-thanh-ban-phac-thao-but-chi-trong-photoshop-28.png" data-was-processed="true" height="237" src="https://st.quantrimang.com/photos/image/2025/03/18/bien-anh-thanh-ban-phac-thao-but-chi-trong-photoshop-28.png" width="267" /></div>

<figcaption>
<div style="text-align: justify;">Tạo một bản sao khác của layer Background.</div>
</figcaption>
</figure>

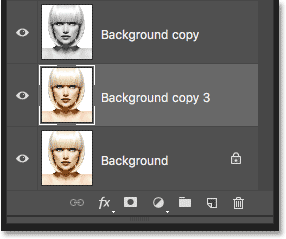
<p style="text-align: justify;">Bản sao (Background copy 3) xuất hiện giữa các layer&nbsp;<strong>Background</strong>&nbsp;và&nbsp;<strong>Background copy</strong>:</p>

<figure>
<div style="text-align: justify;"><img alt="Layer Background copy 3 xuất hiện phía trên layer Background gốc." data-i="28" data-src="https://st.quantrimang.com/photos/image/2025/03/18/bien-anh-thanh-ban-phac-thao-but-chi-trong-photoshop-29.gif" data-was-processed="true" height="239" src="https://st.quantrimang.com/photos/image/2025/03/18/bien-anh-thanh-ban-phac-thao-but-chi-trong-photoshop-29.gif" width="286" /></div>

<figcaption>
<div style="text-align: justify;">Layer Background copy 3 xuất hiện phía trên layer Background gốc.</div>
</figcaption>
</figure>

<h3 id="mcetoc_1imkcm0o869" style="text-align: justify;">Bước 11: Đổi tên layer mới thành Color</h3>

<p style="text-align: justify;">Lúc này, bảng Layers của chúng ta lộn xộn với các bản sao của layer Background. Và tất cả chúng đều có tên như Background copy, Background copy 2, Background copy 3 nhưng không cho chúng ta biết layer đó đang được sử dụng để làm gì. Vì vậy, hãy đổi tên layer mới của chúng ta thành một cái tên mô tả hơn.</p>

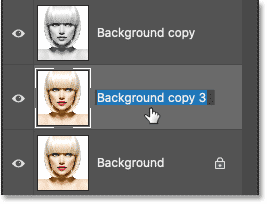
<p style="text-align: justify;">Nhấp đúp trực tiếp vào tên Background copy 3 để làm nổi bật nó:</p>

<figure>
<div style="text-align: justify;"><img alt="Nhấp đúp vào tên của layer để làm nổi bật nó." data-i="29" data-src="https://st.quantrimang.com/photos/image/2025/03/18/bien-anh-thanh-ban-phac-thao-but-chi-trong-photoshop-30.png" data-was-processed="true" height="204" src="https://st.quantrimang.com/photos/image/2025/03/18/bien-anh-thanh-ban-phac-thao-but-chi-trong-photoshop-30.png" width="267" /></div>

<figcaption>
<div style="text-align: justify;">Nhấp đúp vào tên của layer để làm nổi bật nó.</div>
</figcaption>
</figure>

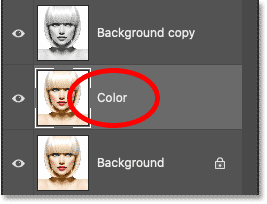
<p style="text-align: justify;">Sau đó đổi tên thành&nbsp;<strong>Color.</strong>&nbsp;Nhấn&nbsp;<strong>Enter</strong>&nbsp;(Win) /&nbsp;<strong>Return</strong>&nbsp;(Mac) trên bàn phím của bạn để chấp nhận nó:</p>

<figure>
<div style="text-align: justify;"><img alt="Đổi tên của layer thành Color." data-i="30" data-src="https://st.quantrimang.com/photos/image/2025/03/18/bien-anh-thanh-ban-phac-thao-but-chi-trong-photoshop-31.png" data-was-processed="true" height="204" src="https://st.quantrimang.com/photos/image/2025/03/18/bien-anh-thanh-ban-phac-thao-but-chi-trong-photoshop-31.png" width="267" /></div>

<figcaption>
<div style="text-align: justify;">Đổi tên của layer thành Color.</div>
</figcaption>
</figure>

<h3 id="mcetoc_1imkcm0o86a" style="text-align: justify;">Bước 12: Di chuyển layer Color lên trên layer điều chỉnh</h3>

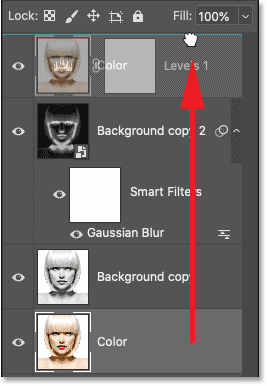
<p style="text-align: justify;">Chúng ta cần hình ảnh xuất hiện phía trên bản phác thảo. Vì vậy, hãy nhấp vào layer&nbsp;<strong>Color</strong>&nbsp;và kéo nó lên trên layer điều chỉnh Levels. Khi một đường màu xanh xuất hiện phía trên layer điều chỉnh, hãy nhả nút chuột:</p>

<figure>
<div style="text-align: justify;"><img alt="Kéo layer Color lên trên cùng." data-i="31" data-src="https://st.quantrimang.com/photos/image/2025/03/18/bien-anh-thanh-ban-phac-thao-but-chi-trong-photoshop-32.png" data-was-processed="true" height="386" src="https://st.quantrimang.com/photos/image/2025/03/18/bien-anh-thanh-ban-phac-thao-but-chi-trong-photoshop-32.png" width="267" /></div>

<figcaption>
<div style="text-align: justify;">Kéo layer Color lên trên cùng.</div>
</figcaption>
</figure>

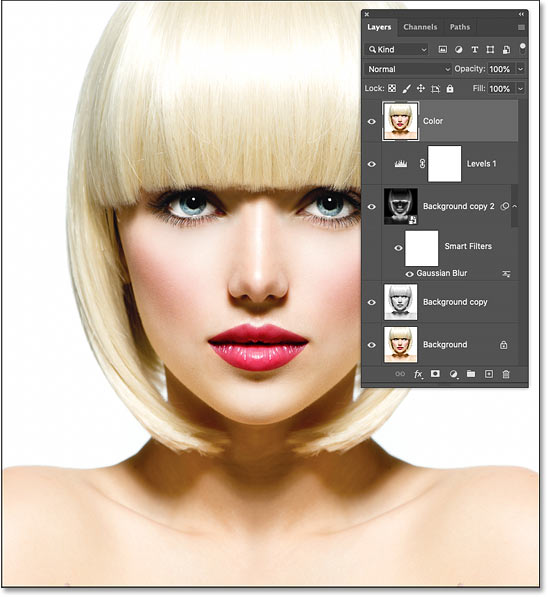
<p style="text-align: justify;">Hình ảnh tạm thời chặn bản phác thảo khỏi chế độ xem:</p>

<figure>
<div style="text-align: justify;"><img alt="Layer Color hiện nằm ở đầu ngăn xếp layer." data-i="32" data-src="https://st.quantrimang.com/photos/image/2025/03/18/bien-anh-thanh-ban-phac-thao-but-chi-trong-photoshop-33.jpg" data-was-processed="true" height="597" src="https://st.quantrimang.com/photos/image/2025/03/18/bien-anh-thanh-ban-phac-thao-but-chi-trong-photoshop-33.jpg" width="548" /></div>

<figcaption>
<div style="text-align: justify;">Layer Color hiện nằm ở đầu ngăn xếp layer.</div>
</figcaption>
</figure>

<h3 id="mcetoc_1imkcm0o86b" style="text-align: justify;">Bước 13: Thay đổi blend mode thành&nbsp;Color</h3>

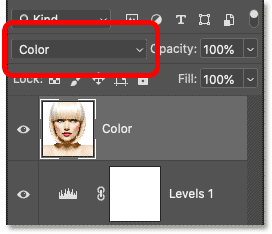
<p style="text-align: justify;">Để hòa trộn màu từ hình ảnh vào bản phác thảo, hãy thay đổi blend mode của layer Color từ&nbsp;<strong>Normal</strong>&nbsp;thành&nbsp;<strong>Color</strong>:</p>

<figure>
<div style="text-align: justify;"><img alt="Thay đổi blend mode của layer thành Color." data-i="33" data-src="https://st.quantrimang.com/photos/image/2025/03/18/bien-anh-thanh-ban-phac-thao-but-chi-trong-photoshop-34.png" data-was-processed="true" height="234" src="https://st.quantrimang.com/photos/image/2025/03/18/bien-anh-thanh-ban-phac-thao-but-chi-trong-photoshop-34.png" width="272" /></div>

<figcaption>
<div style="text-align: justify;">Thay đổi blend mode của layer thành Color.</div>
</figcaption>
</figure>

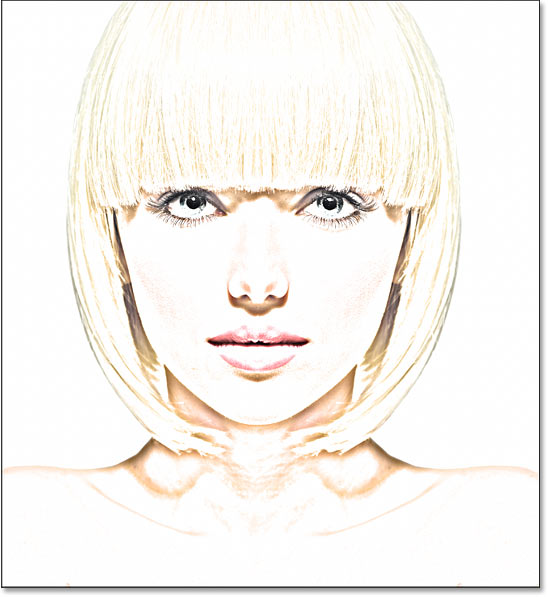
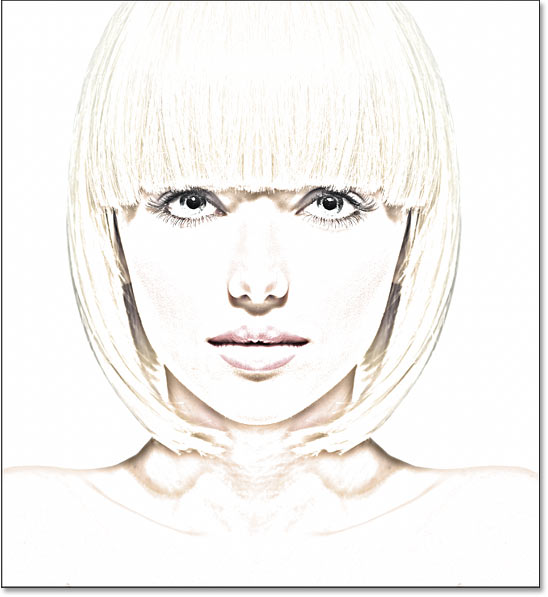
<p style="text-align: justify;">Blend mode Color yêu cầu Photoshop chỉ hòa trộn màu từ layer đang hoạt động với các layer bên dưới. Và như vậy, chúng ta đã thêm màu gốc trở lại bản phác thảo:</p>

<figure>
<div style="text-align: justify;"><img alt="Bản phác thảo được tô màu bằng màu gốc của ảnh." data-i="34" data-src="https://st.quantrimang.com/photos/image/2025/03/18/bien-anh-thanh-ban-phac-thao-but-chi-trong-photoshop-35.jpg" data-was-processed="true" height="597" src="https://st.quantrimang.com/photos/image/2025/03/18/bien-anh-thanh-ban-phac-thao-but-chi-trong-photoshop-35.jpg" width="548" /></div>

<figcaption>
<div style="text-align: justify;">Bản phác thảo được tô màu bằng màu gốc của ảnh.</div>
</figcaption>
</figure>

<p style="text-align: justify;"><strong>Cách tinh chỉnh cường độ màu</strong></p>

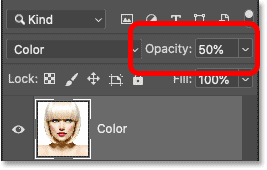
<p style="text-align: justify;">Nếu màu quá đậm, hãy giảm độ mờ của layer. Ví dụ sẽ giảm xuống 50%:</p>

<figure>
<div style="text-align: justify;"><img alt="Giảm độ mờ của layer Color." data-i="35" data-src="https://st.quantrimang.com/photos/image/2025/03/18/bien-anh-thanh-ban-phac-thao-but-chi-trong-photoshop-36.png" data-was-processed="true" height="170" src="https://st.quantrimang.com/photos/image/2025/03/18/bien-anh-thanh-ban-phac-thao-but-chi-trong-photoshop-36.png" width="267" /></div>

<figcaption>
<div style="text-align: justify;">Giảm độ mờ của layer Color.</div>
</figcaption>
</figure>

<p style="text-align: justify;">Khi độ mờ được giảm xuống, màu sắc sẽ trở nên tinh tế hơn. Và đó là cách tô màu cho bản phác thảo bằng màu gốc của ảnh:</p>

<figure>
<div style="text-align: justify;"><img alt="Hiệu ứng bản phác thảo sau khi giảm độ mờ của layer Color." data-i="36" data-src="https://st.quantrimang.com/photos/image/2025/03/18/bien-anh-thanh-ban-phac-thao-but-chi-trong-photoshop-37.jpg" data-was-processed="true" height="597" src="https://st.quantrimang.com/photos/image/2025/03/18/bien-anh-thanh-ban-phac-thao-but-chi-trong-photoshop-37.jpg" width="548" /></div>

<figcaption>
<div style="text-align: justify;">Hiệu ứng bản phác thảo sau khi giảm độ mờ của layer Color.</div>
</figcaption>
</figure>

<h2 id="mcetoc_1imkcm0o86c" style="text-align: justify;">Cách tô màu cho bản phác thảo bằng một màu duy nhất</h2>

<p style="text-align: justify;">Nếu bạn thích xem cách bản phác thảo của mình trông như thế nào với các màu từ ảnh, bạn có thể dừng lại ở đây. Nếu không, hãy xem cách thứ hai để thêm màu, lần này sử dụng một màu duy nhất. Sau đó, chúng ta sẽ kết thúc hướng dẫn bằng cách tìm hiểu cách tô màu cho bản phác thảo bằng một hiệu ứng chuyển màu.</p>

<h3 id="mcetoc_1imkcm0o86d" style="text-align: justify;">Bước 14: Tắt layer Color</h3>

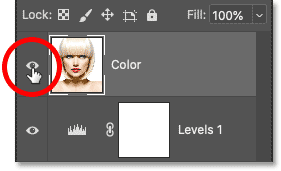
<p style="text-align: justify;">Trước khi đi xa hơn, hãy tắt layer Color mà chúng ta đã sử dụng trong các bước trước bằng cách nhấp vào biểu tượng hiển thị (hình con mắt) trong bảng Layers:</p>

<figure>
<div style="text-align: justify;"><img alt="Tắt layer Màu trong bảng Layers của Photoshop" data-i="37" data-src="https://st.quantrimang.com/photos/image/2025/03/18/bien-anh-thanh-ban-phac-thao-but-chi-trong-photoshop-38.png" data-was-processed="true" height="171" src="https://st.quantrimang.com/photos/image/2025/03/18/bien-anh-thanh-ban-phac-thao-but-chi-trong-photoshop-38.png" width="281" /></div>

<figcaption>
<div style="text-align: justify;">Tắt layer Màu trong bảng Layers của Photoshop</div>
</figcaption>
</figure>

<h3 id="mcetoc_1imkcm0o86e" style="text-align: justify;">Bước 15: Thêm fill layer Solid Color</h3>

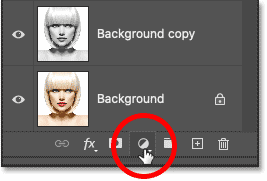
<p style="text-align: justify;">Để tô màu cho bản phác thảo bằng một màu duy nhất, chúng ta sẽ sử dụng fill layer Solid Color. Nhấp vào biểu tượng&nbsp;<strong>New Fill</strong>&nbsp;hoặc&nbsp;<strong>Adjustment Layer</strong>&nbsp;ở cuối bảng Layers:</p>

<figure>
<div style="text-align: justify;"><img alt="Nhấp vào biểu tượng New Fill hoặc Adjustment Layer trong bảng Layers của Photoshop." data-i="38" data-src="https://st.quantrimang.com/photos/image/2025/03/18/bien-anh-thanh-ban-phac-thao-but-chi-trong-photoshop-39.png" data-was-processed="true" height="181" src="https://st.quantrimang.com/photos/image/2025/03/18/bien-anh-thanh-ban-phac-thao-but-chi-trong-photoshop-39.png" width="267" /></div>

<figcaption>
<div style="text-align: justify;">Nhấp vào biểu tượng New Fill hoặc Adjustment Layer trong bảng Layers của Photoshop.</div>
</figcaption>
</figure>

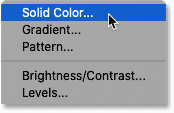
<p style="text-align: justify;">Sau đó chọn&nbsp;<strong>Solid Color</strong>&nbsp;từ danh sách:</p>

<figure>
<div style="text-align: justify;"><img alt="Chọn fill layer Solid Color trong Photoshop." data-i="39" data-src="https://st.quantrimang.com/photos/image/2025/03/18/bien-anh-thanh-ban-phac-thao-but-chi-trong-photoshop-40.png" data-was-processed="true" height="113" src="https://st.quantrimang.com/photos/image/2025/03/18/bien-anh-thanh-ban-phac-thao-but-chi-trong-photoshop-40.png" width="174" /></div>

<figcaption>
<div style="text-align: justify;">Chọn fill layer Solid Color trong Photoshop.</div>
</figcaption>
</figure>

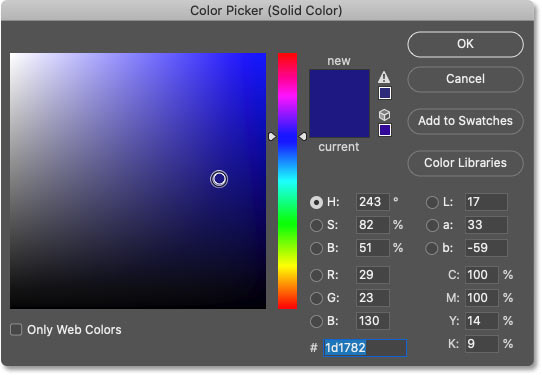
<p style="text-align: justify;">Photoshop mở Color Picker, tại đó chúng ta chọn màu cần thiết. Đừng lo lắng về việc chọn sai màu vì bạn luôn có thể quay lại và chọn một màu khác, như chúng ta sẽ thấy sau đây.</p>

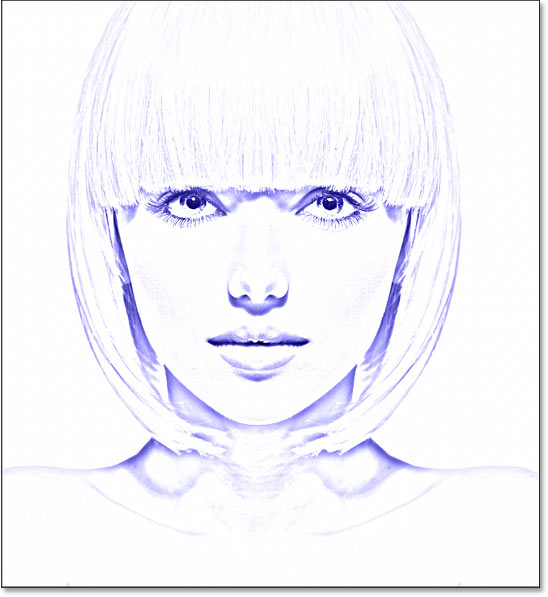
<p style="text-align: justify;">Ví dụ sẽ thử một sắc thái của màu xanh lam. Nhấp vào&nbsp;<strong>OK</strong>&nbsp;khi bạn hoàn tất để đóng Color Picker:</p>

<figure>
<div style="text-align: justify;"><img alt="Chọn màu xanh lam từ Color Picker." data-i="40" data-src="https://st.quantrimang.com/photos/image/2025/03/18/bien-anh-thanh-ban-phac-thao-but-chi-trong-photoshop-41.jpg" data-was-processed="true" height="375" src="https://st.quantrimang.com/photos/image/2025/03/18/bien-anh-thanh-ban-phac-thao-but-chi-trong-photoshop-41.jpg" width="542" /></div>

<figcaption>
<div style="text-align: justify;">Chọn màu xanh lam từ Color Picker.</div>
</figcaption>
</figure>

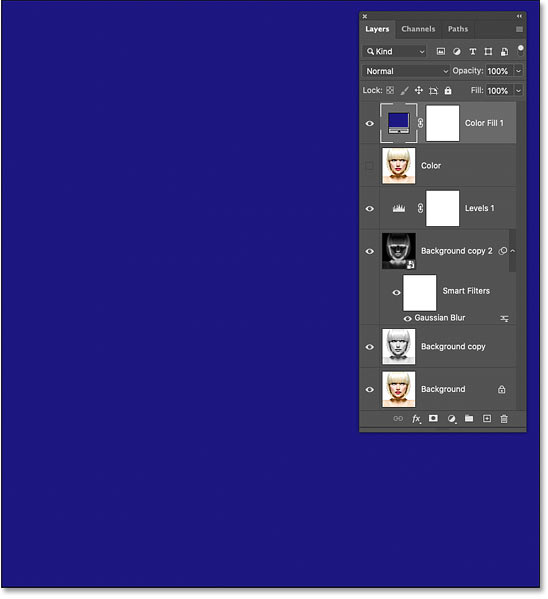
<p style="text-align: justify;">Trong bảng Layers, fill layer Solid Color xuất hiện phía trên các layer khác. Và trong tài liệu, màu bạn đã chọn sẽ tạm thời chặn bản phác thảo khỏi chế độ xem:</p>

<figure>
<div style="text-align: justify;"><img alt="Màu đã chọn sẽ tô đầy hình ảnh." data-i="41" data-src="https://st.quantrimang.com/photos/image/2025/03/18/bien-anh-thanh-ban-phac-thao-but-chi-trong-photoshop-42.jpg" data-was-processed="true" height="599" src="https://st.quantrimang.com/photos/image/2025/03/18/bien-anh-thanh-ban-phac-thao-but-chi-trong-photoshop-42.jpg" width="548" /></div>

<figcaption>
<div style="text-align: justify;">Màu đã chọn sẽ tô đầy&nbsp;hình ảnh.</div>
</figcaption>
</figure>

<h3 id="mcetoc_1imkcm0o86f" style="text-align: justify;">Bước 16: Thay đổi blend mode thành Color</h3>

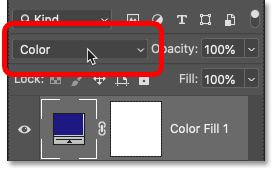
<p style="text-align: justify;">Để hòa trộn màu vào bản phác thảo, hãy thay đổi blend mode của fill layer thành Color:</p>

<figure>
<div style="text-align: justify;"><img alt="Thay đổi blend mode của fill layer thành Color." data-i="42" data-src="https://st.quantrimang.com/photos/image/2025/03/18/bien-anh-thanh-ban-phac-thao-but-chi-trong-photoshop-43.png" data-was-processed="true" height="170" src="https://st.quantrimang.com/photos/image/2025/03/18/bien-anh-thanh-ban-phac-thao-but-chi-trong-photoshop-43.png" width="273" /></div>

<figcaption>
<div style="text-align: justify;">Thay đổi blend mode của fill layer thành Color.</div>
</figcaption>
</figure>

<p style="text-align: justify;">Và đây là kết quả với bản phác thảo được tô màu xanh lam:</p>

<figure>
<div style="text-align: justify;"><img alt="Hiệu ứng màu sử dụng màu xanh lam." data-i="43" data-src="https://st.quantrimang.com/photos/image/2025/03/18/bien-anh-thanh-ban-phac-thao-but-chi-trong-photoshop-44.jpg" data-was-processed="true" height="597" src="https://st.quantrimang.com/photos/image/2025/03/18/bien-anh-thanh-ban-phac-thao-but-chi-trong-photoshop-44.jpg" width="548" /></div>

<figcaption>
<div style="text-align: justify;">Hiệu ứng màu sử dụng màu xanh lam.</div>
</figcaption>
</figure>

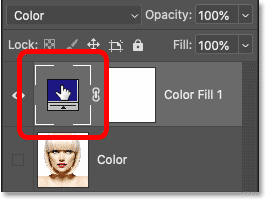
<p style="text-align: justify;"><strong>Cách thay đổi màu</strong></p>

<p style="text-align: justify;">Để thử một màu khác, hãy nhấp đúp vào mẫu màu của fill layer trong bảng Layers:</p>

<figure>
<div style="text-align: justify;"><img alt="Nhấp đúp vào mẫu màu của fill layer trong bảng Layers của Photoshop" data-i="44" data-src="https://st.quantrimang.com/photos/image/2025/03/18/bien-anh-thanh-ban-phac-thao-but-chi-trong-photoshop-45.png" data-was-processed="true" height="201" src="https://st.quantrimang.com/photos/image/2025/03/18/bien-anh-thanh-ban-phac-thao-but-chi-trong-photoshop-45.png" width="267" /></div>

<figcaption>
<div style="text-align: justify;">Nhấp đúp vào mẫu màu của fill layer trong bảng Layers của Photoshop</div>
</figcaption>
</figure>

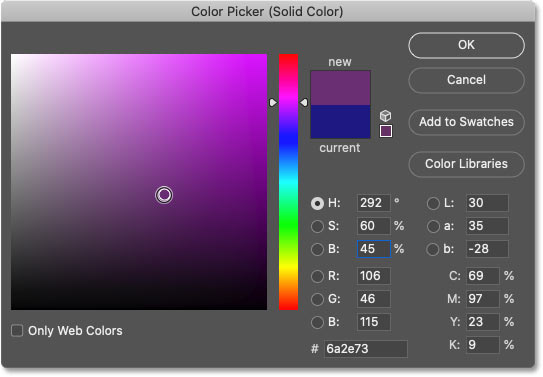
<p style="text-align: justify;">Sau đó, chọn một màu mới từ Color Picker. Miễn là Color Picker vẫn mở, bạn có thể tiếp tục chọn các màu khác nhau và xem bản xem trước trực tiếp trong tài liệu.</p>

<p style="text-align: justify;">Ví dụ sẽ chọn một sắc thái màu tím. Khi bạn hoàn tất, hãy nhấp vào&nbsp;<strong>OK</strong>&nbsp;để đóng Color Picker:</p>

<figure>
<div style="text-align: justify;"><img alt="Chọn một màu khác từ Color Picker." data-i="45" data-src="https://st.quantrimang.com/photos/image/2025/03/18/bien-anh-thanh-ban-phac-thao-but-chi-trong-photoshop-46.jpg" data-was-processed="true" height="377" src="https://st.quantrimang.com/photos/image/2025/03/18/bien-anh-thanh-ban-phac-thao-but-chi-trong-photoshop-46.jpg" width="543" /></div>

<figcaption>
<div style="text-align: justify;">Chọn một màu khác từ Color Picker.</div>
</figcaption>
</figure>

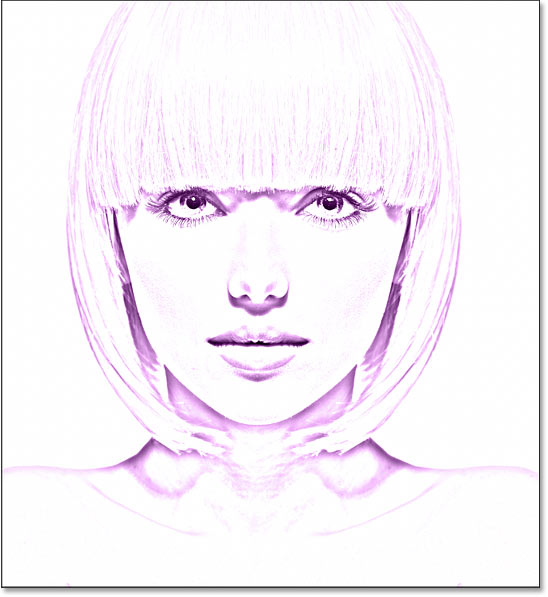
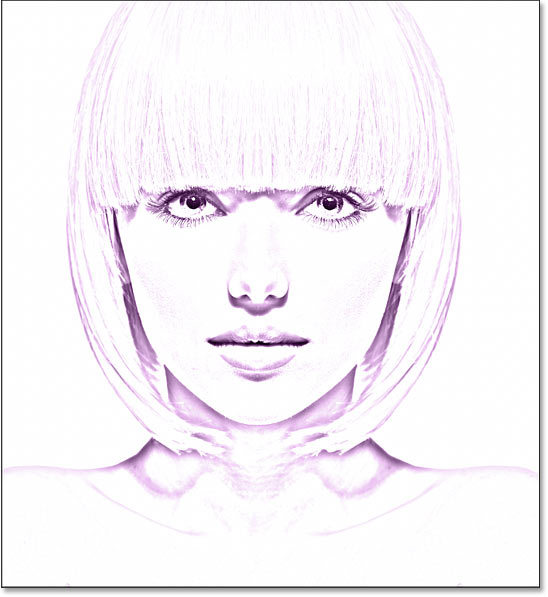
<p style="text-align: justify;">Và bây giờ bản phác thảo được tô màu tím:</p>

<figure>
<div style="text-align: justify;"><img alt="Hiệu ứng màu sử dụng tím." data-i="46" data-src="https://st.quantrimang.com/photos/image/2025/03/18/bien-anh-thanh-ban-phac-thao-but-chi-trong-photoshop-47.jpg" data-was-processed="true" height="597" src="https://st.quantrimang.com/photos/image/2025/03/18/bien-anh-thanh-ban-phac-thao-but-chi-trong-photoshop-47.jpg" width="548" /></div>

<figcaption>
<div style="text-align: justify;">Hiệu ứng màu sử dụng tím.</div>
</figcaption>
</figure>

<p style="text-align: justify;"><strong>Điều chỉnh cường độ màu</strong></p>

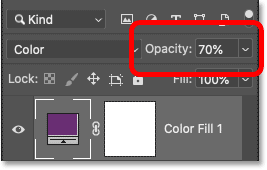
<p style="text-align: justify;">Nếu màu quá đậm, hãy giảm giá trị&nbsp;<strong>Opacity</strong>&nbsp;của fill layer. Ví dụ sẽ giảm xuống 70%:</p>

<figure>
<div style="text-align: justify;"><img alt="Giảm độ mờ của fill layer." data-i="47" data-src="https://st.quantrimang.com/photos/image/2025/03/18/bien-anh-thanh-ban-phac-thao-but-chi-trong-photoshop-48.png" data-was-processed="true" height="170" src="https://st.quantrimang.com/photos/image/2025/03/18/bien-anh-thanh-ban-phac-thao-but-chi-trong-photoshop-48.png" width="267" /></div>

<figcaption>
<div style="text-align: justify;">Giảm độ mờ của fill layer.</div>
</figcaption>
</figure>

<p style="text-align: justify;">Và đó là cách thêm một màu duy nhất vào bản phác thảo của bạn! Tiếp theo, chúng ta sẽ hoàn thành mọi thứ bằng cách học cách tô màu cho bản phác thảo bằng hiệu ứng chuyển màu, sau đó, bài viết sẽ chỉ cho bạn cách chuyển đổi giữa tất cả các phiên bản khác nhau này để chọn phiên bản bạn thích nhất:</p>

<figure>
<div style="text-align: justify;"><img alt="Kết quả với độ mờ được giảm." data-i="48" data-src="https://st.quantrimang.com/photos/image/2025/03/18/bien-anh-thanh-ban-phac-thao-but-chi-trong-photoshop-49.jpg" data-was-processed="true" height="597" src="https://st.quantrimang.com/photos/image/2025/03/18/bien-anh-thanh-ban-phac-thao-but-chi-trong-photoshop-49.jpg" width="548" /></div>

<figcaption>
<div style="text-align: justify;">Kết quả với độ mờ được giảm.</div>
</figcaption>
</figure>

<h2 id="mcetoc_1imkcm0o86g" style="text-align: justify;">Cách tô màu cho bản phác thảo bằng hiệu ứng chuyển màu</h2>

<p style="text-align: justify;">Tại thời điểm này, chúng ta đã học cách chuyển đổi ảnh thành bản phác thảo đen trắng, cách khôi phục lại màu gốc từ ảnh và cách thêm một màu duy nhất. Chúng ta sẽ kết thúc hướng dẫn này bằng cách tìm hiểu cách tô màu cho bản phác thảo bằng hiệu ứng chuyển màu.</p>

<p style="text-align: justify;">Bài viết sẽ không đề cập đến cách tạo hiệu ứng chuyển màu tùy chỉnh của riêng bạn ở đây. Thay vào đó, chúng ta sẽ sử dụng một trong các hiệu ứng chuyển màu tích hợp của Photoshop. Và trong các phiên bản Photoshop mới nhất (từ năm 2020 trở lên), có rất nhiều hiệu ứng chuyển màu mới để lựa chọn.</p>

<h3 id="mcetoc_1imkcm0o86h" style="text-align: justify;">Bước 17: Tắt fill layer Solid Color</h3>

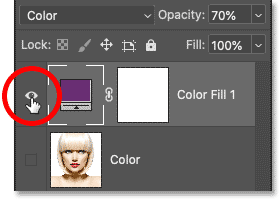
<p style="text-align: justify;">Đầu tiên, nếu bạn đã làm theo từ đầu, hãy tắt fill layer Solid Color mà chúng ta đã sử dụng trong các bước trước bằng cách nhấp vào biểu tượng hiển thị của layer đó trong bảng Layers:</p>

<figure>
<div style="text-align: justify;"><img alt="Nhấp vào biểu tượng hiển thị của fill layer." data-i="49" data-src="https://st.quantrimang.com/photos/image/2025/03/18/bien-anh-thanh-ban-phac-thao-but-chi-trong-photoshop-50.png" data-was-processed="true" height="200" src="https://st.quantrimang.com/photos/image/2025/03/18/bien-anh-thanh-ban-phac-thao-but-chi-trong-photoshop-50.png" width="280" /></div>

<figcaption>
<div style="text-align: justify;">Nhấp vào biểu tượng hiển thị của fill layer.</div>
</figcaption>
</figure>

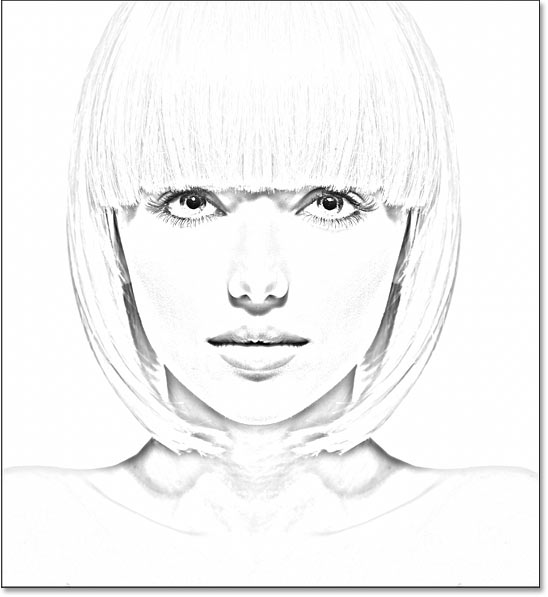
<p style="text-align: justify;">Thao tác này sẽ khôi phục phiên bản đen trắng của bản phác thảo:</p>

<figure>
<div style="text-align: justify;"><img alt="Bản phác thảo đen trắng trở lại." data-i="50" data-src="https://st.quantrimang.com/photos/image/2025/03/18/bien-anh-thanh-ban-phac-thao-but-chi-trong-photoshop-51.jpg" data-was-processed="true" height="597" src="https://st.quantrimang.com/photos/image/2025/03/18/bien-anh-thanh-ban-phac-thao-but-chi-trong-photoshop-51.jpg" width="548" /></div>

<figcaption>
<div style="text-align: justify;">Bản phác thảo đen trắng trở lại.</div>
</figcaption>
</figure>

<h3 id="mcetoc_1imkcm0o86i" style="text-align: justify;">Bước 18: Thêm fill layer Gradient</h3>

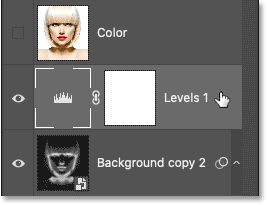
<p style="text-align: justify;">Để tô màu cho bản phác thảo bằng hiệu ứng chuyển màu, chúng ta sẽ sử dụng fill layer Gradient. Và chúng ta sẽ thêm fill layer ngay phía trên layer điều chỉnh Levels. Trước tiên, hãy nhấp vào layer điều chỉnh Levels trong bảng Layers để kích hoạt layer này:</p>

<figure>
<div style="text-align: justify;"><img alt="Chọn layer điều chỉnh Levels trong bảng Layers của Photoshop" data-i="51" data-src="https://st.quantrimang.com/photos/image/2025/03/18/bien-anh-thanh-ban-phac-thao-but-chi-trong-photoshop-52.png" data-was-processed="true" height="205" src="https://st.quantrimang.com/photos/image/2025/03/18/bien-anh-thanh-ban-phac-thao-but-chi-trong-photoshop-52.png" width="267" /></div>

<figcaption>
<div style="text-align: justify;">Chọn layer điều chỉnh Levels trong bảng Layers của Photoshop</div>
</figcaption>
</figure>

<p style="text-align: justify;">Sau đó, nhấp một lần nữa vào biểu tượng&nbsp;<strong>New Fill&nbsp;</strong>hoặc&nbsp;<strong>Adjustment Layer</strong>:</p>

<figure>
<div style="text-align: justify;"><img alt="Nhấp vào biểu tượng New Fill hoặc Adjustment Layer." data-i="52" data-src="https://st.quantrimang.com/photos/image/2025/03/18/bien-anh-thanh-ban-phac-thao-but-chi-trong-photoshop-53.png" data-was-processed="true" height="181" src="https://st.quantrimang.com/photos/image/2025/03/18/bien-anh-thanh-ban-phac-thao-but-chi-trong-photoshop-53.png" width="267" /></div>

<figcaption>
<div style="text-align: justify;">Nhấp vào biểu tượng New Fill hoặc Adjustment Layer.</div>
</figcaption>
</figure>

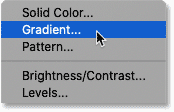
<p style="text-align: justify;">Và chọn&nbsp;<strong>Gradient</strong>&nbsp;từ danh sách:</p>

<figure>
<div style="text-align: justify;"><img alt="Chọn fill layer Gradient." data-i="53" data-src="https://st.quantrimang.com/photos/image/2025/03/18/bien-anh-thanh-ban-phac-thao-but-chi-trong-photoshop-54.png" data-was-processed="true" height="112" src="https://st.quantrimang.com/photos/image/2025/03/18/bien-anh-thanh-ban-phac-thao-but-chi-trong-photoshop-54.png" width="174" /></div>

<figcaption>
<div style="text-align: justify;">Chọn fill layer Gradient.</div>
</figcaption>
</figure>

<h3 id="mcetoc_1imkcm0o86j" style="text-align: justify;">Bước 19: Chọn một gradient</h3>

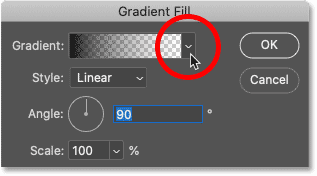
<p style="text-align: justify;">Trong hộp thoại Gradient Fill, hãy chọn một gradient bằng cách nhấp vào mũi tên nhỏ bên cạnh mẫu gradient:</p>

<figure>
<div style="text-align: justify;"><img alt="Nhấp vào mũi tên bên phải mẫu gradient trong hộp thoại Gradient Fill của Photoshop." data-i="54" data-src="https://st.quantrimang.com/photos/image/2025/03/18/bien-anh-thanh-ban-phac-thao-but-chi-trong-photoshop-55.png" data-was-processed="true" height="176" src="https://st.quantrimang.com/photos/image/2025/03/18/bien-anh-thanh-ban-phac-thao-but-chi-trong-photoshop-55.png" width="317" /></div>

<figcaption>
<div style="text-align: justify;">Nhấp vào mũi tên bên phải mẫu gradient trong hộp thoại Gradient Fill của Photoshop.</div>
</figcaption>
</figure>

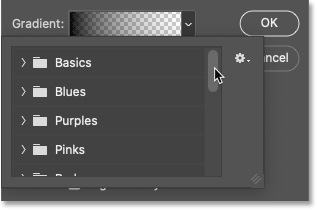
<p style="text-align: justify;">Thao tác này sẽ mở trình chọn Gradient với nhiều gradient mới được thêm vào trong Photoshop 2020. Các gradient được chia thành các nhóm dựa trên theme (Basics, Blues, Purples, v.v...):</p>

<figure>
<div style="text-align: justify;"><img alt="Trình chọn Gradient trong Photoshop" data-i="55" data-src="https://st.quantrimang.com/photos/image/2025/03/18/bien-anh-thanh-ban-phac-thao-but-chi-trong-photoshop-56.png" data-was-processed="true" height="210" src="https://st.quantrimang.com/photos/image/2025/03/18/bien-anh-thanh-ban-phac-thao-but-chi-trong-photoshop-56.png" width="317" /></div>

<figcaption>
<div style="text-align: justify;">Trình chọn Gradient trong Photoshop</div>
</figcaption>
</figure>

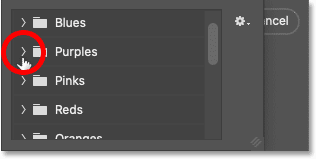
<p style="text-align: justify;">Để mở một nhóm, hãy nhấp vào mũi tên bên cạnh biểu tượng thư mục của nhóm. Xoay tròn để mở nhóm Purples:</p>

<figure>
<div style="text-align: justify;"><img alt="Xoay tròn để mở một trong các nhóm gradient." data-i="56" data-src="https://st.quantrimang.com/photos/image/2025/03/18/bien-anh-thanh-ban-phac-thao-but-chi-trong-photoshop-57.png" data-was-processed="true" height="159" src="https://st.quantrimang.com/photos/image/2025/03/18/bien-anh-thanh-ban-phac-thao-but-chi-trong-photoshop-57.png" width="316" /></div>

<figcaption>
<div style="text-align: justify;">Xoay tròn để mở một trong các nhóm gradient.</div>
</figcaption>
</figure>

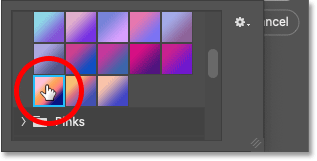
<p style="text-align: justify;">Sau đó, để chọn một gradient bên trong nhóm và đóng trình chọn Gradient, hãy nhấp đúp vào hình thu nhỏ của gradient:</p>

<figure>
<div style="text-align: justify;"><img alt="Chọn một gradient từ trình chọn Gradient của Photoshop" data-i="57" data-src="https://st.quantrimang.com/photos/image/2025/03/18/bien-anh-thanh-ban-phac-thao-but-chi-trong-photoshop-58.png" data-was-processed="true" height="161" src="https://st.quantrimang.com/photos/image/2025/03/18/bien-anh-thanh-ban-phac-thao-but-chi-trong-photoshop-58.png" width="317" /></div>

<figcaption>
<div style="text-align: justify;">Chọn một gradient từ trình chọn Gradient của Photoshop</div>
</figcaption>
</figure>

<p style="text-align: justify;"><strong>Cài đặt gradient</strong></p>

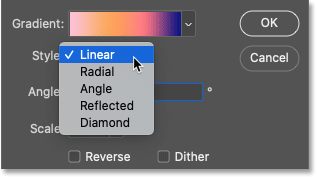
<p style="text-align: justify;">Quay lại hộp thoại Gradient Fill, bạn có thể thay đổi&nbsp;<strong>Style</strong>&nbsp;của gradient từ&nbsp;<strong>Linear</strong>&nbsp;(mặc định) thành Radial, Angle, Reflected hoặc Diamond:</p>

<figure>
<div style="text-align: justify;"><img alt="Các tùy chọn Style." data-i="58" data-src="https://st.quantrimang.com/photos/image/2025/03/18/bien-anh-thanh-ban-phac-thao-but-chi-trong-photoshop-59.png" data-was-processed="true" height="178" src="https://st.quantrimang.com/photos/image/2025/03/18/bien-anh-thanh-ban-phac-thao-but-chi-trong-photoshop-59.png" width="317" /></div>

<figcaption>
<div style="text-align: justify;">Các tùy chọn Style.</div>
</figcaption>
</figure>

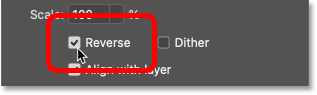
<p style="text-align: justify;">Bạn có thể đảo ngược thứ tự của các màu gradient:</p>

<figure>
<div style="text-align: justify;"><img alt="Tùy chọn Reverse cho gradient trong Photoshop" data-i="59" data-src="https://st.quantrimang.com/photos/image/2025/03/18/bien-anh-thanh-ban-phac-thao-but-chi-trong-photoshop-60.png" data-was-processed="true" height="95" src="https://st.quantrimang.com/photos/image/2025/03/18/bien-anh-thanh-ban-phac-thao-but-chi-trong-photoshop-60.png" width="317" /></div>

<figcaption>
<div style="text-align: justify;">Tùy chọn Reverse cho gradient trong Photoshop</div>
</figcaption>
</figure>

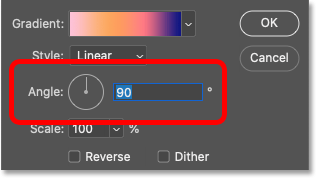
<p style="text-align: justify;">Và bạn có thể thay đổi&nbsp;<strong>Angle</strong>&nbsp;của gradient. Ví dụ sẽ để mặc định là 90 độ:</p>

<figure>
<div style="text-align: justify;"><img alt="Tùy chọn Angle cho gradient trong Photoshop" data-i="60" data-src="https://st.quantrimang.com/photos/image/2025/03/18/bien-anh-thanh-ban-phac-thao-but-chi-trong-photoshop-61.png" data-was-processed="true" height="179" src="https://st.quantrimang.com/photos/image/2025/03/18/bien-anh-thanh-ban-phac-thao-but-chi-trong-photoshop-61.png" width="317" /></div>

<figcaption>
<div style="text-align: justify;">Tùy chọn Angle cho gradient trong Photoshop</div>
</figcaption>
</figure>

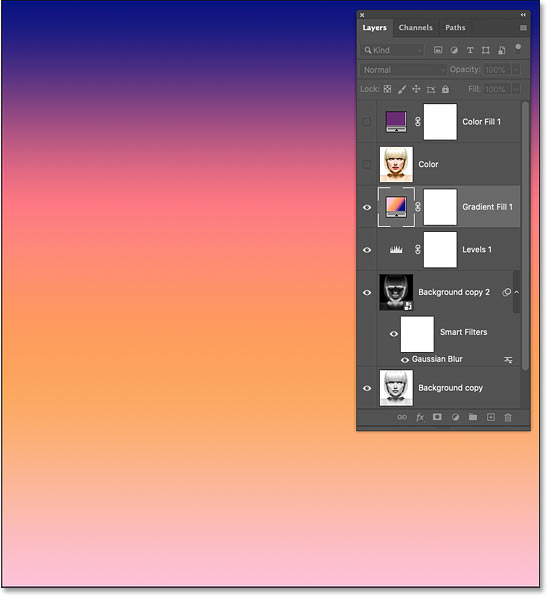
<p style="text-align: justify;">Nhấp vào&nbsp;<strong>OK</strong>&nbsp;khi bạn hoàn tất để đóng hộp thoại Gradient Fill. Gradient tạm thời chặn bản phác thảo khỏi chế độ xem:</p>

<figure>
<div style="text-align: justify;"><img alt="Gradient đã chặn bản phác thảo khỏi chế độ xem" data-i="61" data-src="https://st.quantrimang.com/photos/image/2025/03/18/bien-anh-thanh-ban-phac-thao-but-chi-trong-photoshop-62.jpg" data-was-processed="true" height="597" src="https://st.quantrimang.com/photos/image/2025/03/18/bien-anh-thanh-ban-phac-thao-but-chi-trong-photoshop-62.jpg" width="548" /></div>

<figcaption>
<div style="text-align: justify;">Gradient đã chặn bản phác thảo khỏi chế độ xem</div>
</figcaption>
</figure>

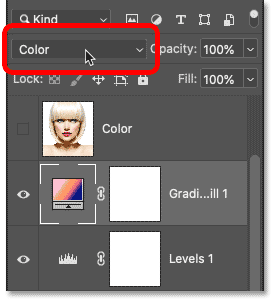
<h3 id="mcetoc_1imkcm0o86k" style="text-align: justify;">Bước 20: Thay đổi blend mode thành Color</h3>

<p style="text-align: justify;">Quay lại bảng Layers, fill layer Gradient xuất hiện phía trên layer điều chỉnh Levels. Để hòa trộn màu gradient với bản phác thảo đen trắng, hãy thay đổi blend mode của fill layer Gradient từ&nbsp;<strong>Normal</strong>&nbsp;thành&nbsp;<strong>Color</strong>:</p>

<figure>
<div style="text-align: justify;"><img alt="Thay đổi blend mode của fill layer Gradient thành Color." data-i="62" data-src="https://st.quantrimang.com/photos/image/2025/03/18/bien-anh-thanh-ban-phac-thao-but-chi-trong-photoshop-63.png" data-was-processed="true" height="300" src="https://st.quantrimang.com/photos/image/2025/03/18/bien-anh-thanh-ban-phac-thao-but-chi-trong-photoshop-63.png" width="272" /></div>

<figcaption>
<div style="text-align: justify;">Thay đổi blend mode của fill layer Gradient thành Color.</div>
</figcaption>
</figure>

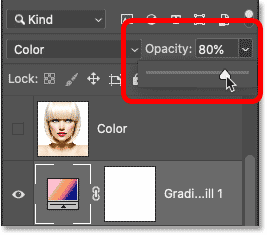
<p style="text-align: justify;">Sau đó, điều chỉnh cường độ màu nếu cần bằng cách giảm độ mờ của layer:</p>

<figure>
<div style="text-align: justify;"><img alt="Giảm độ mờ của fill layer Gradient." data-i="63" data-src="https://st.quantrimang.com/photos/image/2025/03/18/bien-anh-thanh-ban-phac-thao-but-chi-trong-photoshop-64.png" data-was-processed="true" height="235" src="https://st.quantrimang.com/photos/image/2025/03/18/bien-anh-thanh-ban-phac-thao-but-chi-trong-photoshop-64.png" width="267" /></div>

<figcaption>
<div style="text-align: justify;">Giảm độ mờ của fill layer Gradient.</div>
</figcaption>
</figure>

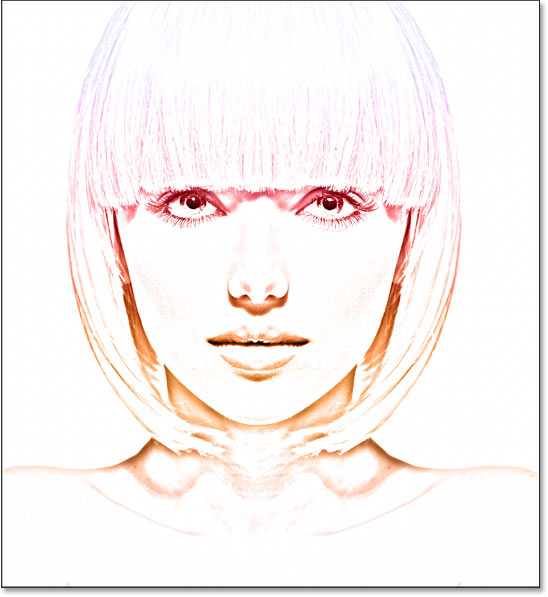
<p style="text-align: justify;">Và đây là bản phác thảo sử dụng màu gradient:</p>

<figure>
<div style="text-align: justify;"><img alt="Bản phác thảo sử dụng màu gradient." data-i="64" data-src="https://st.quantrimang.com/photos/image/2025/03/18/bien-anh-thanh-ban-phac-thao-but-chi-trong-photoshop-65.jpg" data-was-processed="true" height="597" src="https://st.quantrimang.com/photos/image/2025/03/18/bien-anh-thanh-ban-phac-thao-but-chi-trong-photoshop-65.jpg" width="548" /></div>

<figcaption>
<div style="text-align: justify;">Bản phác thảo sử dụng màu gradient.</div>
</figcaption>
</figure>

<p style="text-align: justify;"><strong>Cách chọn một gradient khác hoặc chỉnh sửa cài đặt</strong></p>

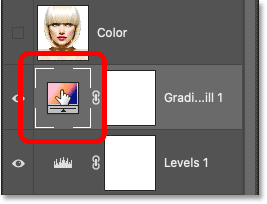
<p style="text-align: justify;">Để thử một gradient khác hoặc chỉnh sửa bất kỳ tùy chọn gradient nào (Style, Reverse, Angle), hãy nhấp đúp vào mẫu màu của fill layer Gradient. Thao tác này sẽ mở lại hộp thoại Gradient Fill, tại đây bạn có thể thực hiện bất kỳ thay đổi nào cần thiết:</p>

<figure>
<div style="text-align: justify;"><img alt="Nhấp đúp vào mẫu màu Gradient fill để chỉnh sửa cài đặt gradient" data-i="65" data-src="https://st.quantrimang.com/photos/image/2025/03/18/bien-anh-thanh-ban-phac-thao-but-chi-trong-photoshop-66.png" data-was-processed="true" height="204" src="https://st.quantrimang.com/photos/image/2025/03/18/bien-anh-thanh-ban-phac-thao-but-chi-trong-photoshop-66.png" width="267" /></div>

<figcaption>
<div style="text-align: justify;">Nhấp đúp vào mẫu màu Gradient fill để chỉnh sửa cài đặt gradient</div>
</figcaption>
</figure>

<h2 id="mcetoc_1imkcm0o86l" style="text-align: justify;">Cách chuyển đổi giữa các hiệu ứng màu phác thảo</h2>

<p style="text-align: justify;">Bây giờ, chúng ta đã tô màu cho bản phác thảo bằng gradient, nếu bạn muốn quay lại màu từ ảnh gốc, hoặc phiên bản một màu, hoặc thậm chí là phiên bản đen trắng thì sao? Sau đây là cách chuyển đổi giữa các hiệu ứng khác nhau.</p>

<h3 id="mcetoc_1imkcm0o86m" style="text-align: justify;">Khôi phục bản phác thảo đen trắng</h3>

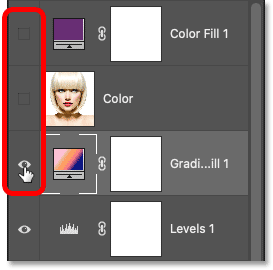
<p style="text-align: justify;">Để ẩn tất cả các hiệu ứng màu và quay lại phiên bản đen trắng, chỉ cần tắt layer Color, layer Solid Color và layer Gradient fill bằng các biểu tượng hiển thị của chúng. Ví dụ đã tắt các layer Color và Solid Color, vì vậy fill layer Gradient cũng sẽ bị tắt:</p>

<figure>
<div style="text-align: justify;"><img alt="Tắt cả 3 layer hiệu ứng màu trong bảng Layers của Photoshop" data-i="66" data-src="https://st.quantrimang.com/photos/image/2025/03/18/bien-anh-thanh-ban-phac-thao-but-chi-trong-photoshop-67.png" data-was-processed="true" height="270" src="https://st.quantrimang.com/photos/image/2025/03/18/bien-anh-thanh-ban-phac-thao-but-chi-trong-photoshop-67.png" width="273" /></div>

<figcaption>
<div style="text-align: justify;">Tắt cả 3 layer hiệu ứng màu trong bảng Layers của Photoshop</div>
</figcaption>
</figure>

<p style="text-align: justify;">Tắt cả 3 layer hiệu ứng màu, chúng ta sẽ quay lại bản phác thảo đen trắng của mình:</p>

<figure>
<div style="text-align: justify;"><img alt="Quay lại phiên bản đen trắng của bản phác thảo" data-i="67" data-src="https://st.quantrimang.com/photos/image/2025/03/18/bien-anh-thanh-ban-phac-thao-but-chi-trong-photoshop-68.jpg" data-was-processed="true" height="597" src="https://st.quantrimang.com/photos/image/2025/03/18/bien-anh-thanh-ban-phac-thao-but-chi-trong-photoshop-68.jpg" width="548" /></div>

<figcaption>
<div style="text-align: justify;">Quay lại phiên bản đen trắng của bản phác thảo</div>
</figcaption>
</figure>

<h3 id="mcetoc_1imkcm0o86n" style="text-align: justify;">Khôi phục phiên bản màu của bản phác thảo</h3>

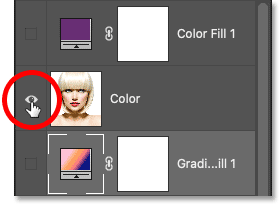
<p style="text-align: justify;">Sau đó, để bật một trong các hiệu ứng màu, hãy nhấp vào biểu tượng hiển thị của hiệu ứng đó. Ví dụ sẽ bật layer Color của mình. Đảm bảo bạn chỉ bật một hiệu ứng màu tại một thời điểm, nếu không chúng sẽ hòa trộn vào nhau:</p>

<figure>
<div style="text-align: justify;"><img alt="Nhấp vào biểu tượng hiển thị của layer Color" data-i="68" data-src="https://st.quantrimang.com/photos/image/2025/03/18/bien-anh-thanh-ban-phac-thao-but-chi-trong-photoshop-69.png" data-was-processed="true" height="205" src="https://st.quantrimang.com/photos/image/2025/03/18/bien-anh-thanh-ban-phac-thao-but-chi-trong-photoshop-69.png" width="280" /></div>

<figcaption>
<div style="text-align: justify;">Nhấp vào biểu tượng hiển thị của layer Color</div>
</figcaption>
</figure>

<p style="text-align: justify;">Và khi bật layer Color, chúng ta quay lại màu gốc của ảnh:</p>

<figure>
<div style="text-align: justify;"><img alt="Phiên bản màu gốc." data-i="69" data-src="https://st.quantrimang.com/photos/image/2025/03/18/bien-anh-thanh-ban-phac-thao-but-chi-trong-photoshop-70.jpg" data-was-processed="true" height="597" src="https://st.quantrimang.com/photos/image/2025/03/18/bien-anh-thanh-ban-phac-thao-but-chi-trong-photoshop-70.jpg" width="548" /></div>

<figcaption>
<div style="text-align: justify;">Phiên bản màu gốc.</div>
</figcaption>
</figure>

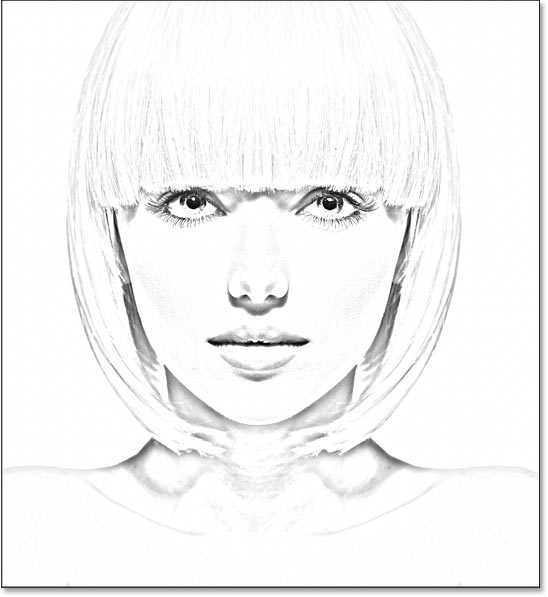
<p style="text-align: justify;">Và thế là xong! Đó là cách biến ảnh thành bản phác thảo bút chì đen trắng, cùng với một số cách khác nhau để tô màu cho bản phác thảo trong Photoshop!</p>

<div style="text-align: justify;">&nbsp;</div>
		</div>
				<div id="author">
						<p>
				<strong>Nguồn tin:</strong>
				Quantrimang.com:
			</p>
		</div>
	</div>
	<div id="footer" class="clearfix">
		<div id="url">
			<strong>URL của bản tin này: </strong><a href="https://www.nguoicodonvn2008.info/vi/news/savefile/kien-thuc-may-tinh/cach-bien-anh-thanh-ban-phac-thao-but-chi-trong-photoshop-10010.html" title="Cách biến ảnh thành bản phác thảo bút chì trong Photoshop">https://www.nguoicodonvn2008.info/vi/news/savefile/kien-thuc-may-tinh/cach-bien-anh-thanh-ban-phac-thao-but-chi-trong-photoshop-10010.html</a>

		</div>
		<div class="clear"></div>
		<div class="copyright">
			&copy; .&#x3A; Nguoicodonvn2008.info - Cõi lòng người cô đơn &#x3A;.
		</div>
		<div id="contact">
			<a href="mailto:admin@nguoicodonvn2008.info">admin@nguoicodonvn2008.info</a>
		</div>
	</div>
</div>
        <div id="timeoutsess" class="chromeframe">
            Bạn đã không sử dụng Site, <a onclick="timeoutsesscancel();" href="https://www.nguoicodonvn2008.info/#">Bấm vào đây để duy trì trạng thái đăng nhập</a>. Thời gian chờ: <span id="secField"> 60 </span> giây
        </div>
        <div id="openidResult" class="nv-alert" style="display:none"></div>
        <div id="openidBt" data-result="" data-redirect=""></div>
		</script>
		<div class="car-top">
  <span><img src="https://www.nguoicodonvn2008.info/themes/default/images/car.png" alt=""></span>
</div>
<script src="https://www.nguoicodonvn2008.info/assets/js/jquery/jquery.min.js"></script>
<script>var nv_base_siteurl="/",nv_lang_data="vi",nv_lang_interface="vi",nv_name_variable="nv",nv_fc_variable="op",nv_lang_variable="language",nv_module_name="news",nv_func_name="savefile",nv_is_user=0, nv_my_ofs=-4,nv_my_abbr="EDT",nv_cookie_prefix="nv4c_e856T",nv_check_pass_mstime=1738000,nv_area_admin=0,nv_safemode=0,theme_responsive=0,nv_recaptcha_ver=2,nv_recaptcha_sitekey="",nv_recaptcha_type="image",XSSsanitize=1;</script>
<script src="https://www.nguoicodonvn2008.info/assets/js/language/vi.js"></script>
<script src="https://www.nguoicodonvn2008.info/assets/js/DOMPurify/purify3.js"></script>
<script src="https://www.nguoicodonvn2008.info/assets/js/global.js"></script>
<script src="https://www.nguoicodonvn2008.info/assets/js/site.js"></script>
<script src="https://www.nguoicodonvn2008.info/themes/default/js/news.js"></script>
<script src="https://www.nguoicodonvn2008.info/themes/default/js/main.js"></script>
<script src="https://www.nguoicodonvn2008.info/themes/default/js/custom.js"></script>
<script type="application/ld+json">
        {
            "@context": "https://schema.org",
            "@type": "Organization",
            "url": "https://www.nguoicodonvn2008.info",
            "logo": "https://www.nguoicodonvn2008.info/uploads/angel.gif"
        }
        </script>
<script src="https://www.nguoicodonvn2008.info/themes/default/js/bootstrap.min.js"></script>
<script type="text/javascript">
var $scrolltop = $('.car-top');
$scrolltop.on('click', function () {
    $('html,body').animate({
        scrollTop: 0
    }, 800);
    $(this).addClass("car-run");
    setTimeout(function(){ $scrolltop.removeClass('car-run');}, 1000);
    return false;
});
$(window).on('scroll', function ()
{ 
    if($(window).scrollTop() >= 200)
    {
        $scrolltop.addClass("show");
        $scrolltop.addClass("car-down");
    }
    else
    {
       $scrolltop.removeClass("show");
       setTimeout(function(){ $scrolltop.removeClass('car-down');}, 300);
    }
});
</script>
</body>
</html>