Cách bật hoặc tắt mã hóa file NTFS trong Windows
- Thứ năm - 09/02/2023 23:47
- In ra
- Đóng cửa sổ này
Encrypting File System (EFS) là công cụ mã hóa tích hợp trong Windows dùng để mã hóa tập tin và thư mục trên ổ đĩa NTFS với mục đích bảo vệ chúng khỏi những truy cập không mong muốn. EFS cho phép mã hóa và giải mã các tập tin minh bạch cho tài khoản người dùng bằng cách sử dụng các thuật toán mã hóa tiêu chuẩn, tiên tiến. Bất kỳ cá nhân hoặc ứng dụng nào không có key mã hóa file thích hợp đều không thể mở bất kỳ file và thư mục được mã hóa nào. Mã hóa là sự bảo vệ mạnh mẽ nhất mà Windows cung cấp cho giúp người dùng để bảo mật các file và thư mục của mình.
Bạn cần phải đăng nhập với tư cách quản trị viên để kích hoạt hoặc vô hiệu hóa mã hóa file NTFS.
Lưu ý: Nếu vô hiệu hóa mã hóa file NTFS, các file được mã hóa gần đây vẫn được mã hóa.

Cách bật/tắt mã hóa file NTFS trong Windows 11
Hãy xem một số cách để kích hoạt tính năng nén file NTFS trong Windows 11.
1. Kích hoạt tính năng nén file NTFS thông qua File Explorer
Cách nhanh nhất để kích hoạt tính năng nén file NTFS là thông qua File Explorer. Dưới đây là các bước để nén một thư mục:
1. Mở File Explorer và đi tới thư mục bạn muốn nén.
2. Nhấp chuột phải vào thư mục đích và chọn Properties từ menu ngữ cảnh.
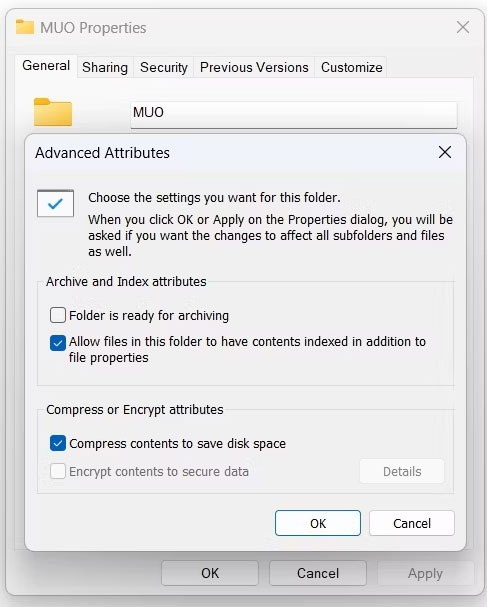
3. Trong tab General, chọn tùy chọn Advanced.
4. Trong phần Compress or Encrypt attributes, hãy chọn hộp Compress contents to save disk space và nhấp vào OK.
5. Nhấp vào Apply > OK để lưu các thay đổi.
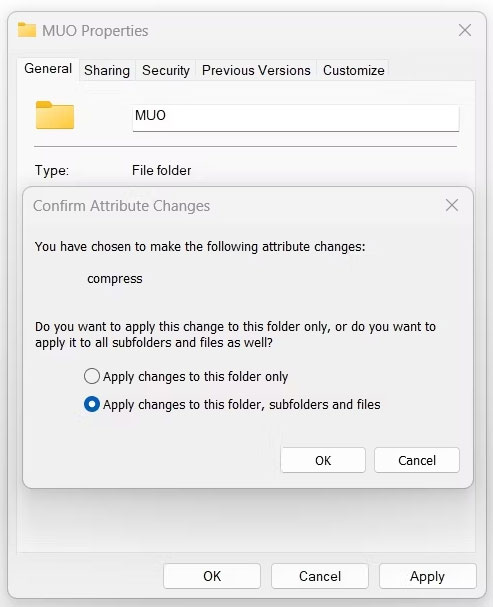
6. Trong hộp thoại xác nhận xuất hiện, hãy chọn tùy chọn Apply changes to this folder, subfolders, and files option.
7. Nhấp vào OK.
Vậy là xong, thư mục đã được nén. Bạn có thể xác nhận điều này bằng cách so sánh kích thước thư mục hiện tại với kích thước trước đó.
Từ giờ trở đi, mọi file hoặc thư mục mà bạn sẽ di chuyển bên trong thư mục nén sẽ được nén tự động. Để tắt tính năng nén, hãy bỏ chọn hộp Compress contents to save disk space và lưu các thay đổi.
Tương tự, bạn có thể nén toàn bộ ổ như sau:
1. Mở File Explorer và nhấp chuột phải vào ổ bạn muốn nén.
2. Trong tab General, hãy chọn hộp Compress this drive to save disk space.
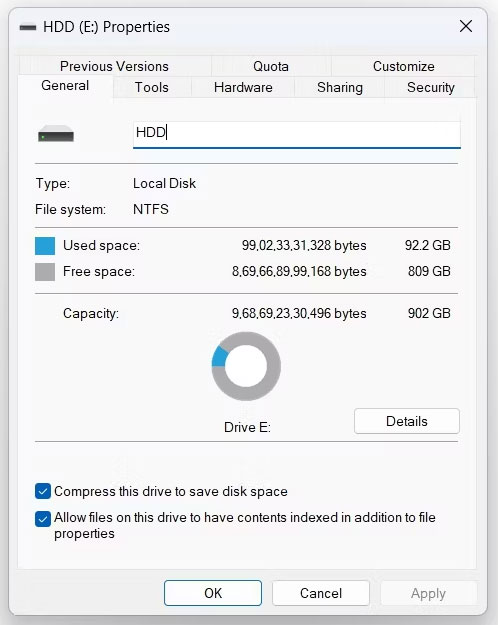
3. Nhấp vào Apply > OK trên hộp xác nhận xuất hiện.
2. Kích hoạt tính năng nén file NTFS bằng Command Prompt
Nếu là người dùng thành thạo, bạn có thể sử dụng Command Prompt để bật tính năng nén file trên Windows 11. Dưới đây là các bước để thực hiện:
1. Nhấn Win + S để mở Windows Search.
2. Trong thanh tìm kiếm, nhập Command Prompt và chọn Run as administrator từ ngăn bên phải. Nếu phương pháp này không hoạt động, bạn có thể sử dụng bất kỳ cách nào khác để mở CMD với quyền admin.
3. Nhập lệnh sau và nhấn Enter để kích hoạt tính năng nén file.
fsutil behavior set disablecompression 0
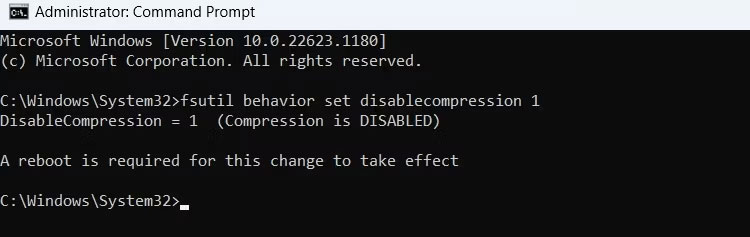
Bạn sẽ thấy thông báo "A reboot is required for this change to take effect" trên bảng điều khiển. Vì vậy, hãy khởi động lại máy tính để áp dụng các thay đổi.
Nếu bạn muốn tắt File Compression, hãy thực thi lệnh sau trong cửa sổ CMD với quyền admin, sau đó khởi động lại hệ thống.
fsutil behavior set disablecompression 1
3. Kích hoạt tính năng nén file NTFS bằng Registry Editor
Một cách nhanh chóng khác để kích hoạt tính năng nén là thông qua Registry Editor. Thực hiện theo các bước dưới đây để làm điều đó:
1. Mở hộp thoại Run bằng cách nhấn Win + R.
2. Nhập regedit vào trường văn bản và nhấp vào OK.
3. Trong Registry Editor, điều hướng đến vị trí bên dưới:
Computer\HKEY_LOCAL_MACHINE\SYSTEM\CurrentControlSet\Policies
4. Nhấp chuột phải vào thư mục Policies ở thanh bên trái, di con trỏ đến New và chọn DWORD (32-bit) Value từ menu ngữ cảnh.
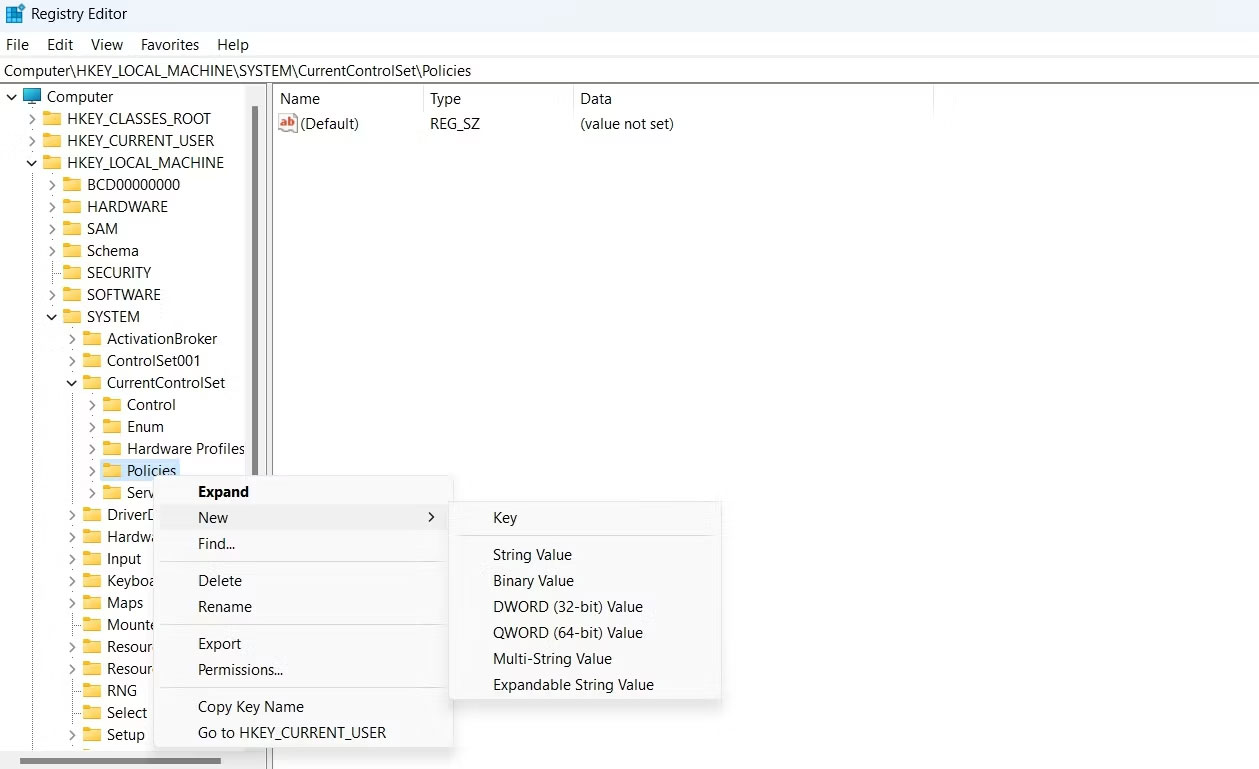
5. Nhấp chuột phải vào giá trị mới được tạo và chọn Rename.
6. Nhập Ntfsenablecompression vào trường văn bản.
7. Chọn và nhấp chuột phải vào Ntfsenablecompression một lần nữa và chọn Modify.
8. Nhập 1 vào Value data.
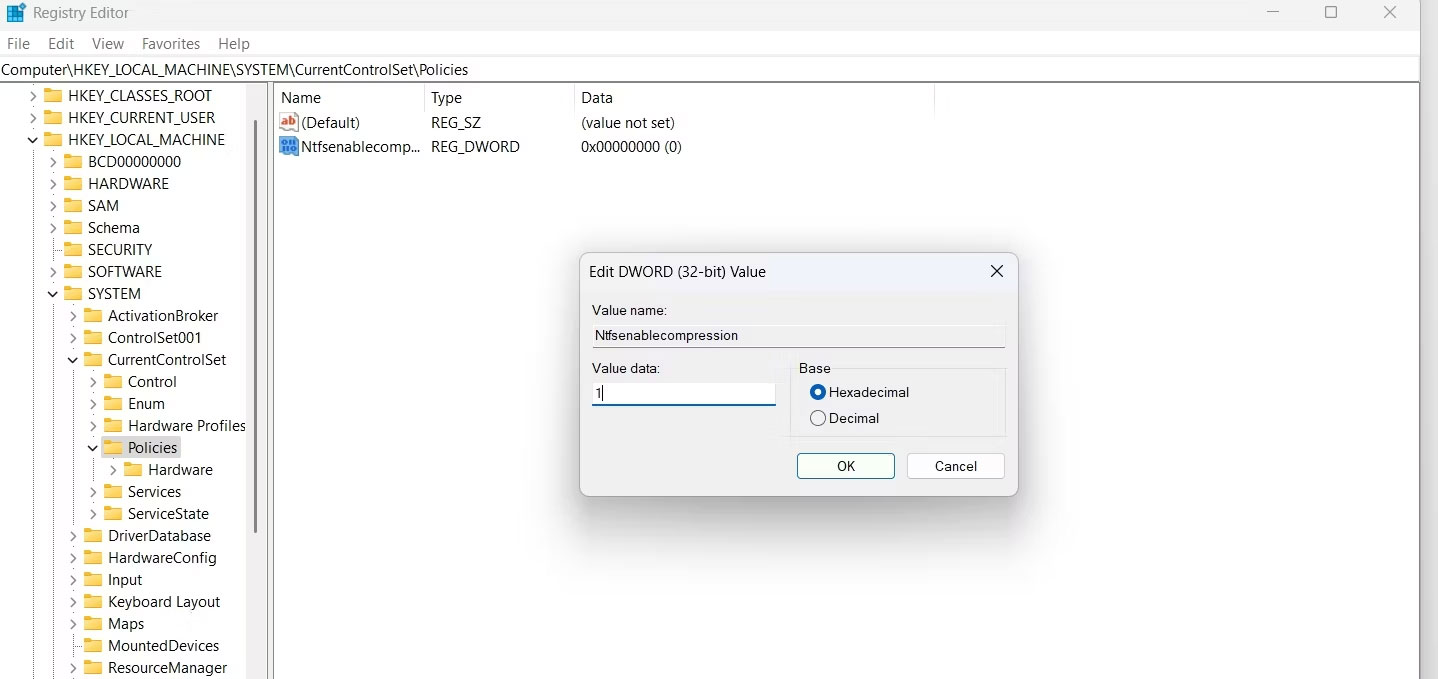
9. Nhấn OK để lưu các thay đổi.
Tính năng nén file hiện đã được bật trên máy tính của bạn. Nếu bạn muốn tắt nó, hãy nhập 0 vào Value data và lưu các thay đổi.
4. Kích hoạt tính năng nén file NTFS bằng Local Group Policy Editor
Local Group Policy Editor là nơi thích hợp để cấu hình các policy quan trọng của Windows. Để sử dụng Local Group Policy Editor kích hoạt tính năng nén file, hãy làm theo các hướng dẫn bên dưới:
1. Trong hộp thoại Run, nhập gpedit.msc và bấm OK.
2. Đi tới vị trí sau trong Local Group Policy Editor:
Computer Configuration\Administrative Templates\System\Filesystem\NTFS
3. Nhấp đúp vào Do not allow compression on all NTFS volumes policy để mở cửa sổ thuộc tính của nó.
4. Chọn tùy chọn Disabled.

5. Nhấp vào Apply > OK để kích hoạt tính năng nén file.
Bạn có thể tắt tính năng nén file bằng cách chọn tùy chọn Enabled trong cửa sổ thuộc tính Do not allow compression on all NTFS volumes policy.
Cách bật/tắt mã hóa file NTFS trong Windows 10/8/7
Phần này sẽ hướng dẫn các bạn cách kích hoạt hoặc vô hiệu hóa mã hóa file NTFS cho tất cả người dùng trong Windows 7, Windows 8 và Windows 10.
Cách 1: Kích hoạt hoặc vô hiệu hóa mã hóa file NTFS trong Local Group Policy Editor
Lưu ý: Local Group Policy Editor chỉ có trên Windows 7/8/10 Pro, Windows 7/8/10 Enterprise và Windows 10 Education editions.
Tất cả các phiên bản khác có thể sử dụng cách thứ hai bên dưới.
Bước 1. Mở Local Group Policy Editor.
Bước 2. Trong khung bên trái của Local Group Policy Editor, điều hướng đến vị trí bên dưới.
Computer Configuration\Administrative Templates\System\Filesystem\NTFS
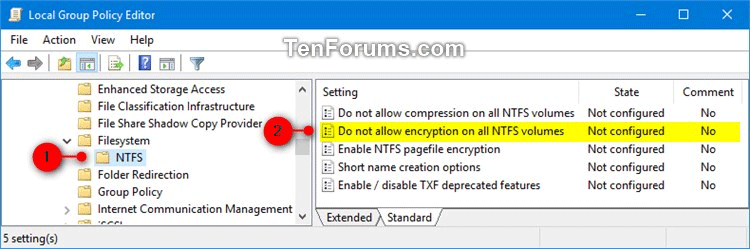
Bước 3. Ở khung bên phải của NTFS trong Local Group Policy Editor, click đúp vào chính sách Do not allow encryption on all NTFS volumes để chỉnh sửa nó.
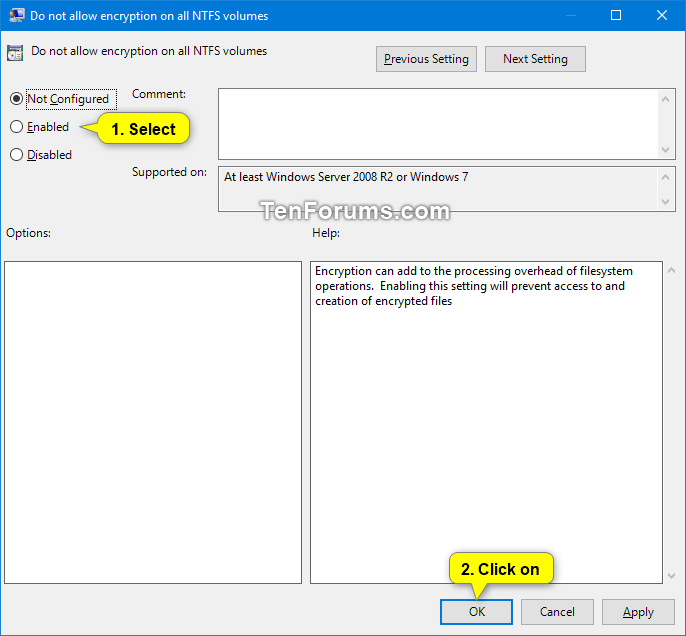
Bước 4.
Để kích hoạt mã hóa file NTFS, chọn Not Configured hoặc Disabled, sau đó click vào OK.
Lưu ý: Not Configured là cài đặt mặc định.
Để vô hiệu hóa mã hóa file NTFS, chọn Enabled và click vào OK.
Bước 5. Khi kết thúc, đóng Local Group Policy Editor.
Bước 6. Khởi động lại máy tính để áp dụng thay đổi.
Cách 2: Kích hoạt hoặc vô hiệu hóa mã hóa file NTFS sử dụng file REG
Lưu ý: File .reg bên dưới sẽ thêm và chỉnh sửa giá trị DWORD trong key registry bên dưới:
quantrimang.com/cong-nghe/cach-mo-file-reg-tren-windows-145777
HKEY_LOCAL_MACHINE\SYSTEM\CurrentControlSet\Policies
NtfsDisableEncryption DWORD
(delete)= Kích hoạt
1 = Vô hiệu hóa
Bước 1. Để kích hoạt mã hóa file NTFS, tải file theo liên kết bên dưới.
https://www.tenforums.com/attachments/tutorials/163380d1510424051-enable-disable-ntfs-file-encryption-windows-enable_ntfs_file_encryption.reg
Lưu ý: Đây là cài đặt mặc định.
Để vô hiệu hóa mã hóa file NTFS, tải file theo liên kết bên dưới.
https://www.tenforums.com/attachments/tutorials/163381d1510424051-enable-disable-ntfs-file-encryption-windows-disable_ntfs_file_encryption.reg
Bước 2. Lưu file .reg trên desktop.
Bước 3. Click đúp vào file .reg để hợp nhất nó.
Bước 4. Khi được thông báo, click vào Run, Yes (UAC), Yes và OK để chấp nhận hợp nhất.
Bước 5. Khởi động lại máy tính để áp dụng thay đổi.
Bước 6. Bạn có thể xóa file .reg nếu muốn.
Chúc các bạn thực hiện thành công!
