8 cách mở công cụ Programs and Features trên Windows
- Thứ sáu - 16/09/2022 00:53
- In ra
- Đóng cửa sổ này
Công cụ Programs and Features hiển thị cho bạn danh sách đầy đủ các ứng dụng được cài đặt trên PC của bạn. Nó giúp bạn thay đổi, sửa chữa hoặc gỡ cài đặt các chương trình phần mềm chỉ trong một vài cú nhấp chuột đơn giản. Nhưng một số cách để truy cập nhanh chóng và dễ dàng tính năng tiện dụng này là gì?
Để trả lời điều đó, bài viết sau đây sẽ đề cập đến các phương pháp khác nhau để mở công cụ Programs and Features của Windows.
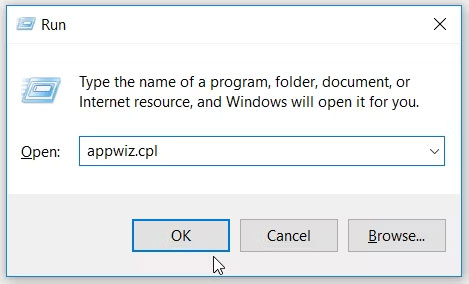
1. Sử dụng hộp thoại lệnh Run
Bạn có thể truy cập nhiều chương trình Windows bằng cách sử dụng hộp thoại lệnh Run. Tất cả những gì bạn cần làm là nhập các lệnh chính xác và bạn đã sẵn sàng.
Bây giờ, đây là cách bạn có thể mở cửa sổ Programs and Features bằng hộp thoại lệnh Run:
- Nhấn Win + R để khởi chạy hộp thoại lệnh Run.
- Nhập appwiz.cpl và nhấp OK để mở công cụ Programs and Features.
2. Sử dụng menu Quick Access
Menu Quick Access của Windows giúp bạn dễ dàng truy cập hầu hết các ứng dụng quan trọng trên thiết bị của mình. Dưới đây là cách menu này có thể giúp bạn mở công cụ Programs and Features:
- Nhấn Win + X để mở menu Quick Access.
- Trong cửa sổ tiếp theo, chọn Apps and Features.
- Cuối cùng, chọn tùy chọn Programs and Features trong Related settings.
3. Sử dụng thanh tìm kiếm của Windows
Thanh tìm kiếm của Windows giúp bạn dễ dàng tìm thấy bất kỳ thứ gì trên thiết bị Windows của mình. Đây là cách bạn có thể sử dụng nó để mở công cụ Programs and Features:
- Bấm vào thanh tìm kiếm của menu Start và nhập Programs and Features.
- Chọn tùy chọn Programs and Features trong số những kết quả phù hợp nhất.
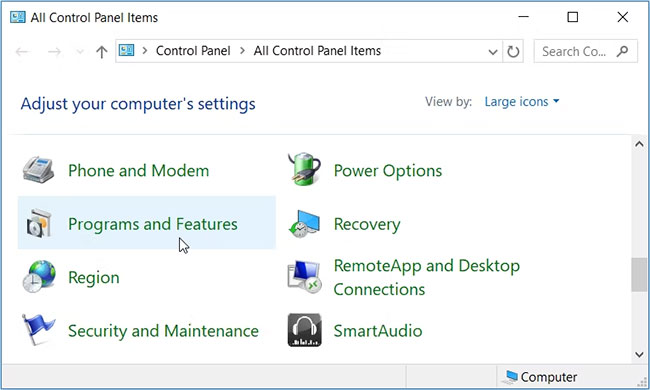
4. Sử dụng Control Panel
Nếu bạn muốn dễ dàng mở công cụ Programs and Features, hãy thử sử dụng Control Panel. Đây là các bước đơn giản để thực hiện:
- Nhấn Win + R để mở hộp thoại lệnh Run.
- Gõ Control Panel và nhấn Enter.
- Nhấp vào menu drop-down View by và chọn Large icons.
- Cuộn xuống và nhấp vào tùy chọn Programs and Features.
5. Sử dụng Command Prompt hoặc PowerShell
Command Prompt và PowerShell có thể hữu ích trong một số trường hợp, chẳng hạn như khắc phục sự cố hệ thống. Những công cụ này cũng có thể giúp bạn mở các chương trình khác nhau trên thiết bị Windows của mình.
Hãy cùng khám phá cách bạn có thể mở cửa sổ Programs and Features bằng Command Prompt hoặc PowerShell. Để bắt đầu, hãy xem Command Prompt có thể trợ giúp như thế nào:
- Nhấn Win + R để mở hộp thoại lệnh Run.
- Nhập CMD và nhấn Ctrl + Shift + Enter để mở Command Prompt với quyền admin.
- Nhập appwiz.cpl và nhấn Enter để mở cửa sổ Programs and Features.
Ngoài ra, hãy thử sử dụng PowerShell bằng cách làm theo các bước sau:
- Nhấn Win + R để mở hộp thoại lệnh Run.
- Nhập PowerShell và nhấn Ctrl + Shift + Enter để mở cửa sổ PowerShell với quyền admin.
- Nhập appwiz.cpl và nhấn Enter để mở cửa sổ Programs and Features.
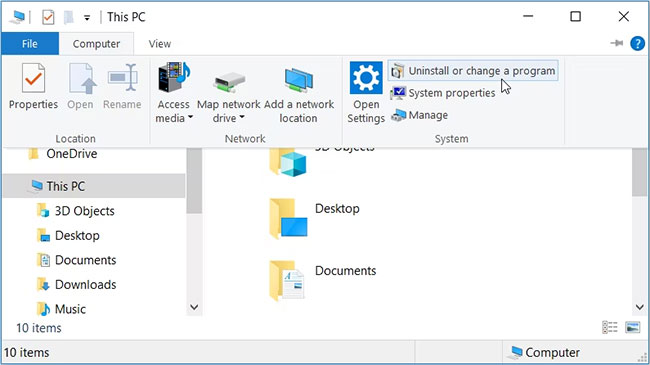
6. Sử dụng File Explorer
Bạn cũng có thể truy cập công cụ Programs and Features bằng File Explorer. Đây là cách thực hiện:
- Nhấn Win + E để mở File Explorer.
- Nhấp vào This PC trên ngăn bên trái.
- Nhấp vào tab Computer về phía góc trên bên trái của màn hình.
- Chọn Uninstall or change a program từ các tùy chọn.
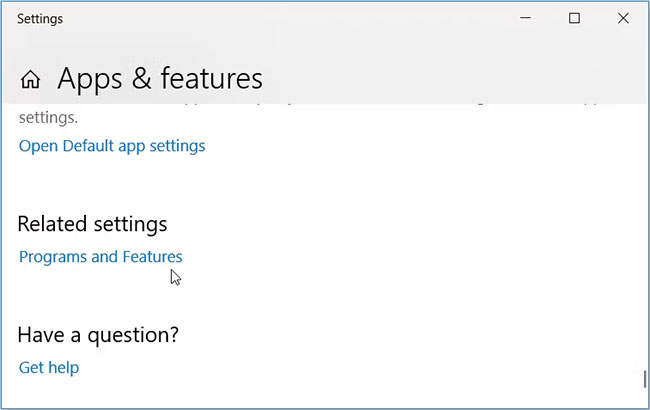
7. Mở qua System Settings
Cài đặt hệ thống luôn có ích khi bạn gặp một số vấn đề liên quan đến hệ thống. Nhưng trong trường hợp này, bài viết sẽ chỉ cho bạn cách những cài đặt này có thể giúp bạn mở công cụ Programs and Features.
- Để bắt đầu, hãy nhấn Win + I để mở cửa sổ Settings.
- Điều hướng đến Apps > Apps & features.
- Cuối cùng, nhấp vào tùy chọn Programs and Features ở phía bên tay phải.
8. Tạo shortcut cho Programs and Features
Bạn cũng có thể tạo shortcut giúp bạn nhanh chóng truy cập vào công cụ Programs and Features. Để bắt đầu, hãy làm theo các bước đơn giản sau:
- Nhấp chuột phải vào khoảng trống trên màn hình và chọn New > Shortcut.
- Nhập %WinDir%\System32\appwiz.cpl vào hộp vị trí rồi bấm Next.
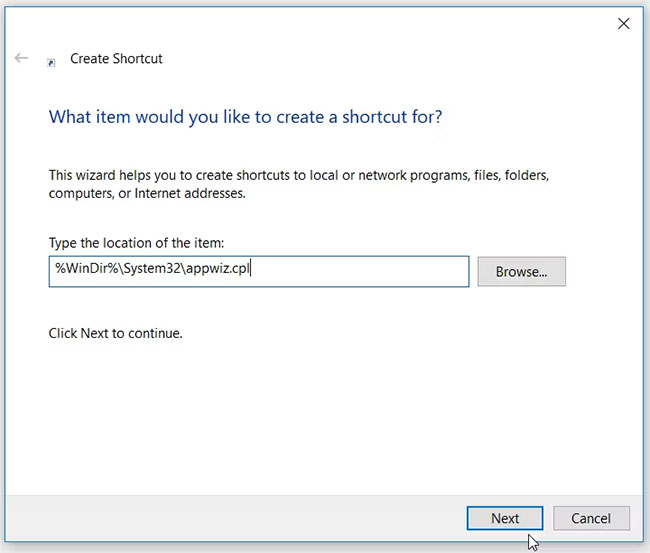
- Đặt tên cho shortcut là Programs and Features hoặc bất kỳ thứ gì tương tự, rồi nhấn Finish.
- Để dễ dàng truy cập công cụ Programs and Features, hãy điều hướng đến Desktop và nhấp đúp vào shortcut bạn vừa tạo.
Bạn muốn một cách đơn giản để hiển thị danh sách đầy đủ các ứng dụng trên thiết bị Windows của mình? Hay bạn cần một trong những phương pháp đơn giản nhất để xóa các chương trình không mong muốn trên Windows? Nếu vậy, hãy thử sử dụng công cụ Programs and Features.
Và nếu bạn đang băn khoăn về cách mở công cụ này, hãy thử bất kỳ mẹo nào mà bài viết đã đề cập ở trên.
