<!DOCTYPE html>
    <html lang="vi" xmlns="http://www.w3.org/1999/xhtml" prefix="og: http://ogp.me/ns#">
    <head>
<title>7 cách dọn dẹp dữ liệu trong Microsoft Excel</title>
<meta name="description" content="7 cách dọn dẹp dữ liệu trong Microsoft Excel - Savefile - Tin Tức -...">
<meta name="author" content=".: Nguoicodonvn2008.info - Cõi lòng người cô đơn :.">
<meta name="copyright" content=".: Nguoicodonvn2008.info - Cõi lòng người cô đơn :. [admin@nguoicodonvn2008.info]">
<meta name="robots" content="index, archive, follow, noodp">
<meta name="googlebot" content="index,archive,follow,noodp">
<meta name="msnbot" content="all,index,follow">
<meta name="generator" content="NukeViet v4.5">
<meta http-equiv="Content-Type" content="text/html; charset=utf-8">
<meta property="og:title" content="7 cách dọn dẹp dữ liệu trong Microsoft Excel">
<meta property="og:type" content="website">
<meta property="og:description" content="Savefile - Tin Tức - https&#x3A;&#x002F;&#x002F;www.nguoicodonvn2008.info&#x002F;vi&#x002F;news&#x002F;savefile&#x002F;kien-thuc-may-tinh&#x002F;7-cach-don-dep-du-lieu-trong-microsoft-excel-7290.html">
<meta property="og:site_name" content=".&#x3A; Nguoicodonvn2008.info - Cõi lòng người cô đơn &#x3A;.">
<meta property="og:url" content="https://www.nguoicodonvn2008.info/vi/news/savefile/kien-thuc-may-tinh/7-cach-don-dep-du-lieu-trong-microsoft-excel-7290.html">
<link rel="shortcut icon" href="https://www.nguoicodonvn2008.info/favicon.ico">
<link rel="canonical" href="https://www.nguoicodonvn2008.info/vi/news/savefile/kien-thuc-may-tinh/7-cach-don-dep-du-lieu-trong-microsoft-excel-7290.html">
<link rel="alternate" href="https://www.nguoicodonvn2008.info/vi/news/rss/" title="Tin Tức" type="application/rss+xml">
<link rel="alternate" href="https://www.nguoicodonvn2008.info/vi/news/rss/karaoke-dual/" title="Tin Tức - Karaoke Dual" type="application/rss+xml">
<link rel="alternate" href="https://www.nguoicodonvn2008.info/vi/news/rss/nhac-tre/" title="Tin Tức - Nhạc trẻ" type="application/rss+xml">
<link rel="alternate" href="https://www.nguoicodonvn2008.info/vi/news/rss/tru-tinh/" title="Tin Tức - Trữ tình" type="application/rss+xml">
<link rel="alternate" href="https://www.nguoicodonvn2008.info/vi/news/rss/nuoc-ngoai/" title="Tin Tức - Nước ngoài" type="application/rss+xml">
<link rel="alternate" href="https://www.nguoicodonvn2008.info/vi/news/rss/remix/" title="Tin Tức - Remix" type="application/rss+xml">
<link rel="alternate" href="https://www.nguoicodonvn2008.info/vi/news/rss/tam-su-tinh-yeu/" title="Tin Tức - Tâm sự tình yêu" type="application/rss+xml">
<link rel="alternate" href="https://www.nguoicodonvn2008.info/vi/news/rss/tho-suu-tam/" title="Tin Tức - Thơ sưu tầm" type="application/rss+xml">
<link rel="alternate" href="https://www.nguoicodonvn2008.info/vi/news/rss/cuoc-song/" title="Tin Tức - Cuộc sống" type="application/rss+xml">
<link rel="alternate" href="https://www.nguoicodonvn2008.info/vi/news/rss/phan-mem/" title="Tin Tức - Phần mềm" type="application/rss+xml">
<link rel="alternate" href="https://www.nguoicodonvn2008.info/vi/news/rss/kien-thuc-may-tinh/" title="Tin Tức - Kiến thức máy tính" type="application/rss+xml">
<link rel="alternate" href="https://www.nguoicodonvn2008.info/vi/news/rss/hoc-tap/" title="Tin Tức - Học tập" type="application/rss+xml">
<link rel="alternate" href="https://www.nguoicodonvn2008.info/vi/news/rss/tai-lieu/" title="Tin Tức - Tài liệu" type="application/rss+xml">
<link rel="alternate" href="https://www.nguoicodonvn2008.info/vi/news/rss/de-thi/" title="Tin Tức - Đề thi" type="application/rss+xml">
<link rel="preload" as="style" href="https://www.nguoicodonvn2008.info/assets/css/font-awesome.min.css" type="text/css">
<link rel="preload" as="style" href="https://www.nguoicodonvn2008.info/themes/default/css/bootstrap.non-responsive.css" type="text/css">
<link rel="preload" as="style" href="https://www.nguoicodonvn2008.info/themes/default/css/style.css" type="text/css">
<link rel="preload" as="style" href="https://www.nguoicodonvn2008.info/themes/default/css/style.non-responsive.css" type="text/css">
<link rel="preload" as="style" href="https://www.nguoicodonvn2008.info/themes/default/css/news.css" type="text/css">
<link rel="preload" as="style" href="https://www.nguoicodonvn2008.info/themes/default/css/custom.css" type="text/css">
<link rel="preload" as="script" href="https://www.nguoicodonvn2008.info/assets/js/jquery/jquery.min.js" type="text/javascript">
<link rel="preload" as="script" href="https://www.nguoicodonvn2008.info/assets/js/language/vi.js" type="text/javascript">
<link rel="preload" as="script" href="https://www.nguoicodonvn2008.info/assets/js/DOMPurify/purify3.js" type="text/javascript">
<link rel="preload" as="script" href="https://www.nguoicodonvn2008.info/assets/js/global.js" type="text/javascript">
<link rel="preload" as="script" href="https://www.nguoicodonvn2008.info/assets/js/site.js" type="text/javascript">
<link rel="preload" as="script" href="https://www.nguoicodonvn2008.info/themes/default/js/news.js" type="text/javascript">
<link rel="preload" as="script" href="https://www.nguoicodonvn2008.info/themes/default/js/main.js" type="text/javascript">
<link rel="preload" as="script" href="https://www.nguoicodonvn2008.info/themes/default/js/custom.js" type="text/javascript">
<link rel="preload" as="script" href="https://www.nguoicodonvn2008.info/themes/default/js/bootstrap.min.js" type="text/javascript">
<link rel="stylesheet" href="https://www.nguoicodonvn2008.info/assets/css/font-awesome.min.css">
<link rel="stylesheet" href="https://www.nguoicodonvn2008.info/themes/default/css/bootstrap.non-responsive.css">
<link rel="stylesheet" href="https://www.nguoicodonvn2008.info/themes/default/css/style.css">
<link rel="stylesheet" href="https://www.nguoicodonvn2008.info/themes/default/css/style.non-responsive.css">
<link rel="StyleSheet" href="https://www.nguoicodonvn2008.info/themes/default/css/news.css">
<link rel="stylesheet" href="https://www.nguoicodonvn2008.info/themes/default/css/custom.css">
<style type="text/css">
	body{background: #fff;}
</style>
    </head>
    <body>
<div id="print">
	<div id="hd_print">
		<h2 class="pull-left">.&#x3A; Nguoicodonvn2008.info - Cõi lòng người cô đơn &#x3A;.</h2>
		<p class="pull-right"><a title=".&#x3A; Nguoicodonvn2008.info - Cõi lòng người cô đơn &#x3A;." href="https://www.nguoicodonvn2008.info/">https://www.nguoicodonvn2008.info</a></p>
	</div>
	<div class="clear"></div>
	<hr />
	<div id="content">
		<h1>7 cách dọn dẹp dữ liệu trong Microsoft Excel</h1>
		<ul class="list-inline">
			<li>Thứ năm - 13/07/2023 09:26</li>
			<li class="hidden-print txtrequired"><em class="fa fa-print">&nbsp;</em><a title="In ra" href="javascript:;" onclick="window.print()">In ra</a></li>
			<li class="hidden-print txtrequired"><em class="fa fa-power-off">&nbsp;</em><a title="Đóng cửa sổ này" href="javascript:;" onclick="window.close()">Đóng cửa sổ này</a></li>
		</ul>
		<div class="clear"></div>
		<div id="hometext">
		</div>
				<div class="imghome">
			<img alt="7 cách dọn dẹp dữ liệu trong Microsoft Excel" src="https://st.quantrimang.com/photos/image/2023/07/13/don-dep-du-lieut-excel-18.jpg" width="460" class="img-thumbnail" />
		</div>
		<div class="clear"></div>
		<div id="bodytext" class="clearfix">
			<p style="text-align: justify;">Lỗi chính tả, khoảng trắng thừa, trùng lặp, lỗi công thức và ô trống đều có thể gây rắc rối khi phân tích dữ liệu bảng tính. Để dọn dẹp bảng tính&nbsp;Microsoft Excel&nbsp;của bạn, hãy thử một hoặc nhiều cách sau đây để xử lý dữ liệu.</p>

<h2 style="text-align: justify;">1. Loại bỏ khoảng trắng thừa</h2>

<p style="text-align: justify;">Cho dù từ nhập hoặc gõ sai, bạn có thể có thêm khoảng trống trong dữ liệu của mình. Điều này có thể bao gồm khoảng trắng ở đầu ô, dấu cách ở cuối ô hoặc khoảng trắng linh tinh giữa các từ hoặc giá trị. Mặc dù chúng có vẻ không quan trọng, nhưng bạn có thể dễ gặp sự cố khi lọc, sắp xếp hoặc tạo dữ liệu.</p>

<p style="text-align: justify;">Có hai cách đơn giản để loại bỏ khoảng trắng thừa trong trang tính Excel của bạn: hàm TRIM và công cụ Find and Replace.</p>

<h3 style="text-align: justify;">Sử dụng hàm TRIM</h3>

<p style="text-align: justify;">Hàm TRIM trong Excel hoạt động đặc biệt tốt để xóa khoảng trắng khỏi dữ liệu của bạn. Cú pháp của công thức đơn giản là&nbsp;<em>TRIM(text).</em>&nbsp;Nhập tham chiếu ô hoặc văn bản cho đối số.</p>

<h3 style="text-align: justify;">Sử dụng công cụ Find and Replace</h3>

<p style="text-align: justify;">Nếu khoảng trắng nằm rải rác trên trang tính, bạn có thể muốn sử dụng công cụ Find and Replace của Excel thay vì hàm TRIM. Với phương pháp này, bạn có thể xóa tất cả hoặc một số khoảng trắng cụ thể.</p>

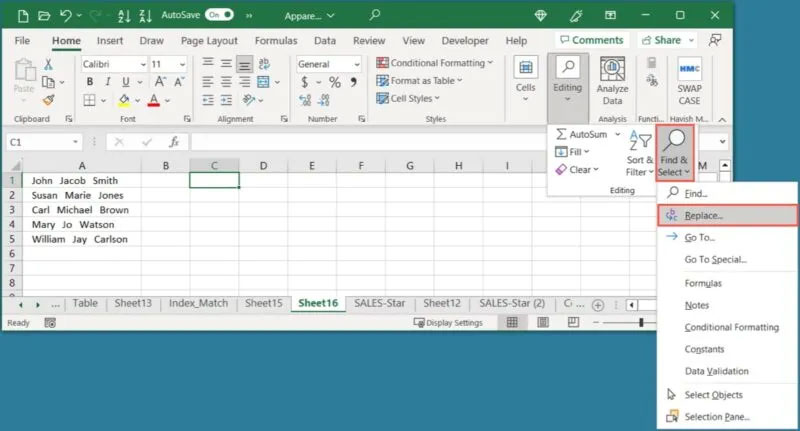
<p style="text-align: justify;">1. Chuyển đến tab&nbsp;<strong>“Home”,</strong>&nbsp;mở menu drop-down&nbsp;<strong>“Find &amp; Select”</strong>&nbsp;trong phần&nbsp;<strong>Editing</strong>&nbsp;và chọn&nbsp;<strong>“Replace”.</strong></p>

<figure>
<div style="text-align: justify;"><img alt="Tùy chọn Replace trong menu Find &amp; Select" data-i="0" data-src="https://st.quantrimang.com/photos/image/2023/07/13/don-dep-du-lieut-excel-1.jpg" data-was-processed="true" height="431" src="https://st.quantrimang.com/photos/image/2023/07/13/don-dep-du-lieut-excel-1.jpg" width="800" /></div>

<figcaption>
<div style="text-align: justify;">Tùy chọn Replace trong menu Find &amp; Select</div>
</figcaption>
</figure>

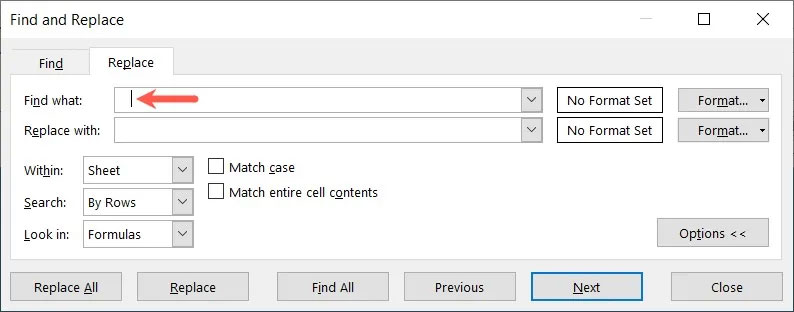
<p style="text-align: justify;">2. Trong hộp&nbsp;<strong>Find and Replace</strong>&nbsp;xuất hiện, hãy sử dụng hộp&nbsp;<strong>“Find what”</strong>&nbsp;để nhập một khoảng trắng nếu bạn muốn xóa tất cả hoặc số lượng khoảng trắng chính xác mà bạn muốn xóa.</p>

<figure>
<div style="text-align: justify;"><img alt="Trường Find what có dấu cách" data-i="1" data-src="https://st.quantrimang.com/photos/image/2023/07/13/don-dep-du-lieut-excel-2.jpg" data-was-processed="true" height="312" src="https://st.quantrimang.com/photos/image/2023/07/13/don-dep-du-lieut-excel-2.jpg" width="794" /></div>

<figcaption>
<div style="text-align: justify;">Trường Find what có dấu cách</div>
</figcaption>
</figure>

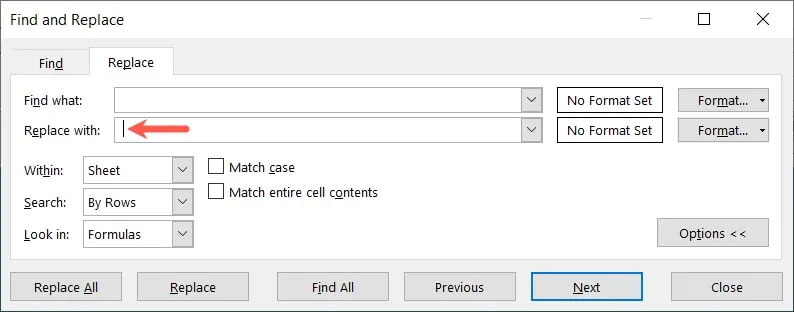
<p style="text-align: justify;">3. Trong hộp&nbsp;<strong>“Replace with”</strong>, không nhập gì nếu bạn muốn xóa tất cả khoảng trắng hoặc số lượng khoảng trắng chính xác mà bạn muốn giữ lại.</p>

<figure>
<div style="text-align: justify;"><img alt="Thay thế trường Replace with bằng một khoảng trắng" data-i="2" data-src="https://st.quantrimang.com/photos/image/2023/07/13/don-dep-du-lieut-excel-3.jpg" data-was-processed="true" height="312" src="https://st.quantrimang.com/photos/image/2023/07/13/don-dep-du-lieut-excel-3.jpg" width="794" /></div>

<figcaption>
<div style="text-align: justify;">Thay thế trường Replace with bằng một khoảng trắng</div>
</figcaption>
</figure>

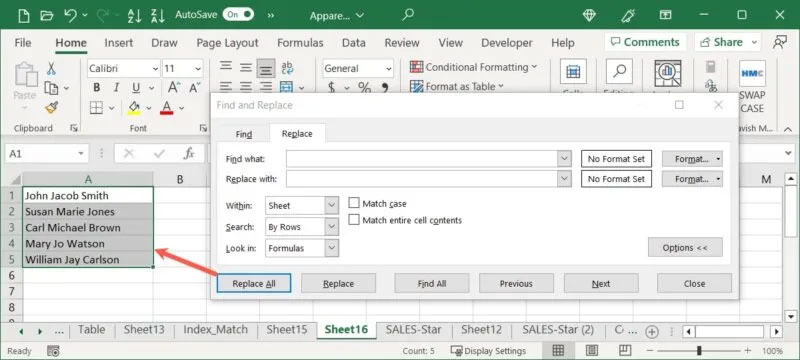
<p style="text-align: justify;">4. Chọn&nbsp;<strong>“Replace All”</strong>&nbsp;để xóa các khoảng trắng thừa và bạn sẽ thấy trang tính của mình cập nhật ngay lập tức.</p>

<figure>
<div style="text-align: justify;"><img alt="Nút Replace All và kết quả" data-i="3" data-src="https://st.quantrimang.com/photos/image/2023/07/13/don-dep-du-lieut-excel-4.jpg" data-was-processed="true" height="360" src="https://st.quantrimang.com/photos/image/2023/07/13/don-dep-du-lieut-excel-4.jpg" width="800" /></div>

<figcaption>
<div style="text-align: justify;">Nút Replace All và kết quả</div>
</figcaption>
</figure>

<h2 style="text-align: justify;">2. Xóa các ký tự không in được</h2>

<p style="text-align: justify;">Các ký tự không in được tương tự như các khoảng trắng thừa. Đây là 32 ký tự đầu tiên, kể cả số 0, trong mã ASCII 7 bit dành cho những thứ như ký tự rỗng, phần đầu của tiêu đề, nguồn cấp biểu mẫu, dấu xuống dòng và dấu tách đơn vị. Giống như khoảng trắng, các ký tự này có thể gây ra sự cố khi tính toán công thức, sắp xếp hoặc lọc trong trang tính Excel của bạn.</p>

<p style="text-align: justify;">Thuận tiện là bạn có thể sử dụng một hàm đơn giản để loại bỏ các ký tự không in được trong Excel. Hàm này được gọi là CLEAN và cú pháp của công thức là&nbsp;<em>CLEAN(text),</em>&nbsp;trong đó bạn có thể nhập văn bản hoặc tham chiếu ô cho đối số.</p>

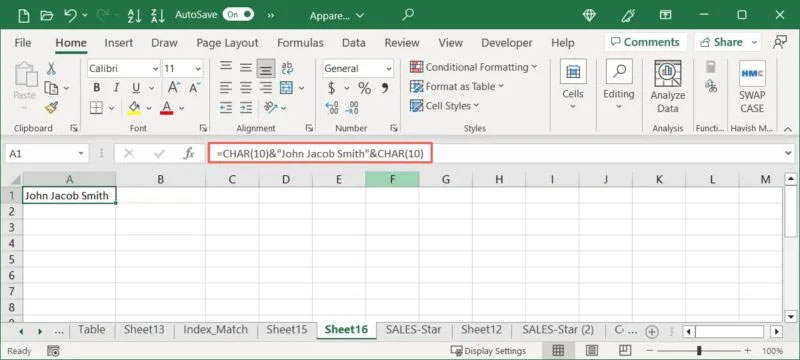
<p style="text-align: justify;">Ví dụ này có các ký tự không in được CHAR(10) ở đầu và cuối công thức trong ô A1.</p>

<figure>
<div style="text-align: justify;"><img alt="Các ký tự không in được trong công thức" data-i="4" data-src="https://st.quantrimang.com/photos/image/2023/07/13/don-dep-du-lieut-excel-5.jpg" data-was-processed="true" height="360" src="https://st.quantrimang.com/photos/image/2023/07/13/don-dep-du-lieut-excel-5.jpg" width="800" /></div>

<figcaption>
<div style="text-align: justify;">Các ký tự không in được trong công thức</div>
</figcaption>
</figure>

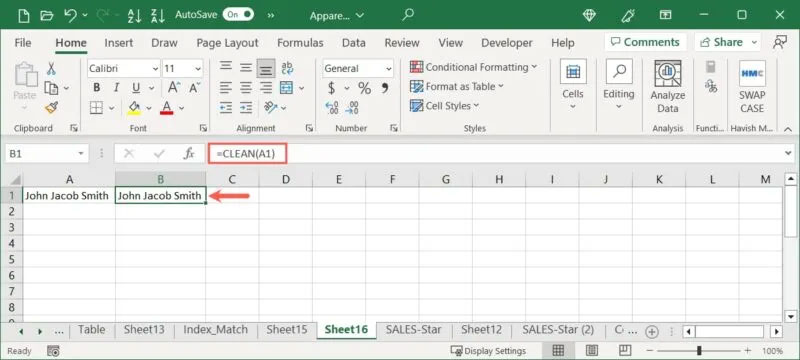
<p style="text-align: justify;">Sử dụng công thức này để loại bỏ chúng:</p>

<pre id="pre0">
<code>=CLEAN(A1)</code></pre>

<figure>
<div style="text-align: justify;"><img alt="Hàm CLEAN sử dụng tham chiếu ô" data-i="5" data-src="https://st.quantrimang.com/photos/image/2023/07/13/don-dep-du-lieut-excel-6.jpg" data-was-processed="true" height="360" src="https://st.quantrimang.com/photos/image/2023/07/13/don-dep-du-lieut-excel-6.jpg" width="800" /></div>

<figcaption>
<div style="text-align: justify;">Hàm CLEAN sử dụng tham chiếu ô</div>
</figcaption>
</figure>

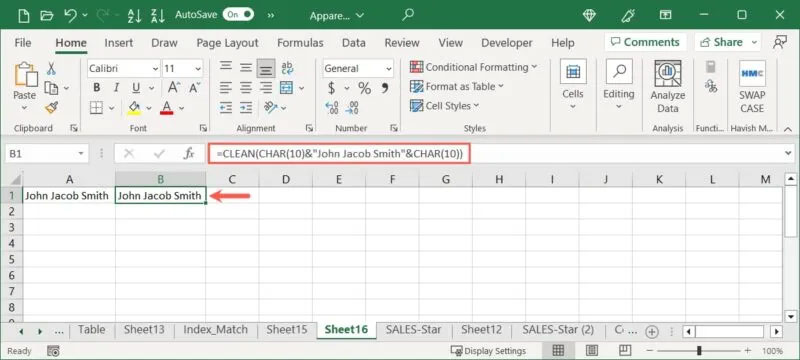
<p style="text-align: justify;">Bạn cũng có thể nhập văn bản như một phần của hàm CLEAN. Sử dụng công thức sau nếu bạn muốn thay thế văn bản hiện có bằng văn bản gọn hơn.</p>

<pre id="pre1">
<code>=CLEAN(CHAR(10)&amp;&quot;John Jacob Smith&quot;&amp;CHAR(10))</code></pre>

<figure>
<div style="text-align: justify;"><img alt="Hàm CLEAN sử dụng văn bản" data-i="6" data-src="https://st.quantrimang.com/photos/image/2023/07/13/don-dep-du-lieut-excel-7.jpg" data-was-processed="true" height="360" src="https://st.quantrimang.com/photos/image/2023/07/13/don-dep-du-lieut-excel-7.jpg" width="800" /></div>

<figcaption>
<div style="text-align: justify;">Hàm CLEAN sử dụng văn bản</div>
</figcaption>
</figure>

<p style="text-align: justify;">Các ký tự không in được loại bỏ, chỉ để lại văn bản.</p>

<h2 style="text-align: justify;">3. Xóa hàng trống</h2>

<p style="text-align: justify;">Nếu bạn có các hàng trống trong trang tính của mình, những hàng này có thể chiếm dung lượng rất cần thiết cho dữ liệu thực tế. Bạn có thể loại bỏ các hàng trống trong Excel chỉ với vài bước và lấy lại không gian trong trang tính của mình.</p>

<p style="text-align: justify;">Tham khảo:&nbsp;<a data-type="internal" href="https://quantrimang.com/cong-nghe/cach-them-hang-xoa-hang-trong-excel-170013" title="Cách thêm hàng, xóa hàng trong Excel">Cách thêm hàng, xóa hàng trong Excel</a>&nbsp;để biết chi tiết cách thực hiện.</p>

<h2 style="text-align: justify;">4. Tìm và loại bỏ dữ liệu trùng lặp</h2>

<p style="text-align: justify;">Dữ liệu trùng lặp là thứ mà bạn có thể muốn xóa trong trang tính Excel của mình. Đó có thể là tên khách hàng, địa chỉ email, số điện thoại hoặc thứ gì đó tương tự.</p>

<p style="text-align: justify;">Có một số cách để tìm và loại bỏ dữ liệu trùng lặp trong Microsoft Excel và bạn có thể xem hướng dẫn:&nbsp;<a data-type="internal" href="https://quantrimang.com/cong-nghe/ms-excel-loc-cac-ban-ghi-trung-lap-trong-excel-2007-83978" title="Cách xóa dữ liệu, nội dung trùng lặp trong Excel">Cách xóa dữ liệu, nội dung trùng lặp trong Excel</a>&nbsp;để biết các phương pháp khác nhau.</p>

<h2 style="text-align: justify;">5. Xóa định dạng</h2>

<p style="text-align: justify;">Nếu có nhiều người làm việc trên một trang tính hoặc cùng sao chép và dán dữ liệu từ một vị trí khác, thì tài liệu có thể có thêm nhiều định dạng mà bạn không cần. Điều này có thể bao gồm phông chữ đậm, tô màu hoặc đường viền. May mắn thay, bạn không phải thay đổi từng ô, hàng hoặc cột. Bạn có thể xóa định dạng trong trang tính của mình bằng một cú nhấp chuột.</p>

<p style="text-align: justify;">Lưu ý rằng nếu bạn thiết lập định dạng có điều kiện trong trang tính của mình, việc xóa định dạng như được giải thích ở đây cũng sẽ xóa định dạng đó.</p>

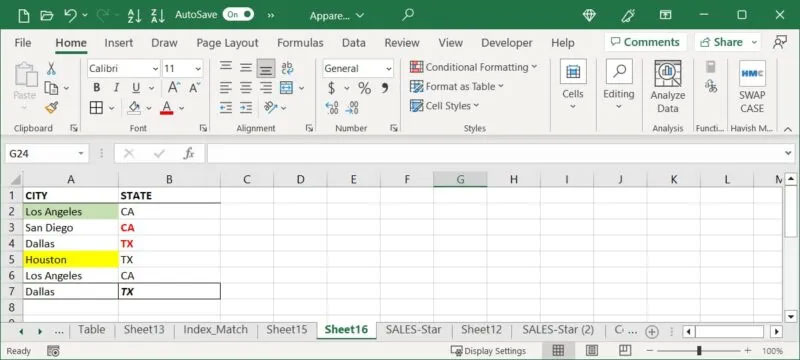
<p style="text-align: justify;">1. Chọn phạm vi ô chứa định dạng bạn muốn xóa. Ví dụ đã áp dụng chữ đậm, màu và chữ nghiêng cho văn bản cùng với màu tô và đường viền.</p>

<figure>
<div style="text-align: justify;"><img alt="Định dạng ô có phông chữ và đường viền trong Excel" data-i="7" data-src="https://st.quantrimang.com/photos/image/2023/07/13/don-dep-du-lieut-excel-8.jpg" data-was-processed="true" height="360" src="https://st.quantrimang.com/photos/image/2023/07/13/don-dep-du-lieut-excel-8.jpg" width="800" /></div>

<figcaption>
<div style="text-align: justify;">Định dạng ô có phông chữ và đường viền trong Excel</div>
</figcaption>
</figure>

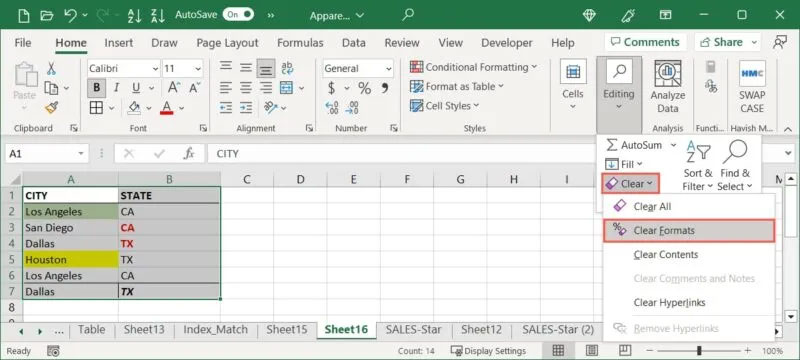
<p style="text-align: justify;">2. Chuyển đến tab&nbsp;<strong>“Home”,</strong>&nbsp;mở menu drop-down&nbsp;<strong>“Clear”</strong>&nbsp;và chọn&nbsp;<strong>“Clear Formats”.</strong></p>

<figure>
<div style="text-align: justify;"><img alt="Xóa định dạng trong menu Clear" data-i="8" data-src="https://st.quantrimang.com/photos/image/2023/07/13/don-dep-du-lieut-excel-9.jpg" data-was-processed="true" height="360" src="https://st.quantrimang.com/photos/image/2023/07/13/don-dep-du-lieut-excel-9.jpg" width="800" /></div>

<figcaption>
<div style="text-align: justify;">Xóa định dạng trong menu Clear</div>
</figcaption>
</figure>

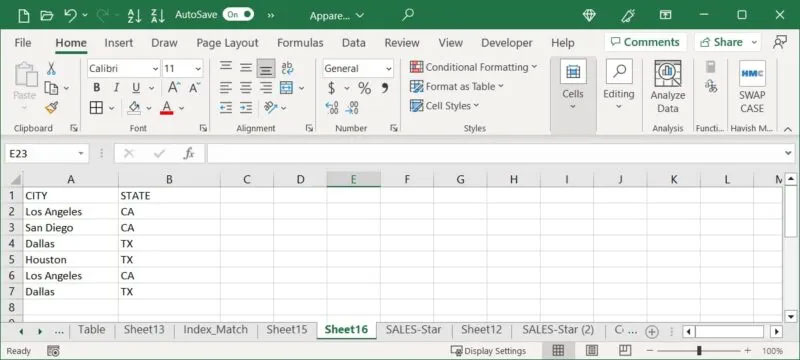
<p style="text-align: justify;">3. Bạn sẽ thấy tất cả định dạng trong các ô đó biến mất.</p>

<figure>
<div style="text-align: justify;"><img alt="Xóa định dạng trong Excel" data-i="9" data-src="https://st.quantrimang.com/photos/image/2023/07/13/don-dep-du-lieut-excel-10.jpg" data-was-processed="true" height="360" src="https://st.quantrimang.com/photos/image/2023/07/13/don-dep-du-lieut-excel-10.jpg" width="800" /></div>

<figcaption>
<div style="text-align: justify;">Xóa định dạng trong Excel</div>
</figcaption>
</figure>

<h2 style="text-align: justify;">6. Chuyển văn bản thành cột</h2>

<p style="text-align: justify;">Khi bạn lấy dữ liệu từ một nguồn khác, không phải lúc nào dữ liệu cũng được trình bày theo cách bạn muốn. Bạn có thể có những hàng với dữ liệu cần được đặt vào các ô riêng biệt trong các cột. Bạn có thể chuyển đổi văn bản này thành các cột chỉ trong vài bước để dễ dàng thao tác hơn.</p>

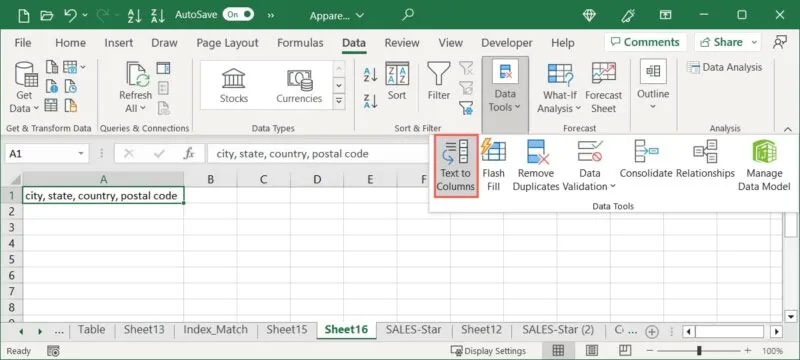
<p style="text-align: justify;">1. Chọn các ô bạn muốn chuyển đổi, chuyển đến tab&nbsp;<strong>“Data”</strong>&nbsp;và chọn&nbsp;<strong>“Text to Columns”</strong>&nbsp;trong nhóm&nbsp;<strong>Data Tools.</strong></p>

<figure>
<div style="text-align: justify;"><img alt="Chuyển văn bản thành cột trên tab Data" data-i="10" data-src="https://st.quantrimang.com/photos/image/2023/07/13/don-dep-du-lieut-excel-11.jpg" data-was-processed="true" height="360" src="https://st.quantrimang.com/photos/image/2023/07/13/don-dep-du-lieut-excel-11.jpg" width="800" /></div>

<figcaption>
<div style="text-align: justify;">Chuyển văn bản thành cột trên tab Data</div>
</figcaption>
</figure>

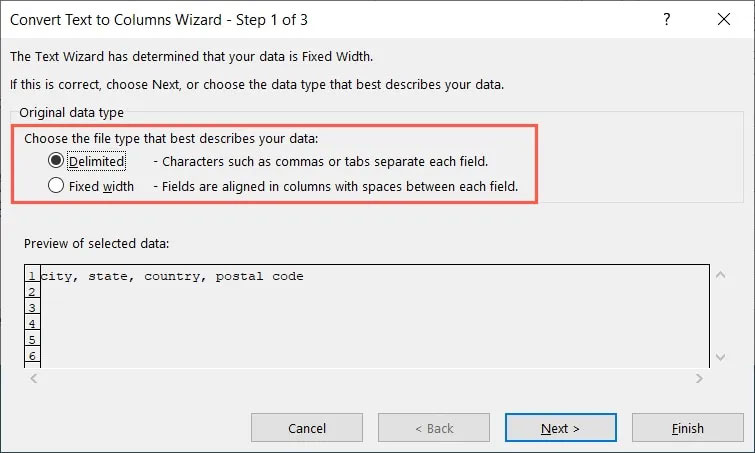
<p style="text-align: justify;">2. Khi Convert Text to Column Wizard mở ra, hãy thực hiện một vài bước để chuyển đổi dữ liệu của bạn dựa trên trạng thái hiện tại và cách bạn muốn hiển thị dữ liệu đó. Bắt đầu bằng cách chọn&nbsp;<strong>“Delimited”</strong>&nbsp;hoặc&nbsp;<strong>“Fixed width”.</strong>&nbsp;Excel cung cấp cho bạn đề xuất dựa trên dữ liệu của bạn, nhưng bạn có thể chọn bất kỳ tùy chọn nào phù hợp nhất. Bấm&nbsp;<strong>Next</strong>.</p>

<figure>
<div style="text-align: justify;"><img alt="Chọn “Delimited” hoặc “Fixed width”" data-i="11" data-src="https://st.quantrimang.com/photos/image/2023/07/13/don-dep-du-lieut-excel-12.jpg" data-was-processed="true" height="453" src="https://st.quantrimang.com/photos/image/2023/07/13/don-dep-du-lieut-excel-12.jpg" width="755" /></div>

<figcaption>
<div style="text-align: justify;">Chọn “Delimited” hoặc “Fixed width”</div>
</figcaption>
</figure>

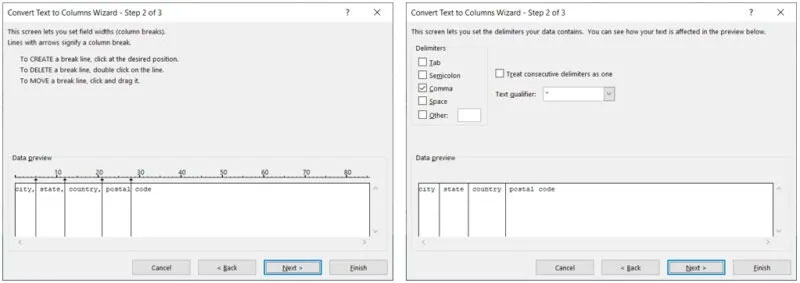
<p style="text-align: justify;">3. Tùy thuộc vào tùy chọn bạn chọn trong bước đầu tiên, bạn sẽ thấy bước thứ hai tương ứng. Ví dụ, nếu chọn&nbsp;<strong>Delimited data</strong>, bạn có thể chọn dấu phân cách và nếu chọn&nbsp;<strong>Fixed data</strong>, bạn có thể điều chỉnh độ rộng cột. Bấm&nbsp;<strong>Next.</strong></p>

<figure>
<div style="text-align: justify;"><img alt="Bấm Next" data-i="12" data-src="https://st.quantrimang.com/photos/image/2023/07/13/don-dep-du-lieut-excel-13.jpg" data-was-processed="true" height="283" src="https://st.quantrimang.com/photos/image/2023/07/13/don-dep-du-lieut-excel-13.jpg" width="800" /></div>

<figcaption>
<div style="text-align: justify;">Bấm Next</div>
</figcaption>
</figure>

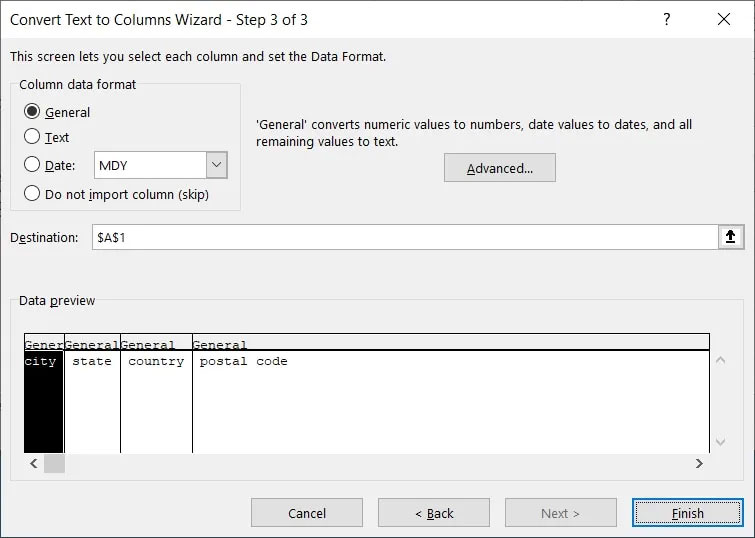
<p style="text-align: justify;">4. Chọn định dạng dữ liệu cho cột, chẳng hạn như văn bản hoặc ngày và nhập đích cho dữ liệu được chuyển đổi. Nhấp vào&nbsp;<strong>“Finish”.</strong></p>

<figure>
<div style="text-align: justify;"><img alt="Chọn định dạng dữ liệu cho cột" data-i="13" data-src="https://st.quantrimang.com/photos/image/2023/07/13/don-dep-du-lieut-excel-14.jpg" data-was-processed="true" height="538" src="https://st.quantrimang.com/photos/image/2023/07/13/don-dep-du-lieut-excel-14.jpg" width="755" /></div>

<figcaption>
<div style="text-align: justify;">Chọn định dạng dữ liệu cho cột</div>
</figcaption>
</figure>

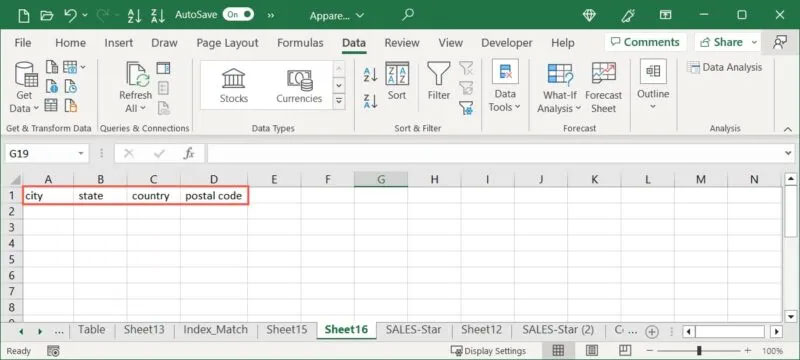
<p style="text-align: justify;">5. Bạn sẽ thấy văn bản của mình được chuyển đổi thành các cột, sẵn sàng để bạn làm việc.</p>

<figure>
<div style="text-align: justify;"><img alt="Chuyển đổi văn bản thành cột trong Excel" data-i="14" data-src="https://st.quantrimang.com/photos/image/2023/07/13/don-dep-du-lieut-excel-15.jpg" data-was-processed="true" height="360" src="https://st.quantrimang.com/photos/image/2023/07/13/don-dep-du-lieut-excel-15.jpg" width="800" /></div>

<figcaption>
<div style="text-align: justify;">Chuyển đổi văn bản thành cột trong Excel</div>
</figcaption>
</figure>

<h2 style="text-align: justify;">7. Đánh dấu lỗi</h2>

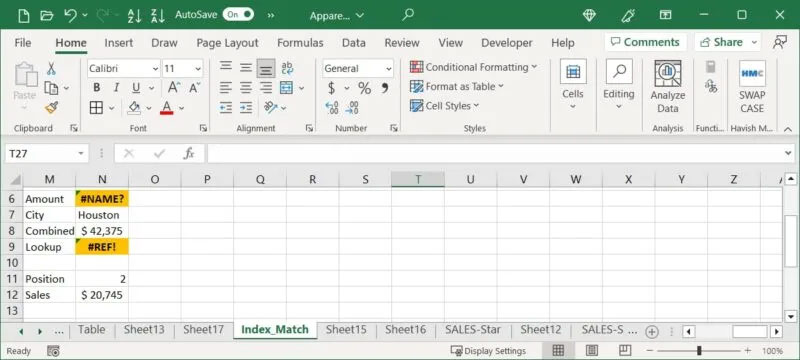
<p style="text-align: justify;">Mặc dù Excel thực hiện tốt công việc chỉ ra lỗi trong các ô, chẳng hạn như các lỗi trong công thức, nhưng bạn có thể không nhận thấy những lỗi này nếu bạn có một bảng tính dài. Với định dạng có điều kiện, bạn có thể đánh dấu các lỗi để dễ dàng nhìn thấy và sửa chúng hơn.</p>

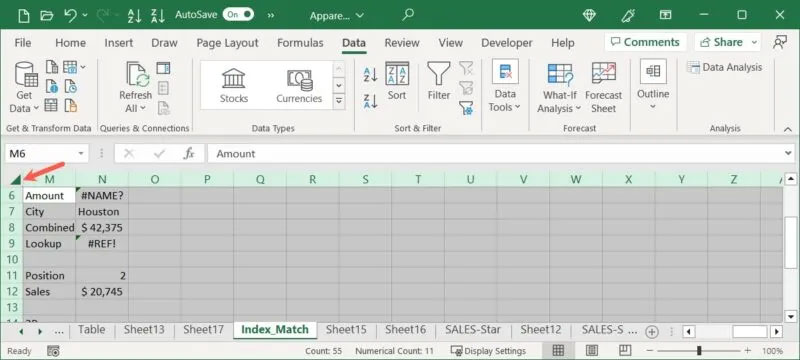
<p style="text-align: justify;">1. Chọn toàn bộ trang tính bằng cách nhấp vào nút&nbsp;<strong>“Select All”</strong>&nbsp;(hình tam giác) ở trên cùng bên trái của trang tính. Nếu bạn chỉ muốn kiểm tra một số ô nhất định, hãy chọn những ô đó.</p>

<figure>
<div style="text-align: justify;"><img alt="Nút Select All trong Excel" data-i="15" data-src="https://st.quantrimang.com/photos/image/2023/07/13/don-dep-du-lieut-excel-16.jpg" data-was-processed="true" height="360" src="https://st.quantrimang.com/photos/image/2023/07/13/don-dep-du-lieut-excel-16.jpg" width="800" /></div>

<figcaption>
<div style="text-align: justify;">Nút Select All trong Excel</div>
</figcaption>
</figure>

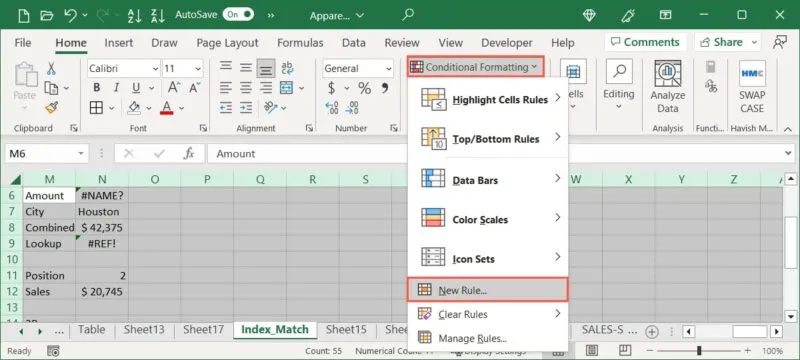
<p style="text-align: justify;">2. Chuyển đến tab&nbsp;<strong>“Home”,</strong>&nbsp;mở menu drop-down&nbsp;<strong>“Conditional Formatting”</strong>&nbsp;trong nhóm&nbsp;<strong>Styles</strong>&nbsp;và chọn&nbsp;<strong>“New Rule”.</strong></p>

<figure>
<div style="text-align: justify;"><img alt="Quy tắc mới trong menu Conditional Formatting" data-i="16" data-src="https://st.quantrimang.com/photos/image/2023/07/13/don-dep-du-lieut-excel-17.jpg" data-was-processed="true" height="360" src="https://st.quantrimang.com/photos/image/2023/07/13/don-dep-du-lieut-excel-17.jpg" width="800" /></div>

<figcaption>
<div style="text-align: justify;">Quy tắc mới trong menu Conditional Formatting</div>
</figcaption>
</figure>

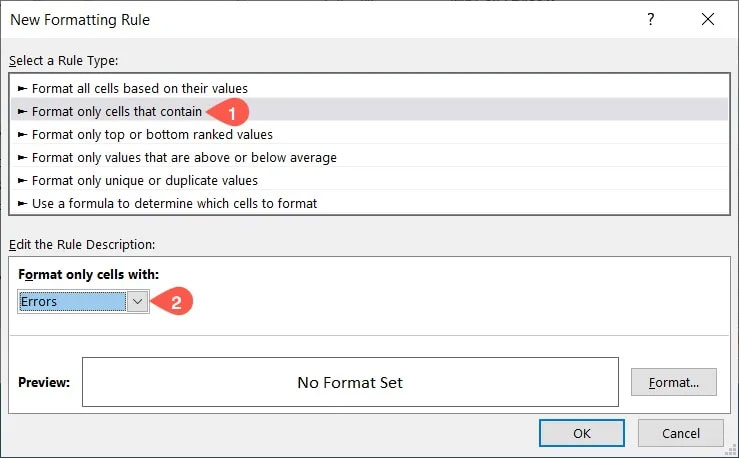
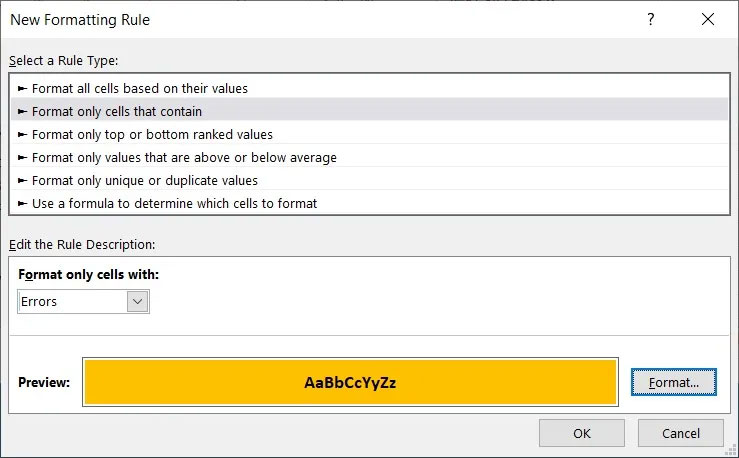
<p style="text-align: justify;">3. Khi cửa sổ&nbsp;<strong>New Formatting Rule</strong>&nbsp;mở ra, hãy chọn&nbsp;<strong>“Format only cells that contain”</strong>&nbsp;ở trên cùng và&nbsp;<strong>“Errors”</strong>&nbsp;trong danh sách drop-down ở dưới cùng.</p>

<figure>
<div style="text-align: justify;"><img alt="Thiết lập quy tắc mới cho các ô chứa lỗi" data-i="17" data-src="https://st.quantrimang.com/photos/image/2023/07/13/don-dep-du-lieut-excel-18.jpg" data-was-processed="true" height="458" src="https://st.quantrimang.com/photos/image/2023/07/13/don-dep-du-lieut-excel-18.jpg" width="739" /></div>

<figcaption>
<div style="text-align: justify;">Thiết lập quy tắc mới cho các ô chứa lỗi</div>
</figcaption>
</figure>

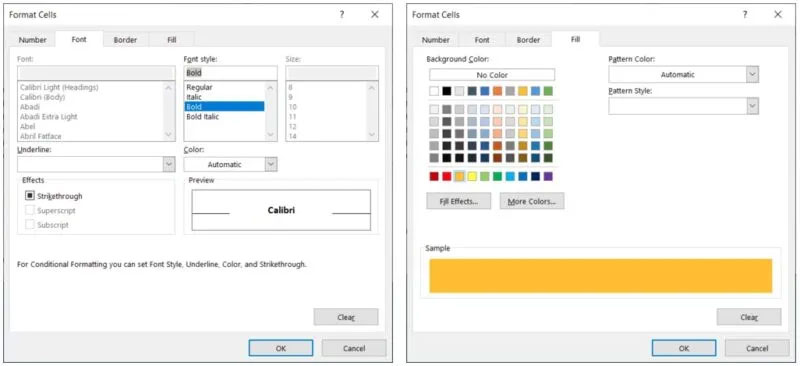
<p style="text-align: justify;">4. Nhấp vào nút&nbsp;<strong>“Format”</strong>&nbsp;để chọn định dạng bạn muốn áp dụng. Bạn có thể thực hiện những việc như tô màu cho các ô, in đậm văn bản hoặc thêm đường viền đậm. Chọn&nbsp;<strong>“OK”</strong>&nbsp;sau khi bạn thiết lập định dạng.</p>

<figure>
<div style="text-align: justify;"><img alt="Các tùy chọn định dạng cho một quy tắc mới trong Excel" data-i="18" data-src="https://st.quantrimang.com/photos/image/2023/07/13/don-dep-du-lieut-excel-19.jpg" data-was-processed="true" height="366" src="https://st.quantrimang.com/photos/image/2023/07/13/don-dep-du-lieut-excel-19.jpg" width="800" /></div>

<figcaption>
<div style="text-align: justify;">Các tùy chọn định dạng cho một quy tắc mới trong Excel</div>
</figcaption>
</figure>

<p style="text-align: justify;">5. Bạn sẽ thấy bản xem trước lựa chọn của mình ở cuối cửa sổ&nbsp;<strong>New Formatting Rule</strong>. Nhấp vào&nbsp;<strong>“OK”</strong>&nbsp;để lưu và áp dụng quy tắc.</p>

<figure>
<div style="text-align: justify;"><img alt="Xem trước quy tắc mới trong Excel" data-i="19" data-src="https://st.quantrimang.com/photos/image/2023/07/13/don-dep-du-lieut-excel-20.jpg" data-was-processed="true" height="458" src="https://st.quantrimang.com/photos/image/2023/07/13/don-dep-du-lieut-excel-20.jpg" width="739" /></div>

<figcaption>
<div style="text-align: justify;">Xem trước quy tắc mới trong Excel</div>
</figcaption>
</figure>

<p style="text-align: justify;">6. Khi xem trang tính hoặc các ô đã chọn, bạn sẽ thấy các lỗi đó xuất hiện. Sau khi bạn sửa lỗi, định dạng sẽ biến mất và bạn có thể chuyển sang lỗi tiếp theo.</p>

<figure>
<div style="text-align: justify;"><img alt="Các lỗi được đánh dấu trong Excel" data-i="20" data-src="https://st.quantrimang.com/photos/image/2023/07/13/don-dep-du-lieut-excel-21.jpg" data-was-processed="true" height="360" src="https://st.quantrimang.com/photos/image/2023/07/13/don-dep-du-lieut-excel-21.jpg" width="800" /></div>

<figcaption>
<div style="text-align: justify;">Các lỗi được đánh dấu trong Excel</div>
</figcaption>
</figure>

<div style="text-align: justify;">&nbsp;</div>
		</div>
				<div id="author">
						<p>
				<strong>Nguồn tin:</strong>
				Quantrimang.com
			</p>
		</div>
	</div>
	<div id="footer" class="clearfix">
		<div id="url">
			<strong>URL của bản tin này: </strong><a href="https://www.nguoicodonvn2008.info/vi/news/savefile/kien-thuc-may-tinh/7-cach-don-dep-du-lieu-trong-microsoft-excel-7290.html" title="7 cách dọn dẹp dữ liệu trong Microsoft Excel">https://www.nguoicodonvn2008.info/vi/news/savefile/kien-thuc-may-tinh/7-cach-don-dep-du-lieu-trong-microsoft-excel-7290.html</a>

		</div>
		<div class="clear"></div>
		<div class="copyright">
			&copy; .&#x3A; Nguoicodonvn2008.info - Cõi lòng người cô đơn &#x3A;.
		</div>
		<div id="contact">
			<a href="mailto:admin@nguoicodonvn2008.info">admin@nguoicodonvn2008.info</a>
		</div>
	</div>
</div>
        <div id="timeoutsess" class="chromeframe">
            Bạn đã không sử dụng Site, <a onclick="timeoutsesscancel();" href="https://www.nguoicodonvn2008.info/#">Bấm vào đây để duy trì trạng thái đăng nhập</a>. Thời gian chờ: <span id="secField"> 60 </span> giây
        </div>
        <div id="openidResult" class="nv-alert" style="display:none"></div>
        <div id="openidBt" data-result="" data-redirect=""></div>
		</script>
		<div class="car-top">
  <span><img src="https://www.nguoicodonvn2008.info/themes/default/images/car.png" alt=""></span>
</div>
<div id="run_cronjobs" style="visibility:hidden;display:none;"><img alt="cron" src="/index.php?second=cronjobs&amp;p=u15KlmcO" width="1" height="1" /></div>
<script src="https://www.nguoicodonvn2008.info/assets/js/jquery/jquery.min.js"></script>
<script>var nv_base_siteurl="/",nv_lang_data="vi",nv_lang_interface="vi",nv_name_variable="nv",nv_fc_variable="op",nv_lang_variable="language",nv_module_name="news",nv_func_name="savefile",nv_is_user=0, nv_my_ofs=-4,nv_my_abbr="EDT",nv_cookie_prefix="nv4c_e856T",nv_check_pass_mstime=1738000,nv_area_admin=0,nv_safemode=0,theme_responsive=0,nv_recaptcha_ver=2,nv_recaptcha_sitekey="",nv_recaptcha_type="image",XSSsanitize=1;</script>
<script src="https://www.nguoicodonvn2008.info/assets/js/language/vi.js"></script>
<script src="https://www.nguoicodonvn2008.info/assets/js/DOMPurify/purify3.js"></script>
<script src="https://www.nguoicodonvn2008.info/assets/js/global.js"></script>
<script src="https://www.nguoicodonvn2008.info/assets/js/site.js"></script>
<script src="https://www.nguoicodonvn2008.info/themes/default/js/news.js"></script>
<script src="https://www.nguoicodonvn2008.info/themes/default/js/main.js"></script>
<script src="https://www.nguoicodonvn2008.info/themes/default/js/custom.js"></script>
<script type="application/ld+json">
        {
            "@context": "https://schema.org",
            "@type": "Organization",
            "url": "https://www.nguoicodonvn2008.info",
            "logo": "https://www.nguoicodonvn2008.info/uploads/angel.gif"
        }
        </script>
<script src="https://www.nguoicodonvn2008.info/themes/default/js/bootstrap.min.js"></script>
<script type="text/javascript">
var $scrolltop = $('.car-top');
$scrolltop.on('click', function () {
    $('html,body').animate({
        scrollTop: 0
    }, 800);
    $(this).addClass("car-run");
    setTimeout(function(){ $scrolltop.removeClass('car-run');}, 1000);
    return false;
});
$(window).on('scroll', function ()
{ 
    if($(window).scrollTop() >= 200)
    {
        $scrolltop.addClass("show");
        $scrolltop.addClass("car-down");
    }
    else
    {
       $scrolltop.removeClass("show");
       setTimeout(function(){ $scrolltop.removeClass('car-down');}, 300);
    }
});
</script>
</body>
</html>