6 mẹo sử dụng ổ cứng ngoài trên máy Mac
- Chủ nhật - 16/02/2025 22:01
- In ra
- Đóng cửa sổ này

Apple tính phí cao cho bộ nhớ tích hợp, vì vậy, đầu tư vào ổ cứng ngoài giá cả phải chăng có thể giúp giải quyết các vấn đề về bộ nhớ của bạn mà không tốn kém. Sau đây là một số mẹo để đảm bảo bạn tận dụng tối đa các ổ cứng ngoài trên máy Mac của mình.
6. Chọn đúng định dạng hệ thống file
Máy Mac của bạn tương thích với một số hệ thống file, bao gồm FAT32, exFAT, APFS và HFS+. Việc chọn đúng định dạng cho ổ cứng ngoài của bạn phụ thuộc vào cách bạn định sử dụng nó. APFS phù hợp với các ổ được thiết kế để sử dụng trên máy Mac và tương thích với Time Machine. Mặt khác, ExFAT và FAT32 là các tùy chọn tốt hơn về khả năng tương thích với Windows và Linux.
Lưu ý: Những lợi ích chính của APFS so với Hierarchical File System Plus (HFS+), còn được gọi là Mac OS Extended, là độ tin cậy và tính toàn vẹn của dữ liệu được tăng cường, mã hóa tích hợp, ảnh chụp nhanh, sao chép, file sparse, chia sẻ không gian và kích thước thư mục nhanh. HFS+ phù hợp nhất với ổ cứng cơ học hoặc ổ được sử dụng với các phiên bản macOS cũ hơn.
5. Tạo một volume Time Machine chuyên dụng
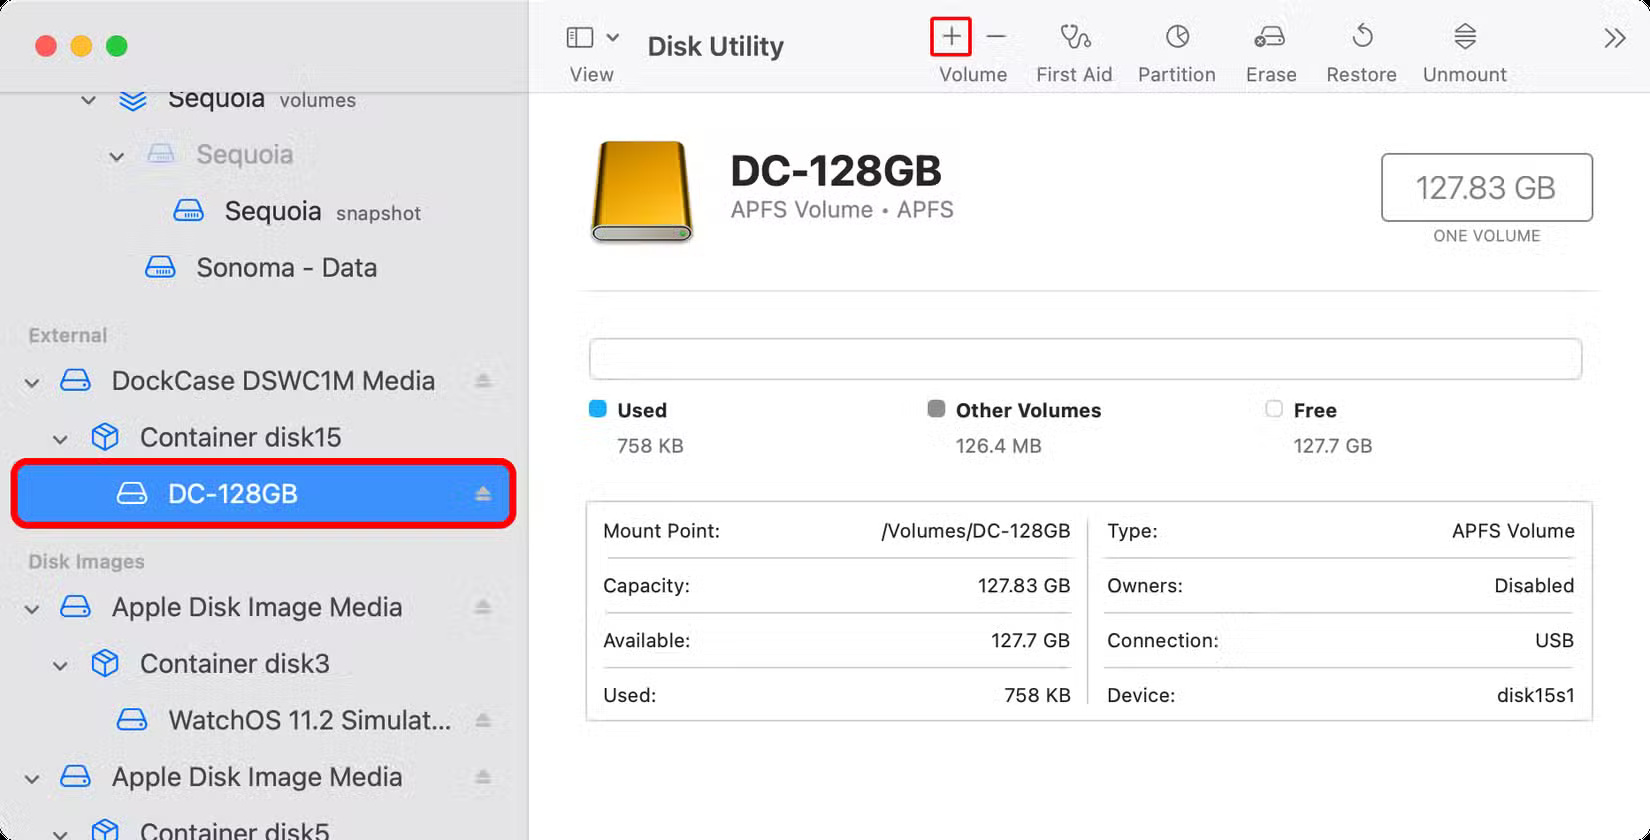
Để lưu trữ cả file và bản sao lưu Time Machine trên một ổ duy nhất, bạn phải tạo một volume APFS chuyên dụng cho Time Machine. Trước tiên, xóa ổ đĩa trong Disk Utility bằng hệ thống file APFS như đã giải thích ở phần trước. Thứ hai, thêm một volume APFS chỉ dành cho Time Machine bằng cách chọn volume APFS vừa tạo trong thanh bên Disk Utility và nhấp vào biểu tượng + (dấu cộng) trên thanh công cụ.
Đặt tên cho ổ là “Time Machine” hoặc tương tự và chọn “APFS” trong menu Format.
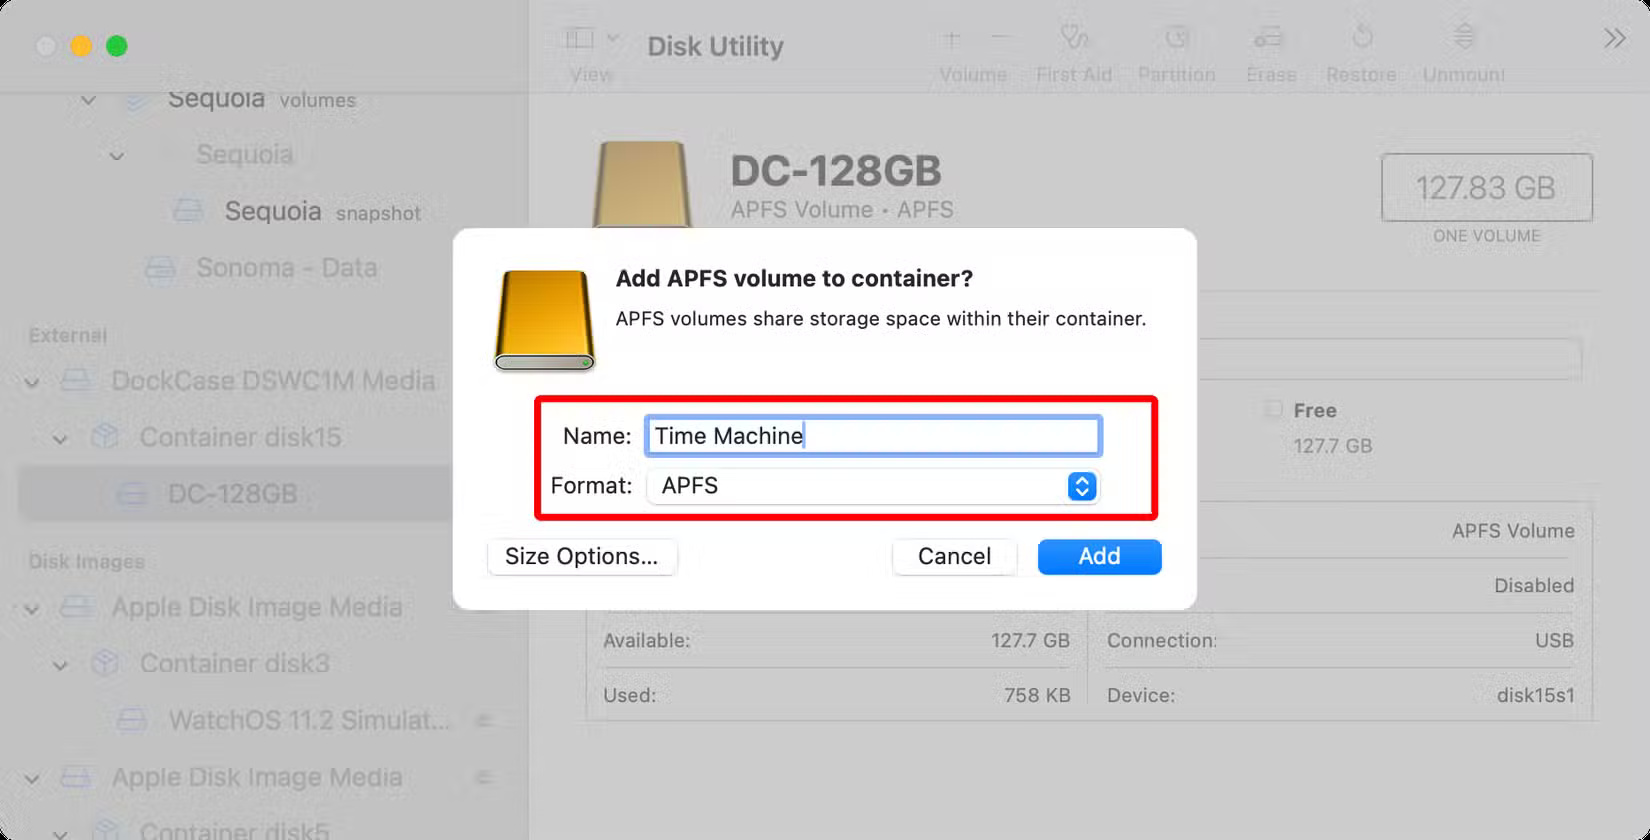
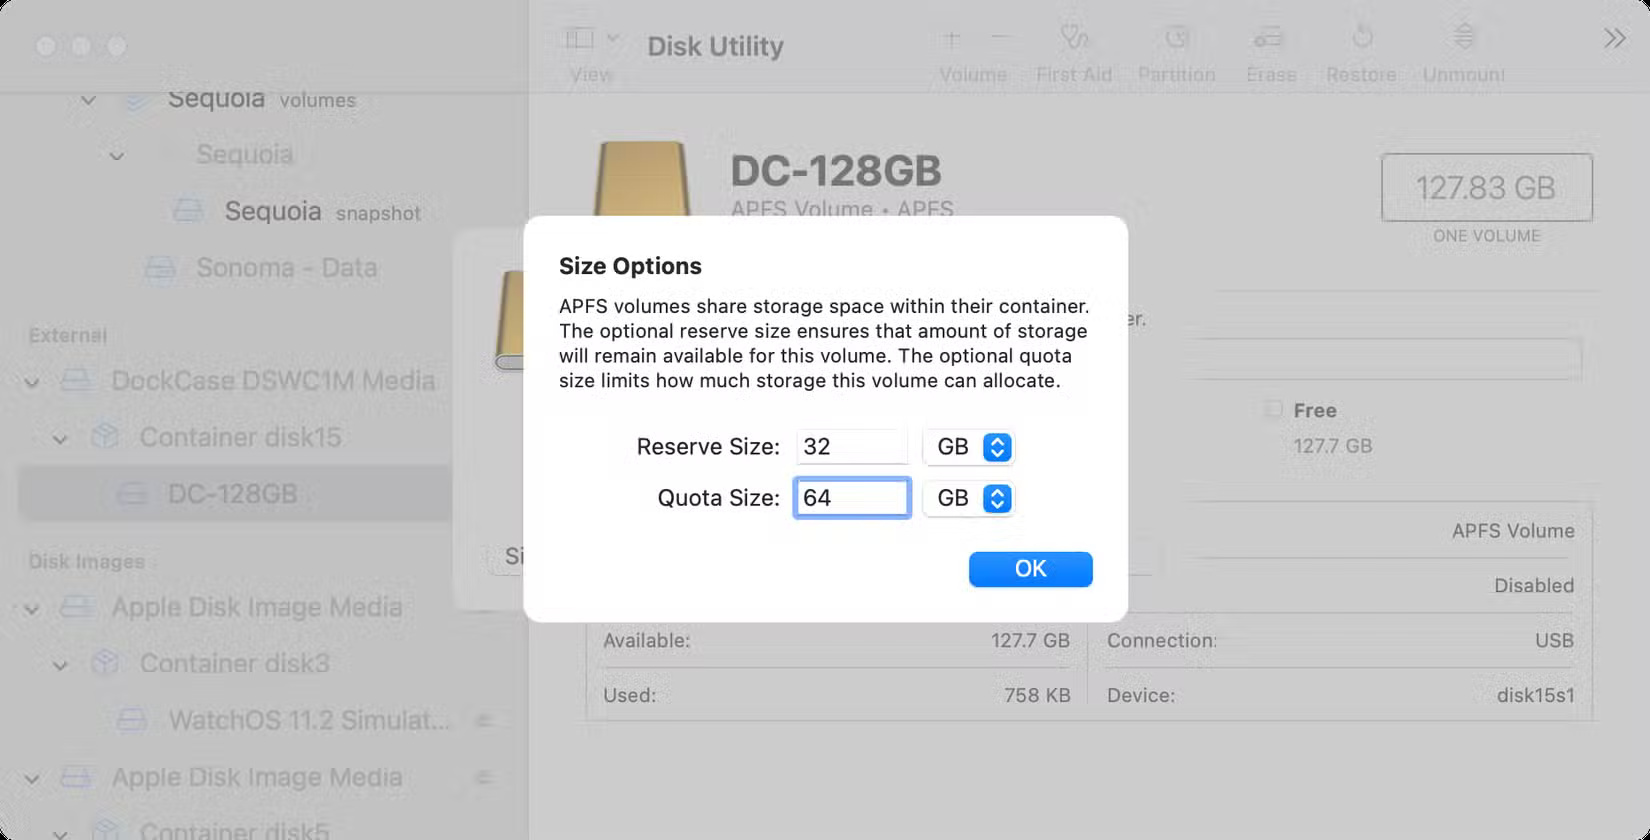
Nhấp vào nút Size Options để cấp phát dung lượng tối thiểu và tối đa cho volume. Khi đã sẵn sàng, hãy nhấp vào OK, sau đó chọn Add để tạo volume mới dựa trên các thông số này.
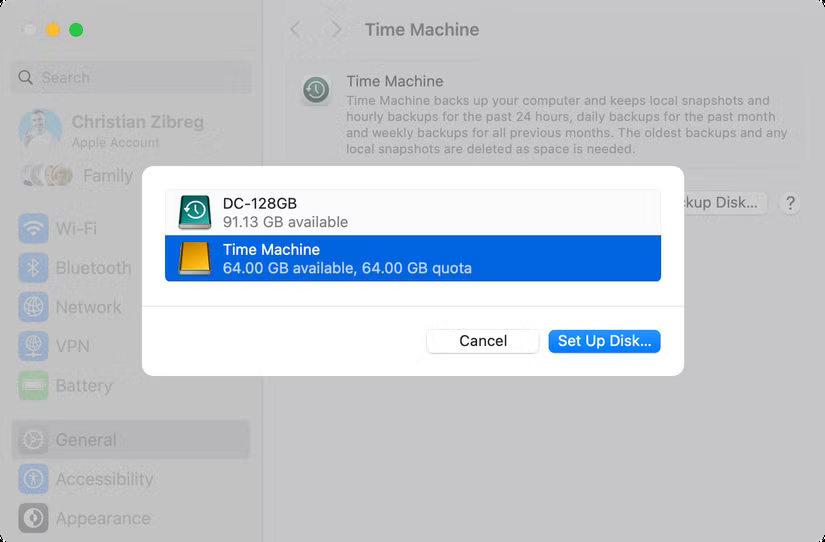
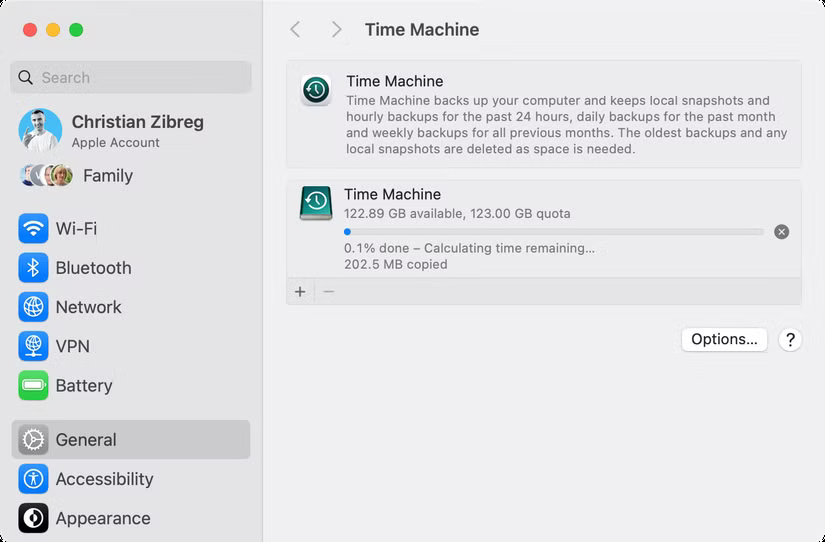
Để đặt volume APS của bạn làm đích Time Machine, hãy vào System Settings > General > Time Machine. Nhấp vào biểu tượng + hoặc nút Add Backup Disk, chọn ổ đĩa sao lưu, nhấp vào Set Up Disk và làm theo hướng dẫn.
Time Machine hiện sẽ sao lưu máy Mac của bạn vào phân vùng chuyên dụng trên ổ, có thể mất một chút thời gian ban đầu. Bạn có thể sử dụng bản sao lưu Time Machine để khôi phục máy Mac của mình từ đầu, khôi phục các phiên bản file trước đó mà không cần ổ đĩa sao lưu được đính kèm và nhiều hơn nữa.
4. Tạo thư mục để sắp xếp file
Thư mục là cách dễ nhất để sắp xếp file xung quanh các dự án. macOS cung cấp các thư mục người dùng tích hợp như Documents, Movies, Music, Pictures và Downloads mà bạn có thể truy cập từ thanh bên của Finder. Bạn cũng có thể tạo thư mục của riêng mình để lưu trữ một bộ sưu tập file.
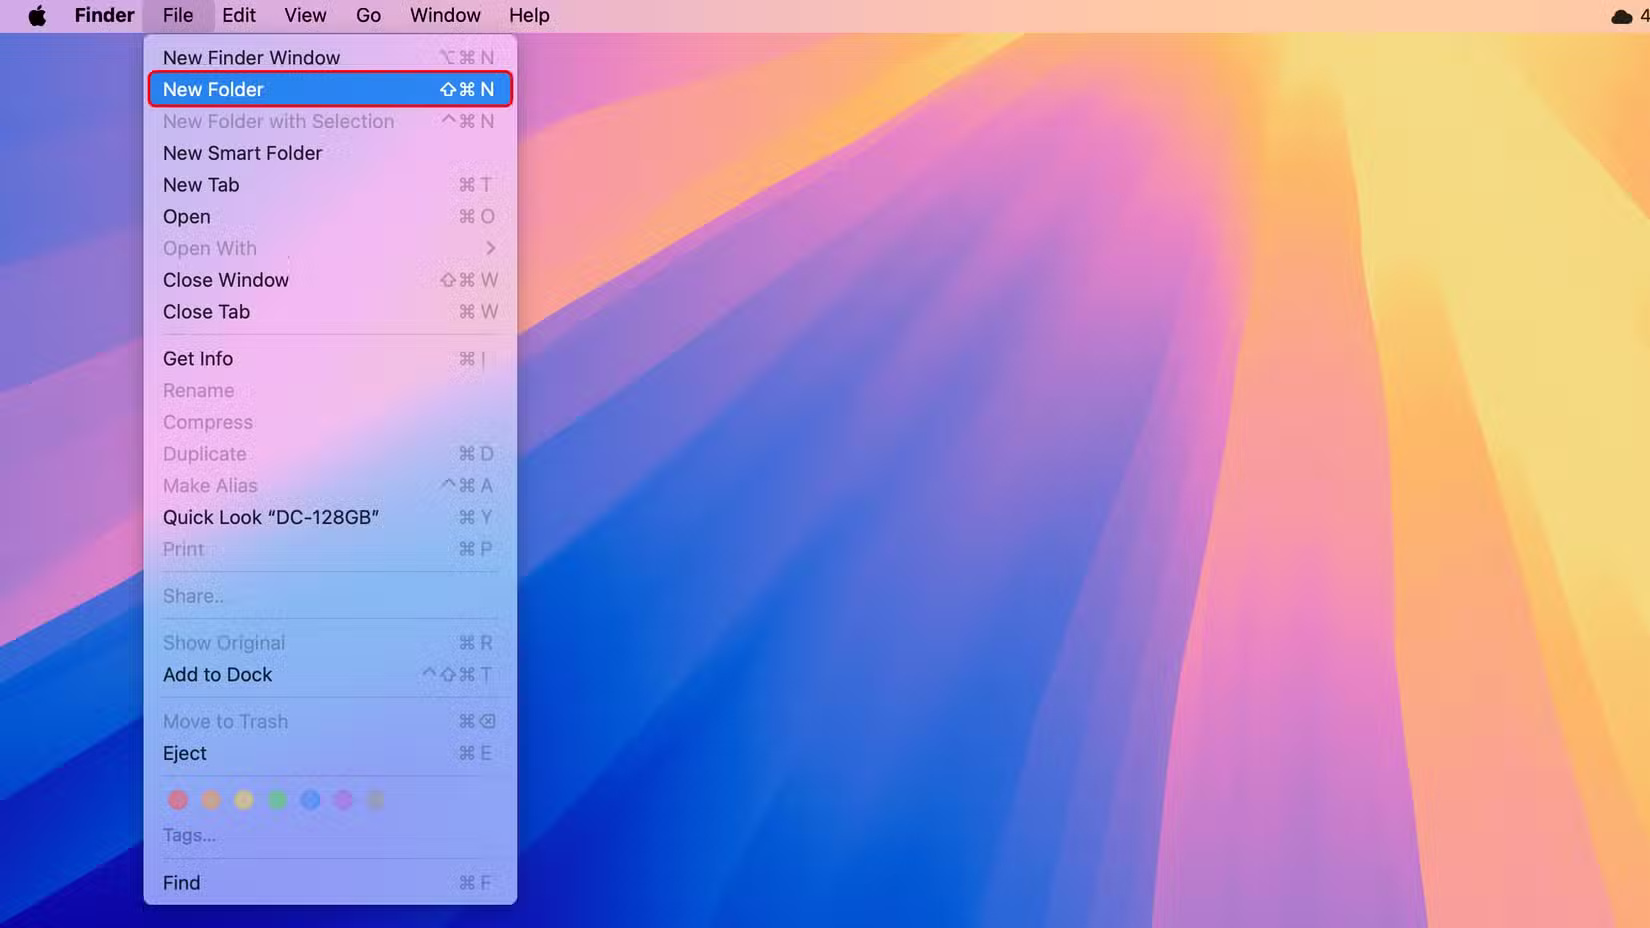
Điều hướng đến vị trí mong muốn trên ổ cứng ngoài, sau đó nhấp vào File > New Folder trên thanh menu hoặc nhấn phím Shift + Command + N trên bàn phím, đặt tên cho thư mục và nhấn Return.

Để di chuyển nội dung vào thư mục của bạn, hãy chọn file và kéo chúng vào thư mục.
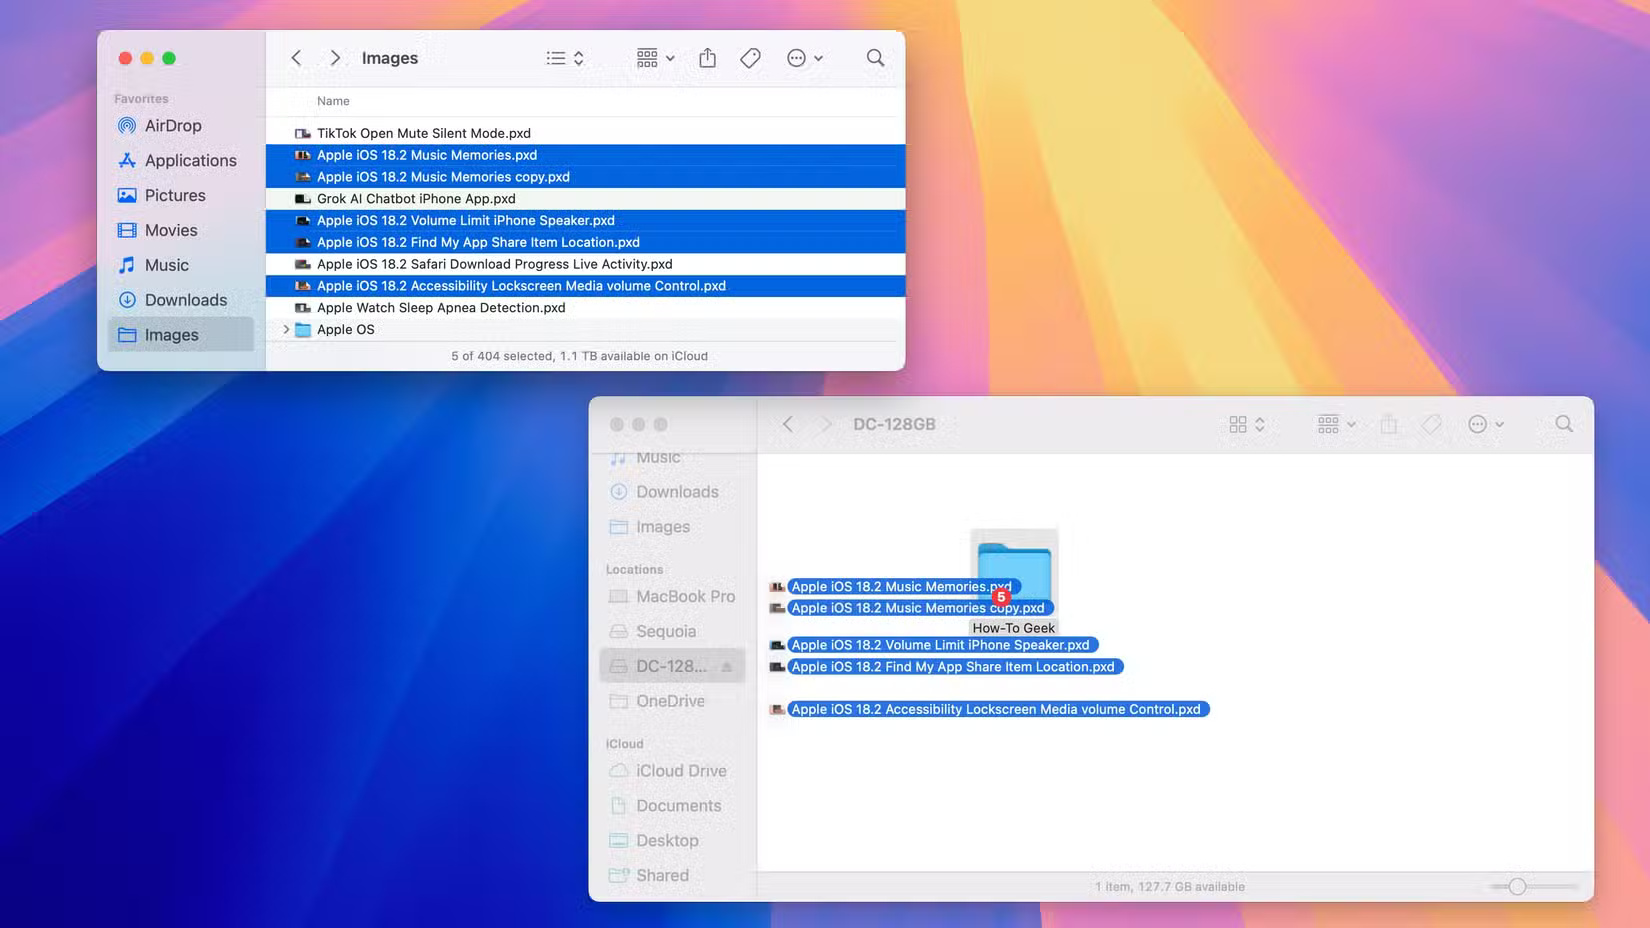
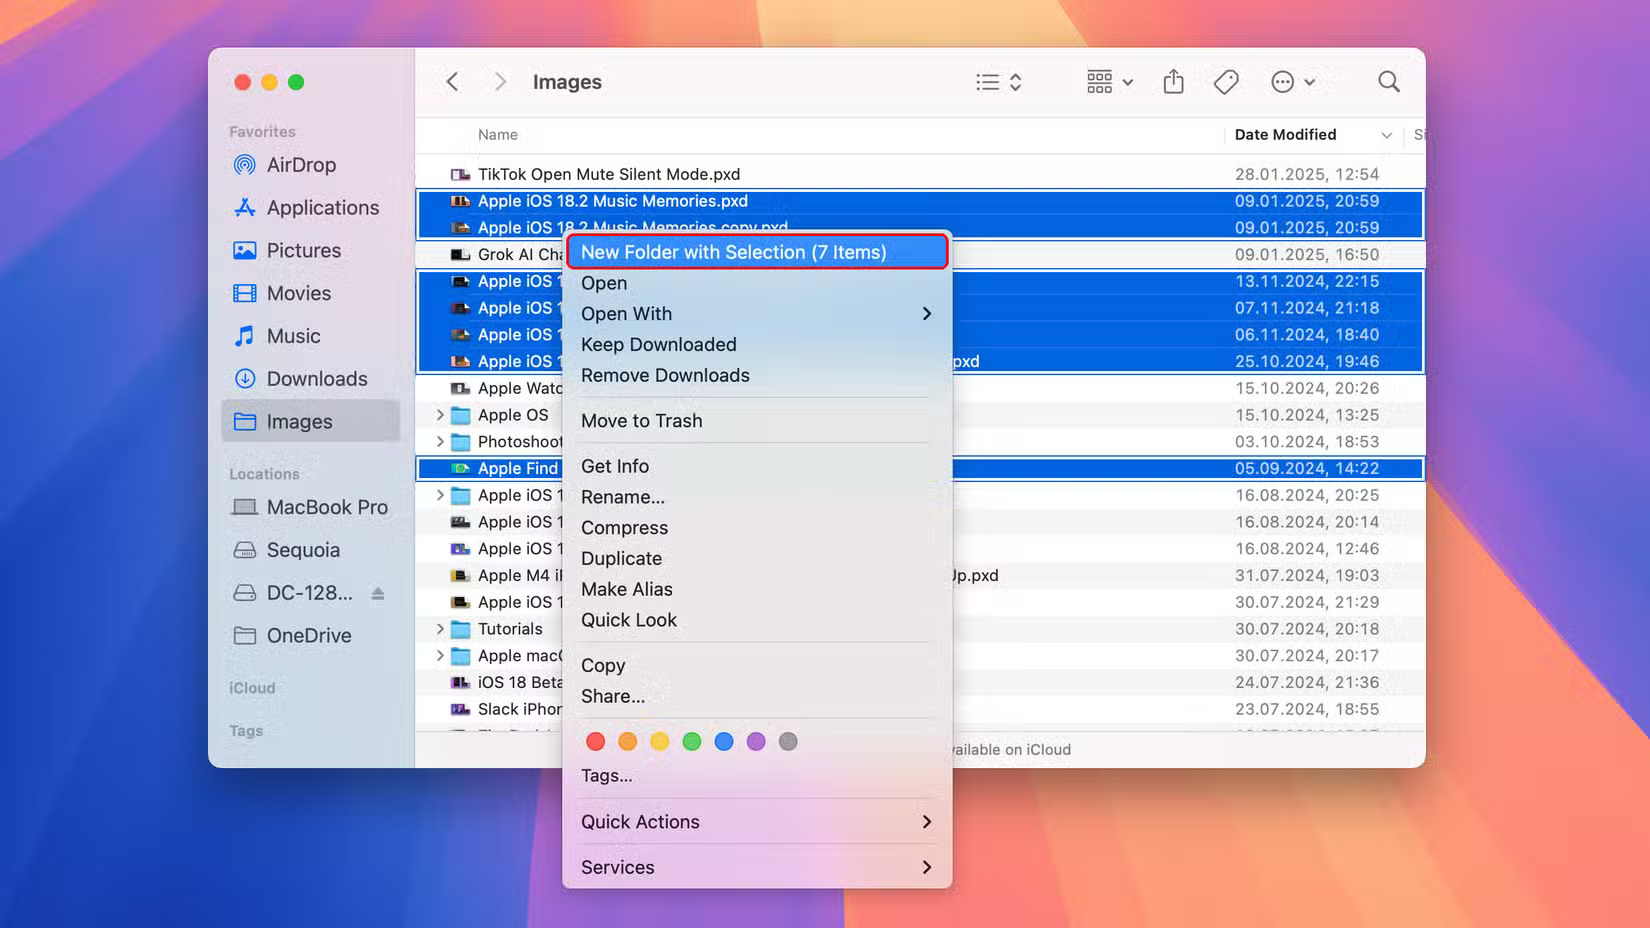
Để tạo thư mục mới từ một loạt file, hãy chọn chúng trong Finder, nhấp chuột phải (control+click) vào lựa chọn và chọn New Folder with Selection từ menu.
3. Có cần mã hóa ổ không?
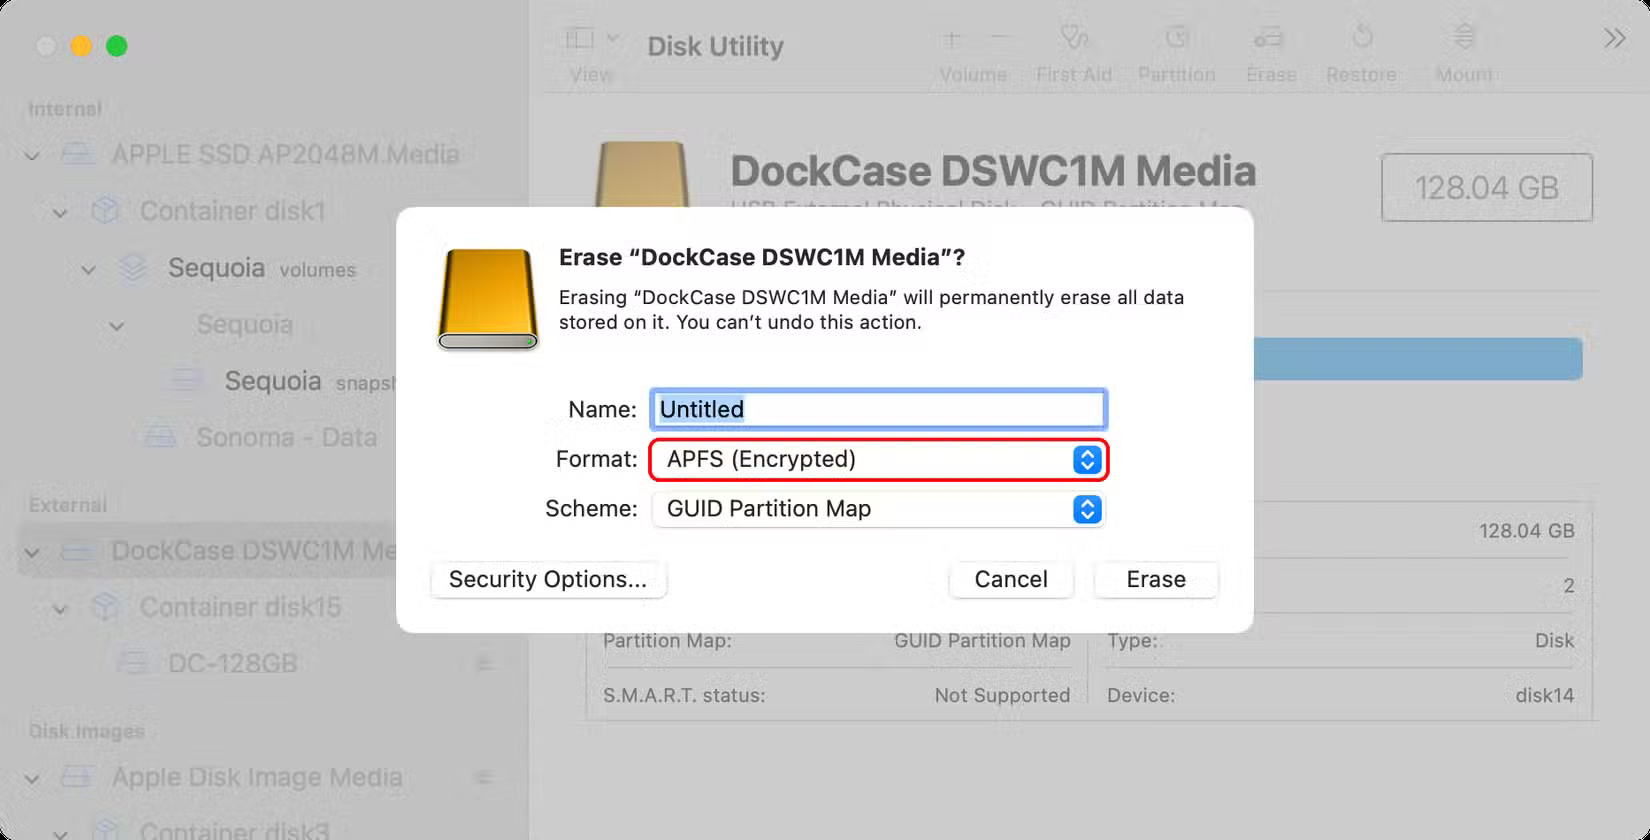
Mã hóa ổ đĩa đảm bảo file của bạn vẫn an toàn nếu bị đánh cắp hoặc bị mất. Không ai có thể mount ổ đĩa vào máy tính khác nếu không có mật khẩu mã hóa. Bạn có thể mã hóa ổ trong Disk Utility, tiện ích này sẽ xóa ổ hoặc từ Finder nếu bạn đã có file trên đó.
Chọn ổ đĩa trong thanh bên Disk Utility và nhấp vào Erase trên thanh công cụ, chọn GUID Partition Map trong menu Scheme và đảm bảo chọn APFS (Encrypted) trong menu Format. Nhập và xác minh mật khẩu mã hóa và nhấp vào Choose, sau đó là Erase > Done. Làm như vậy sẽ xóa, định dạng và mã hóa ổ trong một lần.
Để bật mã hóa mà không xóa ổ, hãy nhấp chuột phải (control+click) vào ổ trong thanh bên của Finder, chọn lệnh Encrypt từ menu, đặt mật khẩu và nhấp vào Encrypt Disk.
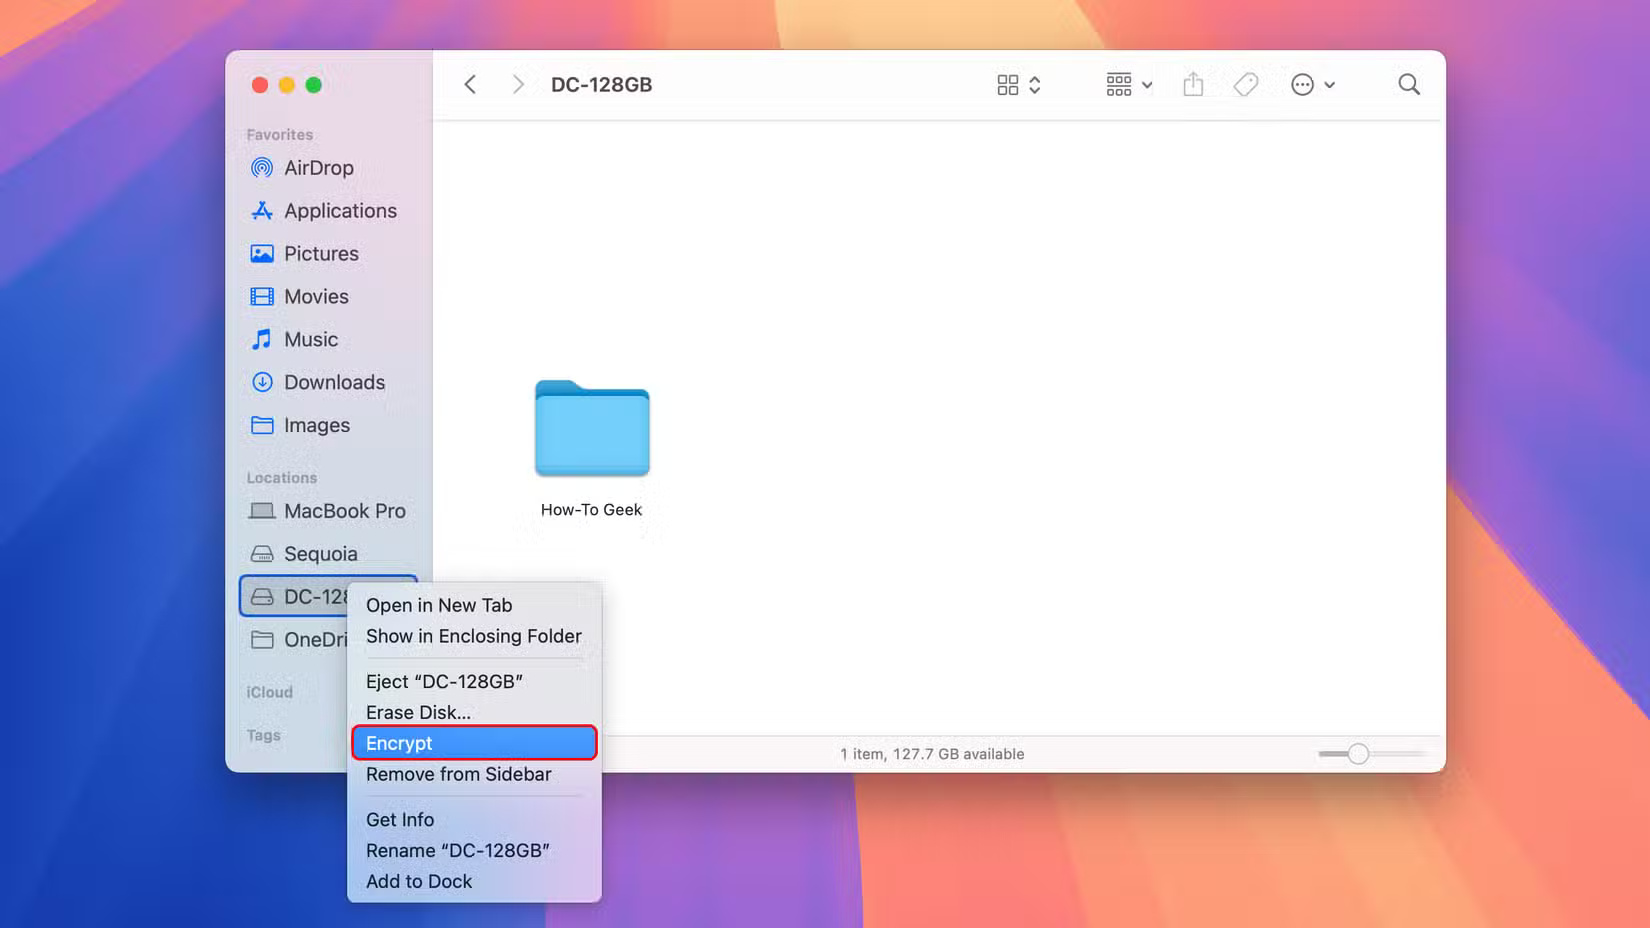
Lưu ý: Ghi lại mật khẩu mã hóa và giữ ở nơi an toàn vì bạn sẽ không thể truy cập dữ liệu trên ổ đĩa nếu không có mật khẩu.
2. Tháo ổ an toàn
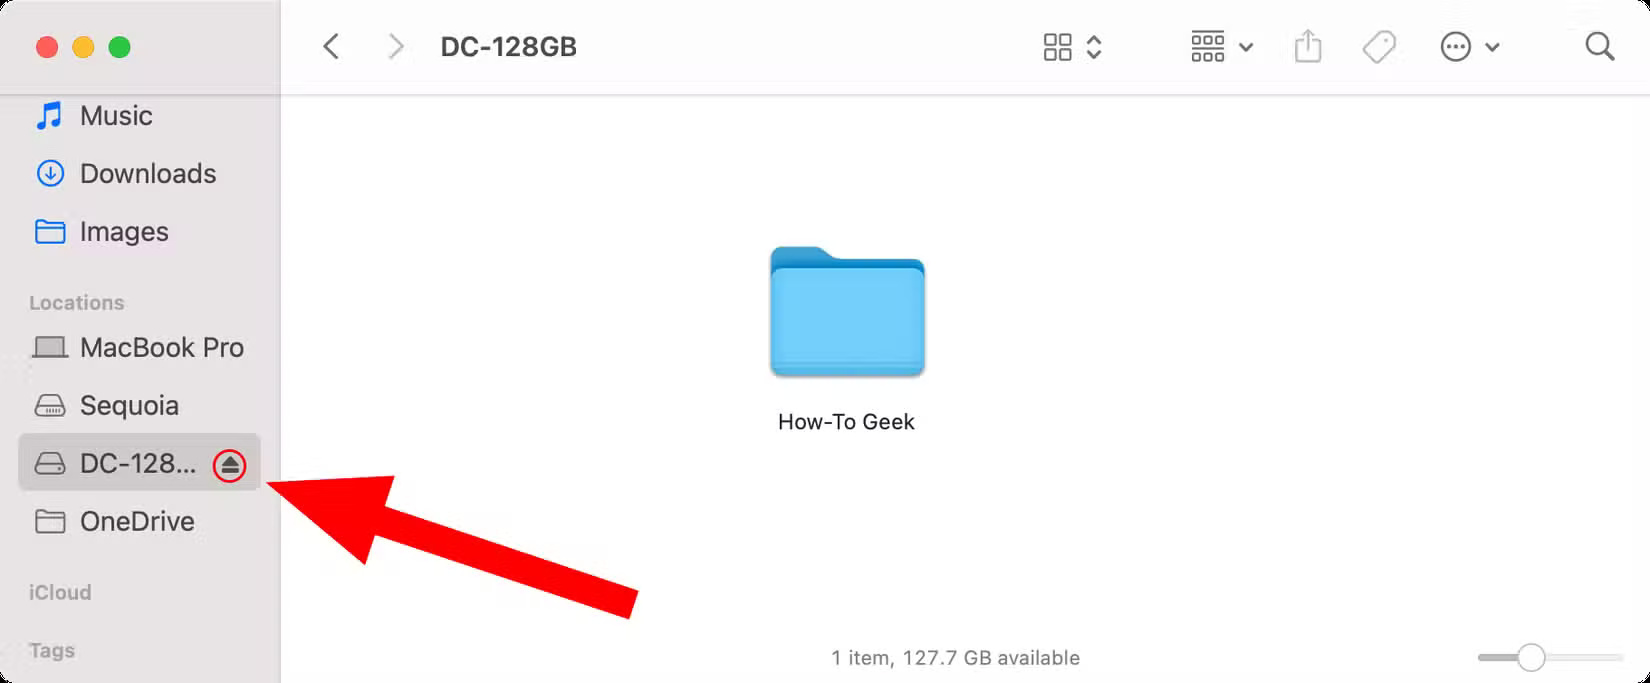
Hãy luôn tháo ổ di động trước khi rút phích cắm để tránh mất dữ liệu. Bạn có thể tháo ổ đĩa trong macOS theo nhiều cách, chẳng hạn như chọn ổ đĩa trên desktop và nhấn vào Eject từ menu File của Finder, nhấn Command + E hoặc kéo biểu tượng ổ đĩa vào Trash.
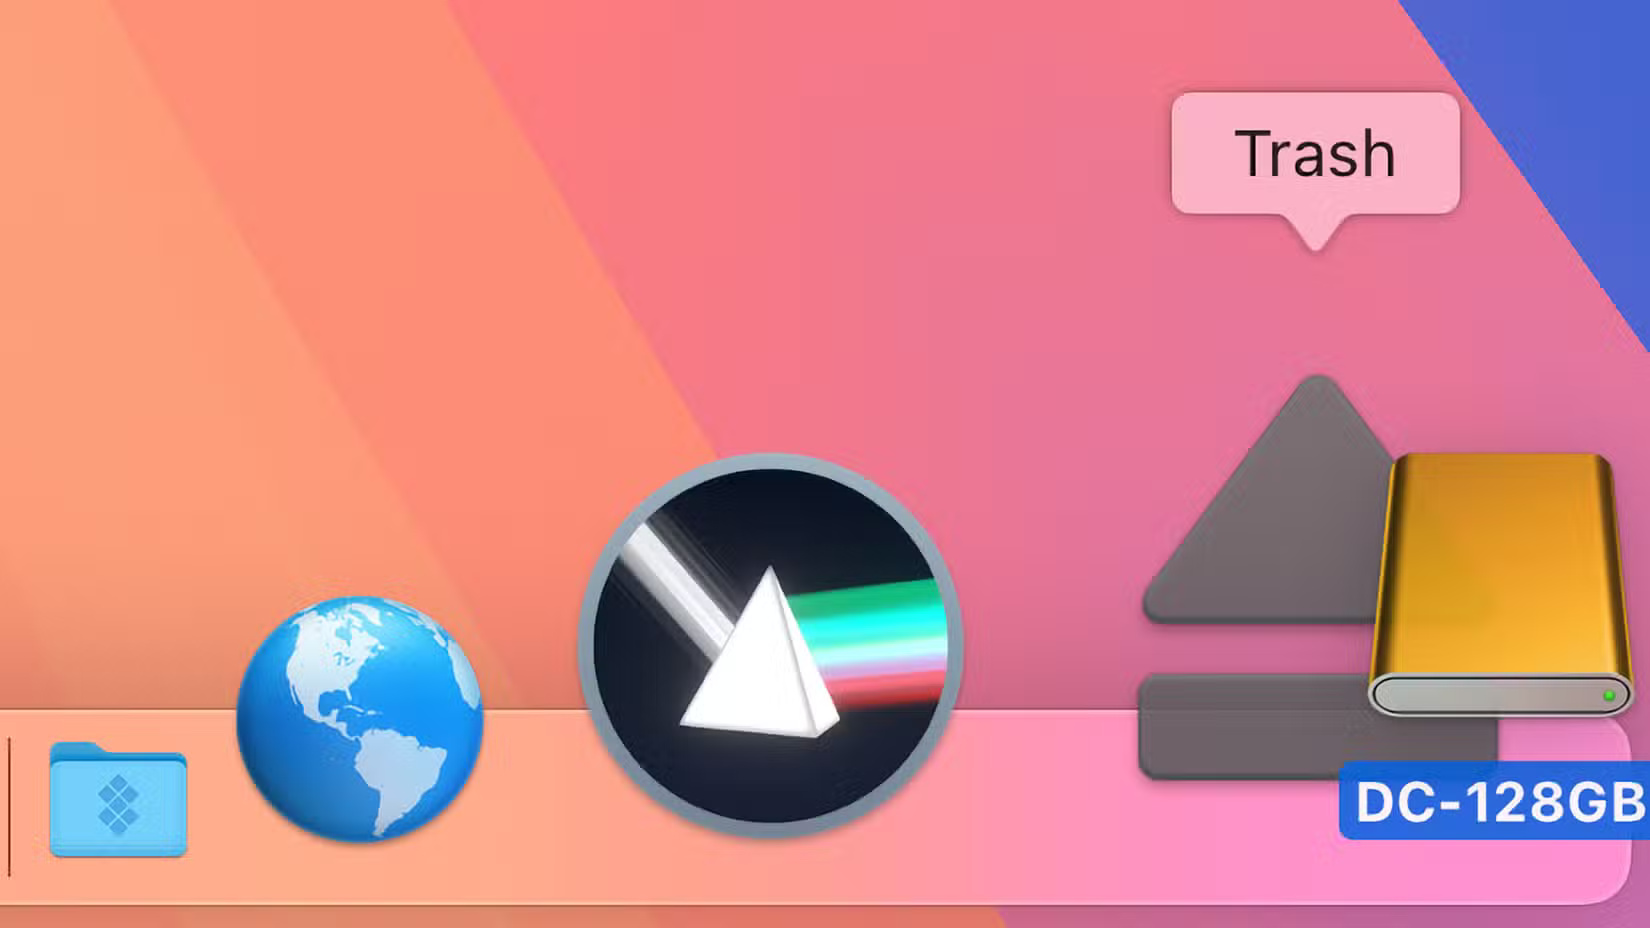
Bạn cũng có thể giữ Command và nhấp vào ổ để truy cập tùy chọn này, nhấp vào biểu tượng Eject của ổ đĩa trong thanh bên Finder hoặc chọn ổ trong Disk Utility và nhấp vào File > Eject.
Mẹo: Nếu ổ cứng ngoài không hiển thị trên desktop, hãy nhấp vào menu Finder và chọn Settings, sau đó chọn tab General và đánh dấu vào hộp External Disks.
Nếu ổ đĩa không đẩy ra, hãy đảm bảo lưu và đóng các tài liệu đang mở trên ổ, buộc thoát mọi ứng dụng, đăng xuất khỏi các tài khoản macOS yêu cầu ổ và khởi động lại nếu cần. Nếu không được, hãy mở Terminal từ thư mục Applications/Utilities, dán lệnh này và nhấn Enter:
diskutil list external
Ghi lại tên ổ đĩa của bạn, chẳng hạn như "Disk1", sau đó nhập lệnh này vào Terminal và nhấn Return.
diskutil eject disk1
Nếu cách này không hiệu quả và xảy ra mất dữ liệu, hãy sử dụng First Aid trong Disk Utility để sửa chữa ổ.
1. Cài đặt ứng dụng trên ổ cứng ngoài
Các ứng dụng được tải xuống từ Mac App Store sẽ cài đặt các file nhị phân và file liên quan của chúng trong một thư mục con thuộc Applications, một số nội dung được lưu trong thư mục Library. Đối với các ứng dụng được tải xuống từ các nguồn khác như trang web của nhà phát triển, trình cài đặt macOS tiêu chuẩn cho phép bạn chỉ định một đường dẫn tùy chỉnh như thư mục trên ổ cứng ngoài của mình.

Để cài đặt ứng dụng từ Mac App Store trên ổ cứng ngoài được định dạng APFS, hãy mở App Store bằng cách nhấp vào biểu tượng của ứng dụng trong Dock, sau đó nhấp vào App Store > Settings, đánh dấu vào ô Download and install large apps to a separate disk và chọn ổ của bạn từ menu.
Bất kỳ ứng dụng hoặc game nào được tải xuống từ Mac App Store lớn hơn một gigabyte sẽ được tải xuống và cài đặt vào ổ cứng ngoài, giúp tiết kiệm dung lượng quý giá trên ổ boot.
Mẹo: Bạn nên cài đặt ứng dụng trên ổ boot để tránh việc chia các file nhị phân giữa ổ cứng ngoài và thư mục Library, thư mục này phải nằm trên ổ khởi động.
Hãy nhớ rằng bạn phải mở trực tiếp các ứng dụng như vậy từ ổ cứng ngoài vì chúng không hiển thị trong Launchpad. Bạn cũng có thể di chuyển các ứng dụng chiếm nhiều dung lượng hiện có như iMovie vào ổ cứng ngoài và chạy chúng từ đó; chỉ cần kéo chúng vào ổ cứng ngoài, xóa các bản sao khỏi thư mục Applications và làm trống Trash để giải phóng dung lượng trên ổ khởi động.
Cho dù bạn đang sử dụng ổ đĩa cơ hay ổ cứng truyền thống, những mẹo này sẽ giúp bạn tận dụng tối đa các ổ cứng ngoài của mình. Mặc dù ổ đĩa cứng có giá cả phải chăng hơn ổ flash, bạn nên chọn ổ SSD nếu ngân sách cho phép để tránh các vấn đề về độ trễ và độ tin cậy.
