6 cách vô hiệu hóa Remote Desktop trên Windows 11
- Chủ nhật - 05/03/2023 23:57
- In ra
- Đóng cửa sổ này
Windows Remote Desktop là một tính năng hữu ích nếu bạn cần truy cập vào máy tính của mình nhưng không thể tiếp cận theo cách vật lý. Trên thực tế, nhu cầu này đã dẫn tới sự ra đời của nhiều ứng dụng remote desktop. Các ứng dụng như AnyDesk và TeamViewer hỗ trợ kết nối remote desktop tương tự với trải nghiệm người dùng trực quan hơn.
Tuy nhiên, nếu bạn không thường xuyên sử dụng tính năng Windows Remote Desktop để kết nối với máy tính của mình, tốt nhất bạn nên tắt tính năng này. Hướng dẫn này sẽ liệt kê tất cả các phương pháp để tắt tính năng Remote Desktop trên máy tính Windows 11.
Cách vô hiệu hóa Remote Desktop trên Windows 11
Bạn có thể tắt Remote Desktop từ Control Panel, ứng dụng Settings, sử dụng Command Prompt hoặc Registry Editor. Hơn nữa, bạn thậm chí có thể tạo một file batch và chạy nó trực tiếp từ desktop.
1. Sử dụng ứng dụng Settings
Bạn có thể tắt nhanh tính năng Remote Desktop trên hệ thống của mình bằng ứng dụng Settings. Đây là cách thực hiện:
1. Nhấn Win + I để khởi chạy ứng dụng Settings.
2. Trong phần System, cuộn xuống và nhấp vào tùy chọn Remote Desktop.
3. Sau đó, nhấp vào nút chuyển đổi bên cạnh tùy chọn Remote Desktop để tắt nó đi.
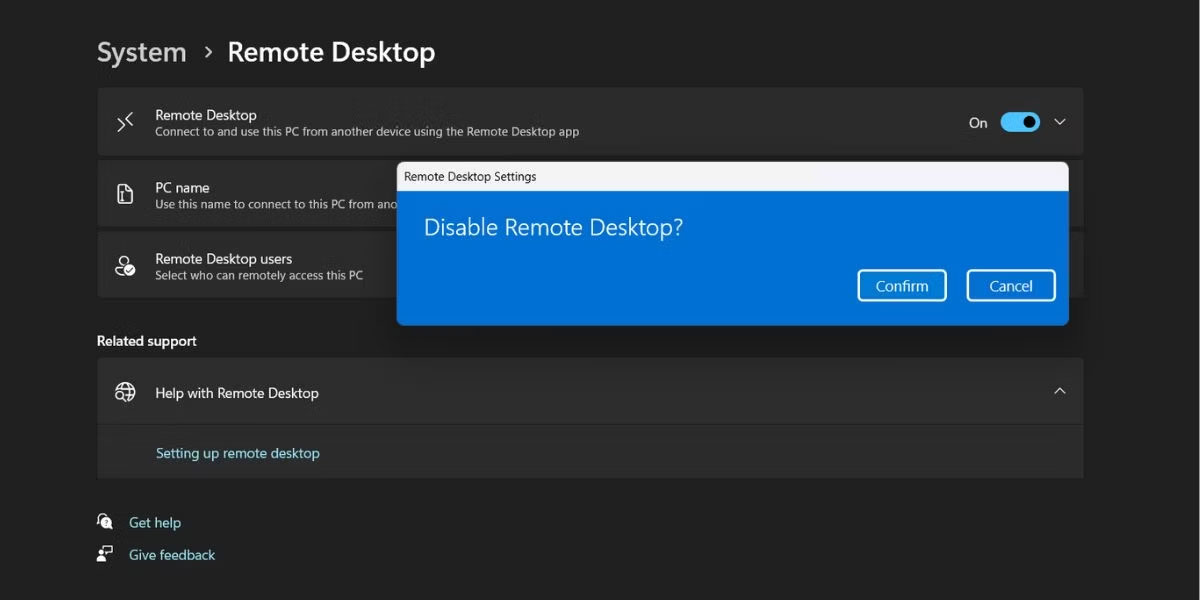
4. Windows sẽ nhắc bạn xác nhận quyết định của mình. Nhấp vào nút Disable và thoát khỏi ứng dụng Settings.
2. Sử dụng Control Panel
Mặc dù Microsoft đang cố gắng chuyển hầu hết các tùy chọn của Control Panel sang ứng dụng Settings nhưng quá trình chuyển đổi vẫn chưa hoàn tất. Vì vậy, bạn vẫn có thể tắt tính năng Remote Desktop bằng Control Panel. Làm theo các bước sau:
1. Nhấn Win + R để khởi chạy hộp lệnh Run. Nhập control và nhấn phím Enter.
2. Control Panel sẽ khởi chạy. Nhấp vào tùy chọn System and Security.
3. Điều hướng đến phần System và nhấp vào tùy chọn Allow remote access.
4. Sau đó, chọn Don't allow remote desktop connections to this computer và nhấp vào nút Apply.
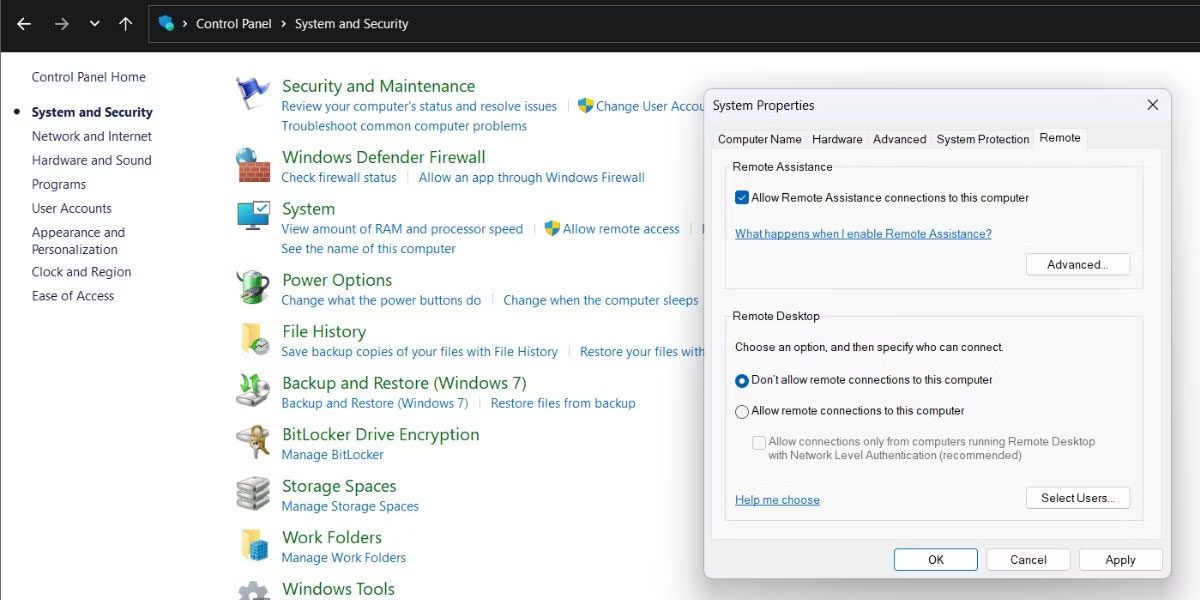
5. Cuối cùng, nhấp vào nút OK để hoàn tất các thay đổi và đóng công cụ Remote Desktop.
3. Sử dụng Registry Editor
Bạn có thể tạo registry key theo cách thủ công để tắt tính năng Remote Desktop trên hệ thống của mình. Tuy nhiên, việc tinh chỉnh Registry là một việc mạo hiểm và bạn phải luôn nhớ tạo bản sao lưu Registry trước khi thực hiện bất kỳ thay đổi nào. Ngay cả khi mọi thứ rơi vào tình huống xấu nhất, bạn luôn có thể nhập bản sao lưu và làm cho hệ thống hoạt động bình thường trở lại.
Làm theo các bước sau để tắt Remote Desktop bằng Registry Editor::
1. Nhấn Win + R để khởi chạy hộp lệnh Run. Nhập Regedit vào vùng nhập văn bản và nhấn phím Enter để khởi chạy tiện ích.
2. Bây giờ, hãy chuyển đến thanh địa chỉ trên đầu cửa sổ Registry Editor, dán đường dẫn sau và nhấn phím Enter:
HKEY_LOCAL_MACHINE\SYSTEM\CurrentControlSet\Control\Terminal Server
3. Khi bạn đang ở trong key Terminal Server, hãy tìm giá trị DWORD fDenyTSConnections. Nếu không có, nhấp chuột phải và chọn New > DWORD (32-bit) Value.
4. Đặt tên cho key mới tạo là fDenyTSConnections và không viết hoa.
5. Nhấp đúp vào giá trị DWORD fDenyTSConnections và thay đổi Value Data thành 1. Giữ nguyên Base là Hexadecimal.
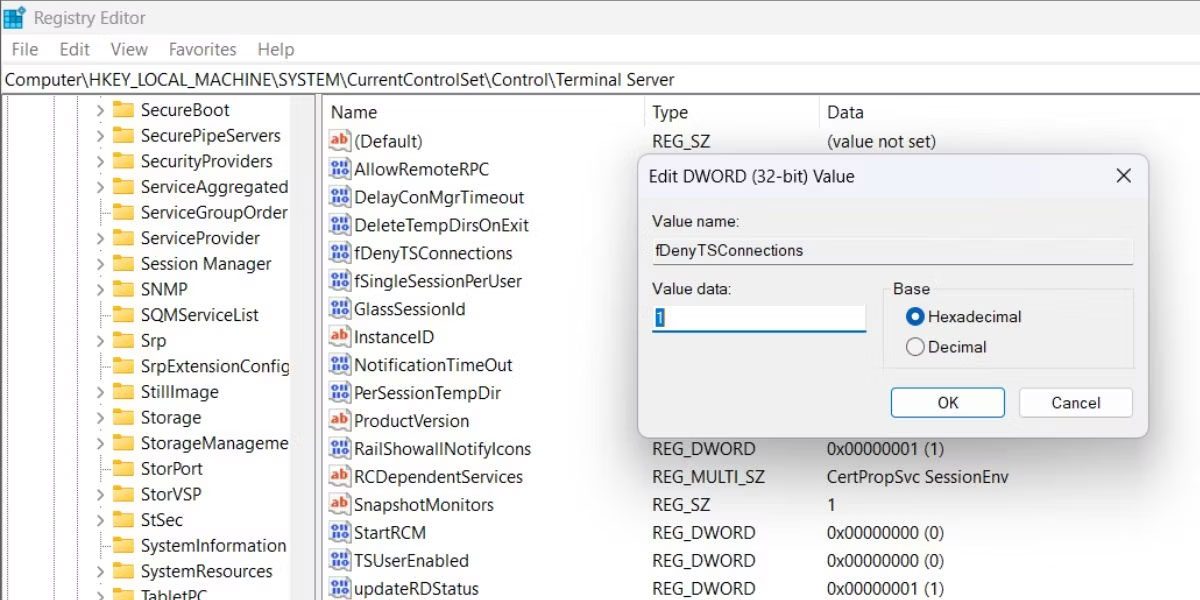
6. Cuối cùng, nhấp vào nút OK và thoát khỏi Registry Editor.
7. Khởi động lại hệ thống để cho phép các thay đổi có hiệu lực.
4. Sử dụng Windows Firewall
Bạn có thể chặn Remote Desktop khỏi danh sách các ứng dụng được phép trong Windows Firewall. Sau đó, ngay cả khi tính năng này đang hoạt động trên hệ thống của bạn, sẽ không có máy tính nào khác có thể kết nối với nó. Đây là cách thực hiện:
1. Nhấn Win + R để khởi chạy hộp lệnh Run. Nhập control firewall.cpl vào hộp văn bản và nhấn phím Enter.
2. Trên trang Windows Defender Firewall, nhấp vào tùy chọn Allow an app or feature through the Windows Defender Firewall.
3. Nhấp vào nút Change settings. Cuộn xuống và bỏ chọn tùy chọn Remote Desktop và Remote Desktop (WebSocket) trong danh sách.
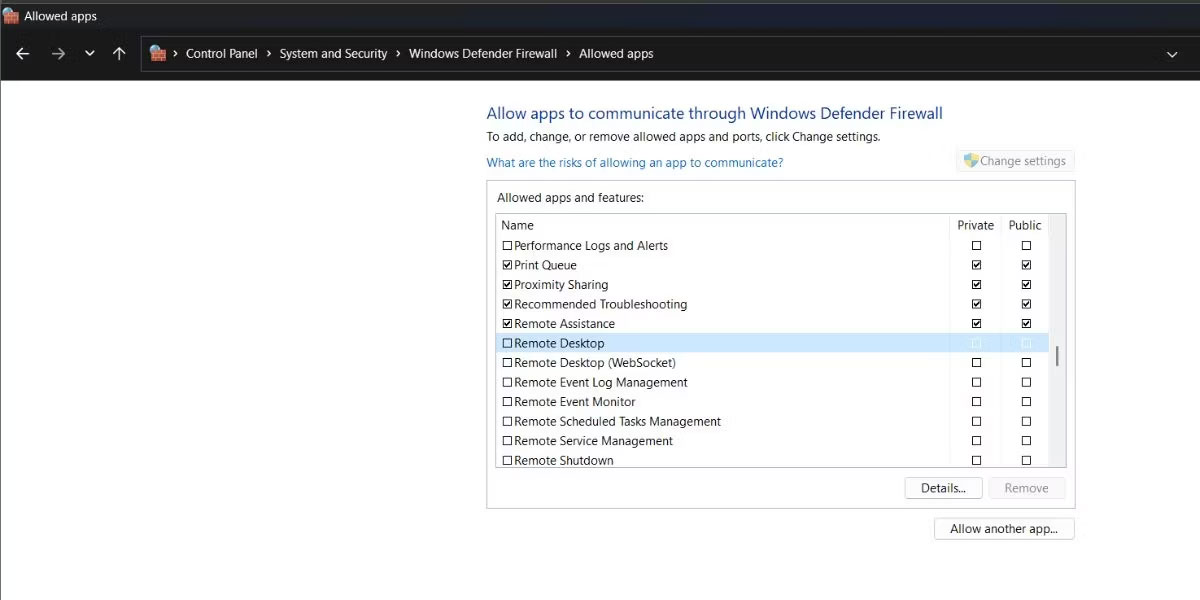
4. Bấm vào nút OK và thoát khỏi cửa sổ Control Panel.
5. Sử dụng Command Prompt
Bạn có thể sử dụng Command Prompt để tắt Remote Desktop mà không cần điều hướng đến Control Panel hoặc ứng dụng Settings. Làm theo các bước sau:
1. Nhấn Win + X để mở Power User Menu. Tìm tùy chọn Terminal (Admin) từ danh sách và nhấp vào nó.
2. Trong cửa sổ Command Prompt, gõ lệnh sau và nhấn phím Enter:
net stop termservice
3. Nhập Y và nhấn Enter để dừng Remote Desktop và các service liên quan của nó.
4. Sau đó, gõ lệnh sau và nhấn phím Enter.
sc config termservice start= disabled
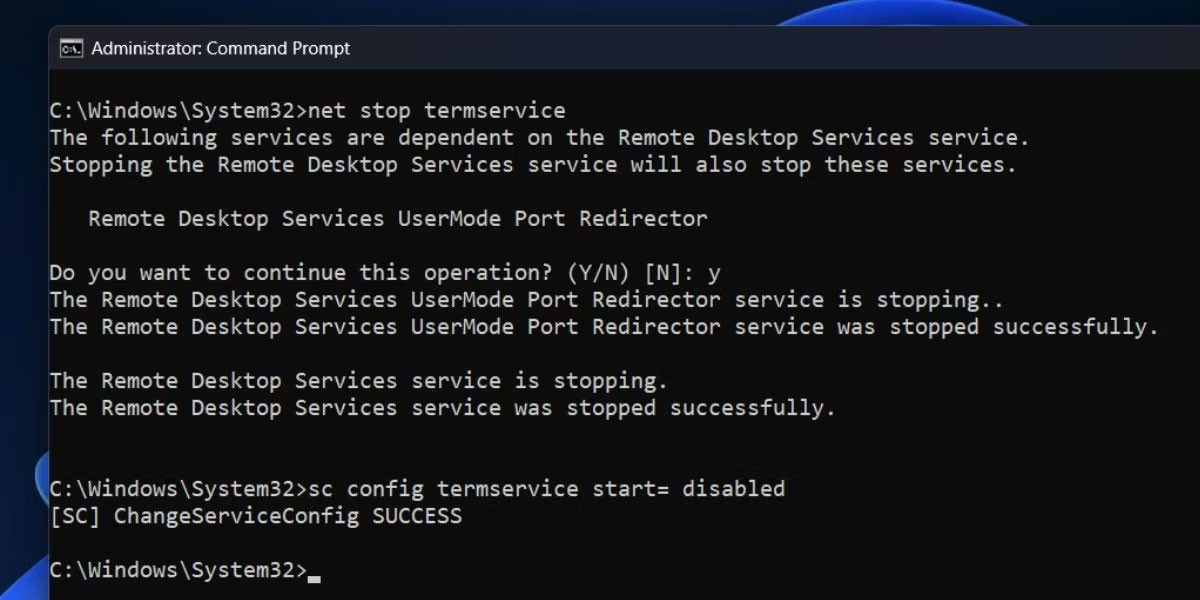
5. Sau khi lệnh thực thi thành công, gõ exit để đóng cửa sổ Command Prompt.
6. Sử dụng file batch
File batch là một cách dễ dàng hơn để bật hoặc tắt Remote Desktop. Bạn có thể lưu nó trên desktop và chạy nó khi không cần tính năng này hoạt động trên hệ thống của mình nữa. Đây là cách thực hiện:
1. Nhấn Win + D để chuyển sang desktop.
2. Nhấp chuột phải vào Desktop và chọn New > Text Document.
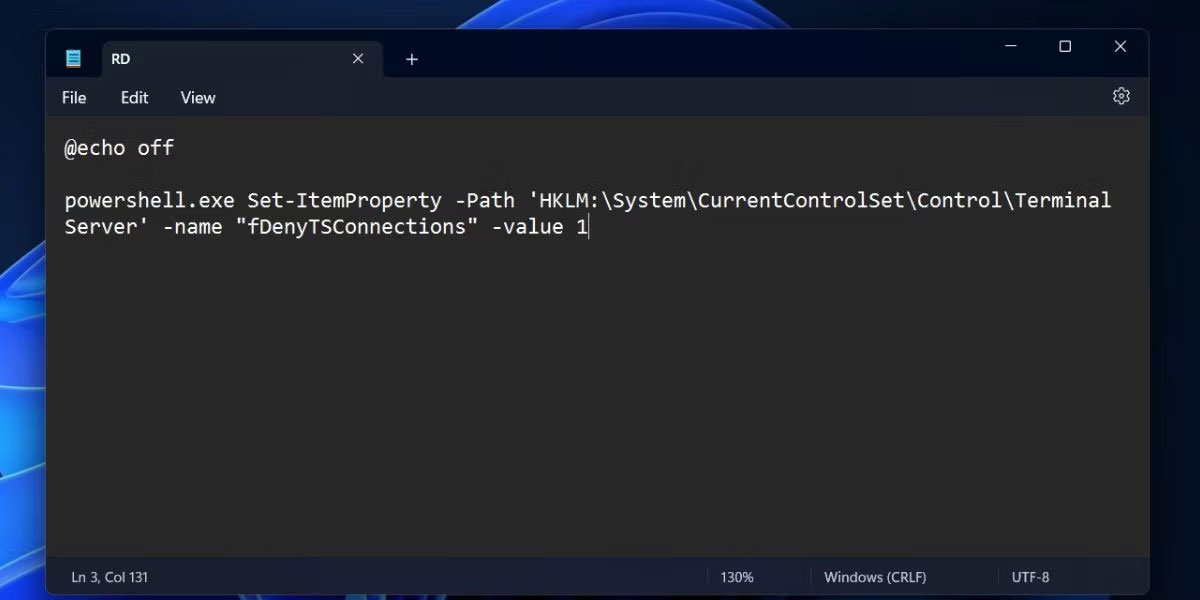
3. Mở file văn bản trống và dán đoạn code sau:
@echo off powershell.exe Set-ItemProperty -Path 'HKLM:\System\CurrentControlSet\Control\Terminal Server' -name "fDenyTSConnections" -value 1
4. Nhấn Ctrl + Shift + S để mở tùy chọn Save as. Đặt tên file là RD.bat và giữ nguyên File Type là All Files. Bây giờ, nhấp vào nút Save.
5. Nhấn Win + D để chuyển sang desktop và nhấp chuột phải vào file RD.bat. Chọn tùy chọn Run as administrator từ menu ngữ cảnh.
6. File batch sẽ khởi chạy PowerShell, thực thi lệnh vô hiệu hóa và tự động đóng. Bạn không cần phải can thiệp.
Remote Desktop chỉ nên hoạt động khi bạn cần tính năng này. Bạn có thể sử dụng ứng dụng Settings hoặc Control Panel để tắt tính năng này. Ngoài ra, bạn có thể chỉnh sửa các giá trị registry hoặc vô hiệu hóa ứng dụng khỏi Windows Firewall. Cuối cùng, bạn có thể tạo và chạy một file batch nếu muốn tắt tính năng này chỉ bằng một cú nhấp chuột.
