4 cách thay đổi phần mở rộng file trong Windows 11
- Thứ bảy - 09/08/2025 05:12
- In ra
- Đóng cửa sổ này
Bài viết này giải thích cách thay đổi phần mở rộng file trong Windows 11, cũng như thảo luận về sự khác biệt giữa phần mở rộng file và loại file.
Thay đổi phần mở rộng file theo cách dễ dàng
Đối với hầu hết mọi người, cách dễ nhất để thay đổi phần mở rộng file trong Windows 11 là thực hiện từ cùng nơi bạn thay đổi tên file. Tuy nhiên, Windows không hiển thị phần mở rộng file theo mặc định, vì vậy trước tiên chúng ta phải thực hiện một thay đổi nhỏ đối với phần mở rộng đó trước khi được cung cấp tùy chọn chỉnh sửa phần mở rộng file.
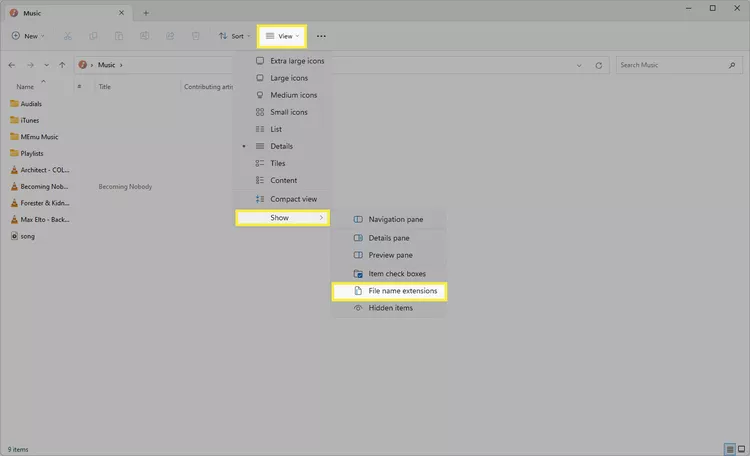
1. Mở File Explorer. Một phương pháp nhanh chóng là sử dụng phím tắt WIN + E.
2. Chọn View ở đầu cửa sổ, sau đó chọn Show > File name extensions.
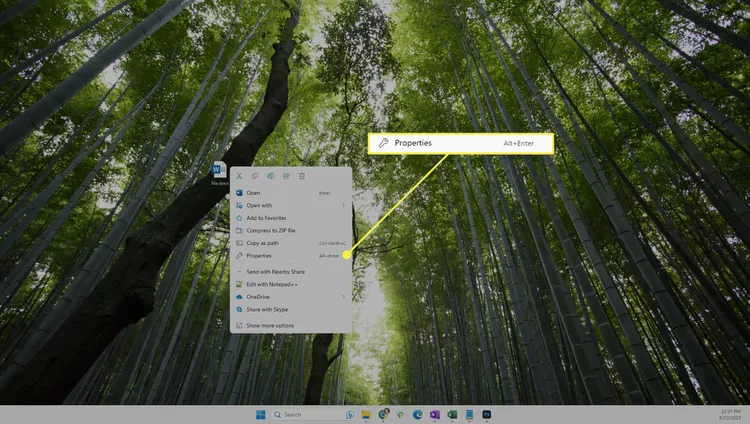
3. Bây giờ, Windows 11 hiển thị phần mở rộng file, hãy nhấp chuột phải vào file bạn muốn chỉnh sửa phần mở rộng và chọn Properties.
Mẹo: Nếu bạn đang vội, hãy nhấp chuột trái vào file một lần (không mở file), nhấn F2, chỉnh sửa phần mở rộng file, nhấn Enter, sau đó chọn Save.
4. Trong tab General, hãy đổi tên các ký tự sau dấu chấm để thay đổi phần mở rộng file.
5. Nhấn OK, rồi chọn Yes để lưu.
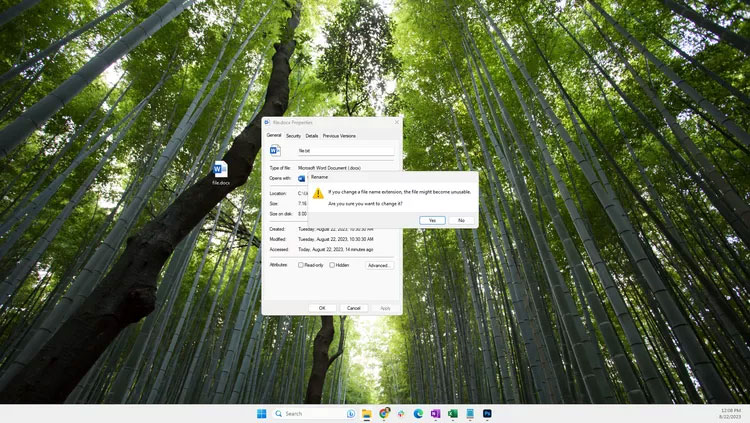
Lưu ý: Việc thay đổi phần mở rộng file không thay đổi loại file. Xem phần cuối trang này để biết thêm thông tin về điều đó.
Thay đổi phần mở rộng file từ Command Prompt
Nếu quen thuộc với Command Prompt, bạn có thể thích sử dụng lệnh rename/ren để thay đổi phần mở rộng file. Phương pháp này cho phép bạn bỏ qua việc phải chỉnh sửa các tùy chọn File Explorer (tức là bạn có thể ẩn phần mở rộng file và thao tác này vẫn có hiệu quả).
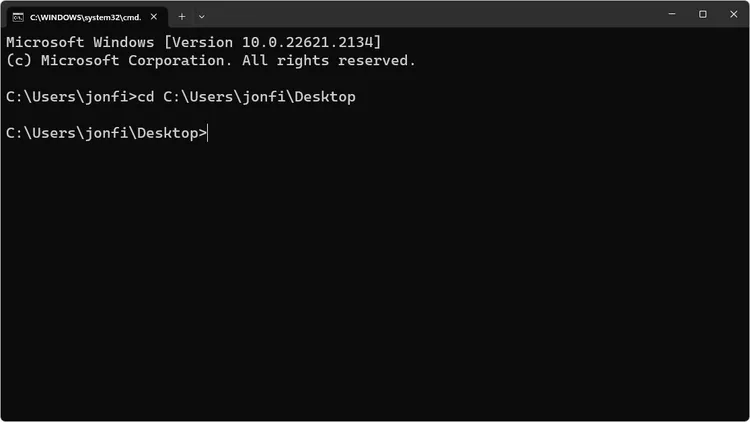
1. Mở Command Prompt.
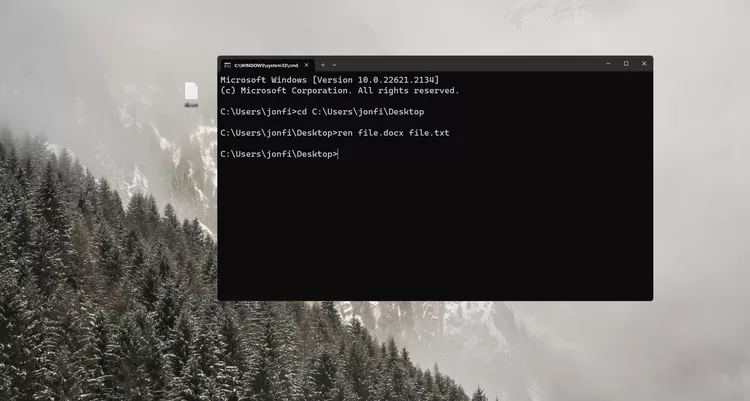
2. Thay đổi đến thư mục chứa file của bạn.
Ví dụ, nếu Command Prompt mở ra C:\Users\jonfi, nhưng file nằm trên desktop, hãy nhập lệnh này vào Command Prompt:
cd C:\Users\jonfi\Desktop
3. Nhập ren theo sau là file gốc và sau đó là tên mới cho file.
Sau đây là ví dụ về việc thay đổi phần mở rộng file từ DOCX thành TXT:
ren file.docx file.txt
4. Nhấn Enter để thay đổi phần mở rộng file ngay lập tức.
Cách thay đổi phần mở rộng file hàng loạt
Command Prompt cũng giúp bạn dễ dàng chỉnh sửa phần mở rộng file cho nhiều file cùng lúc, giả sử chúng nằm trong cùng một thư mục. Mẹo là sử dụng dấu hoa thị để bạn không phải gọi tên bất kỳ file cụ thể nào.
1. Đặt tất cả các file bạn muốn chỉnh sửa vào thư mục riêng của chúng.
2. Nhấp chuột phải vào vùng trống bên cạnh các file và chọn Open in Terminal.
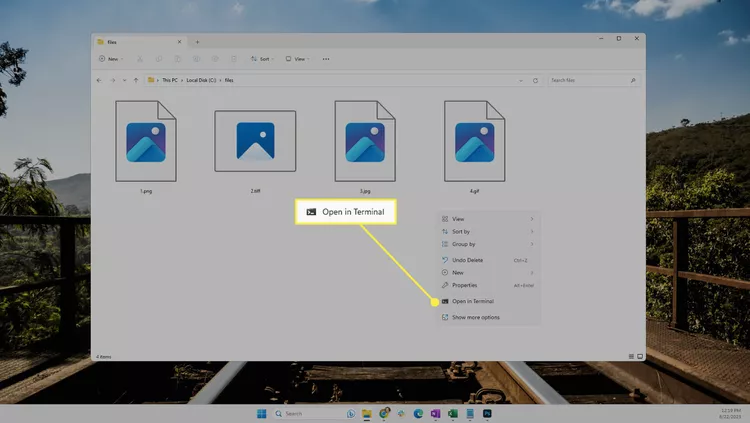
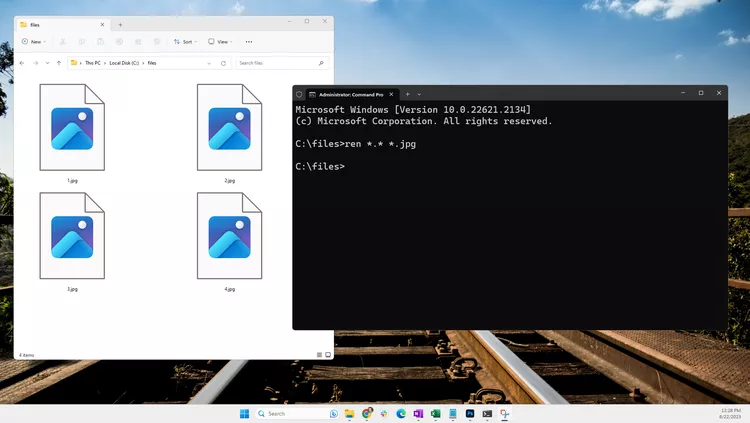
3. Xác nhận rằng Command Prompt hiển thị đúng thư mục. Trong ví dụ, nó là C:\files>.
Nếu PowerShell mở thay vào đó, hãy nhấn Ctrl + Shift + 2 để đến Command Prompt. Tìm hiểu thêm về Terminal nếu bạn cần trợ giúp.
Lưu ý quan trọng: Đừng bỏ qua bước này. Nếu bạn đang ở sai thư mục, không có cách dễ dàng nào để hoàn tác lệnh bạn sắp thực hiện.
4. Nhập lệnh sau, nhưng hãy đổi *.jpg thành bất kỳ file nào bạn muốn:
ren *.* *.jpg
Cảnh báo: Lệnh này sẽ đổi tên mọi thứ trong thư mục này. Đảm bảo rằng bạn đang ở đúng thư mục và muốn thay đổi phần mở rộng file cho mọi file trong đó.
Nếu chỉ cần đổi tên một nhóm các phần mở rộng file tương tự, bạn có thể sửa đổi lệnh một chút. Sau đây là những gì cần nhập nếu bạn muốn tất cả các file GIF có phần mở rộng file JPG (mọi thứ khác sẽ được giữ nguyên):
ren *.gif *.jpg
5. Nhấn Enter. Tất cả các phần mở rộng file sẽ tự động thay đổi.
Chuyển đổi file để thay đổi loại file
Công cụ chuyển đổi file cũng có thể thay đổi phần mở rộng file. Lý do chính khiến bạn thực hiện thao tác này là nếu bạn muốn thay đổi định dạng file thực tế (tức là loại file), chẳng hạn như khi bạn cần file tương thích với một thiết bị hoặc chương trình phần mềm cụ thể.
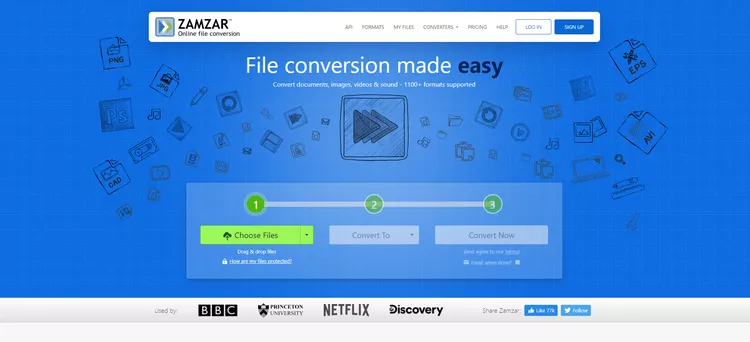
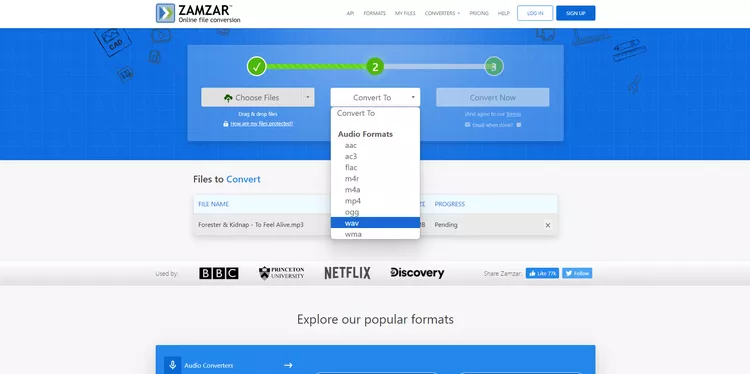
Sau đây là ví dụ về việc sử dụng trình chuyển đổi file Zamzar để thay đổi phần mở rộng file của file âm thanh từ MP3 sang WAV.
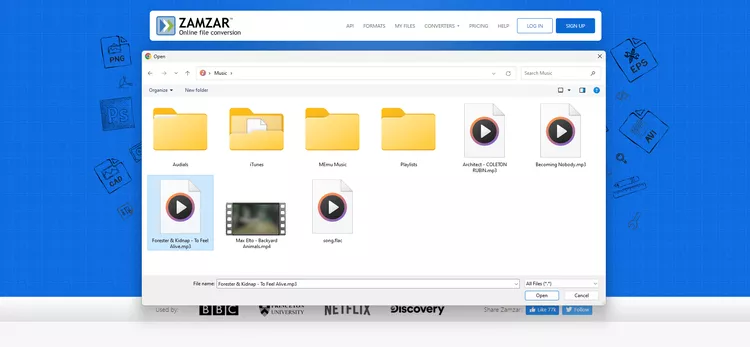
1. Truy cập Zamzar và chọn Choose Files.
https://www.zamzar.com/
2. Chọn file MP3 bạn muốn đổi thành WAV, sau đó nhấn Open.
3. Chọn Convert To, sau đó chọn WAV từ danh sách.
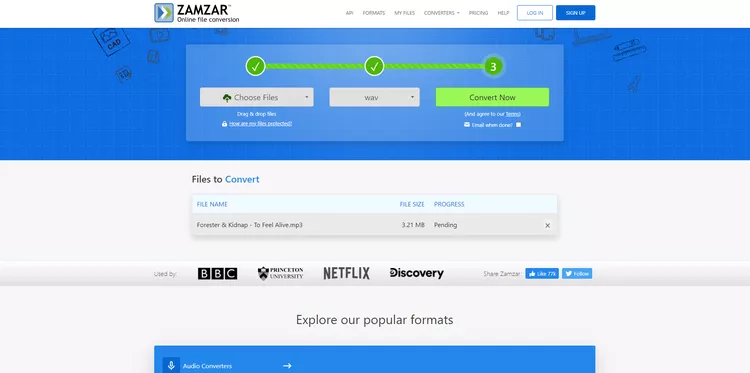
4. Chọn Convert Now để bắt đầu chuyển đổi file.
5. Chọn Download để lưu file vào thiết bị.

Một số chương trình phần mềm có công cụ chuyển đổi file tích hợp. Trường hợp này thường xảy ra đối với các chương trình có thể mở nhiều loại file. Ví dụ, Adobe Photoshop có thể mở file PNG và chuyển đổi file đó sang hơn chục định dạng hình ảnh khác, sau đó thay đổi phần mở rộng file (thành JPG, GIF, TIFF, v.v...).
Thay đổi phần mở rộng file có tác dụng gì?
Hệ điều hành Windows sử dụng phần mở rộng file để hiểu cách mở file. Ví dụ, khi bạn nhấp đúp để mở file TXT, Notepad có thể sẽ mở file đó. Điều này xảy ra vì Notepad được cấu hình để mở file TXT.
Nếu thay đổi file TXT thành phần mở rộng file DOCX, Microsoft Word sẽ mở file đó thay vì PC được cấu hình để sử dụng Word cho loại file đó.
Xem cách thay đổi liên kết file trong Windows nếu bạn muốn một chương trình khác mở bất kỳ loại file cụ thể nào. Điều này cho phép bạn thay đổi ứng dụng phát MP3 hoặc chọn trình xem ảnh khác cho file GIF của mình.
Lý do thay đổi phần mở rộng file
Một lý do để thay đổi phần mở rộng file là nếu phần mở rộng gốc được thêm vào file do nhầm lẫn. Điều này đôi khi xảy ra khi file được tải xuống từ một trang web. Ví dụ, nếu bạn được cho là nhận file PDF, nhưng dịch vụ web đã xuất file của mình sang thứ khác, bạn có thể thay đổi phần mở rộng file thành PDF để làm cho nó hoạt động chính xác với trình đọc PDF của mình.
Một ví dụ khác là nếu bạn đang làm việc với file BAT. Việc xây dựng file dưới dạng tài liệu TXT có ý nghĩa hơn, vì vậy bạn có thể nhanh chóng nhấp đúp để mở file trong trình soạn thảo văn bản khi bạn cần thực hiện thay đổi. Nhưng khi hoàn tất, bạn phải đổi phần mở rộng file thành BAT để hoạt động như mong muốn.
Bạn có thể nghĩ đến việc đổi phần mở rộng file để file hoạt động với chương trình hoặc thiết bị khác. Ví dụ, việc đổi phần mở rộng file có vẻ hữu ích nếu eReader của bạn hỗ trợ file PDF, nhưng sách của bạn là file FB2. Trên thực tế, bạn cần phải đổi loại file.
"Loại" file khác nhau
Việc thay đổi phần mở rộng file không làm thay đổi loại file. Có thể có vẻ như vậy nếu biểu tượng thay đổi và một chương trình khác mở file khi nhấp đúp. Tuy nhiên, phần mở rộng file chỉ thông báo cho Windows về chương trình nào cần sử dụng khi mở file.
Loại file đề cập đến định dạng mà file được lưu trữ. Ví dụ, file SVG là định dạng hình ảnh, khá khác so với JPG. Cả hai đều khác biệt đáng kể so với file ISO. Chúng đại diện cho 3 loại file riêng biệt.
Phần mở rộng DAT là một ví dụ khác. Theo liên kết, bạn sẽ thấy một loại file DAT có thể là video, một loại khác là file văn bản và một loại khác nữa để lưu trữ dữ liệu sao lưu. Đó là ba loại file khác nhau sử dụng cùng một phần mở rộng.
Để hiểu những khác biệt này, hãy cân nhắc việc thay đổi phần mở rộng file MP3 thành DOCX. MP3 dành cho âm thanh, trong khi DOCX dành cho tài liệu. Việc chỉ thay đổi phần mở rộng file sẽ không chuyển đổi lời bài hát MP3 thành tài liệu có thể đọc được trong Microsoft Word.
Thay vào đó, hãy sử dụng trình chuyển đổi file để thay đổi loại file. Nếu bạn cần video MKV dưới dạng MP4, có lẽ để nó hoạt động với trình phát video yêu thích của mình chỉ chấp nhận MP4, thì một công cụ chuyển đổi file là lý tưởng. Điều này cũng áp dụng cho các loại file khác.
