<!DOCTYPE html>
    <html lang="vi" xmlns="http://www.w3.org/1999/xhtml" prefix="og: http://ogp.me/ns#">
    <head>
<title>11 cách mở Resource Monitor trong Windows 10</title>
<meta name="description" content="11 cách mở Resource Monitor trong Windows 10 - Savefile - Tin Tức -...">
<meta name="author" content=".: Nguoicodonvn2008.info - Cõi lòng người cô đơn :.">
<meta name="copyright" content=".: Nguoicodonvn2008.info - Cõi lòng người cô đơn :. [admin@nguoicodonvn2008.info]">
<meta name="robots" content="index, archive, follow, noodp">
<meta name="googlebot" content="index,archive,follow,noodp">
<meta name="msnbot" content="all,index,follow">
<meta name="generator" content="NukeViet v4.5">
<meta http-equiv="Content-Type" content="text/html; charset=utf-8">
<meta property="og:title" content="11 cách mở Resource Monitor trong Windows 10">
<meta property="og:type" content="website">
<meta property="og:description" content="Savefile - Tin Tức - https&#x3A;&#x002F;&#x002F;www.nguoicodonvn2008.info&#x002F;vi&#x002F;news&#x002F;savefile&#x002F;kien-thuc-may-tinh&#x002F;11-cach-mo-resource-monitor-trong-windows-10-2676.html">
<meta property="og:site_name" content=".&#x3A; Nguoicodonvn2008.info - Cõi lòng người cô đơn &#x3A;.">
<meta property="og:url" content="https://www.nguoicodonvn2008.info/vi/news/savefile/kien-thuc-may-tinh/11-cach-mo-resource-monitor-trong-windows-10-2676.html">
<link rel="shortcut icon" href="https://www.nguoicodonvn2008.info/favicon.ico">
<link rel="canonical" href="https://www.nguoicodonvn2008.info/vi/news/savefile/kien-thuc-may-tinh/11-cach-mo-resource-monitor-trong-windows-10-2676.html">
<link rel="alternate" href="https://www.nguoicodonvn2008.info/vi/news/rss/" title="Tin Tức" type="application/rss+xml">
<link rel="alternate" href="https://www.nguoicodonvn2008.info/vi/news/rss/karaoke-dual/" title="Tin Tức - Karaoke Dual" type="application/rss+xml">
<link rel="alternate" href="https://www.nguoicodonvn2008.info/vi/news/rss/nhac-tre/" title="Tin Tức - Nhạc trẻ" type="application/rss+xml">
<link rel="alternate" href="https://www.nguoicodonvn2008.info/vi/news/rss/tru-tinh/" title="Tin Tức - Trữ tình" type="application/rss+xml">
<link rel="alternate" href="https://www.nguoicodonvn2008.info/vi/news/rss/nuoc-ngoai/" title="Tin Tức - Nước ngoài" type="application/rss+xml">
<link rel="alternate" href="https://www.nguoicodonvn2008.info/vi/news/rss/remix/" title="Tin Tức - Remix" type="application/rss+xml">
<link rel="alternate" href="https://www.nguoicodonvn2008.info/vi/news/rss/tam-su-tinh-yeu/" title="Tin Tức - Tâm sự tình yêu" type="application/rss+xml">
<link rel="alternate" href="https://www.nguoicodonvn2008.info/vi/news/rss/tho-suu-tam/" title="Tin Tức - Thơ sưu tầm" type="application/rss+xml">
<link rel="alternate" href="https://www.nguoicodonvn2008.info/vi/news/rss/cuoc-song/" title="Tin Tức - Cuộc sống" type="application/rss+xml">
<link rel="alternate" href="https://www.nguoicodonvn2008.info/vi/news/rss/phan-mem/" title="Tin Tức - Phần mềm" type="application/rss+xml">
<link rel="alternate" href="https://www.nguoicodonvn2008.info/vi/news/rss/kien-thuc-may-tinh/" title="Tin Tức - Kiến thức máy tính" type="application/rss+xml">
<link rel="alternate" href="https://www.nguoicodonvn2008.info/vi/news/rss/hoc-tap/" title="Tin Tức - Học tập" type="application/rss+xml">
<link rel="alternate" href="https://www.nguoicodonvn2008.info/vi/news/rss/tai-lieu/" title="Tin Tức - Tài liệu" type="application/rss+xml">
<link rel="alternate" href="https://www.nguoicodonvn2008.info/vi/news/rss/de-thi/" title="Tin Tức - Đề thi" type="application/rss+xml">
<link rel="preload" as="style" href="https://www.nguoicodonvn2008.info/assets/css/font-awesome.min.css" type="text/css">
<link rel="preload" as="style" href="https://www.nguoicodonvn2008.info/themes/default/css/bootstrap.non-responsive.css" type="text/css">
<link rel="preload" as="style" href="https://www.nguoicodonvn2008.info/themes/default/css/style.css" type="text/css">
<link rel="preload" as="style" href="https://www.nguoicodonvn2008.info/themes/default/css/style.non-responsive.css" type="text/css">
<link rel="preload" as="style" href="https://www.nguoicodonvn2008.info/themes/default/css/news.css" type="text/css">
<link rel="preload" as="style" href="https://www.nguoicodonvn2008.info/themes/default/css/custom.css" type="text/css">
<link rel="preload" as="script" href="https://www.nguoicodonvn2008.info/assets/js/jquery/jquery.min.js" type="text/javascript">
<link rel="preload" as="script" href="https://www.nguoicodonvn2008.info/assets/js/language/vi.js" type="text/javascript">
<link rel="preload" as="script" href="https://www.nguoicodonvn2008.info/assets/js/DOMPurify/purify3.js" type="text/javascript">
<link rel="preload" as="script" href="https://www.nguoicodonvn2008.info/assets/js/global.js" type="text/javascript">
<link rel="preload" as="script" href="https://www.nguoicodonvn2008.info/assets/js/site.js" type="text/javascript">
<link rel="preload" as="script" href="https://www.nguoicodonvn2008.info/themes/default/js/news.js" type="text/javascript">
<link rel="preload" as="script" href="https://www.nguoicodonvn2008.info/themes/default/js/main.js" type="text/javascript">
<link rel="preload" as="script" href="https://www.nguoicodonvn2008.info/themes/default/js/custom.js" type="text/javascript">
<link rel="preload" as="script" href="https://www.nguoicodonvn2008.info/themes/default/js/bootstrap.min.js" type="text/javascript">
<link rel="stylesheet" href="https://www.nguoicodonvn2008.info/assets/css/font-awesome.min.css">
<link rel="stylesheet" href="https://www.nguoicodonvn2008.info/themes/default/css/bootstrap.non-responsive.css">
<link rel="stylesheet" href="https://www.nguoicodonvn2008.info/themes/default/css/style.css">
<link rel="stylesheet" href="https://www.nguoicodonvn2008.info/themes/default/css/style.non-responsive.css">
<link rel="StyleSheet" href="https://www.nguoicodonvn2008.info/themes/default/css/news.css">
<link rel="stylesheet" href="https://www.nguoicodonvn2008.info/themes/default/css/custom.css">
<style type="text/css">
	body{background: #fff;}
</style>
    </head>
    <body>
<div id="print">
	<div id="hd_print">
		<h2 class="pull-left">.&#x3A; Nguoicodonvn2008.info - Cõi lòng người cô đơn &#x3A;.</h2>
		<p class="pull-right"><a title=".&#x3A; Nguoicodonvn2008.info - Cõi lòng người cô đơn &#x3A;." href="https://www.nguoicodonvn2008.info/">https://www.nguoicodonvn2008.info</a></p>
	</div>
	<div class="clear"></div>
	<hr />
	<div id="content">
		<h1>11 cách mở Resource Monitor trong Windows 10</h1>
		<ul class="list-inline">
			<li>Thứ tư - 09/09/2020 00:58</li>
			<li class="hidden-print txtrequired"><em class="fa fa-print">&nbsp;</em><a title="In ra" href="javascript:;" onclick="window.print()">In ra</a></li>
			<li class="hidden-print txtrequired"><em class="fa fa-power-off">&nbsp;</em><a title="Đóng cửa sổ này" href="javascript:;" onclick="window.close()">Đóng cửa sổ này</a></li>
		</ul>
		<div class="clear"></div>
		<div id="hometext">
		</div>
				<div class="imghome">
			<img alt="11 cách mở Resource Monitor trong Windows 10" src="https://st.quantrimang.com/photos/image/2020/09/08/mo-resource-monitor-2.jpg" width="460" class="img-thumbnail" />
		</div>
		<div class="clear"></div>
		<div id="bodytext" class="clearfix">
			<h2 style="text-align: justify;">Resource Monitor là gì?</h2>

<p style="text-align: justify;">
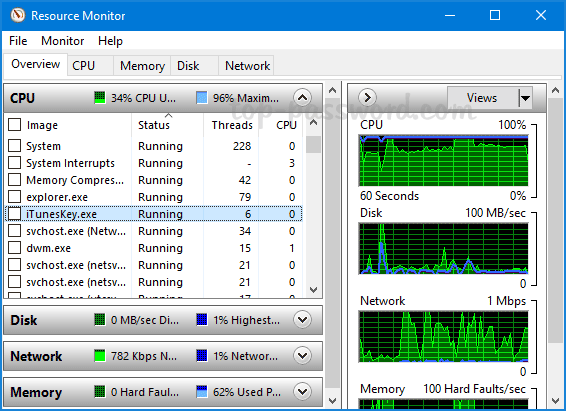
Resource Monitor là một công cụ tích hợp hữu ích trong Windows, cho phép bạn theo dõi việc sử dụng CPU, bộ nhớ, ổ cứng và mạng một cách đơn giản. Nó cung cấp nhiều thông tin hơn&nbsp;Task Manager. Trong hướng dẫn này,&nbsp;<strong>Quantrimang.com</strong>&nbsp;sẽ chỉ cho bạn các cách nhanh chóng để mở Resource Monitor trong Windows 10.</p>

<figure data-inimage-loaded="true">
<div style="text-align: justify;"><br />
<img alt="Resource Monitor là công cụ cho phép bạn theo dõi việc sử dụng CPU, bộ nhớ, đĩa và mạng" data-i="0" data-src="https://st.quantrimang.com/photos/image/2020/05/01/mo-resource-monitor-1.png" data-was-processed="true" height="411" src="https://st.quantrimang.com/photos/image/2020/05/01/mo-resource-monitor-1.png" width="566" /></div>

<figcaption>
<div style="text-align: justify;">Resource Monitor là công cụ cho phép bạn theo dõi việc sử dụng CPU, bộ nhớ, đĩa và mạng</div>
</figcaption>
</figure>

<div style="text-align: justify;">&nbsp;</div>

<h2 id="mcetoc_1ehmi5oqd0" style="text-align: justify;">
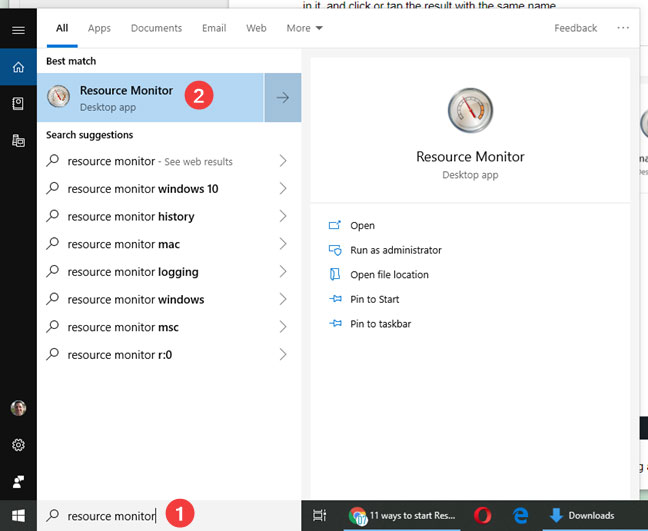
1. Mở Resource Monitor thông qua hộp tìm kiếm</h2>

<p style="text-align: justify;">Nhấp vào hộp tìm kiếm&nbsp;<strong>Search</strong>&nbsp;nằm ở phía bên trái của thanh tác vụ và nhập&nbsp;<strong>“restore monitor“.</strong>&nbsp;Chọn&nbsp;<strong>Resource Monitor</strong>&nbsp;từ kết quả và bạn có thể khởi động ứng dụng với quyền admin.</p>

<figure>
<div style="text-align: justify;"><img alt="Mở Resource Monitor thông qua hộp tìm kiếm" data-i="1" data-src="https://st.quantrimang.com/photos/image/2020/09/08/mo-resource-monitor-1.jpg" data-was-processed="true" height="531" src="https://st.quantrimang.com/photos/image/2020/09/08/mo-resource-monitor-1.jpg" width="648" /></div>

<figcaption>
<div style="text-align: justify;">Mở Resource Monitor thông qua hộp tìm kiếm</div>
</figcaption>
</figure>

<div style="text-align: justify;">&nbsp;</div>

<h2 id="mcetoc_1ehmi5oqd1" style="text-align: justify;">
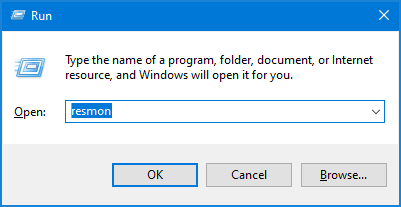
2. Mở Resource Monitor thông qua Run</h2>

<p style="text-align: justify;">Nhấn phím&nbsp;<code>Win</code>+<code>R</code>&nbsp;trên bàn phím để mở hộp lệnh&nbsp;<strong>Run.</strong>&nbsp;Nhập&nbsp;<strong>resmon</strong>&nbsp;và nhấn&nbsp;<code>Enter</code>, tiện ích Resource Monitor sẽ khởi chạy.</p>

<figure>
<div style="text-align: justify;"><img alt="Mở Resource Monitor thông qua Run" data-i="2" data-src="https://st.quantrimang.com/photos/image/2020/05/01/mo-resource-monitor-3.png" data-was-processed="true" height="207" src="https://st.quantrimang.com/photos/image/2020/05/01/mo-resource-monitor-3.png" width="401" /></div>

<figcaption>
<div style="text-align: justify;">Mở Resource Monitor thông qua Run</div>
</figcaption>
</figure>

<h2 id="mcetoc_1ehmi5oqd2" style="text-align: justify;">3. Mở Resource Monitor với PowerShell</h2>

<p style="text-align: justify;">Mở&nbsp;PowerShell&nbsp;hoặc&nbsp;Command Prompt, nhập&nbsp;<strong>resmon</strong>&nbsp;vào dòng lệnh và nhấn&nbsp;<code>Enter</code>. Resource Monitor sẽ mở ngay lập tức.</p>

<figure>
<div style="text-align: justify;"><img alt="Mở Resource Monitor với PowerShell" data-i="3" data-src="https://st.quantrimang.com/photos/image/2020/09/08/mo-resource-monitor-2.jpg" data-was-processed="true" height="97" src="https://st.quantrimang.com/photos/image/2020/09/08/mo-resource-monitor-2.jpg" width="561" /></div>

<figcaption>
<div style="text-align: justify;">Mở Resource Monitor với PowerShell</div>
</figcaption>
</figure>

<h2 id="mcetoc_1ehmi5oqd3" style="text-align: justify;">
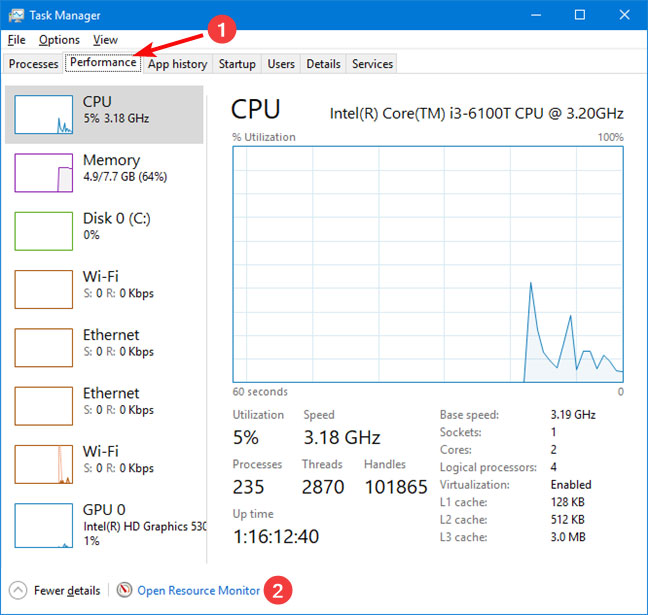
4. Mở Resource Monitor từ Task Manager</h2>

<p style="text-align: justify;"><a href="https://quantrimang.com/6-cach-don-gian-mo-task-manager-tren-windows-119941" title="6 cách mở Task Manager trên Windows đơn giản nhất">Mở Task Manager</a>&nbsp;và chuyển đến tab&nbsp;<strong>Performance.</strong>&nbsp;Nhấp vào liên kết&nbsp;<strong>Open Resource Monitor</strong>&nbsp;ở góc dưới bên trái. Cửa sổ Resource Monitor sẽ hiển thị.</p>

<figure>
<div style="text-align: justify;"><img alt="Mở Resource Monitor từ Task Manager" data-i="4" data-src="https://st.quantrimang.com/photos/image/2020/09/08/mo-resource-monitor-3.jpg" data-was-processed="true" height="615" src="https://st.quantrimang.com/photos/image/2020/09/08/mo-resource-monitor-3.jpg" width="648" /></div>

<figcaption>
<div style="text-align: justify;">Mở Resource Monitor từ Task Manager</div>
</figcaption>
</figure>

<div style="text-align: justify;">&nbsp;</div>

<h2 id="mcetoc_1ehmi5oqd4" style="text-align: justify;">5. Mở Resource Monitor từ menu Start
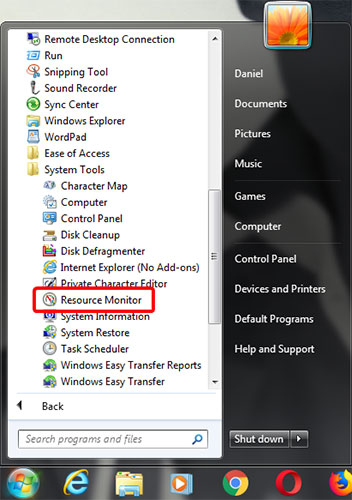
</h2>

<p style="text-align: justify;">Nhấp vào nút&nbsp;<strong>Start</strong>&nbsp;ở góc dưới bên trái để hiển thị menu Start, sau đó mở rộng, Windows&nbsp;<strong>Administrative Tools</strong>&nbsp;và bạn có thể tìm thấy shortcut&nbsp;<strong>Resource Monitor</strong>&nbsp;trong danh sách.</p>

<figure>
<div style="text-align: justify;"><img alt="Mở Resource Monitor từ menu Start" data-i="5" data-src="https://st.quantrimang.com/photos/image/2020/09/08/mo-resource-monitor-4.jpg" data-was-processed="true" height="500" src="https://st.quantrimang.com/photos/image/2020/09/08/mo-resource-monitor-4.jpg" width="352" /></div>

<figcaption>
<div style="text-align: justify;">Mở Resource Monitor từ menu Start</div>
</figcaption>
</figure>

<h2 id="mcetoc_1ehmj2iv30" style="text-align: justify;">6. Mở Resource Monitor bằng Cortana</h2>

<figure>
<div style="text-align: justify;"><img alt="Mở Resource Monitor bằng Cortana" data-i="6" data-src="https://st.quantrimang.com/photos/image/2020/09/08/mo-resource-monitor-5.jpg" data-was-processed="true" height="500" src="https://st.quantrimang.com/photos/image/2020/09/08/mo-resource-monitor-5.jpg" width="289" /></div>

<figcaption>
<div style="text-align: justify;">Mở Resource Monitor bằng Cortana</div>
</figcaption>
</figure>

<p style="text-align: justify;">
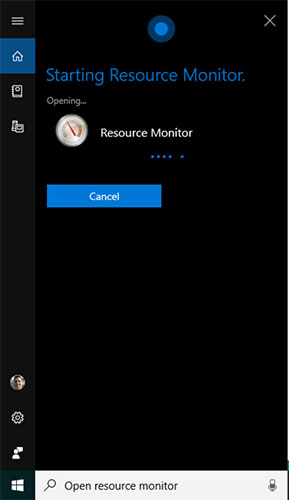
Nếu Cortana được bật trên hệ thống Windows 10, bạn có thể yêu cầu trợ lý ảo này mở Resource Monitor cho bạn. Sau khi bạn kích hoạt Cortana bằng cách nói&nbsp;<strong>&quot;Hey Cortana&quot;</strong>hoặc bằng cách nhấp vào nút micro trên thanh tác vụ, hãy nói&nbsp;<strong>&quot;Open Resource Monitor&quot;</strong>. Cortana sẽ xác nhận lệnh và hiển thị thông báo&nbsp;<strong>&quot;Starting Resource Monitor&quot;</strong>:</p>

<h2 id="mcetoc_1ehmj2iv31" style="text-align: justify;">7. Ghim Resource Monitor vào Taskbar, menu Start</h2>

<figure>
<div style="text-align: justify;"><img alt="Ghim Resource Monitor vào menu Start" data-i="7" data-src="https://st.quantrimang.com/photos/image/2020/09/08/mo-resource-monitor-6.jpg" data-was-processed="true" height="453" src="https://st.quantrimang.com/photos/image/2020/09/08/mo-resource-monitor-6.jpg" width="648" /></div>

<figcaption>
<div style="text-align: justify;">Ghim Resource Monitor vào menu Start</div>
</figcaption>
</figure>

<p style="text-align: justify;">
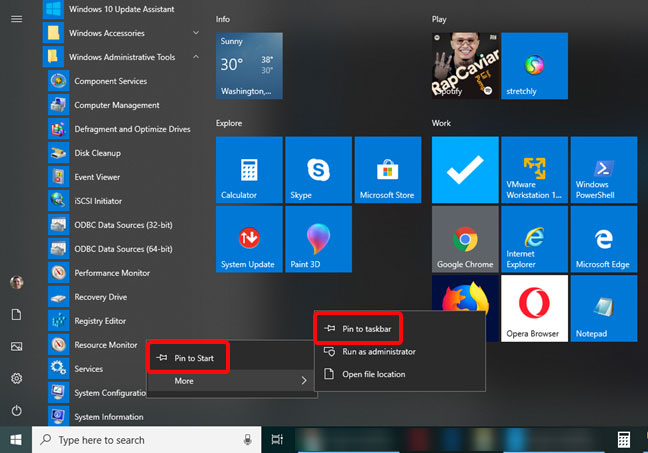
Nếu bạn truy cập Resource Monitor thường xuyên, những nơi thuận tiện mà bạn có thể ghim nó để truy cập nhanh là thanh tác vụ và menu Start.</p>

<p style="text-align: justify;">Trước tiên, hãy tìm Resource Monitor trong menu Start của Windows 10. Nhấp chuột phải hoặc nhấn và giữ vào shortcut Resource Monitor. Trong menu mở ra, bạn sẽ có tùy chọn&nbsp;<strong>&quot;Pin to Start&quot;</strong>&nbsp;cho menu Start.</p>

<ul>
	<li style="text-align: justify;"><a href="https://quantrimang.com/them-bieu-tuong-ung-dung-vao-taskbar-theo-3-cach-120039" title="Cách ghim ứng dụng vào Taskbar để mở nhanh hơn">Cách ghim ứng dụng vào Taskbar để mở nhanh hơn</a></li>
</ul>

<h2 id="mcetoc_1ehmj2iv32" style="text-align: justify;">8. Mở Resource Monitor từ System Configuration</h2>

<figure>
<div style="text-align: justify;"><img alt="Mở Resource Monitor từ System Configuration" data-i="8" data-src="https://st.quantrimang.com/photos/image/2020/09/08/mo-resource-monitor-7.jpg" data-was-processed="true" height="385" src="https://st.quantrimang.com/photos/image/2020/09/08/mo-resource-monitor-7.jpg" width="571" /></div>

<figcaption>
<div style="text-align: justify;">Mở Resource Monitor từ System Configuration</div>
</figcaption>
</figure>

<p style="text-align: justify;">
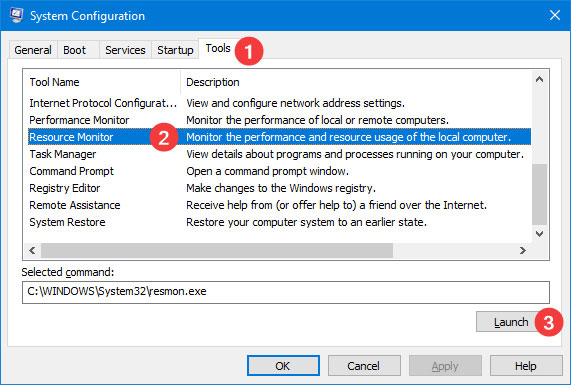
Bạn có thể khởi chạy công cụ Resource Monitor từ&nbsp;<strong>System Configuration.</strong>&nbsp;Chuyển đến tab&nbsp;<strong>Tools</strong>&nbsp;trong&nbsp;<strong>System Configuration</strong>, chọn&nbsp;<strong>Resource Monitor</strong>&nbsp;và nhấn&nbsp;<strong>Launch.</strong></p>

<h2 id="mcetoc_1ehmj2iv33" style="text-align: justify;">9. Tạo shortcut Resource Monitor</h2>

<figure>
<div style="text-align: justify;"><img alt="Tạo shortcut Resource Monitor" data-i="9" data-src="https://st.quantrimang.com/photos/image/2020/09/08/mo-resource-monitor-8.jpg" data-was-processed="true" height="454" src="https://st.quantrimang.com/photos/image/2020/09/08/mo-resource-monitor-8.jpg" width="614" /></div>

<figcaption>
<div style="text-align: justify;">Tạo shortcut Resource Monitor</div>
</figcaption>
</figure>

<p style="text-align: justify;">
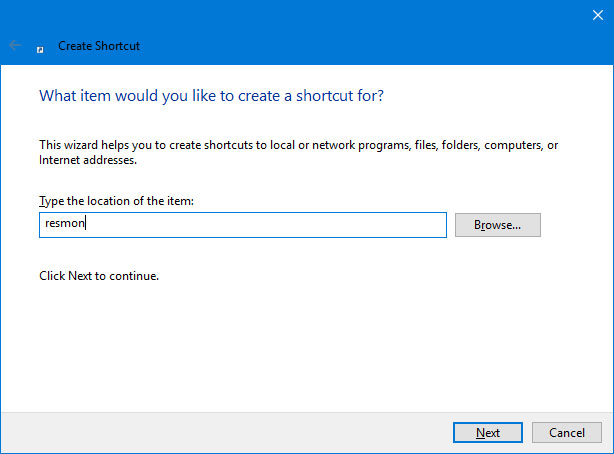
Nếu shortcut trên màn hình là cách ưa thích của bạn để khởi động ứng dụng, bạn có thể tạo shortcut cho Resource Monitor. Trong cửa sổ&nbsp;<strong>Create Shortcut</strong>, hãy gõ&nbsp;<strong>resmon.</strong></p>

<h2 id="mcetoc_1ehmj2iv34" style="text-align: justify;">
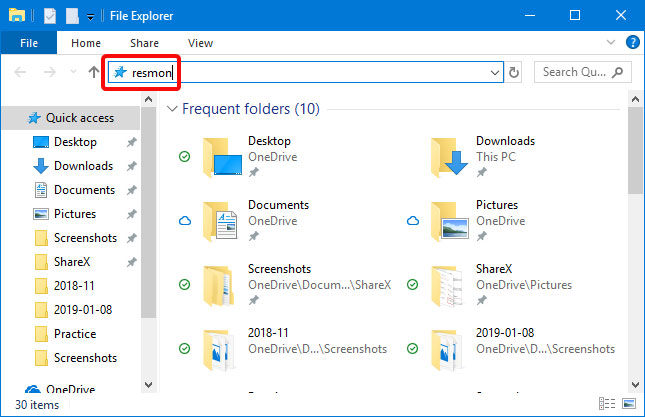
10. Mở Resource Monitor bằng cách sử dụng File Explorer</h2>

<div style="text-align: justify;">&nbsp;</div>

<p style="text-align: justify;">File Explorer trong Windows 10 là cách thuận tiện để khởi động Resource Monitor. Gõ&nbsp;<strong>&quot;resmon&quot;</strong>&nbsp;vào thanh địa chỉ và nhấn&nbsp;<strong>ENTER</strong>&nbsp;trên bàn phím.</p>

<figure>
<div style="text-align: justify;"><img alt="Mở Resource Monitor bằng cách sử dụng File Explorer" data-i="10" data-src="https://st.quantrimang.com/photos/image/2020/09/08/mo-resource-monitor-9.jpg" data-was-processed="true" height="417" src="https://st.quantrimang.com/photos/image/2020/09/08/mo-resource-monitor-9.jpg" width="645" /></div>

<figcaption>
<div style="text-align: justify;">Mở Resource Monitor bằng cách sử dụng File Explorer</div>
</figcaption>
</figure>

<h2 id="mcetoc_1ehmj2iv35" style="text-align: justify;">11. Mở Resource Monitor bằng cách chạy file thực thi</h2>

<figure>
<div style="text-align: justify;"><img alt="Mở Resource Monitor bằng cách chạy file thực thi" data-i="11" data-src="https://st.quantrimang.com/photos/image/2020/09/08/mo-resource-monitor-10.jpg" data-was-processed="true" height="417" src="https://st.quantrimang.com/photos/image/2020/09/08/mo-resource-monitor-10.jpg" width="645" /></div>

<figcaption>
<div style="text-align: justify;">Mở Resource Monitor bằng cách chạy file thực thi</div>
</figcaption>
</figure>

<p style="text-align: justify;">
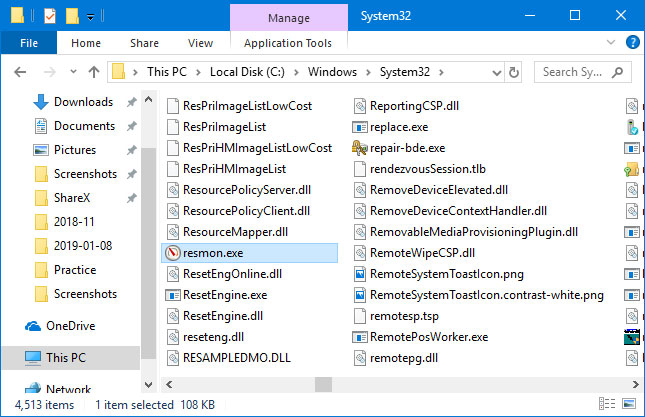
File thực thi Resource Monitor được tìm thấy trong thư mục con&nbsp;<strong>System32</strong>&nbsp;của thư mục&nbsp;<strong>Windows.</strong>&nbsp;Bạn cần xác định file resmon.exe và sau đó nhấp đúp vào file đó.</p>

<div style="text-align: justify;">&nbsp;</div>

<p style="text-align: justify;">Chúc bạn thực hiện thành công!</p>
		</div>
				<div id="author">
						<p>
				<strong>Nguồn tin:</strong>
				Quantrimang.com
			</p>
		</div>
	</div>
	<div id="footer" class="clearfix">
		<div id="url">
			<strong>URL của bản tin này: </strong><a href="https://www.nguoicodonvn2008.info/vi/news/savefile/kien-thuc-may-tinh/11-cach-mo-resource-monitor-trong-windows-10-2676.html" title="11 cách mở Resource Monitor trong Windows 10">https://www.nguoicodonvn2008.info/vi/news/savefile/kien-thuc-may-tinh/11-cach-mo-resource-monitor-trong-windows-10-2676.html</a>

		</div>
		<div class="clear"></div>
		<div class="copyright">
			&copy; .&#x3A; Nguoicodonvn2008.info - Cõi lòng người cô đơn &#x3A;.
		</div>
		<div id="contact">
			<a href="mailto:admin@nguoicodonvn2008.info">admin@nguoicodonvn2008.info</a>
		</div>
	</div>
</div>
        <div id="timeoutsess" class="chromeframe">
            Bạn đã không sử dụng Site, <a onclick="timeoutsesscancel();" href="https://www.nguoicodonvn2008.info/#">Bấm vào đây để duy trì trạng thái đăng nhập</a>. Thời gian chờ: <span id="secField"> 60 </span> giây
        </div>
        <div id="openidResult" class="nv-alert" style="display:none"></div>
        <div id="openidBt" data-result="" data-redirect=""></div>
		</script>
		<div class="car-top">
  <span><img src="https://www.nguoicodonvn2008.info/themes/default/images/car.png" alt=""></span>
</div>
<script src="https://www.nguoicodonvn2008.info/assets/js/jquery/jquery.min.js"></script>
<script>var nv_base_siteurl="/",nv_lang_data="vi",nv_lang_interface="vi",nv_name_variable="nv",nv_fc_variable="op",nv_lang_variable="language",nv_module_name="news",nv_func_name="savefile",nv_is_user=0, nv_my_ofs=-4,nv_my_abbr="EDT",nv_cookie_prefix="nv4c_e856T",nv_check_pass_mstime=1738000,nv_area_admin=0,nv_safemode=0,theme_responsive=0,nv_recaptcha_ver=2,nv_recaptcha_sitekey="",nv_recaptcha_type="image",XSSsanitize=1;</script>
<script src="https://www.nguoicodonvn2008.info/assets/js/language/vi.js"></script>
<script src="https://www.nguoicodonvn2008.info/assets/js/DOMPurify/purify3.js"></script>
<script src="https://www.nguoicodonvn2008.info/assets/js/global.js"></script>
<script src="https://www.nguoicodonvn2008.info/assets/js/site.js"></script>
<script src="https://www.nguoicodonvn2008.info/themes/default/js/news.js"></script>
<script src="https://www.nguoicodonvn2008.info/themes/default/js/main.js"></script>
<script src="https://www.nguoicodonvn2008.info/themes/default/js/custom.js"></script>
<script type="application/ld+json">
        {
            "@context": "https://schema.org",
            "@type": "Organization",
            "url": "https://www.nguoicodonvn2008.info",
            "logo": "https://www.nguoicodonvn2008.info/uploads/angel.gif"
        }
        </script>
<script src="https://www.nguoicodonvn2008.info/themes/default/js/bootstrap.min.js"></script>
<script type="text/javascript">
var $scrolltop = $('.car-top');
$scrolltop.on('click', function () {
    $('html,body').animate({
        scrollTop: 0
    }, 800);
    $(this).addClass("car-run");
    setTimeout(function(){ $scrolltop.removeClass('car-run');}, 1000);
    return false;
});
$(window).on('scroll', function ()
{ 
    if($(window).scrollTop() >= 200)
    {
        $scrolltop.addClass("show");
        $scrolltop.addClass("car-down");
    }
    else
    {
       $scrolltop.removeClass("show");
       setTimeout(function(){ $scrolltop.removeClass('car-down');}, 300);
    }
});
</script>
</body>
</html>