11 cách mở Recycle Bin trên Windows
- Thứ sáu - 06/12/2024 22:31
- In ra
- Đóng cửa sổ này
Cho dù bạn đang sử dụng Windows 10 hay Windows 11, việc tìm các mục bạn đã xóa bắt đầu bằng việc mở thư mục Recycle Bin. Đó là vì Recycle Bin trong Windows giống như một lưới an toàn mà bạn có thể sử dụng để khôi phục các file hoặc thư mục bạn đã xóa trước đó khỏi máy tính hoặc thiết bị của mình.
Vì vậy, nếu bạn đang thắc mắc "Recycle Bin ở đâu trong Windows?" hoặc "Tìm Recycle Bin ở đâu trên laptop", hướng dẫn này sẽ cung cấp cho bạn câu trả lời.
1. Sử dụng desktop shortcut Recycle Bin trong Windows 10 và Windows 11
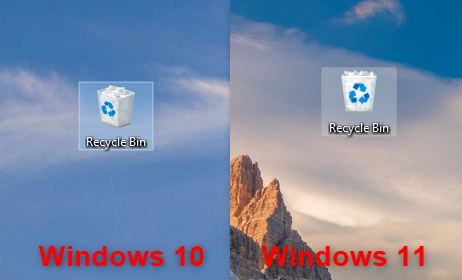
Theo mặc định, Recycle Bin sẽ nằm ở góc trên bên trái desktop. Đây là cách dễ nhất để truy cập Recycle Bin, vì tất cả những gì bạn phải làm là tìm biểu tượng trên desktop. Trong trường hợp bạn cần xem lại biểu tượng này trông như thế nào, đây là biểu tượng của nó trong Windows 10 và Windows 11:
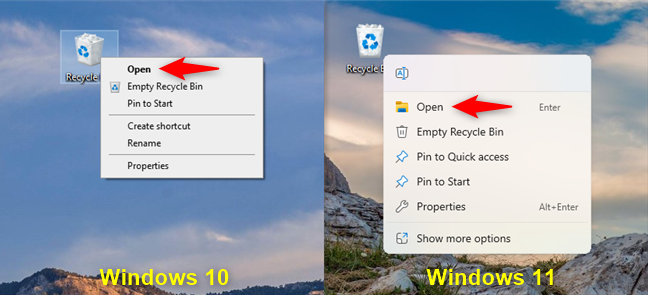
Khi bạn tìm thấy Recycle Bin trên desktop, hãy chọn biểu tượng đó và nhấn Enter trên bàn phím hoặc nhấp đúp vào biểu tượng đó để mở thư mục. Ngoài ra, bạn có thể nhấp chuột phải hoặc nhấn và giữ biểu tượng để mở menu ngữ cảnh. Sau đó, nhấp vào Open.
2. Cách thêm biểu tượng Recycle Bin vào desktop
Nếu Recycle Bin không có trên desktop, hướng dẫn khôi phục biểu tượng trên desktop trong Windows 10 và Windows 11 có thể giúp bạn khôi phục lại. Nếu không có thời gian để đọc hướng dẫn, sau đây là các bước cơ bản bạn cần thực hiện:
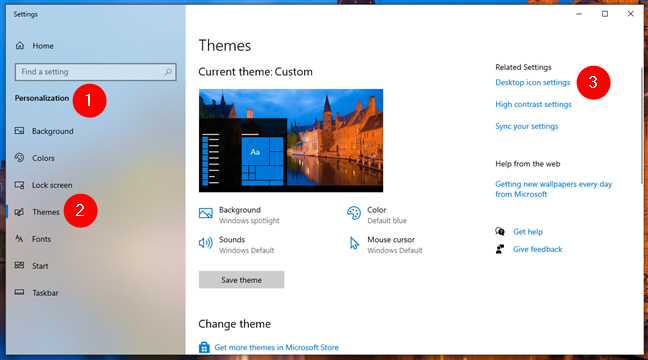
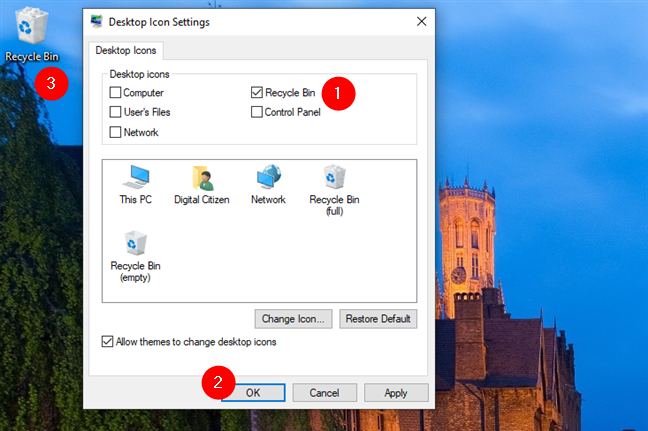
Bất kể bạn đang sử dụng Windows 10 hay Windows 11, hãy mở ứng dụng Settingss (Win + I) và đi tới Personalization > Themes. Sau đó, nhấp vào liên kết Desktop icon settings trong Related Settings. Đây là cách tìm trong Windows 10:
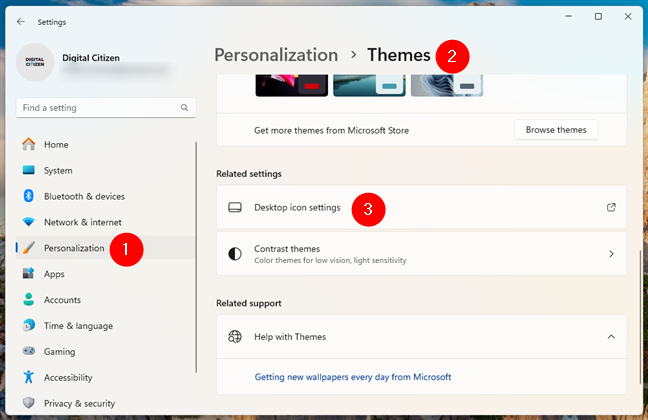
Và đây là giao diện trong Windows 11:
Sau khi bạn nhấp vào liên kết Desktop icon settings, một cửa sổ mới có cùng tên sẽ mở ra. Điều đó không liên quan đến việc bạn có Windows 10 hay Windows 11. Trong cửa sổ này, hãy đánh dấu vào ô bên cạnh Recycle Bin, sau đó nhấn OK. Ngay sau khi bạn thực hiện thao tác đó, biểu tượng Recycle Bin sẽ được thêm vào desktop.
Bây giờ, bạn đã thiết lập Windows hiển thị Recycle Bin trên desktop, bạn sẽ luôn biết nó ở đâu, đúng không?
3. Cách tìm Recycle Bin trong Windows bằng cách sử dụng Search
Bạn luôn có thể tin tưởng vào Search trong Windows 10 để tìm những gì bạn đang tìm kiếm. Chỉ cần nhập "Recycle Bin" vào trường tìm kiếm, sau đó nhấp vào kết quả có liên quan.
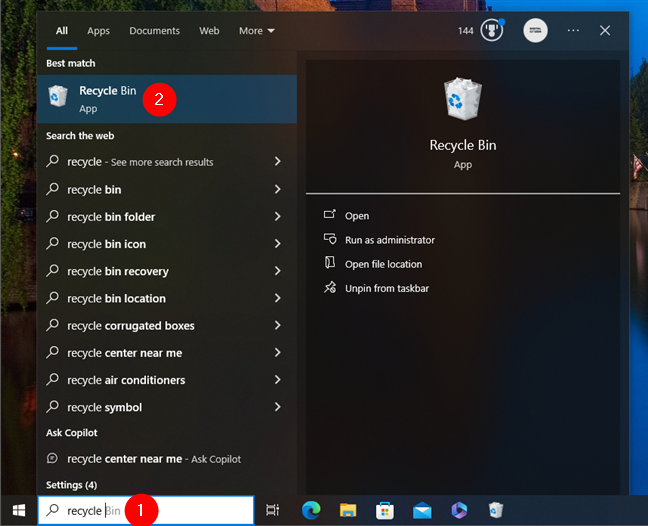
Điều tương tự cũng áp dụng cho Windows 11: nhập recycle bin vào hộp tìm kiếm trên thanh tác vụ và nhấp vào kết quả Recycle Bin.
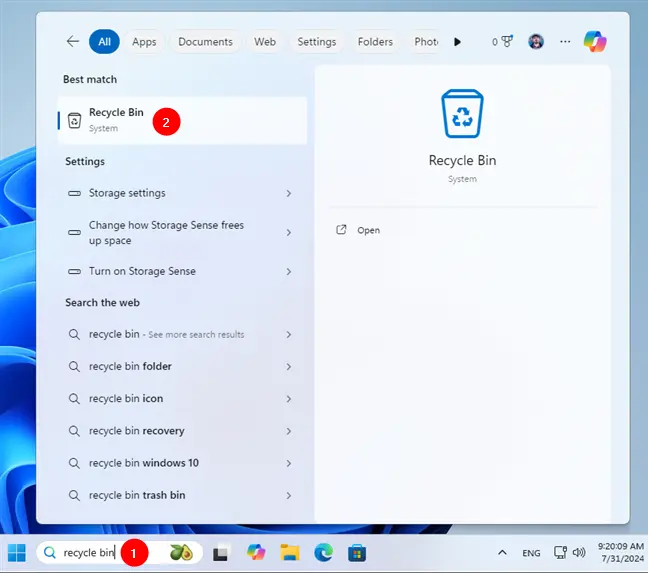
Trong cả hai hệ điều hành, Recycle Bin sẽ mở ra ngay khi bạn nhấp vào kết quả tìm kiếm.
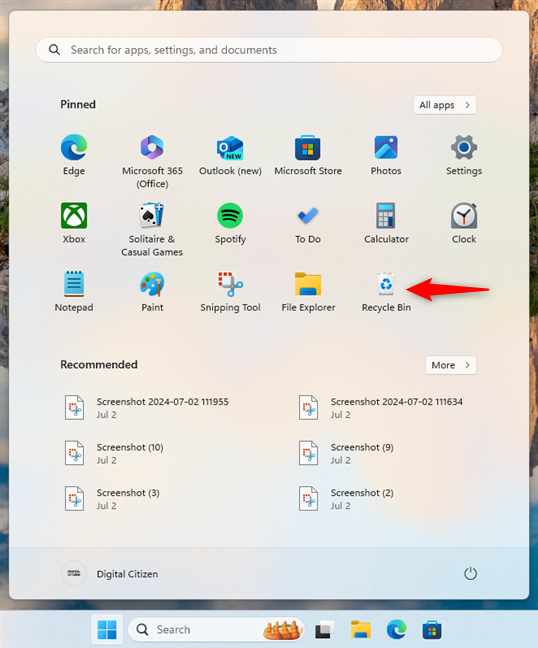
4. Cách ghim Recycle Bin vào menu Start
Mặc dù theo mặc định, Recycle Bin không có biểu tượng menu Start, nhưng bạn có thể ghim nó ở đó giống như bất kỳ shortcut nào khác trong Windows 11 hoặc Windows 10. Nhấp chuột phải hoặc nhấn và giữ vào biểu tượng Recycle Bin trên desktop, sau đó nhấp vào Pin to Start.
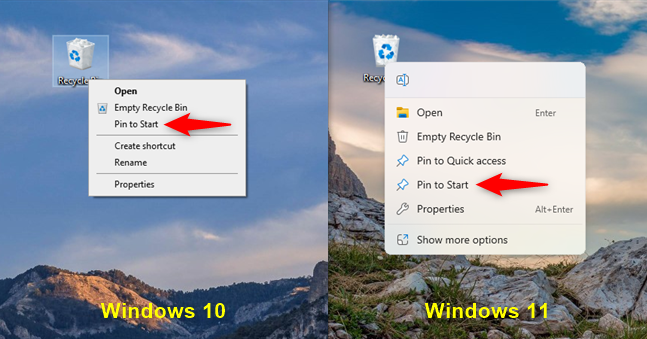
Nếu bạn đang sử dụng Windows 10, biểu tượng Recycle Bin sẽ được thêm vào phần tile của menu Start.
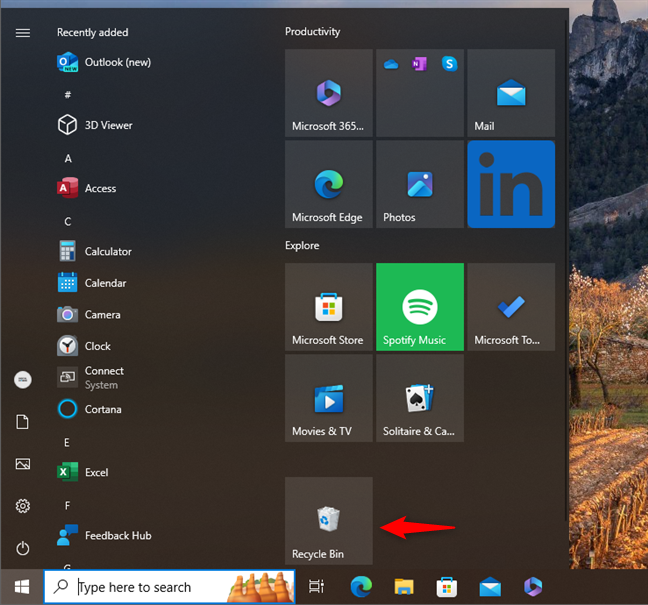
Trong Windows 11, Recycle Bin sẽ được thêm vào phần Pinned của menu Start.
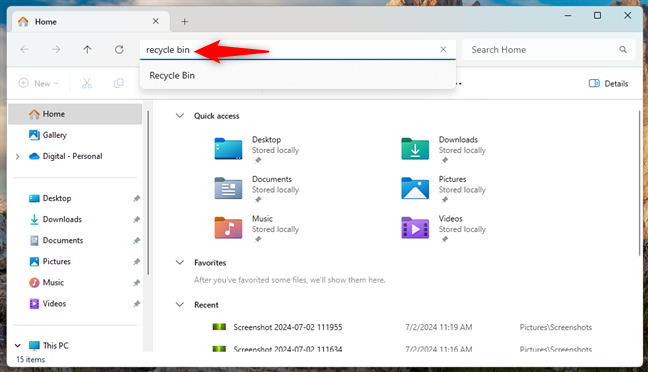
5. Cách tìm Recycle Bin trong File Explorer
Bạn cũng có thể truy cập vị trí Recycle Bin bằng File Explorer. Trước tiên, hãy mở File Explorer và nhấp vào một vùng trống trên thanh địa chỉ để chỉnh sửa. Nhập recycle bin vào thanh địa chỉ, sau đó nhấn Enter trên bàn phím hoặc nhấp vào kết quả Recycle Bin hiển thị bên dưới để truy cập thư mục. Toàn bộ quá trình trông như thế này trong Windows 10:
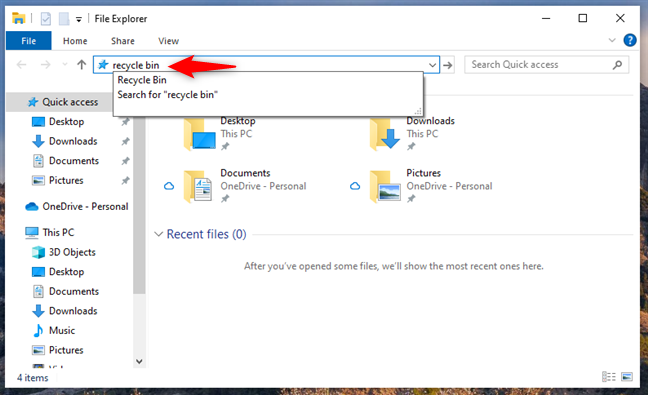
Và đây cũng là điều tương tự trong Windows 11:
6. Cách truy cập Recycle Bin bằng menu > của File Explorer
Bạn cũng có thể mở Recycle Bin bằng cách nhấp vào dấu ">" (dấu lớn hơn) đầu tiên trên thanh địa chỉ của File Explorer, sau đó chọn Recycle Bin từ menu hiển thị. Đây là cách hoạt động trong Windows 10:

Và đây là cách nó trông như thế nào trong Windows 11:
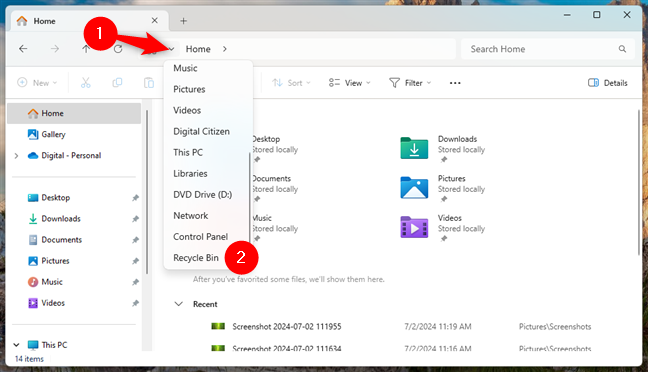
Trong cả hai hệ điều hành, bạn có thể truy cập ngay vào Recycle Bin.
7. Cách thêm Recycle Bin vào File Explorer
Nếu thường xuyên sử dụng File Explorer, bạn có thể muốn có cách nhanh hơn để mở Recycle Bin từ đó. May mắn thay, bạn có thể tạo shortcut Recycle Bin trong Quick access của File Explorer, thêm Recycle Bin vào danh sách thư mục và thậm chí đặt Recycle Bin hiển thị dưới dạng ổ trong This PC.
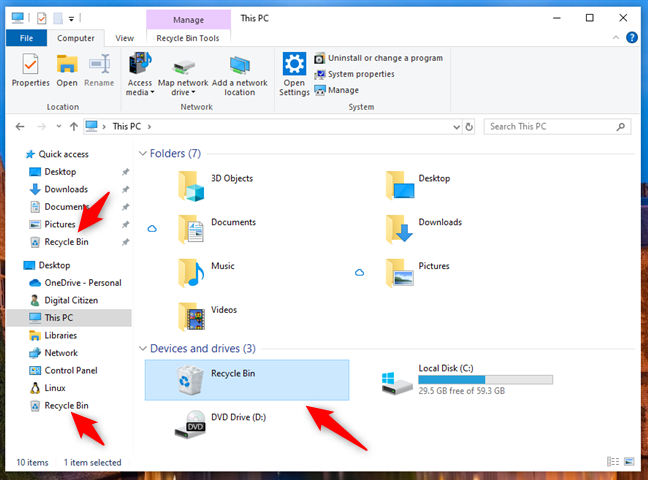
Nếu bất kỳ điều nào trong số đó nghe có vẻ ổn, hãy xem hướng dẫn cách thêm Recycle Bin vào File Explorer. Nếu làm theo các bước trong đó, bạn có thể truy cập nhanh và dễ dàng vào Recycle Bin từ tất cả các phần quan trọng của File Explorer.
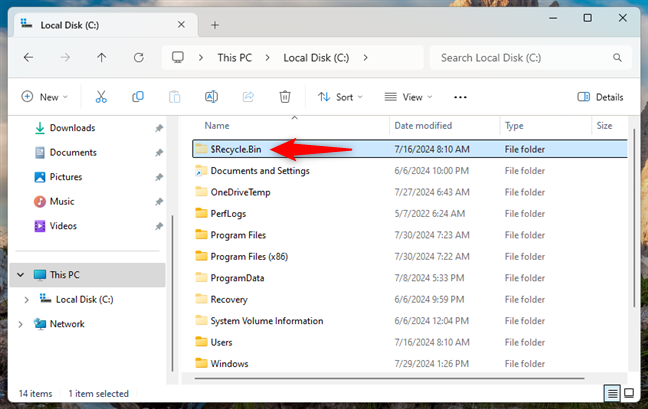
8. Vị trí Recycle Bin trong File Explorer là gì?
Tất cả các file bạn xóa đều được hiển thị trong thư mục Recycle Bin chính, nhưng mỗi phân vùng ổ cứng đều có Recycle Bin. Bạn có thể sử dụng thư mục này để truy cập Recycle Bin, nhưng quy trình phức tạp hơn.
Bất kể bạn đang sử dụng Windows 10 hay Windows 11, hãy đảm bảo rằng bạn thấy các file ẩn và được hệ thống bảo vệ trên máy tính của mình và sử dụng File Explorer để truy cập This PC > C:. Ở đó, bạn sẽ tìm thấy một thư mục có tên:
$Recycle.Bin
Mở thư mục và bạn sẽ thấy Recycle Bin bên trong.
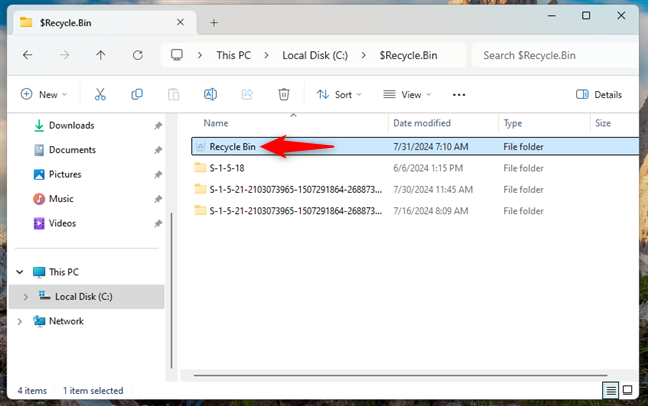
LƯU Ý: Recycle Bin được hiển thị trên tất cả các ổ của PC, không chỉ trên C:, vì vậy đường dẫn được sử dụng có thể dễ dàng trở thành This PC > D: hoặc một số ký tự ổ đĩa khác.
9. Cách truy cập Recycle Bin bằng cửa sổ Run
Bạn cũng có thể sử dụng cửa sổ Run để truy cập vị trí Recycle Bin. Trước tiên, sử dụng phím tắt Win + R hoặc cách khác để mở Run. Sau đó, chèn lệnh sau:
shell:RecycleBinFolder
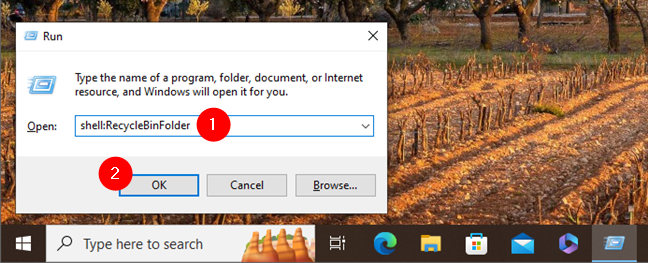
Cuối cùng, nhấn phím Enter hoặc nhấn OK và Recycle Bin sẽ mở ngay lập tức.
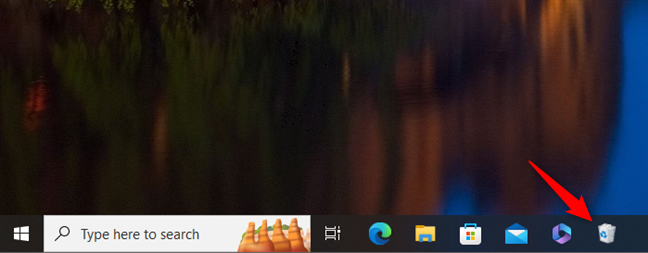
10. Cách mở Recycle Bin bằng shortcut Taskbar
Bạn cũng có thể tạo shortcut cho Recycle Bin và ghim vào Taskbar trong cả Windows 10 và Windows 11. Quá trình này hơi phức tạp và sẽ được giải thích chi tiết trong Cách ghim ứng dụng vào Taskbar để mở nhanh hơn.
11. Cách mở Recycle Bin bằng CMD hoặc PowerShell
Bạn cũng có thể khởi động PowerShell hoặc Command Prompt, hoặc thậm chí khởi chạy Windows Terminal nếu bạn thích. Trong bất kỳ ứng dụng dòng lệnh nào trong số này, hãy nhập:
start shell:RecycleBinFolder
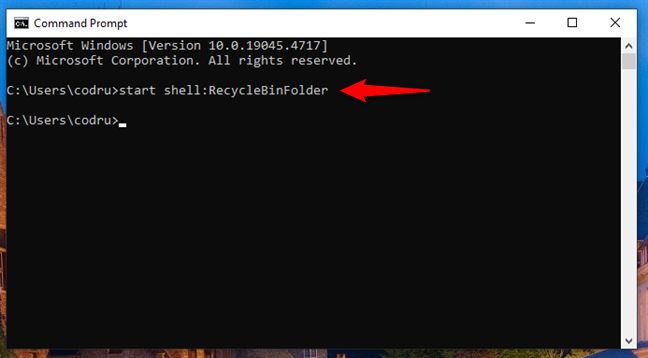
Nhấn Enter trên bàn phím và Recycle Bin sẽ được mở trong File Explorer.
