10 cách “Show desktop” siêu nhanh cho Windows
- Thứ ba - 02/07/2024 01:28
- In ra
- Đóng cửa sổ này
Khi làm việc trên máy tính Windows, đôi khi người dùng phải quay trở lại màn hình để khởi chạy một chương trình khác từ các phím tắt trên desktop trong khi đang chỉnh sửa tài liệu hoặc thực hiện các công việc khác. Nhiều người không biết cách hiển thị màn hình desktop một cách nhanh chóng mà phải thu nhỏ từng cửa sổ một. Cách này rất tốn thời gian và gây bực bội cho người dùng. Vì vậy, bài viết này sẽ giới thiệu cho các bạn năm cách “show desktop” siêu nhanh trong Windows.
Lưu ý: Một trong những cách này có thể không hoạt động trong các phiên bản Windows trước đó, nhưng chúng đã được thử nghiệm trên Windows 7, Windows 8.1, Windows 10 và Windows 11.
Cách 1: Hiển thị nút Show Desktop trên thanh Taskbar
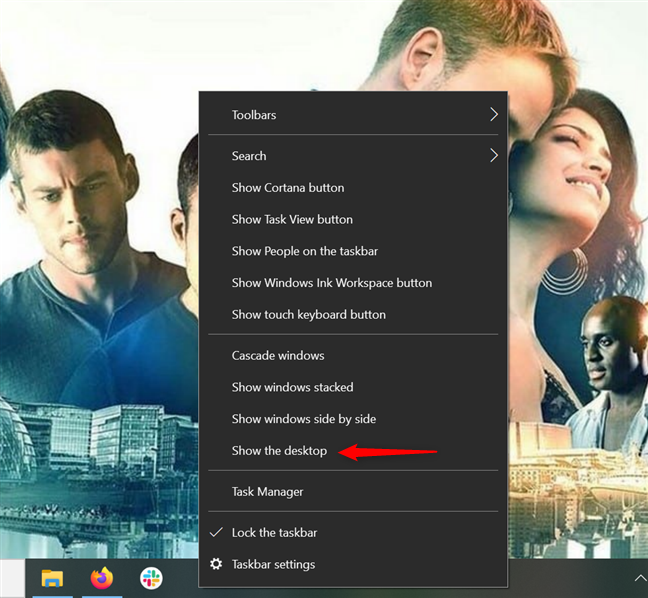
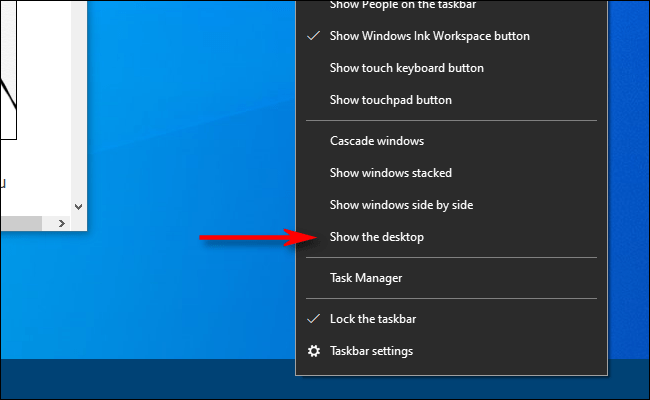
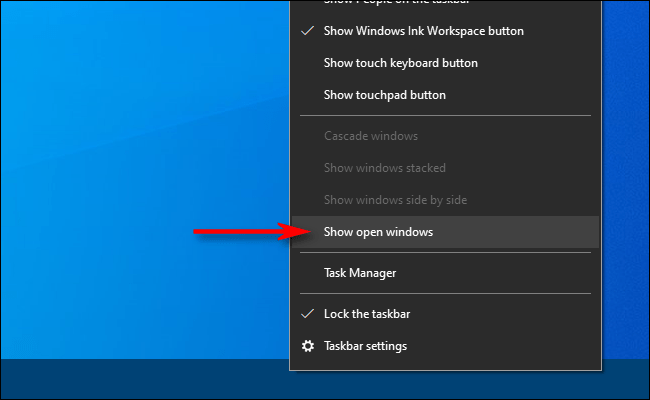
Taskbar cung cấp thêm một cách để chuyển sang desktop. Đầu tiên, nhấp chuột phải vào vùng trống trên Taskbar để mở menu ngữ cảnh. Sau đó, nhấp vào Show the desktop.
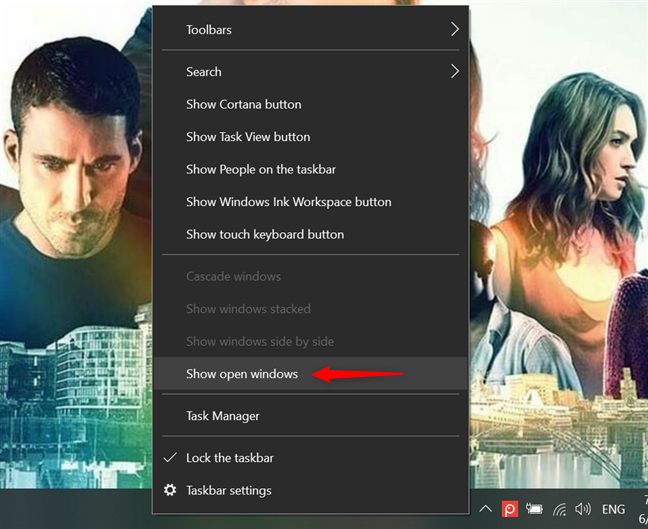
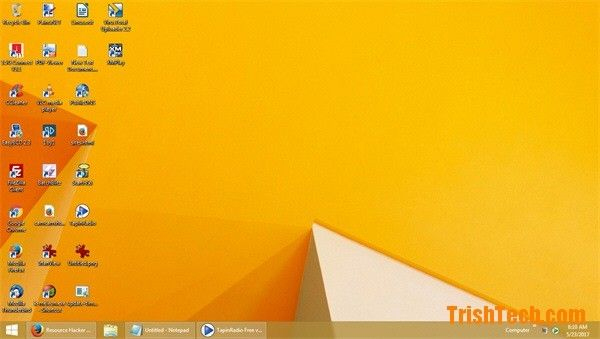
Tất cả các cửa sổ đang mở đều được thu nhỏ và bạn có thể nhìn thấy desktop. Để khôi phục các cửa sổ ứng dụng bạn đang sử dụng, hãy mở lại menu Taskbar bằng cách nhấp chuột phải vào nó. Sau đó, nhấn vào tùy chọn Show open windows.
MẸO: Ngoại trừ phím tắt Minimize All trong phần sau, tất cả các phương pháp khác đều có thể được kết hợp để chuyển đổi nhanh chóng giữa desktop và các cửa sổ đang mở của bạn. Ví dụ, nhấp vào nút Show Desktop ở phía ngoài cùng bên phải của Taskbar để hiển thị desktop Windows, sau đó sử dụng phím tắt Windows + D để đưa các cửa sổ ứng dụng đang hoạt động của bạn trở lại màn hình.
Nếu chỉ muốn kiểm tra nội dung nào đó trên desktop mà không thu nhỏ tất cả các cửa sổ đang mở, bạn có thể sử dụng Peek at Desktop. Tùy chọn này cho phép bạn ẩn nội dung trên màn hình mà không cần nhấn bất cứ thứ gì. Cách dễ nhất để kích hoạt nó là nhấp chuột phải vào nút Show desktop ở cuối Taskbar. Nhấn vào Peek at desktop sẽ bật tùy chọn này và thêm dấu kiểm bên cạnh tùy chọn đó.
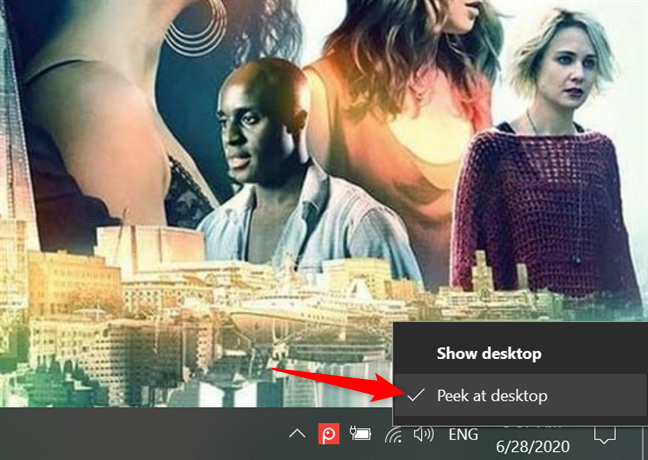
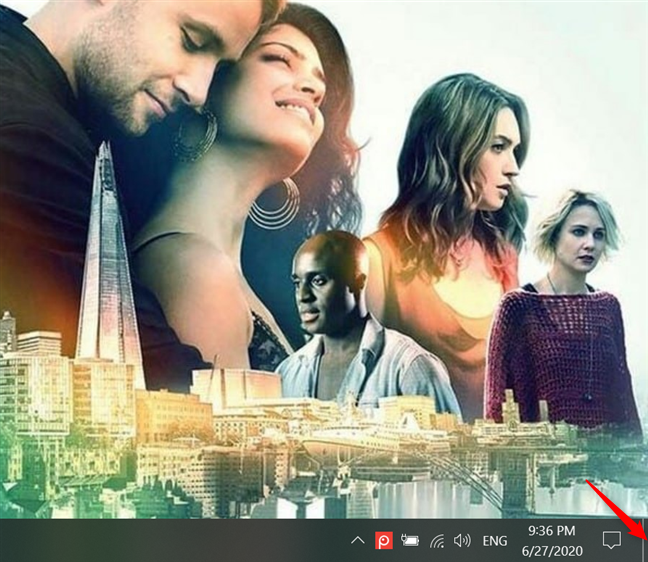
Sau khi tùy chọn được bật, bạn có thể di con trỏ chuột qua nút Show desktop ở cuối Taskbar để hiển thị desktop. Di chuyển con trỏ ra khỏi khu vực sẽ đưa bạn trở lại cửa sổ đang mở để tiếp tục hoạt động của mình.
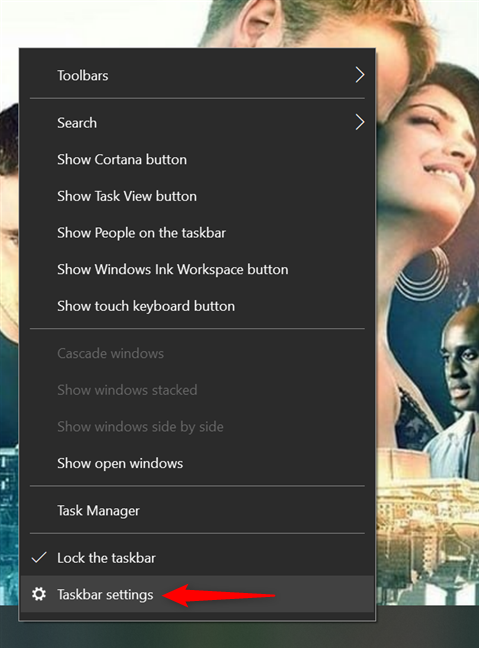
Ngoài ra, bạn cũng có thể bật Peek at the Desktop từ ứng dụng Settings. Nhấp chuột phải trên Taskbar để truy cập menu của nó, sau đó nhấn vào Taskbar settings.
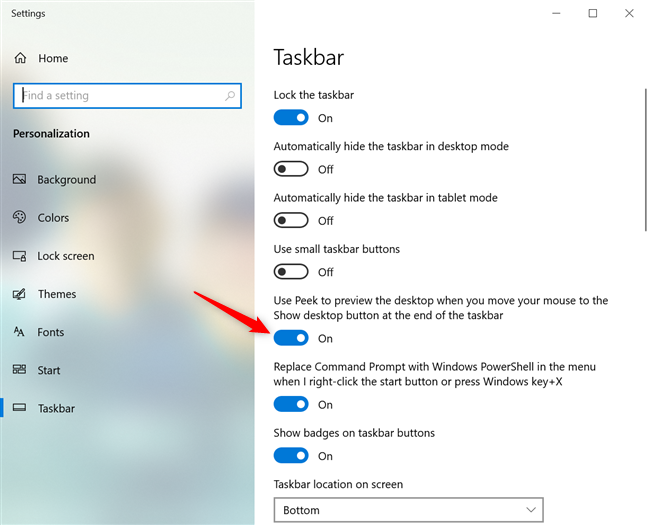
Sau đó, bật nút chuyển đổi bên cạnh tùy chọn "Use Peek to preview the desktop when you move your mouse to the Show desktop button at the end of the taskbar".
Để tắt tùy chọn này, hãy bỏ chọn Peek at desktop từ menu của nút Show desktop hoặc tắt nút chuyển đổi từ Taskbar settings.
Cách 2: Phím tắt Win + D
Phím tắt này thực hiện cùng một chức năng như nút Show Desktop được đề cập ở trên. Nhấn tổ hợp phím tắt này một lần sẽ hiển thị màn hình Windows, nhấn lại một lần nữa tất cả các cửa sổ được phục hồi như trước.
Cách 3: Phím nóng Win + Space
Tổ hợp phím tắt này chỉ hiển thị cửa sổ xem trước màn hình, giống như di chuyển con chuột qua nút Desktop Peek trong thanh Taskbar như đã đề cập ở trên.
Cách 4: Phím nóng Win + M
Phím tắt này sẽ thu nhỏ tất cả các cửa sổ đang mở để hiển thị màn hình desktop. Tuy nhiên, bạn không thể nhấn tổ hợp phím này để khôi phục lại tất cả các cửa sổ đã thu nhỏ, cần phải mở từng cửa sổ một.
Cách 5: Phím tắt Alt + Tab
Đây là phím tắt nổi tiếng và được sử dụng để chuyển đổi giữa các cửa số đang mở. Vì màn hình máy tính cũng là một cửa sổ, nên bạn có thể dùng tổ hợp phím tắt này để chuyển đến màn hình desktop.
Cách 6: Hiển thị desktop bằng cách nhấp chuột phải vào Taskbar
Bạn cũng có thể hiển thị desktop một cách nhanh chóng bằng cách nhấp chuột phải vào Taskbar. Khi một menu xuất hiện, hãy chọn Show The Desktop.
Cũng như các phương pháp trên, tất cả các cửa sổ ứng dụng sẽ tạm thời bị ẩn. Để đưa chúng trở lại, nhấp chuột phải vào Taskbar một lần nữa. Lần này, hãy chọn Show Open Windows và các cửa sổ ứng dụng sẽ trở lại như trước.
Có nhiều cách khác nhau để “show desktop” trong Windows, một số sử dụng con chuột, một số khác lại sử dụng các phím tắt. Hãy chọn cho mình cách hiển thị màn hình desktop tiện dụng nhất nhé.
Cách 7: Hiển thị desktop bằng shortcut Taskbar tùy chỉnh
Nút Show desktop mặc định hơi nhỏ. Bạn muốn có một nút trên Taskbar thay thế lớn hơn một chút để hiển thị nhanh desktop không? Nếu có, bạn có thể thiết lập shortcut trên Taskbar tùy chỉnh lớn và tốt hơn để nhanh chóng hiển thị desktop như thế này:
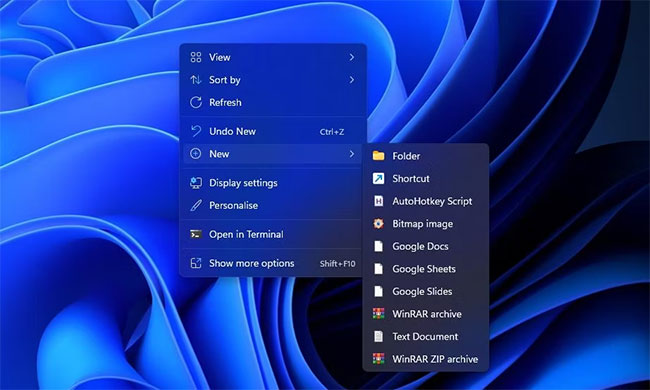
1. Nhấp chuột phải vào một khu vực trên màn hình nơi không có bất kỳ shortcut nào và chọn New.
2. Chọn Shortcut trên menu con New.
3. Nhập explorer.exe shell:::{3080F90D-D7AD-11D9-BD98-0000947B0257} bên trong hộp Type the location of item.
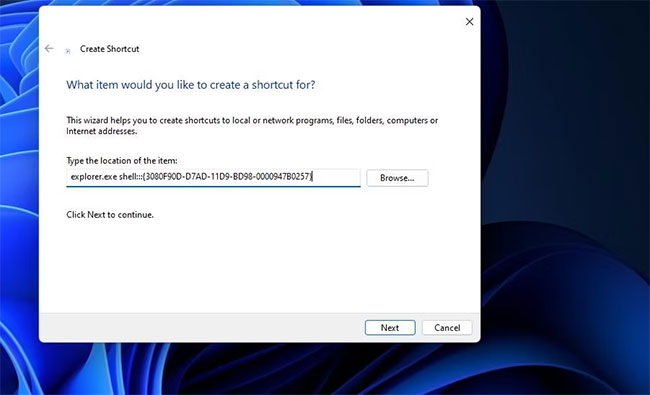
4. Nhấn Next để tiếp tục bước cuối cùng của trình hướng dẫn.
5. Xóa tiêu đề explorer mặc định và nhập Show desktop vào hộp Type a name.
6. Chọn Finish để thêm shortcut Show desktop.
7. Nhấp chuột phải vào shortcut Show desktop để chọn Show more options > Pin to taskbar.
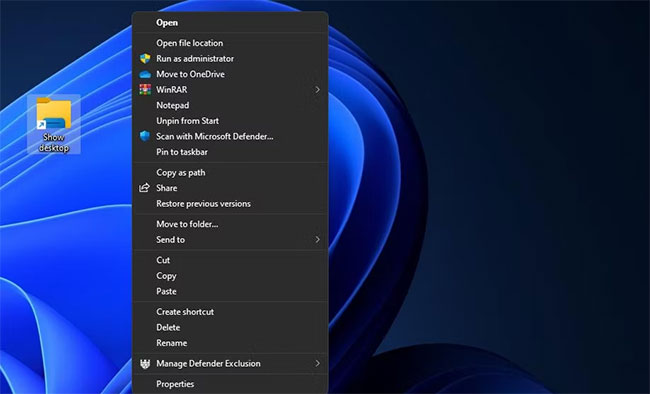
Bây giờ, bạn có thể nhấp vào nút Show desktop lớn hơn để ẩn tất cả các cửa sổ đang mở. Shortcut sẽ có biểu tượng thư viện thư mục mặc định khớp với nút File Explorer. Vì vậy, bạn nên thay đổi biểu tượng cho shortcut Show desktop trước khi ghim nó vào Taskbar. Đây là cách bạn có thể thêm một biểu tượng khác vào shortcut đó:
1. Nhấp chuột phải vào biểu tượng Show desktop và chọn tùy chọn Properties cho shortcut đó.
2. Nhấp vào Change Icon để hiển thị một cửa sổ mà từ đó bạn có thể chọn các biểu tượng.
3. Chọn biểu tượng cho nút Show desktop của Windows XP được hiển thị ngay bên dưới.
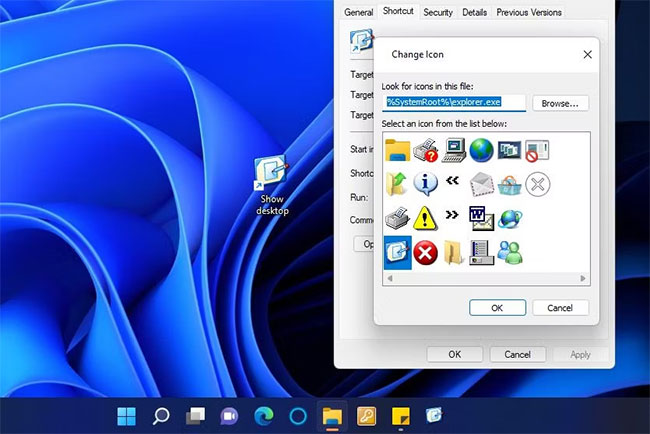
4. Nhấp vào OK > Apply để thêm biểu tượng.
5. Sau đó, chọn OK để đóng cửa sổ thuộc tính và ghim shortcut vào Taskbar.
Bạn cũng có thể ghim một shortcut để hiển thị desktop vào menu Start. Hiển thị menu ngữ cảnh cổ điển cho shortcut Show desktop. Sau đó, chọn tùy chọn Pin to Start menu thay vì tùy chọn trên Taskbar.
Cách 8: Hiển thị desktop bằng cử chỉ cảm ứng/touchpad (Windows 11)
Các cử chỉ cảm ứng và touchpad là các thao tác vuốt ngón tay mà bạn có thể thực hiện những thao tác khác nhau trong Windows 11. Bạn có thể sử dụng các cử chỉ như vậy trên các thiết bị màn hình cảm ứng và touchpad, được tích hợp trên nhiều bàn phím laptop (và một số bàn phím desktop). Chúng hữu ích nhất trên laptop và máy tính bảng 2 trong 1 như những thiết bị từ dòng Microsoft Surface.
Bạn có thể nhanh chóng hiển thị desktop bằng một cử chỉ chạm/touchpad. Để làm như vậy, hãy đồng thời vuốt xuống màn hình hoặc touchpad của thiết bị bằng ba ngón tay. Sau đó, bạn có thể hiển thị lại tất cả các cửa sổ đang mở bằng cách vuốt lên màn hình hoặc bàn di chuột bằng ba ngón tay.
Lưu ý rằng các cử chỉ cảm ứng/touchpad cần được kích hoạt trong Windows 11 để bạn có thể sử dụng chúng. Bạn có thể bật và cấu hình các cử chỉ từ phần Touchpad và Touch của ứng dụng Settings, như được nêu trên trang “Touch gestures for Windows” của Microsoft. Hướng dẫn của Quantrimang.com về các cử chỉ trên bàn di chuột trên Windows 11 cũng bao gồm chi tiết về cách bạn có thể bật những cử chỉ trên touchpad.
Cách 9: Hiển thị desktop bằng menu Power User (Windows 11)
Menu Power User còn có thể được gọi là menu Power User Task, menu Win + X, menu WinX, Power User Hotkey, menu Windows Tools. Đây là một menu pop-up chứa các shortcut đến những công cụ thường dùng, cung cấp cho người dùng một cách thuận tiện để truy cập các chương trình và tiết kiệm nhiều thời gian. Và nó lần đầu tiên xuất hiện trong Windows 8 và tiếp tục hiện diện trong Windows 10 và Windows 11. Menu Power User có sẵn theo mặc định (không phải tải xuống) trong Windows 11, Windows 10 và Windows 8. Bạn có thể tham khảo: Cách truy cập menu Power User trên Windows 11 để biết thêm chi tiết.
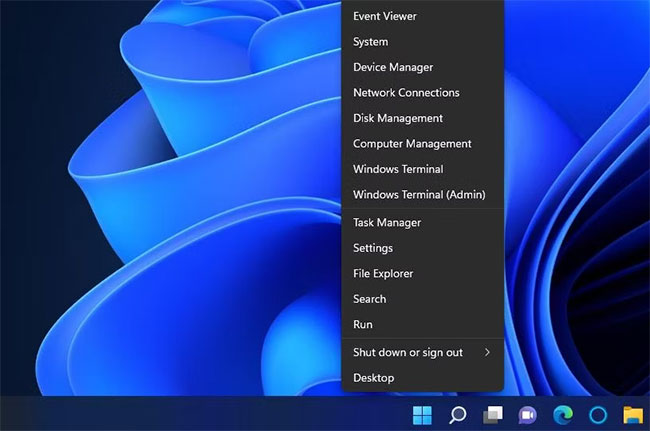
Menu Power User bao gồm nhiều phím tắt tiện dụng để mở các công cụ Windows 11. Bạn cũng có thể chọn hiển thị desktop từ menu đó. Nhấn phím Windows + X để xem menu Power User. Sau đó chọn tùy chọn Desktop ở đó để ẩn tất cả các cửa sổ đang mở.
Cách 10: Hiển thị desktop bằng Hot corners
Hot corners là một tính năng của macOS mà người dùng có thể kích hoạt hành động bằng cách di chuyển con trỏ của họ đến các góc của màn hình. Bạn có thể thêm một tính năng như vậy vào Windows 11/10 bằng WinXCorners. Với phần mềm được cài đặt và đang chạy, bạn có thể đặt một góc màn hình để hiển thị desktop khi bạn di chuyển con trỏ đến đó.
Sử dụng công cụ WinXCorners này, bạn còn có thể đặt bất kỳ góc nào trong 4 góc của màn hình Windows để mở Action Center, khởi chạy chế độ Task View (để xem trước tất cả các cửa sổ đã mở), ẩn các ứng dụng nền và chỉ hiển thị cửa sổ nền trước hoặc đang hoạt động, tắt màn hình, khởi chạy Screen Saver hoặc tắt màn hình laptop. Bạn chỉ cần cấu hình công cụ này một lần và di con trỏ chuột đến bất kỳ góc nào của màn hình. Hành động do bạn thiết lập sẽ được kích hoạt ngay lập tức.
Cách làm cụ thể như sau:
1. Mở trang web WinXCorners và nhấp vào liên kết tải xuống WinXCorners 1.2b trên trang web đó.
2. Mở tiện ích giải nén 7-Zip.
3. Chọn kho lưu trữ WinXCorners_1.2b trong 7-Zip.
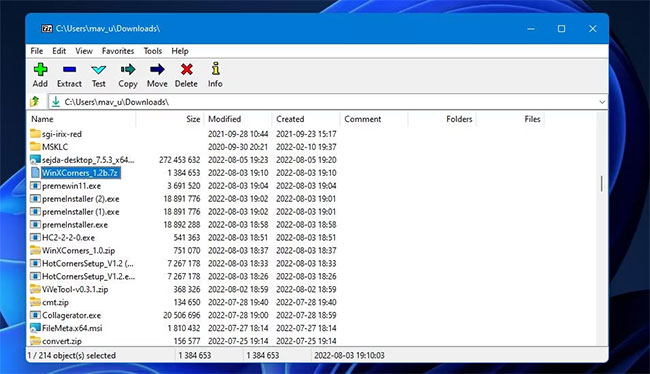
4. Nhấp vào Extract để hiển thị cửa sổ hiển thị ngay bên dưới.
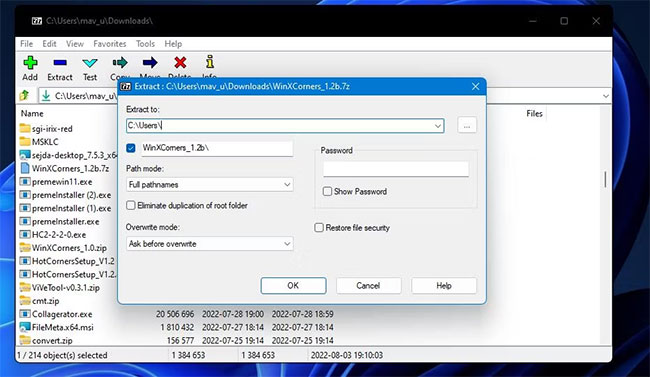
5. Nhấn nút hình elip.
6. Chọn một thư mục để đưa thư mục WinXCorners_1.2b đã giải nén vào và nhấn OK để chọn.
7. Nhấn OK trong cửa sổ Extract.
8. Mở thư mục WinXCorners_1.2b đã giải nén.
9. Nhấp đúp vào WinXCorners.exe để chạy phần mềm.
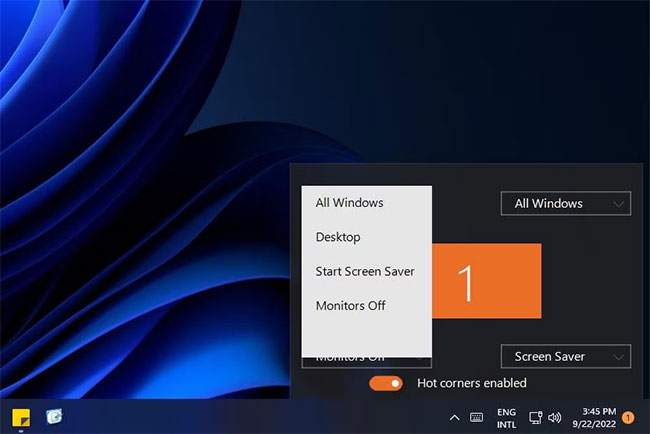
10. Nếu phần mềm bị vô hiệu hóa, hãy nhấp vào công tắc chuyển đổi Temporarily disabled toggle trong WinXCorners để kích hoạt các hot corner.
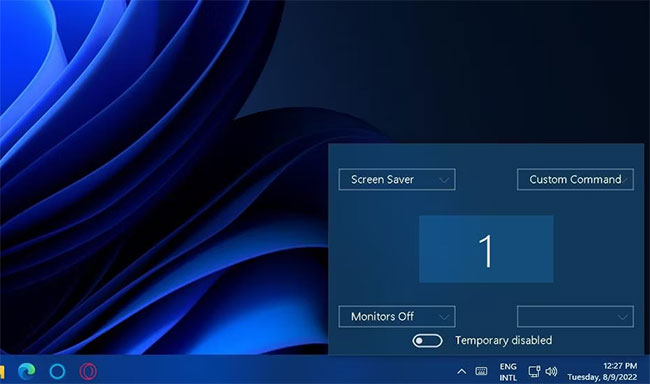
Khi ứng dụng đang chạy, bạn có thể chọn những hành động ở góc màn hình bằng cách nhấp vào menu drop-down để chọn các tùy chọn mong muốn. Bạn có thể gán hầu hết các hành động mặc định có sẵn cho 4 góc. Trong trường hợp này là Desktop để hiển thị màn hình desktop.

Kể từ thời điểm này, di chuyển con trỏ đến góc đã thiết lập sẽ kích hoạt bất kỳ hành động show desktop bạn đã chỉ định cho nó, miễn là WinXCorners đang chạy trong nền. Để cấu hình WinXCorners tự khởi động khi boot, nhấp chuột phải vào biểu tượng trên khay hệ thống của nó và chọn Start with Windows.
Lưu ý: Công cụ này không được hỗ trợ cho nhiều màn hình. Vì vậy, bạn chỉ nên sử dụng nó trên một thiết bị màn hình duy nhất.
Một số câu hỏi thường gặp
1. Phím tắt để show desktop trong Windows là gì?
Phím tắt để hiển thị nhanh màn hình desktop trong Windows là phím Windows + D.
2. Nút Show Desktop có được bật theo mặc định trong Windows 11 không?
Có, nút Show desktop thường được bật theo mặc định trong Windows 11.
3. Làm cách nào để hiển thị nhanh màn hình desktop trong Windows?
Nhấp vào nút Show desktop ở cuối bên phải của Taskbar để nhanh chóng hiển thị màn hình desktop trong Windows.
4. Windows 10 có nút Show Desktop không?
Có, hệ điều hành Windows 10 có nút Show desktop.
5. Làm cách nào để bật nút Show Desktop trong Windows 11?
a) Nhấp chuột phải vào bất kỳ không gian trống nào trên Taskbar Windows 11, sau đó chọn Taskbar settings.
b) Sau đó, chọn Taskbar behaviors ở ngăn bên phải của cửa sổ Settings.
c) Cuối cùng, hãy chọn hộp Select the far corner of the taskbar to show the desktop trong Taskbar behaviors.
Tất cả các phương pháp trên cho phép bạn hiển thị desktop Windows trong nháy mắt bất cứ khi nào cần. Chúng chắc chắn là những cách thuận tiện hơn nhiều để hiển thị màn hình thay vì thu nhỏ tất cả các cửa sổ đang mở theo cách thủ công. Vì vậy, hãy thoải mái lựa chọn bất kỳ phương pháp nào mà bạn thích nhất.
