<!DOCTYPE html>
    <html lang="vi" xmlns="http://www.w3.org/1999/xhtml" prefix="og: http://ogp.me/ns#">
    <head>
<title>2 cách tạo USB boot Windows 11 bằng máy Mac</title>
<meta name="description" content="2 cách tạo USB boot Windows 11 bằng máy Mac - Savefile - Tin Tức -...">
<meta name="author" content=".: Nguoicodonvn2008.info - Cõi lòng người cô đơn :.">
<meta name="copyright" content=".: Nguoicodonvn2008.info - Cõi lòng người cô đơn :. [admin@nguoicodonvn2008.info]">
<meta name="robots" content="index, archive, follow, noodp">
<meta name="googlebot" content="index,archive,follow,noodp">
<meta name="msnbot" content="all,index,follow">
<meta name="generator" content="NukeViet v4.5">
<meta http-equiv="Content-Type" content="text/html; charset=utf-8">
<meta property="og:title" content="2 cách tạo USB boot Windows 11 bằng máy Mac">
<meta property="og:type" content="website">
<meta property="og:description" content="Savefile - Tin Tức - https&#x3A;&#x002F;&#x002F;www.nguoicodonvn2008.info&#x002F;vi&#x002F;news&#x002F;savefile&#x002F;cuoc-song&#x002F;2-cach-tao-usb-boot-windows-11-bang-may-mac-8915.html">
<meta property="og:site_name" content=".&#x3A; Nguoicodonvn2008.info - Cõi lòng người cô đơn &#x3A;.">
<meta property="og:url" content="https://www.nguoicodonvn2008.info/vi/news/savefile/cuoc-song/2-cach-tao-usb-boot-windows-11-bang-may-mac-8915.html">
<link rel="shortcut icon" href="https://www.nguoicodonvn2008.info/favicon.ico">
<link rel="canonical" href="https://www.nguoicodonvn2008.info/vi/news/savefile/cuoc-song/2-cach-tao-usb-boot-windows-11-bang-may-mac-8915.html">
<link rel="alternate" href="https://www.nguoicodonvn2008.info/vi/news/rss/" title="Tin Tức" type="application/rss+xml">
<link rel="alternate" href="https://www.nguoicodonvn2008.info/vi/news/rss/karaoke-dual/" title="Tin Tức - Karaoke Dual" type="application/rss+xml">
<link rel="alternate" href="https://www.nguoicodonvn2008.info/vi/news/rss/nhac-tre/" title="Tin Tức - Nhạc trẻ" type="application/rss+xml">
<link rel="alternate" href="https://www.nguoicodonvn2008.info/vi/news/rss/tru-tinh/" title="Tin Tức - Trữ tình" type="application/rss+xml">
<link rel="alternate" href="https://www.nguoicodonvn2008.info/vi/news/rss/nuoc-ngoai/" title="Tin Tức - Nước ngoài" type="application/rss+xml">
<link rel="alternate" href="https://www.nguoicodonvn2008.info/vi/news/rss/remix/" title="Tin Tức - Remix" type="application/rss+xml">
<link rel="alternate" href="https://www.nguoicodonvn2008.info/vi/news/rss/tam-su-tinh-yeu/" title="Tin Tức - Tâm sự tình yêu" type="application/rss+xml">
<link rel="alternate" href="https://www.nguoicodonvn2008.info/vi/news/rss/tho-suu-tam/" title="Tin Tức - Thơ sưu tầm" type="application/rss+xml">
<link rel="alternate" href="https://www.nguoicodonvn2008.info/vi/news/rss/cuoc-song/" title="Tin Tức - Cuộc sống" type="application/rss+xml">
<link rel="alternate" href="https://www.nguoicodonvn2008.info/vi/news/rss/phan-mem/" title="Tin Tức - Phần mềm" type="application/rss+xml">
<link rel="alternate" href="https://www.nguoicodonvn2008.info/vi/news/rss/kien-thuc-may-tinh/" title="Tin Tức - Kiến thức máy tính" type="application/rss+xml">
<link rel="alternate" href="https://www.nguoicodonvn2008.info/vi/news/rss/hoc-tap/" title="Tin Tức - Học tập" type="application/rss+xml">
<link rel="alternate" href="https://www.nguoicodonvn2008.info/vi/news/rss/tai-lieu/" title="Tin Tức - Tài liệu" type="application/rss+xml">
<link rel="alternate" href="https://www.nguoicodonvn2008.info/vi/news/rss/de-thi/" title="Tin Tức - Đề thi" type="application/rss+xml">
<link rel="preload" as="style" href="https://www.nguoicodonvn2008.info/assets/css/font-awesome.min.css" type="text/css">
<link rel="preload" as="style" href="https://www.nguoicodonvn2008.info/themes/default/css/bootstrap.non-responsive.css" type="text/css">
<link rel="preload" as="style" href="https://www.nguoicodonvn2008.info/themes/default/css/style.css" type="text/css">
<link rel="preload" as="style" href="https://www.nguoicodonvn2008.info/themes/default/css/style.non-responsive.css" type="text/css">
<link rel="preload" as="style" href="https://www.nguoicodonvn2008.info/themes/default/css/news.css" type="text/css">
<link rel="preload" as="style" href="https://www.nguoicodonvn2008.info/themes/default/css/custom.css" type="text/css">
<link rel="preload" as="script" href="https://www.nguoicodonvn2008.info/assets/js/jquery/jquery.min.js" type="text/javascript">
<link rel="preload" as="script" href="https://www.nguoicodonvn2008.info/assets/js/language/vi.js" type="text/javascript">
<link rel="preload" as="script" href="https://www.nguoicodonvn2008.info/assets/js/DOMPurify/purify3.js" type="text/javascript">
<link rel="preload" as="script" href="https://www.nguoicodonvn2008.info/assets/js/global.js" type="text/javascript">
<link rel="preload" as="script" href="https://www.nguoicodonvn2008.info/assets/js/site.js" type="text/javascript">
<link rel="preload" as="script" href="https://www.nguoicodonvn2008.info/themes/default/js/news.js" type="text/javascript">
<link rel="preload" as="script" href="https://www.nguoicodonvn2008.info/themes/default/js/main.js" type="text/javascript">
<link rel="preload" as="script" href="https://www.nguoicodonvn2008.info/themes/default/js/custom.js" type="text/javascript">
<link rel="preload" as="script" href="https://www.nguoicodonvn2008.info/themes/default/js/bootstrap.min.js" type="text/javascript">
<link rel="stylesheet" href="https://www.nguoicodonvn2008.info/assets/css/font-awesome.min.css">
<link rel="stylesheet" href="https://www.nguoicodonvn2008.info/themes/default/css/bootstrap.non-responsive.css">
<link rel="stylesheet" href="https://www.nguoicodonvn2008.info/themes/default/css/style.css">
<link rel="stylesheet" href="https://www.nguoicodonvn2008.info/themes/default/css/style.non-responsive.css">
<link rel="StyleSheet" href="https://www.nguoicodonvn2008.info/themes/default/css/news.css">
<link rel="stylesheet" href="https://www.nguoicodonvn2008.info/themes/default/css/custom.css">
<style type="text/css">
	body{background: #fff;}
</style>
    </head>
    <body>
<div id="print">
	<div id="hd_print">
		<h2 class="pull-left">.&#x3A; Nguoicodonvn2008.info - Cõi lòng người cô đơn &#x3A;.</h2>
		<p class="pull-right"><a title=".&#x3A; Nguoicodonvn2008.info - Cõi lòng người cô đơn &#x3A;." href="https://www.nguoicodonvn2008.info/">https://www.nguoicodonvn2008.info</a></p>
	</div>
	<div class="clear"></div>
	<hr />
	<div id="content">
		<h1>2 cách tạo USB boot Windows 11 bằng máy Mac</h1>
		<ul class="list-inline">
			<li>Thứ hai - 26/08/2024 23:20</li>
			<li class="hidden-print txtrequired"><em class="fa fa-print">&nbsp;</em><a title="In ra" href="javascript:;" onclick="window.print()">In ra</a></li>
			<li class="hidden-print txtrequired"><em class="fa fa-power-off">&nbsp;</em><a title="Đóng cửa sổ này" href="javascript:;" onclick="window.close()">Đóng cửa sổ này</a></li>
		</ul>
		<div class="clear"></div>
		<div id="hometext">
		</div>
				<div class="imghome">
			<img alt="2 cách tạo USB boot Windows 11 bằng máy Mac" src="https://st.quantrimang.com/photos/image/2024/08/26/tao-usb-boot-windows-11-bang-may-mac-1.jpg" width="460" class="img-thumbnail" />
		</div>
		<div class="clear"></div>
		<div id="bodytext" class="clearfix">
			<p style="text-align: justify;">Việc tạo USB boot Windows 11 trên máy Mac chắc chắn khó khăn hơn so với trên PC Windows, nhưng không phải là không thể. Hãy cùng khám phá một vài phương pháp khác nhau mà bạn có thể sử dụng để hoàn thành công việc trên máy Mac của mình.</p>

<h2 style="text-align: justify;">Những gì bạn cần trước khi bắt đầu</h2>

<p style="text-align: justify;">Bạn sẽ cần những mục sau để tạo trình cài đặt boot Windows 11:</p>

<ul>
	<li style="text-align: justify;">Ổ flash hoặc bất kỳ dạng phương tiện di động nào khác có dung lượng 8GB trở lên.</li>
	<li style="text-align: justify;">Kết nối Internet đang hoạt động.</li>
	<li style="text-align: justify;">Bạn cũng sẽ cần file ISO Windows 11 mới nhất. Để tải xuống, hãy&nbsp;truy cập trang tải xuống của Microsoft:&nbsp;<span style="color:rgb(192, 57, 43);"><strong>https://www.microsoft.com/software-download/windows11</strong></span>&nbsp;và chọn&nbsp;<strong>Windows 11</strong>&nbsp;từ phần&nbsp;<strong>Download Windows 11 Disk Image (ISO) for x64 devices</strong>. Chọn ngôn ngữ ưa thích từ&nbsp;<strong>Select the product language</strong>, sau đó nhấp vào&nbsp;<strong>Confirm</strong>&nbsp;và tải xuống trình cài đặt trên máy Mac bằng cách chọn&nbsp;<strong>64-bit Download</strong>.</li>
</ul>

<p style="text-align: justify;"><strong>Cảnh báo</strong>: Cả hai phương pháp dưới đây đều sẽ xóa hoàn toàn USB của bạn, vì vậy hãy đảm bảo sao lưu mọi file quan trọng trước.</p>

<h2 style="text-align: justify;">Sử dụng ứng dụng của bên thứ ba để tạo ổ boot Windows</h2>

<p style="text-align: justify;">Cách đơn giản nhất để tạo USB boot Windows 11 là sử dụng ứng dụng của bên thứ ba. Bài viết khuyên dùng WinDiskWriter vì đây là mã nguồn mở, nhẹ và có giao diện dễ sử dụng.</p>

<p style="text-align: justify;">Chỉ cần kết nối ổ flash với máy Mac và làm theo các bước sau để tạo ổ boot Windows 11 bằng WinDiskWriter.</p>

<ul>
	<li style="text-align: justify;"><a href="https://quantrimang.com/url?u=aHR0cHM6Ly9naXRodWIuY29tL1RlY2hVblJlc3RyaWN0ZWQvV2luRGlza1dyaXRlci9yZWxlYXNlcw%3D%3D" rel="nofollow noopener" target="_blank" title="Truy cập trang GitHub của WinDiskWriter">Truy cập trang GitHub của WinDiskWriter</a>&nbsp;và tải xuống bản build mới nhất có sẵn.</li>
	<li style="text-align: justify;">Sau khi tải xuống file zip, hãy giải nén và mở ứng dụng bằng cách nhấp đúp vào file đó.</li>
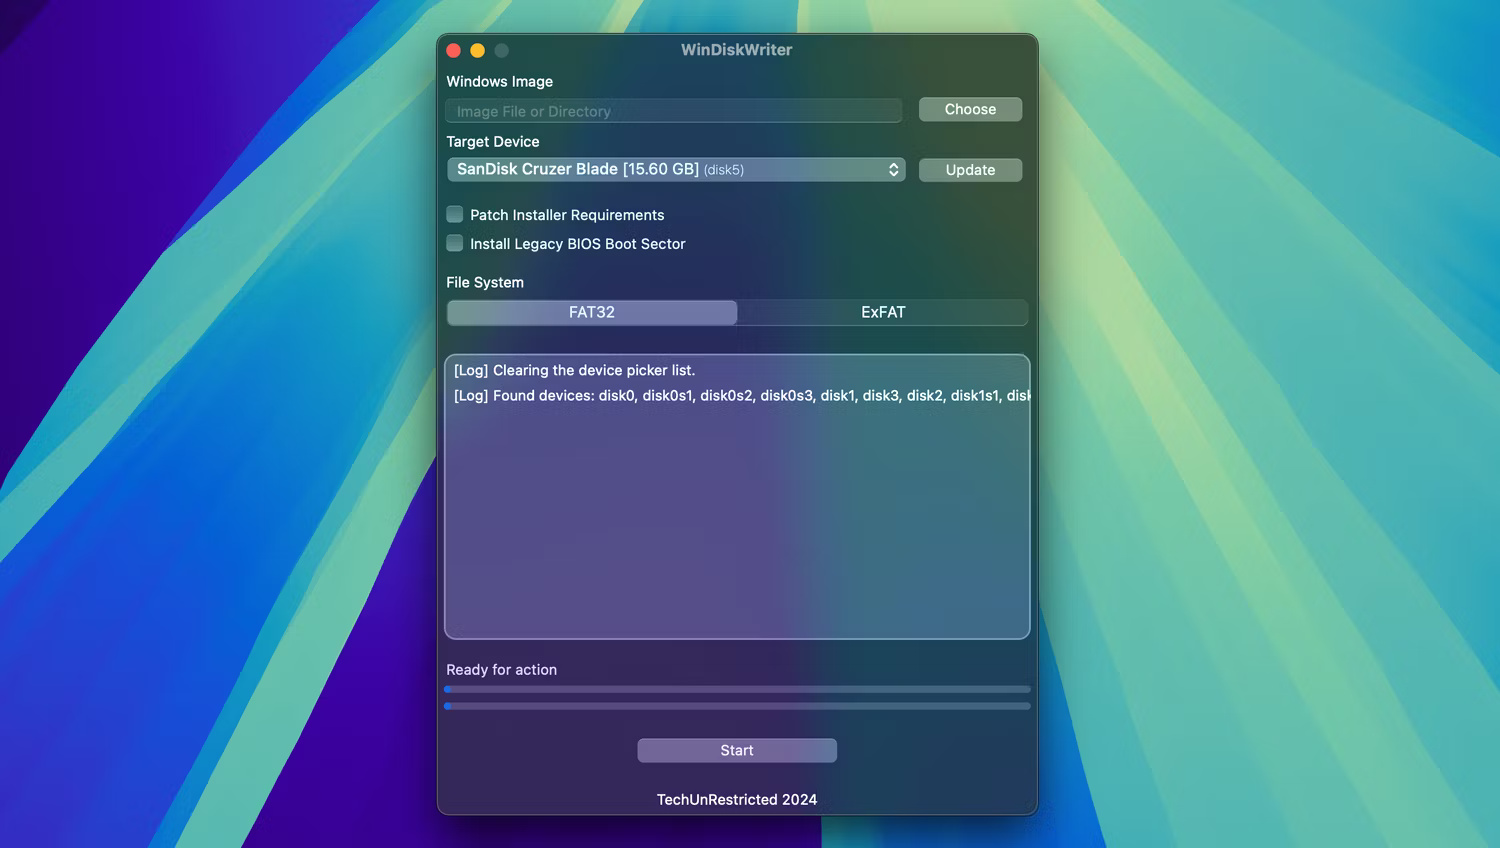
	<li style="text-align: justify;">Trong phần&nbsp;<strong>Target Device</strong>, hãy đảm bảo chọn đúng ổ. Nếu ổ khác được hiển thị, hãy nhấp vào tùy chọn menu drop-down và chọn USB của bạn.</li>
</ul>

<div style="text-align: justify;"><iframe allow="autoplay" allowtransparency="true" aria-label="Advertisement" data-google-container-id="a!2" data-google-query-id="CNy_29ublIgDFUqG6QUdVYEtaw" data-load-complete="true" frameborder="0" height="0" hspace="0" id="aswift_1" marginheight="0" marginwidth="0" name="aswift_1" sandbox="allow-scripts allow-same-origin allow-forms allow-presentation allow-popups" scrolling="no" tabindex="0" title="Advertisement" vspace="0" width="694"></iframe></div>

<figure>
<div style="text-align: justify;"><img alt="WinDiskWriter mở trên máy Mac với thiết bị đích được chọn đúng." data-i="0" data-src="https://st.quantrimang.com/photos/image/2024/08/26/tao-usb-boot-windows-11-bang-may-mac-1.jpg" data-was-processed="true" height="848" src="https://st.quantrimang.com/photos/image/2024/08/26/tao-usb-boot-windows-11-bang-may-mac-1.jpg" width="1500" /></div>

<figcaption>
<div style="text-align: justify;">WinDiskWriter mở trên máy Mac với thiết bị đích được chọn đúng.</div>
</figcaption>
</figure>

<ul>
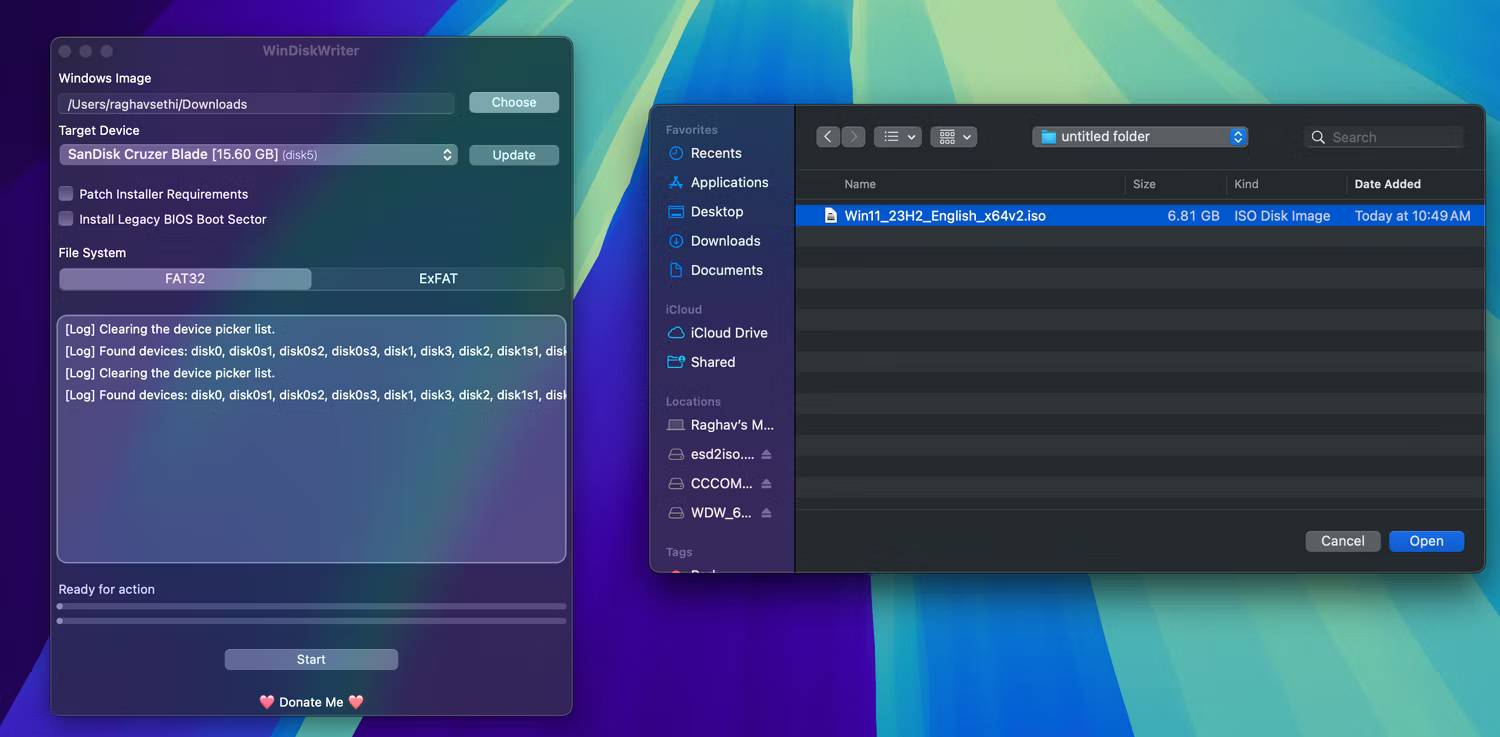
	<li style="text-align: justify;">Nhấp vào&nbsp;<strong>Choose</strong>&nbsp;trong phần&nbsp;<strong>Windows Image</strong>&nbsp;để mở cửa sổ Finder và định vị file ISO Windows mà bạn đã tải xuống trước đó. Sau đó, nhấp vào&nbsp;<strong>Open</strong>.</li>
</ul>

<figure>
<div style="text-align: justify;"><br />
<img alt="WinDiskWriter mở trên máy Mac, với file ISO Windows 11 chính xác được chọn trong cửa sổ Finder" data-adbro-processed="true" data-i="1" data-src="https://st.quantrimang.com/photos/image/2024/08/26/tao-usb-boot-windows-11-bang-may-mac-2.jpg" data-was-processed="true" height="737" src="https://st.quantrimang.com/photos/image/2024/08/26/tao-usb-boot-windows-11-bang-may-mac-2.jpg" width="1500" /></div>

<figcaption>
<div style="text-align: justify;">WinDiskWriter mở trên máy Mac, với file ISO Windows 11 chính xác được chọn trong cửa sổ Finder</div>
</figcaption>
</figure>

<div style="text-align: justify;"><iframe allow="autoplay" allowtransparency="true" aria-label="Advertisement" data-google-container-id="a!3" data-google-query-id="CN3E29ublIgDFY6K6QUds-E3AA" data-load-complete="true" frameborder="0" height="0" hspace="0" id="aswift_2" marginheight="0" marginwidth="0" name="aswift_2" sandbox="allow-scripts allow-same-origin allow-forms allow-presentation allow-popups" scrolling="no" tabindex="0" title="Advertisement" vspace="0" width="694"></iframe></div>

<ul>
	<li style="text-align: justify;">Cuối cùng, nhấp vào&nbsp;<strong>Start</strong>&nbsp;ở cuối để bắt đầu quá trình. Lưu ý rằng quá trình này có thể mất một chút thời gian, vì vậy hãy kiên nhẫn.</li>
</ul>

<p style="text-align: justify;">Sau khi quá trình hoàn tất, bạn có thể tháo USB của mình một cách an toàn và sử dụng nó như một ổ boot trên bất kỳ PC nào.</p>

<h2 style="text-align: justify;">Tạo ổ boot Windows 11 bằng Terminal</h2>

<p style="text-align: justify;">Nếu không muốn sử dụng ứng dụng của bên thứ ba, bạn có thể tạo trình cài đặt thủ công bằng ứng dụng Terminal trên máy Mac. Trước khi bắt đầu, hãy đảm bảo rằng bạn đã&nbsp;<a data-type="internal" href="https://quantrimang.com/cong-nghe/huong-dan-cai-dat-goi-phan-mem-voi-homebrew-tren-he-dieu-hanh-mac-os-x-139300" title="Hướng dẫn cài đặt phần mềm bằng Homebrew trên macOS X">cài đặt Homebrew trên máy Mac</a>&nbsp;của mình, vì bạn sẽ cần nó sau này.</p>

<ul>
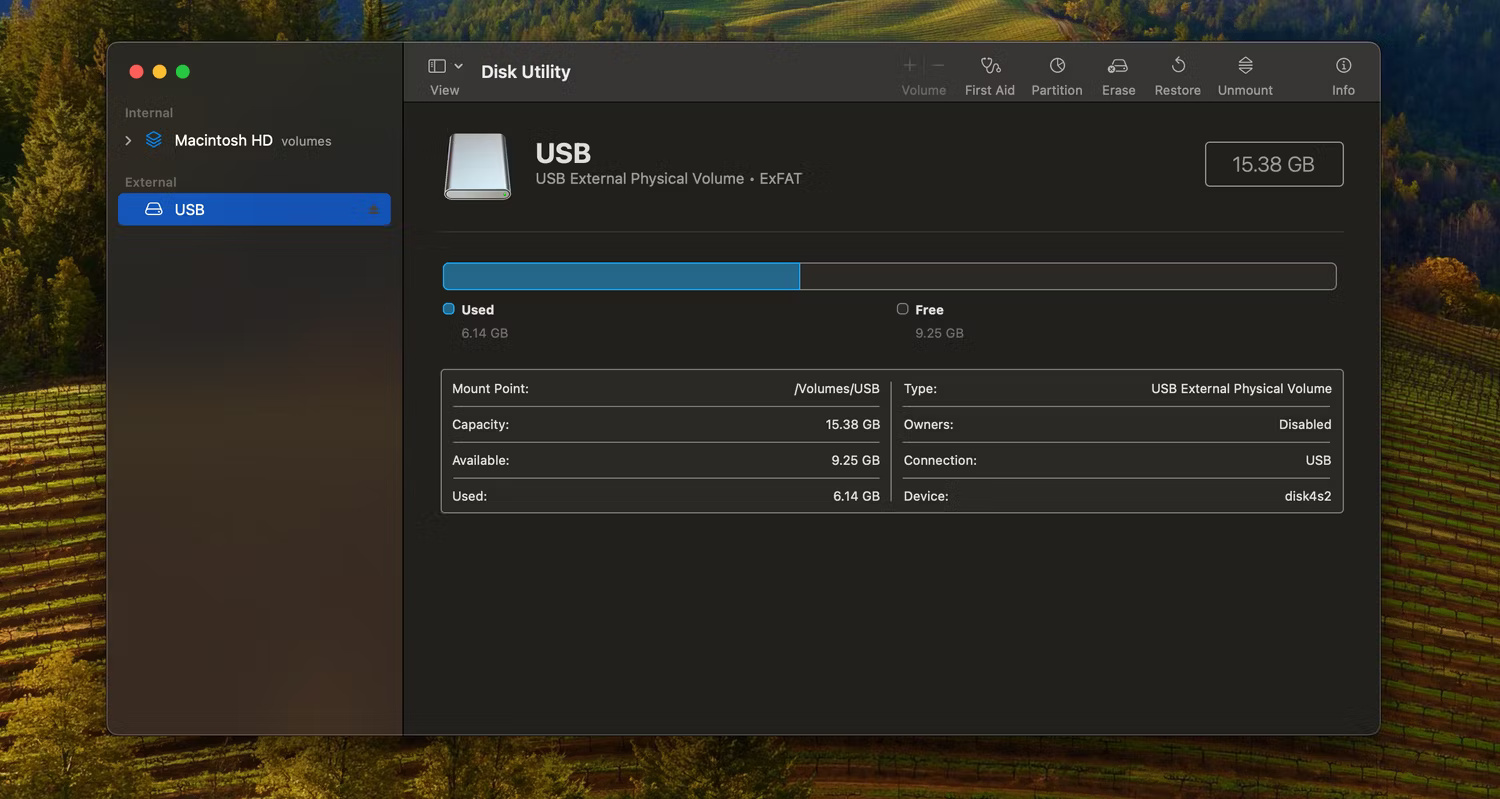
	<li style="text-align: justify;">Mở Disk Utility trên máy Mac bằng Spotlight Search hoặc tìm nó trong thư mục&nbsp;<strong>Applications &gt; Utilities</strong>.</li>
	<li style="text-align: justify;">Trong thanh bên, hãy chọn USB của bạn, sau đó nhấp vào&nbsp;<strong>Erase</strong>&nbsp;ở góc trên bên phải.</li>
</ul>

<figure>
<div style="text-align: justify;"><img alt="macOS Sonoma Disk Utility" data-i="2" data-src="https://st.quantrimang.com/photos/image/2024/08/26/tao-usb-boot-windows-11-bang-may-mac-3.jpg" data-was-processed="true" height="799" src="https://st.quantrimang.com/photos/image/2024/08/26/tao-usb-boot-windows-11-bang-may-mac-3.jpg" width="1500" /></div>

<figcaption>
<div style="text-align: justify;">macOS Sonoma Disk Utility</div>
</figcaption>
</figure>

<ul>
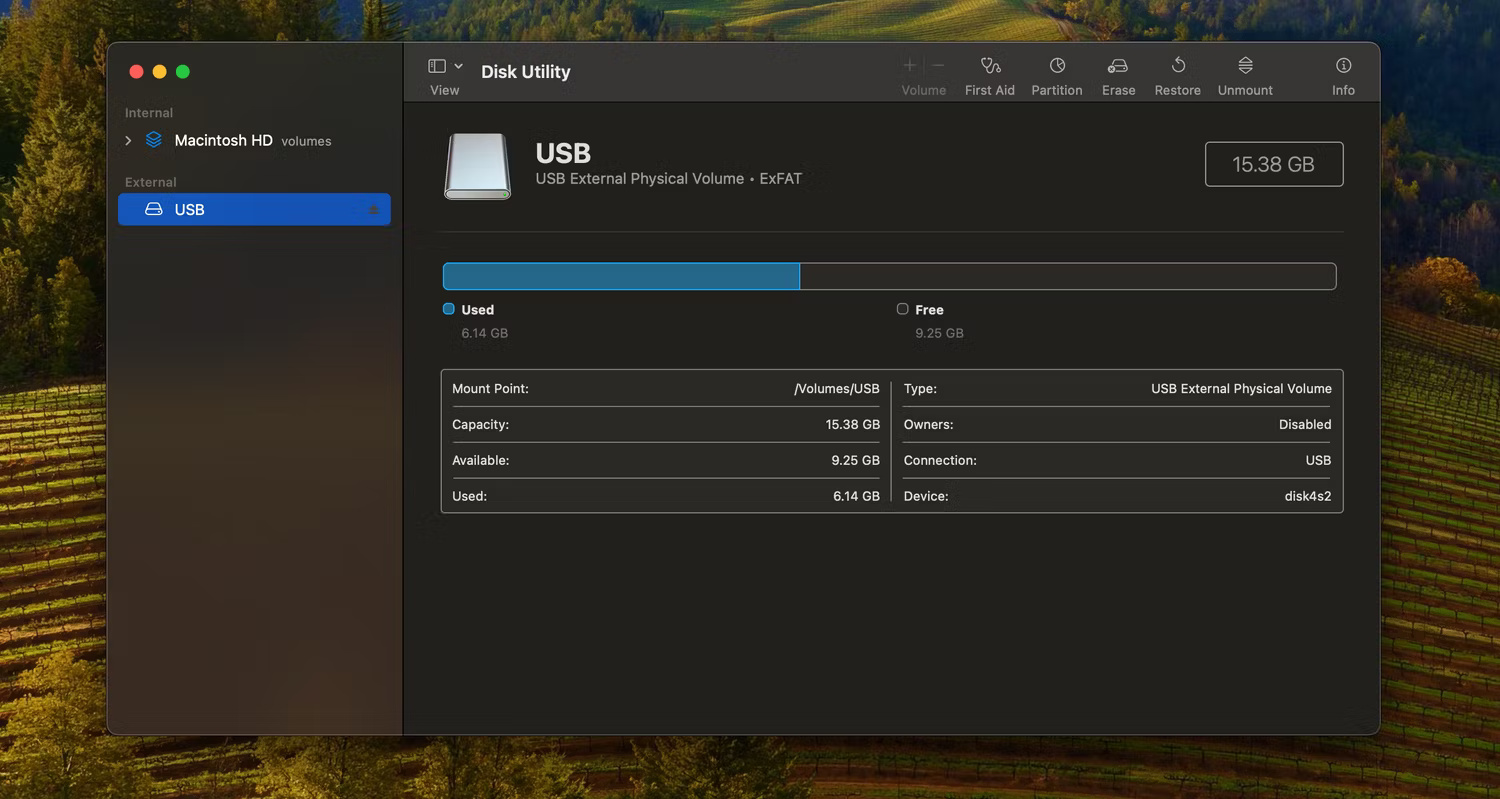
	<li style="text-align: justify;">Đặt tên cho ổ theo ý thích của bạn, chọn&nbsp;<strong>ExFAT</strong>&nbsp;làm định dạng, sau đó nhấp vào&nbsp;<strong>Erase.</strong></li>
</ul>

<figure>
<div style="text-align: justify;"><img alt="Menu Erase trong Disk Utility trên macOS Sonoma" data-i="3" data-src="https://st.quantrimang.com/photos/image/2024/08/26/tao-usb-boot-windows-11-bang-may-mac-4.jpg" data-was-processed="true" height="799" src="https://st.quantrimang.com/photos/image/2024/08/26/tao-usb-boot-windows-11-bang-may-mac-4.jpg" width="1500" /></div>

<figcaption>
<div style="text-align: justify;">Menu Erase trong Disk Utility trên macOS Sonoma</div>
</figcaption>
</figure>

<div style="text-align: justify;"><iframe allow="autoplay" allowtransparency="true" aria-label="Advertisement" data-google-container-id="a!4" data-google-query-id="CO_R29ublIgDFR2G6QUd27MlKw" data-load-complete="true" frameborder="0" height="0" hspace="0" id="aswift_3" marginheight="0" marginwidth="0" name="aswift_3" sandbox="allow-scripts allow-same-origin allow-forms allow-presentation allow-popups" scrolling="no" tabindex="0" title="Advertisement" vspace="0" width="694"></iframe></div>

<ul>
	<li style="text-align: justify;">Mở Terminal trên máy Mac và nhập lệnh sau để mount file ISO. Đảm bảo thay thế đường dẫn của file ISO đến nơi bạn đã lưu trữ file. Trong hầu hết các trường hợp, file sẽ nằm trong thư mục&nbsp;<strong>Downloads</strong>&nbsp;của bạn.</li>
</ul>

<pre id="pre0">
<code>hdiutil mount ~/Downloads/Win11_23H2_English_x64v1.iso</code></pre>

<ul>
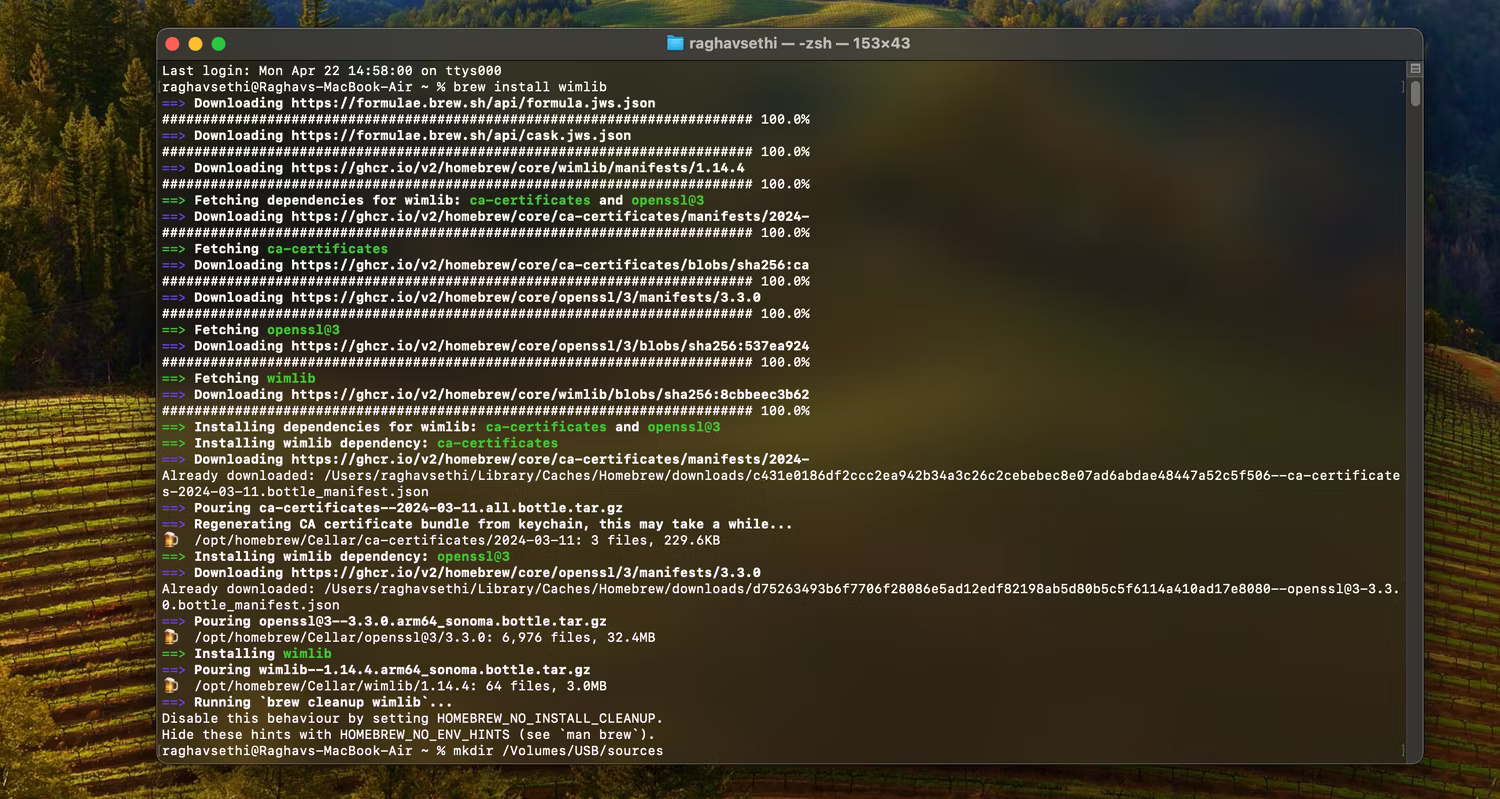
	<li style="text-align: justify;">Bây giờ bạn sẽ cần cài đặt wimlib qua Homebrew. Bạn có thể thực hiện bằng cách nhập lệnh này:</li>
</ul>

<pre id="pre1">
<code>brew install wimlib</code></pre>

<figure>
<div style="text-align: justify;"><img alt="Cửa sổ Terminal cài đặt Wimlib qua Homebrew" data-i="4" data-src="https://st.quantrimang.com/photos/image/2024/08/26/tao-usb-boot-windows-11-bang-may-mac-5.jpg" data-was-processed="true" height="799" src="https://st.quantrimang.com/photos/image/2024/08/26/tao-usb-boot-windows-11-bang-may-mac-5.jpg" width="1500" /></div>

<figcaption>
<div style="text-align: justify;">Cửa sổ Terminal cài đặt Wimlib qua Homebrew</div>
</figcaption>
</figure>

<ul>
	<li style="text-align: justify;">Tiếp theo, nhập lệnh sau để tạo thư mục có tên&nbsp;<strong>sources</strong>&nbsp;trong thư mục root của ổ flash. Đảm bảo thay thế USB bằng tên bạn đã gán cho ổ khi format.</li>
</ul>

<pre id="pre2">
<code>mkdir sources /Volumes/USB/sources</code></pre>

<ul>
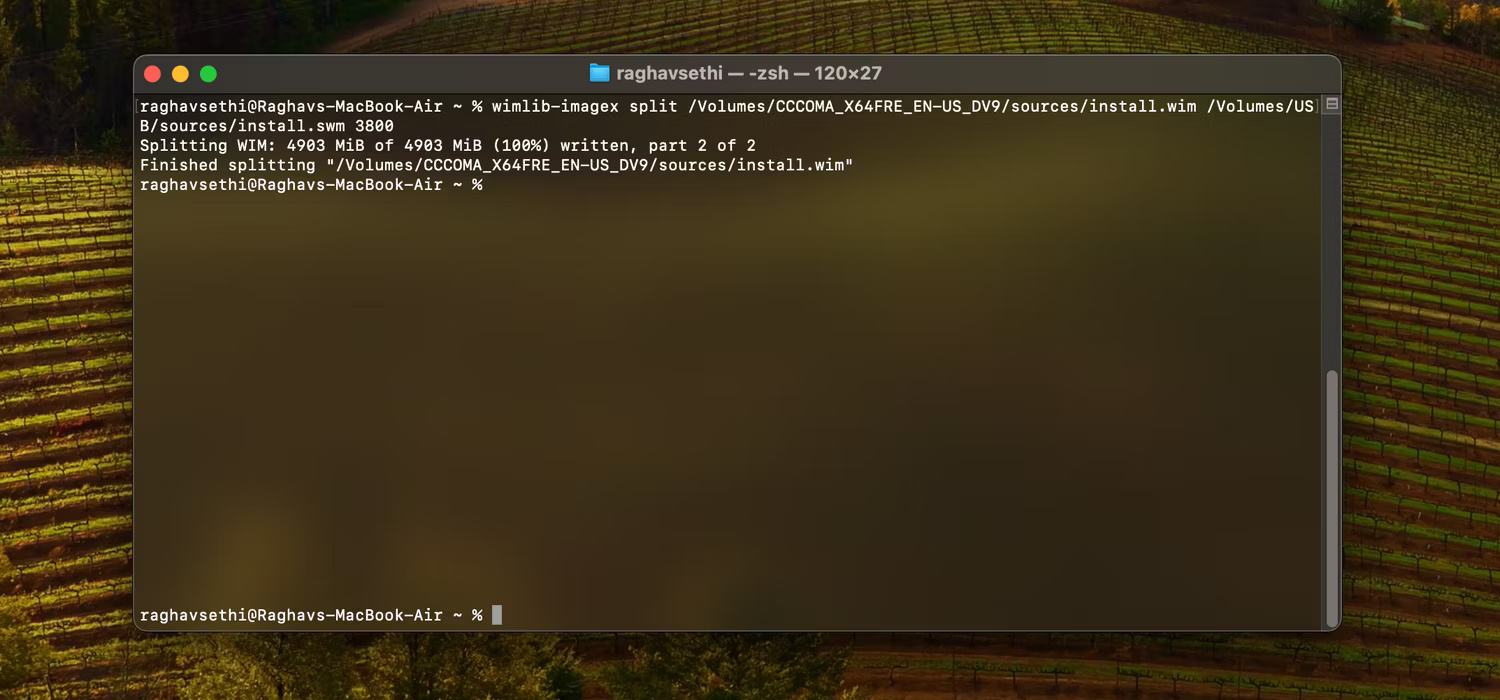
	<li style="text-align: justify;">Bây giờ, bạn sẽ cần chia một trong các file thành hai phần. Nếu không, trình cài đặt có thể không khởi động được. Lưu ý rằng quá trình này có thể mất một thời gian để hoàn tất, vì vậy hãy kiên nhẫn.</li>
</ul>

<pre id="pre3">
<code>wimlib-imagex split /Volumes/CCCOMA_X64FRE_EN-US_DV9/sources/install.wim /Volumes/USB/sources/install.swm 3800</code></pre>

<figure>
<div style="text-align: justify;"><img alt="Cửa sổ Terminal chia tách file bằng Wimlib" data-i="5" data-src="https://st.quantrimang.com/photos/image/2024/08/26/tao-usb-boot-windows-11-bang-may-mac-6.jpg" data-was-processed="true" height="700" src="https://st.quantrimang.com/photos/image/2024/08/26/tao-usb-boot-windows-11-bang-may-mac-6.jpg" width="1500" /></div>

<figcaption>
<div style="text-align: justify;">Cửa sổ Terminal chia tách file bằng Wimlib</div>
</figcaption>
</figure>

<ul>
	<li style="text-align: justify;">Cuối cùng, bạn có thể sao chép tất cả các file còn lại bằng cách nhập lệnh này:</li>
</ul>

<pre id="pre4">
<code>rsync -vha --exclude=sources/install.wim /Volumes/CCCOMA_X64FRE_EN-US_DV9/* /Volumes/USB</code></pre>

<p style="text-align: justify;">Bây giờ, ổ boot Windows 11 đã sẵn sàng, bạn có thể sử dụng nó để cài đặt bản sao Windows mới trên PC của mình. Việc tạo trình cài đặt boot Windows trên máy Mac không đơn giản như trên PC Windows, vì vậy nếu bạn vẫn gặp sự cố, có thể dễ dàng hơn khi tạo trình cài đặt trực tiếp trên Windows.</p>
		</div>
				<div id="author">
						<p>
				<strong>Nguồn tin:</strong>
				Quantrimang.com:
			</p>
		</div>
	</div>
	<div id="footer" class="clearfix">
		<div id="url">
			<strong>URL của bản tin này: </strong><a href="https://www.nguoicodonvn2008.info/vi/news/savefile/cuoc-song/2-cach-tao-usb-boot-windows-11-bang-may-mac-8915.html" title="2 cách tạo USB boot Windows 11 bằng máy Mac">https://www.nguoicodonvn2008.info/vi/news/savefile/cuoc-song/2-cach-tao-usb-boot-windows-11-bang-may-mac-8915.html</a>

		</div>
		<div class="clear"></div>
		<div class="copyright">
			&copy; .&#x3A; Nguoicodonvn2008.info - Cõi lòng người cô đơn &#x3A;.
		</div>
		<div id="contact">
			<a href="mailto:admin@nguoicodonvn2008.info">admin@nguoicodonvn2008.info</a>
		</div>
	</div>
</div>
        <div id="timeoutsess" class="chromeframe">
            Bạn đã không sử dụng Site, <a onclick="timeoutsesscancel();" href="https://www.nguoicodonvn2008.info/#">Bấm vào đây để duy trì trạng thái đăng nhập</a>. Thời gian chờ: <span id="secField"> 60 </span> giây
        </div>
        <div id="openidResult" class="nv-alert" style="display:none"></div>
        <div id="openidBt" data-result="" data-redirect=""></div>
		</script>
		<div class="car-top">
  <span><img src="https://www.nguoicodonvn2008.info/themes/default/images/car.png" alt=""></span>
</div>
<script src="https://www.nguoicodonvn2008.info/assets/js/jquery/jquery.min.js"></script>
<script>var nv_base_siteurl="/",nv_lang_data="vi",nv_lang_interface="vi",nv_name_variable="nv",nv_fc_variable="op",nv_lang_variable="language",nv_module_name="news",nv_func_name="savefile",nv_is_user=0, nv_my_ofs=-4,nv_my_abbr="EDT",nv_cookie_prefix="nv4c_e856T",nv_check_pass_mstime=1738000,nv_area_admin=0,nv_safemode=0,theme_responsive=0,nv_recaptcha_ver=2,nv_recaptcha_sitekey="",nv_recaptcha_type="image",XSSsanitize=1;</script>
<script src="https://www.nguoicodonvn2008.info/assets/js/language/vi.js"></script>
<script src="https://www.nguoicodonvn2008.info/assets/js/DOMPurify/purify3.js"></script>
<script src="https://www.nguoicodonvn2008.info/assets/js/global.js"></script>
<script src="https://www.nguoicodonvn2008.info/assets/js/site.js"></script>
<script src="https://www.nguoicodonvn2008.info/themes/default/js/news.js"></script>
<script src="https://www.nguoicodonvn2008.info/themes/default/js/main.js"></script>
<script src="https://www.nguoicodonvn2008.info/themes/default/js/custom.js"></script>
<script type="application/ld+json">
        {
            "@context": "https://schema.org",
            "@type": "Organization",
            "url": "https://www.nguoicodonvn2008.info",
            "logo": "https://www.nguoicodonvn2008.info/uploads/angel.gif"
        }
        </script>
<script src="https://www.nguoicodonvn2008.info/themes/default/js/bootstrap.min.js"></script>
<script type="text/javascript">
var $scrolltop = $('.car-top');
$scrolltop.on('click', function () {
    $('html,body').animate({
        scrollTop: 0
    }, 800);
    $(this).addClass("car-run");
    setTimeout(function(){ $scrolltop.removeClass('car-run');}, 1000);
    return false;
});
$(window).on('scroll', function ()
{ 
    if($(window).scrollTop() >= 200)
    {
        $scrolltop.addClass("show");
        $scrolltop.addClass("car-down");
    }
    else
    {
       $scrolltop.removeClass("show");
       setTimeout(function(){ $scrolltop.removeClass('car-down');}, 300);
    }
});
</script>
</body>
</html>